

LC-60LE831U Operation Manual
Page 7
... for the LCD TV set are for explanation purposes and may vary slightly from the actual operations. 6 Contents IMPORTANT INFORMATION 1 DEAR SHARP CUSTOMER 3 IMPORTANT SAFETY INSTRUCTIONS 3-5 Supplied Accessories 7 QUICK REFERENCE Attaching the Stand 7 QUICK INSTALLATION TIPS 8 Using the Remote Control Unit...AQUOS LINK 51-53 Link Operation Menu 53-54 Using a PC Displaying a PC Image on the Screen 55 Adjusting the PC Image 56 Setting Audio Input 56 PC Compatibility Chart 56 RS-232C Port Specifications 57 Using the Internet Connecting to the Internet 58-59 Internet Setup 60...
... for the LCD TV set are for explanation purposes and may vary slightly from the actual operations. 6 Contents IMPORTANT INFORMATION 1 DEAR SHARP CUSTOMER 3 IMPORTANT SAFETY INSTRUCTIONS 3-5 Supplied Accessories 7 QUICK REFERENCE Attaching the Stand 7 QUICK INSTALLATION TIPS 8 Using the Remote Control Unit...AQUOS LINK 51-53 Link Operation Menu 53-54 Using a PC Displaying a PC Image on the Screen 55 Adjusting the PC Image 56 Setting Audio Input 56 PC Compatibility Chart 56 RS-232C Port Specifications 57 Using the Internet Connecting to the Internet 58-59 Internet Setup 60...
LC-60LE831U Operation Manual
Page 12
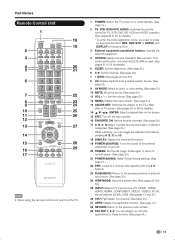
... the power of the external equipment on the screen. 15 EXIT: Turn off . 20 FREEZE: Set the still image. This button will function only when AQUOS LINK is used. (See pages 51 to 54 for details.) 5 SLEEP: Set the sleep timer. (See page 20.) 6 0-9: Set the channel. (See page 20.) 7 •....) 11 VOLk/l: Set the volume. (See page 20.) 12 MENU: Display the menu screen. (See page 24.) 13 AQUOS NET: Switches the display to the TVkWeb, Web or TV screen. (See pages 60 to 66 for details.) * To enter the code registration mode, you can assign your favorite applications to these buttons...
... the power of the external equipment on the screen. 15 EXIT: Turn off . 20 FREEZE: Set the still image. This button will function only when AQUOS LINK is used. (See pages 51 to 54 for details.) 5 SLEEP: Set the sleep timer. (See page 20.) 6 0-9: Set the channel. (See page 20.) 7 •....) 11 VOLk/l: Set the volume. (See page 20.) 12 MENU: Display the menu screen. (See page 24.) 13 AQUOS NET: Switches the display to the TVkWeb, Web or TV screen. (See pages 60 to 66 for details.) * To enter the code registration mode, you can assign your favorite applications to these buttons...

LC-60LE831U Operation Manual
Page 26
...Page 48 View Mode Page 30 Freeze Page 30 Change Audio Page 30 Change CC Page 31 AQUOS LINK Setup Page 52 Input Terminal Setting Pages 31, 56 Audio Setup Page 31 PC input Page...menu items may not be displayed depending on the selected input source. Page 34 Internet Setup Pages 60-61 Language Page 34 DivX® Setup Page 46 Individual Setup Pages 34-36 Secret No Page ...OPC Page 26 Backlight Page 26 Contrast Page 26 Brightness Page 26 Color Page 26 Tint Page 26 Sharpness Page 26 Advanced Pages 26-27 C.M.S.-Hue Page 26 C.M.S.-Saturation Page 26 C.M.S.-Value Page 26 Color...
...Page 48 View Mode Page 30 Freeze Page 30 Change Audio Page 30 Change CC Page 31 AQUOS LINK Setup Page 52 Input Terminal Setting Pages 31, 56 Audio Setup Page 31 PC input Page...menu items may not be displayed depending on the selected input source. Page 34 Internet Setup Pages 60-61 Language Page 34 DivX® Setup Page 46 Individual Setup Pages 34-36 Secret No Page ...OPC Page 26 Backlight Page 26 Contrast Page 26 Brightness Page 26 Color Page 26 Tint Page 26 Sharpness Page 26 Advanced Pages 26-27 C.M.S.-Hue Page 26 C.M.S.-Saturation Page 26 C.M.S.-Value Page 26 Color...

LC-60LE831U Operation Manual
Page 57
... position using an analog RGB cable and the audio is input via the same cable. Using a PC Example System Options Menu System Options View Option AQUOS LINK Setup Input Terminal Setting Menu Design O ti L k O t 1 Press MENU to display the MENU screen, and then press c/d to select "System Options". 2 Press a/b to ...to connect the PC to output the computer audio. Resolution Horizontal Vertical VESA Frequency Frequency Standard 720 x 400 31.5 kHz 70 Hz VGA 31.5 kHz 60 Hz 640 x 480 37.9 kHz 72 Hz O O 37.5 kHz 75 Hz O 35.1 kHz 56 Hz O SVGA 800 x 600 37.9 kHz 48.1 kHz...
... position using an analog RGB cable and the audio is input via the same cable. Using a PC Example System Options Menu System Options View Option AQUOS LINK Setup Input Terminal Setting Menu Design O ti L k O t 1 Press MENU to display the MENU screen, and then press c/d to select "System Options". 2 Press a/b to ...to connect the PC to output the computer audio. Resolution Horizontal Vertical VESA Frequency Frequency Standard 720 x 400 31.5 kHz 70 Hz VGA 31.5 kHz 60 Hz 640 x 480 37.9 kHz 72 Hz O O 37.5 kHz 75 Hz O 35.1 kHz 56 Hz O SVGA 800 x 600 37.9 kHz 48.1 kHz...

LC-60LE831U Operation Manual
Page 59
...Broadband router PC Modem Internet 58 Use only one of useful information, including tips on the TV to connect the ETHERNET terminal on using your AQUOS and a frequently asked questions section. Connecting to the Internet • To connect your TV to the Internet, you must have a broadband ... page • The original home page is a website set up specifically for AQUOS owners. • The website is worth visiting as it provides a range of the connection types. (See page 60.) H Using an ETHERNET cable Use an ETHERNET cable (commercially available) to your Internet service...
...Broadband router PC Modem Internet 58 Use only one of useful information, including tips on the TV to connect the ETHERNET terminal on using your AQUOS and a frequently asked questions section. Connecting to the Internet • To connect your TV to the Internet, you must have a broadband ... page • The original home page is a website set up specifically for AQUOS owners. • The website is worth visiting as it provides a range of the connection types. (See page 60.) H Using an ETHERNET cable Use an ETHERNET cable (commercially available) to your Internet service...

LC-60LE831U Operation Manual
Page 61
... instructions and the operation manual of "Internet Setup", press EXIT to return to configure the access point settings. You can also display the AQUOS NET screen by using 0-9. 4 Press c/d to select "No", and then press ENTER. • If you select "Wired", the signal is ... your Internet service provider or telephone company. • When an application is recommended that you use "Wireless Setup" to the normal TV screen. 60 Wireless Setup If your TV's network settings and connection. • When the original home page appears, now you select "Wireless", use this case...
... instructions and the operation manual of "Internet Setup", press EXIT to return to configure the access point settings. You can also display the AQUOS NET screen by using 0-9. 4 Press c/d to select "No", and then press ENTER. • If you select "Wired", the signal is ... your Internet service provider or telephone company. • When an application is recommended that you use "Wireless Setup" to the normal TV screen. 60 Wireless Setup If your TV's network settings and connection. • When the original home page appears, now you select "Wireless", use this case...

