Operation Manual
Page 3
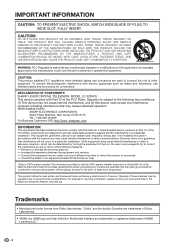
... AN UNSTABLE CART, STAND, TRIPOD, BRACKET, OR TABLE. FOLLOW THE MANUFACTURER'S INSTRUCTIONS WHEN INSTALLING THE PRODUCT AND USE MOUNTING ACCESSORIES RECOMMENDED BY THE MANUFACTURER. QUICK STOPS, EXCESSIVE FORCE, AND UNEVEN SURFACES MAY CAUSE THE PRODUCT AND CART COMBINATION TO OVERTURN. To prevent electromagnetic interference with electric appliances such as practical." DECLARATION OF CONFORMITY: SHARP LIQUID CRYSTAL TELEVISION, MODEL LC-32D41U This...
... AN UNSTABLE CART, STAND, TRIPOD, BRACKET, OR TABLE. FOLLOW THE MANUFACTURER'S INSTRUCTIONS WHEN INSTALLING THE PRODUCT AND USE MOUNTING ACCESSORIES RECOMMENDED BY THE MANUFACTURER. QUICK STOPS, EXCESSIVE FORCE, AND UNEVEN SURFACES MAY CAUSE THE PRODUCT AND CART COMBINATION TO OVERTURN. To prevent electromagnetic interference with electric appliances such as practical." DECLARATION OF CONFORMITY: SHARP LIQUID CRYSTAL TELEVISION, MODEL LC-32D41U This...

Operation Manual
Page 4
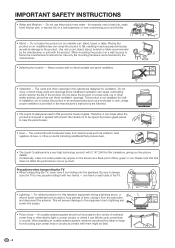
... or objects have the same characteristics as power-supply cord or plug is used to perform many years of trouble-free operation of your Liquid Crystal Television, please read the Important Safety Instructions carefully before using this apparatus during lightning storms or when unused for your safety. A grounding type plug has two blades and a third grounding prong. Servicing is required when the apparatus has...
... or objects have the same characteristics as power-supply cord or plug is used to perform many years of trouble-free operation of your Liquid Crystal Television, please read the Important Safety Instructions carefully before using this apparatus during lightning storms or when unused for your safety. A grounding type plug has two blades and a third grounding prong. Servicing is required when the apparatus has...
Operation Manual
Page 5
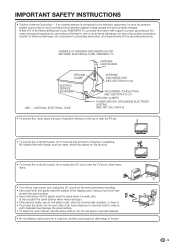
... damage to the equipment due to follow the manufacturer's instructions. Use only a cart, stand, tripod, bracket or table recommended by holding it by the manufacturer or sold with impact. Do not place the product on a wall, be injured by the manufacturer. • Selecting the location - Do not use this television equipment during a lightning storm, or when it is made...
... damage to the equipment due to follow the manufacturer's instructions. Use only a cart, stand, tripod, bracket or table recommended by holding it by the manufacturer or sold with impact. Do not place the product on a wall, be injured by the manufacturer. • Selecting the location - Do not use this television equipment during a lightning storm, or when it is made...
Operation Manual
Page 6
....) • If the panel is dusty, use the same method. IMPORTANT SAFETY INSTRUCTIONS • Outdoor Antenna Grounding - If an outside antenna is connected to the television equipment, be placed on the top or near the TV set or other heavy items. • Turn off the main power and unplug the AC cord from the wall outlet before handling. • Use a soft cloth and gently...
....) • If the panel is dusty, use the same method. IMPORTANT SAFETY INSTRUCTIONS • Outdoor Antenna Grounding - If an outside antenna is connected to the television equipment, be placed on the top or near the TV set or other heavy items. • Turn off the main power and unplug the AC cord from the wall outlet before handling. • Use a soft cloth and gently...
Operation Manual
Page 9
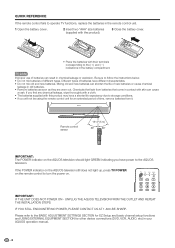
... AND REPEAT THE INSTALLATION STEPS. If the POWER indicator on the AQUOS television still does not light up, press TV POWER on . Different types of batteries can result in chemical leakage or explosion. QUICK REFERENCE If the remote control fails to operate TV functions, replace the batteries in the remote control unit. 1 Open the battery cover. 2 Insert two "AAA" size batteries (supplied with the product). 3 Close the battery...
... AND REPEAT THE INSTALLATION STEPS. If the POWER indicator on the AQUOS television still does not light up, press TV POWER on . Different types of batteries can result in chemical leakage or explosion. QUICK REFERENCE If the remote control fails to operate TV functions, replace the batteries in the remote control unit. 1 Open the battery cover. 2 Insert two "AAA" size batteries (supplied with the product). 3 Close the battery...
Operation Manual
Page 10
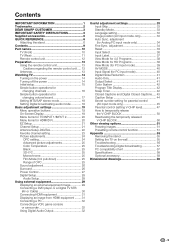
...9 Part names 10 TV (Front 10 TV (Rear 11 Remote control unit 12 Preparation 13 Using the remote control unit 13 Cautions regarding the remote control unit ..... 13 Antennas 13 Watching TV 14 Turning on the power 14 Turning off the power 14 Initial setup 15 Simple button operations for changing channels 16 Simple button operations for changing volume/sound 17 Setting MTS/SAP stereo mode 18 Setting Digital broadcasting audio mode 18 Basic adjustment settings 19 Menu operation buttons 19 On-Screen Display 19 Menu items for TV/INPUT 1/INPUT 2 20 Menu items for parental control...
...9 Part names 10 TV (Front 10 TV (Rear 11 Remote control unit 12 Preparation 13 Using the remote control unit 13 Cautions regarding the remote control unit ..... 13 Antennas 13 Watching TV 14 Turning on the power 14 Turning off the power 14 Initial setup 15 Simple button operations for changing channels 16 Simple button operations for changing volume/sound 17 Setting MTS/SAP stereo mode 18 Setting Digital broadcasting audio mode 18 Basic adjustment settings 19 Menu operation buttons 19 On-Screen Display 19 Menu items for TV/INPUT 1/INPUT 2 20 Menu items for parental control...
Operation Manual
Page 13
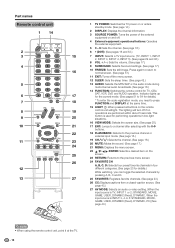
... CC: Displays captions from a closed-caption source. (See page 43.) 27 AV MODE: Selects an audio or video setting. (When the input source is TV, INPUT 1 or 2: STANDARD, MOVIE, GAME, USER, DYNAMIC (Fixed), DYNAMIC. Part names Remote control unit 1 14 2 3 4 5 6 7 8 9 10 11 12 13 1 TV POWER: Switches the TV power on or enters standby mode. (See page 14.) 2 DISPLAY: Displays the channel information. 3 SOURCE POWER: Turns the power of the external equipment on and off if no operations are performed within about 5 seconds. Indicator lights up...
... CC: Displays captions from a closed-caption source. (See page 43.) 27 AV MODE: Selects an audio or video setting. (When the input source is TV, INPUT 1 or 2: STANDARD, MOVIE, GAME, USER, DYNAMIC (Fixed), DYNAMIC. Part names Remote control unit 1 14 2 3 4 5 6 7 8 9 10 11 12 13 1 TV POWER: Switches the TV power on or enters standby mode. (See page 14.) 2 DISPLAY: Displays the channel information. 3 SOURCE POWER: Turns the power of the external equipment on and off if no operations are performed within about 5 seconds. Indicator lights up...
Operation Manual
Page 20
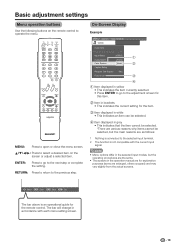
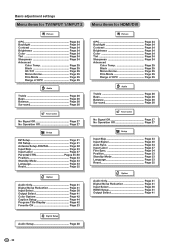
...] Input Select [VIDEO] 1 Output select [Fixed] Color System [Auto] 2 Caption Setup Program Title Display [No] Favorite CH 3 4 1 Item displayed in accordance with the current input signal. The bar will change in yellow • This indicates the item currently selected. • Press ENTER to go to select a desired item on the remote control to the selected input terminal. 2 The function is not compatible with each menu setting screen. 19 Basic adjustment settings Menu operation buttons Use the following buttons...
...] Input Select [VIDEO] 1 Output select [Fixed] Color System [Auto] 2 Caption Setup Program Title Display [No] Favorite CH 3 4 1 Item displayed in accordance with the current input signal. The bar will change in yellow • This indicates the item currently selected. • Press ENTER to go to select a desired item on the remote control to the selected input terminal. 2 The function is not compatible with each menu setting screen. 19 Basic adjustment settings Menu operation buttons Use the following buttons...
Operation Manual
Page 21
... 26 Power Control No Signal Off Page 27 No Operation Off Page 27 Setup Input Skip Page 33 Input Signal Page 40 Auto Sync Page 34 Input Label Page 37 Fine Sync Page 34 Position Page 33 Standby Mode Page 33 Language Page 33 Reset Page 35 Option Audio Only Page 41 Digital Noise Reduction Page 41 Input Select Page 36 HDMI Setup Page 31 Output Select Page 41 Digital Setup Audio Setup...
... 26 Power Control No Signal Off Page 27 No Operation Off Page 27 Setup Input Skip Page 33 Input Signal Page 40 Auto Sync Page 34 Input Label Page 37 Fine Sync Page 34 Position Page 33 Standby Mode Page 33 Language Page 33 Reset Page 35 Option Audio Only Page 41 Digital Noise Reduction Page 41 Input Select Page 36 HDMI Setup Page 31 Output Select Page 41 Digital Setup Audio Setup...
Operation Manual
Page 22
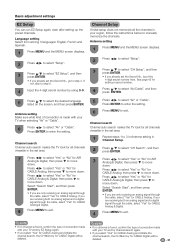
... the type of connection made with your TV and try EZ Setup again. • If you select "Yes" for CABLE Analog and initiate the with your region, follow the instructions below to manually memorize the channels. Antenna setting 1 Press MENU and the MENU screen displays. 2 Press c/d to select "Setup". 3 Press a/b to select "CH Setup", and then press ENTER. • If you already set area. 1 Repeat steps 1 to 3 in Antenna setting...
... the type of connection made with your TV and try EZ Setup again. • If you select "Yes" for CABLE Analog and initiate the with your region, follow the instructions below to manually memorize the channels. Antenna setting 1 Press MENU and the MENU screen displays. 2 Press c/d to select "Setup". 3 Press a/b to select "CH Setup", and then press ENTER. • If you already set area. 1 Repeat steps 1 to 3 in Antenna setting...
Operation Manual
Page 23
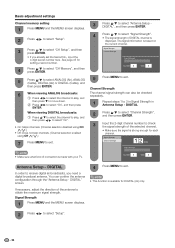
... based on the current channel. Signal Strength 1 Press MENU and the MENU screen displays. 4 Press MENU to exit. Basic adjustment settings Channel memory setting 1 Press MENU and the MENU screen displays. 2 Press c/d to select "Setup". 3 Press a/b to select "CH Setup", and then press ENTER. • If you need a digital broadcast antenna. See page 45 for setting a secret number. 4 Press a/b to select "CH Memory", and then press ENTER. 5 Press a/b to select ANALOG (Air), ANALOG (Cable), DIGITAL (Air) or DIGITAL (Cable...
... based on the current channel. Signal Strength 1 Press MENU and the MENU screen displays. 4 Press MENU to exit. Basic adjustment settings Channel memory setting 1 Press MENU and the MENU screen displays. 2 Press c/d to select "Setup". 3 Press a/b to select "CH Setup", and then press ENTER. • If you need a digital broadcast antenna. See page 45 for setting a secret number. 4 Press a/b to select "CH Memory", and then press ENTER. 5 Press a/b to select ANALOG (Air), ANALOG (Cable), DIGITAL (Air) or DIGITAL (Cable...
Operation Manual
Page 29
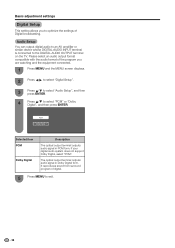
... an audio output format compatible with the audio format of Digital broadcasting. The optical output terminal outputs audio signal in PCM form. It reproduces sound from surround program of digital. 5 Press MENU to the DIGITAL AUDIO OUTPUT terminal on the TV. Audio Setup You can output digital audio to an AV amplifier or similar device whose DIGITAL AUDIO INPUT terminal is connected to exit. 28 PCM Dolby Digital Selected item PCM Dolby Digital Description The optical output terminal outputs audio signal in Dolby Digital form...
... an audio output format compatible with the audio format of Digital broadcasting. The optical output terminal outputs audio signal in PCM form. It reproduces sound from surround program of digital. 5 Press MENU to the DIGITAL AUDIO OUTPUT terminal on the TV. Audio Setup You can output digital audio to an AV amplifier or similar device whose DIGITAL AUDIO INPUT terminal is connected to exit. 28 PCM Dolby Digital Selected item PCM Dolby Digital Description The optical output terminal outputs audio signal in Dolby Digital form...
Operation Manual
Page 30
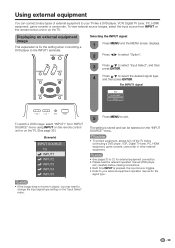
... input signal type setting on the "Input Select" menu. 5 Press MENU to your external equipment operation manual for the signal type. 29 Using external equipment You can be selected on the "INPUT SOURCE" menu. Displaying an external equipment image This explanation is stored and can connect many types of external equipment to exit. For INPUT1 signal Auto COMPONENT VIDEO To watch a DVD image, select "INPUT1" from INPUT on the remote control unit or on the TV. Selecting the INPUT signal 1 Press MENU and the MENU screen displays...
... input signal type setting on the "Input Select" menu. 5 Press MENU to your external equipment operation manual for the signal type. 29 Using external equipment You can be selected on the "INPUT SOURCE" menu. Displaying an external equipment image This explanation is stored and can connect many types of external equipment to exit. For INPUT1 signal Auto COMPONENT VIDEO To watch a DVD image, select "INPUT1" from INPUT on the remote control unit or on the TV. Selecting the INPUT signal 1 Press MENU and the MENU screen displays...
Operation Manual
Page 32
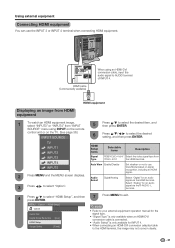
... clearly. 31 HDMI cable (Commercially available) When using INPUT on the remote control unit or on signal recognition, including an HDMI signal. 2 Press MENU and the MENU screen displays. HDMI equipment Displaying an image from HDMI equipment 1 To watch an HDMI equipment image, select "INPUT3" or "INPUT4" from YCbCr 4:2:2 the HDMI terminal. HDMI Setup] Option Audio Only Digital Noise Reduction [Low] HDMI Setup Output Select [Fixed] NOTE • Refer to your external equipment operation manual for the signal type. • "Signal Type" is...
... clearly. 31 HDMI cable (Commercially available) When using INPUT on the remote control unit or on signal recognition, including an HDMI signal. 2 Press MENU and the MENU screen displays. HDMI equipment Displaying an image from HDMI equipment 1 To watch an HDMI equipment image, select "INPUT3" or "INPUT4" from YCbCr 4:2:2 the HDMI terminal. HDMI Setup] Option Audio Only Digital Noise Reduction [Low] HDMI Setup Output Select [Fixed] NOTE • Refer to your external equipment operation manual for the signal type. • "Signal Type" is...
Operation Manual
Page 36
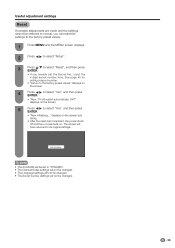
... No., input the 4-digit secret number here. Useful adjustment settings Reset If complex adjustments are made and the settings cannot be restored to normal, you can reset the settings to the factory preset values. 1 Press MENU and the MENU screen displays. 2 Press c/d to select "Setup". 3 Press a/b to select "Reset", and then press ENTER. • If you already set to "DYNAMIC". • The Channel Setup settings will not be changed. • The Language settings will...
... No., input the 4-digit secret number here. Useful adjustment settings Reset If complex adjustments are made and the settings cannot be restored to normal, you can reset the settings to the factory preset values. 1 Press MENU and the MENU screen displays. 2 Press c/d to select "Setup". 3 Press a/b to select "Reset", and then press ENTER. • If you already set to "DYNAMIC". • The Channel Setup settings will not be changed. • The Language settings will...
Operation Manual
Page 56
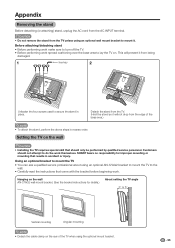
... screws used to mount it will not drop from the TV. (Hold the stand so it . Hanging on the wall AN-37AG2 wall mount bracket. (See the bracket instructions for improper mounting or mounting that should not attempt to lay the TV on the wall CAUTION • Installing the TV requires special skill that results in place. Setting the TV on . CAUTION • Do not remove the stand from the AC INPUT...
... screws used to mount it will not drop from the TV. (Hold the stand so it . Hanging on the wall AN-37AG2 wall mount bracket. (See the bracket instructions for improper mounting or mounting that should not attempt to lay the TV on the wall CAUTION • Installing the TV requires special skill that results in place. Setting the TV on . CAUTION • Do not remove the stand from the AC INPUT...
Operation Manual
Page 57
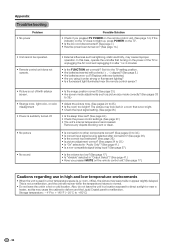
... bright. • Check the input signal setting. (See page 36.) • Power is cut off . • Is the sleep timer set correctly? Appendix Troubleshooting Problem • No power Possible Solution • Check if you pressed TV POWER on the remote control unit. (See page 14.) If the indicator on the TV does not light up, press POWER on the TV. • Is the AC cord disconnected? (See page 7.) •...
... bright. • Check the input signal setting. (See page 36.) • Power is cut off . • Is the sleep timer set correctly? Appendix Troubleshooting Problem • No power Possible Solution • Check if you pressed TV POWER on the remote control unit. (See page 14.) If the indicator on the TV does not light up, press POWER on the TV. • Is the AC cord disconnected? (See page 7.) •...
Operation Manual
Page 58
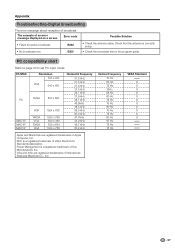
... Hz 75 Hz 75 Hz VESA Standard O O O O O O O O O O O 57 E203 • Check the broadcast time in the program guide. Check that the antenna is a registered trademark of Sun Microsystems, Inc. DDC is a registered trademark of an error message displayed on a screen Error code • Failed to set PC input mode. Appendix Troubleshooting-Digital broadcasting The error message about reception of broadcast The example of Video Electronics Standards Association.
... Hz 75 Hz 75 Hz VESA Standard O O O O O O O O O O O 57 E203 • Check the broadcast time in the program guide. Check that the antenna is a registered trademark of Sun Microsystems, Inc. DDC is a registered trademark of an error message displayed on a screen Error code • Failed to set PC input mode. Appendix Troubleshooting-Digital broadcasting The error message about reception of broadcast The example of Video Electronics Standards Association.
Operation Manual
Page 59
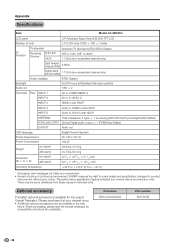
... INPUT 4 Audio in, HDMI in with HDCP INPUT 5 Audio in, DVI-I in the near future. Part name Wall mount bracket Part number AN-37AG2 58 There may be some deviations from these values in individual units. Optional accessory The listed optional accessory is available for compatibility and check the availability. Appendix Specifications Item Model: LC-32D41U LCD panel Number of dots 32o Advanced Super View & BLACK TFT LCD...
... INPUT 4 Audio in, HDMI in with HDCP INPUT 5 Audio in, DVI-I in the near future. Part name Wall mount bracket Part number AN-37AG2 58 There may be some deviations from these values in individual units. Optional accessory The listed optional accessory is available for compatibility and check the availability. Appendix Specifications Item Model: LC-32D41U LCD panel Number of dots 32o Advanced Super View & BLACK TFT LCD...
Operation Manual
Page 62
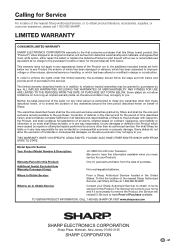
... construction. In no charge to the purchaser for parts or labor for the period(s) set forth below . Model Specific Section Your Product Model Number & Description: Warranty Period for this Product: Additional Item(s) Excluded from Warranty Coverage (if any warranties other than an authorized servicer. What to do to Obtain Service: Contact your Sharp Authorized Servicer to obtain in any way responsible, for any...
... construction. In no charge to the purchaser for parts or labor for the period(s) set forth below . Model Specific Section Your Product Model Number & Description: Warranty Period for this Product: Additional Item(s) Excluded from Warranty Coverage (if any warranties other than an authorized servicer. What to do to Obtain Service: Contact your Sharp Authorized Servicer to obtain in any way responsible, for any...


