
Operation Manual
Page 4
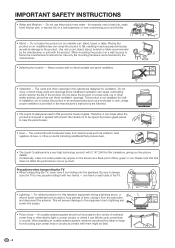
... the apparatus has been damaged in proper operating condition. 21) Wall or ceiling mounting-When mounting the product on safety. DEAR SHARP CUSTOMER Thank you are provided for your safety. The wide blade or the third prong are not sure of the type of... or objects have fallen into your outlet, consult an electrician for replacement of the polarized or grounding-type plug. Additional Safety Information 15) Power Sources-This product should be sure the service technician has used replacement parts specified by the manufacturer. 3 Never spill liquid of any ventilation openings...
... the apparatus has been damaged in proper operating condition. 21) Wall or ceiling mounting-When mounting the product on safety. DEAR SHARP CUSTOMER Thank you are provided for your safety. The wide blade or the third prong are not sure of the type of... or objects have fallen into your outlet, consult an electrician for replacement of the polarized or grounding-type plug. Additional Safety Information 15) Power Sources-This product should be sure the service technician has used replacement parts specified by the manufacturer. 3 Never spill liquid of any ventilation openings...
Operation Manual
Page 5
...hands - do not place the product in this does not affect the performance of overhead power lines or other similar surface, since insufficient ventilation can cause the product to always carry the TV by broken glass pieces in the vicinity of your product. one hand on a wall... this product is provided or the manufacturer's instructions are designed for long periods of blue, green or red. Be sure to fall into such power lines or circuits. Do not use this television equipment during a lightning storm, or when it is not designed for example, near a bath ...
...hands - do not place the product in this does not affect the performance of overhead power lines or other similar surface, since insufficient ventilation can cause the product to always carry the TV by broken glass pieces in the vicinity of your product. one hand on a wall... this product is provided or the manufacturer's instructions are designed for long periods of blue, green or red. Be sure to fall into such power lines or circuits. Do not use this television equipment during a lightning storm, or when it is not designed for example, near a bath ...
Operation Manual
Page 6
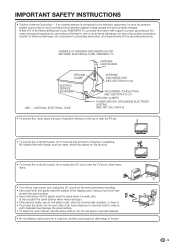
... SAFETY INSTRUCTIONS • Outdoor Antenna Grounding - NATIONAL ELECTRICAL CODE ANTENNA DISCHARGE UNIT (NEC SECTION 810-20) GROUNDING CONDUCTORS (NEC SECTION 810-21) GROUND CLAMPS POWER SERVICE GROUNDING ELECTRODE SYSTEM (NEC ART 250, PART H) • To prevent fire, never place any type of candle or flames on the.... • To prevent fire or shock hazard, do not place the AC cord under the TV set or other heavy items. • Turn off the main power and unplug the AC cord from the wall outlet before handling. • Use a soft cloth and gently wipe the surface of ...
... SAFETY INSTRUCTIONS • Outdoor Antenna Grounding - NATIONAL ELECTRICAL CODE ANTENNA DISCHARGE UNIT (NEC SECTION 810-20) GROUNDING CONDUCTORS (NEC SECTION 810-21) GROUND CLAMPS POWER SERVICE GROUNDING ELECTRODE SYSTEM (NEC ART 250, PART H) • To prevent fire, never place any type of candle or flames on the.... • To prevent fire or shock hazard, do not place the AC cord under the TV set or other heavy items. • Turn off the main power and unplug the AC cord from the wall outlet before handling. • Use a soft cloth and gently wipe the surface of ...
Operation Manual
Page 8
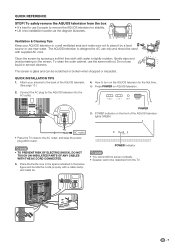
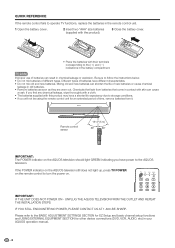
...How to place it by spraying a soft lint free cloth with a cable clamp and cable tie. AC outlet • Place the TV close to the back of the AQUOS television lights GREEN. Do not use the same method. Place the Ferrite core in the space ...Gently wipe and avoid pressing on AQUOS television. The screen is designed for stability. • Lift onto installation location as the diagram illustrates. POWER B) POWER indicator on the AQUOS television for the AQUOS television into the AC outlet. 4. QUICK REFERENCE STOP! QUICK INSTALLATION TIPS 1. To safely remove...
...How to place it by spraying a soft lint free cloth with a cable clamp and cable tie. AC outlet • Place the TV close to the back of the AQUOS television lights GREEN. Do not use the same method. Place the Ferrite core in the space ...Gently wipe and avoid pressing on AQUOS television. The screen is designed for stability. • Lift onto installation location as the diagram illustrates. POWER B) POWER indicator on the AQUOS television for the AQUOS television into the AC outlet. 4. QUICK REFERENCE STOP! QUICK INSTALLATION TIPS 1. To safely remove...
Operation Manual
Page 9
...batteries can shorten the life of new batteries or cause chemical leakage in chemical leakage or explosion. IF YOU STILL ENCOUNTER NO POWER, PLEASE CONTACT US AT 1-800-BE-SHARP. Chemicals that come in contact with this product may have a shorter life expectancy due to storage conditions. • If you... can result in old batteries. • Remove batteries as soon as they are worn out. If the POWER indicator on the AQUOS television still does not light up, press TV POWER on the remote control to the BASIC ADJUSTMENT SETTINGS SECTION for EZ Setup and basic channel setup functions and ...
...batteries can shorten the life of new batteries or cause chemical leakage in chemical leakage or explosion. IF YOU STILL ENCOUNTER NO POWER, PLEASE CONTACT US AT 1-800-BE-SHARP. Chemicals that come in contact with this product may have a shorter life expectancy due to storage conditions. • If you... can result in old batteries. • Remove batteries as soon as they are worn out. If the POWER indicator on the AQUOS television still does not light up, press TV POWER on the remote control to the BASIC ADJUSTMENT SETTINGS SECTION for EZ Setup and basic channel setup functions and ...
Operation Manual
Page 10
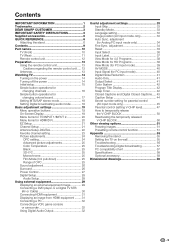
... images 51 Presetting remote control function 51 Appendix 55 Removing the stand 55 Setting the TV on the power 14 Turning off the power 14 Initial setup 15 Simple button operations for changing channels 16 Simple button operations for ...32 Useful adjustment settings 33 Input Skip 33 Standby Mode 33 Language setting 33 Image position (AV input mode only 33 Auto Sync. Contents IMPORTANT INFORMATION 1 Trademarks 2 DEAR SHARP CUSTOMER 3 IMPORTANT SAFETY INSTRUCTIONS 3 Supplied accessories 6 QUICK REFERENCE 6 Attaching the stand 6 Contents 9 Part names 10 TV (Front 10 TV...
... images 51 Presetting remote control function 51 Appendix 55 Removing the stand 55 Setting the TV on the power 14 Turning off the power 14 Initial setup 15 Simple button operations for changing channels 16 Simple button operations for ...32 Useful adjustment settings 33 Input Skip 33 Standby Mode 33 Language setting 33 Image position (AV input mode only 33 Auto Sync. Contents IMPORTANT INFORMATION 1 Trademarks 2 DEAR SHARP CUSTOMER 3 IMPORTANT SAFETY INSTRUCTIONS 3 Supplied accessories 6 QUICK REFERENCE 6 Attaching the stand 6 Contents 9 Part names 10 TV (Front 10 TV...
Operation Manual
Page 13
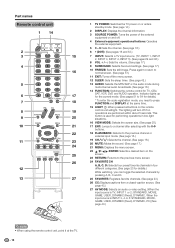
... preset favorite channels in four different categories. (See page 23 for TV, CBL/ SAT, VCR, DVD and AUDIO operation. The lighting will light. Part names Remote control unit 1 14 2 3 4 5 6 7 8 9 10 11 12 13 1 TV POWER: Switches the TV power on or enters standby mode. (See page 14.) 2 DISPLAY: ...Displays the channel information. 3 SOURCE POWER: Turns the power of the external equipment on the remote 19 control unit will turn off . 4 External equipment...
... preset favorite channels in four different categories. (See page 23 for TV, CBL/ SAT, VCR, DVD and AUDIO operation. The lighting will light. Part names Remote control unit 1 14 2 3 4 5 6 7 8 9 10 11 12 13 1 TV POWER: Switches the TV power on or enters standby mode. (See page 14.) 2 DISPLAY: ...Displays the channel information. 3 SOURCE POWER: Turns the power of the external equipment on the remote 19 control unit will turn off . 4 External equipment...
Operation Manual
Page 15
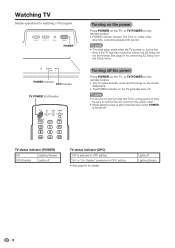
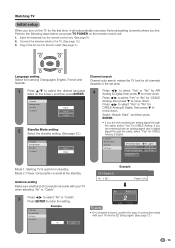
...8226; The initial setup starts when the TV powers on for performing EZ Setup from the Setup menu. If the TV has been turned on the TV gradually turns off. TV status indicator (POWER) ON Lighting (Green) OFF/Standby Lights off TV status indicator (OPC) "Off" is selected...going to use this TV for details. Lights off Lighting (Green) 14 Watching TV Simple operations for watching a TV program POWER POWER indicator OPC indicator TV POWER (On/Standby) Turning on the power Press POWER on the TV, or TV POWER on the remote control. • POWER indicator (Green): The TV is turned off. ...
...8226; The initial setup starts when the TV powers on for performing EZ Setup from the Setup menu. If the TV has been turned on the TV gradually turns off. TV status indicator (POWER) ON Lighting (Green) OFF/Standby Lights off TV status indicator (OPC) "Off" is selected...going to use this TV for details. Lights off Lighting (Green) 14 Watching TV Simple operations for watching a TV program POWER POWER indicator OPC indicator TV POWER (On/Standby) Turning on the power Press POWER on the TV, or TV POWER on the remote control. • POWER indicator (Green): The TV is turned off. ...
Operation Manual
Page 16
...no channel is found, confirm the type of connection is made with your TV and try EZ Setup again. (See page 21.) 15 Perform the following steps before you press TV POWER on the TV for the first time, it will automatically memorize the broadcasting channels where you... page 13.) 3. Connect the antenna cable to move down . Insert the batteries into the remote control unit. (See page 8.) 2. If you live. Mode 2: Power consumption is quick from among 3 languages: English, French and Spanish. 1 Press a/b to move down. Press c/d to select "Yes" or "No" for CABLE ...
...no channel is found, confirm the type of connection is made with your TV and try EZ Setup again. (See page 21.) 15 Perform the following steps before you press TV POWER on the TV for the first time, it will automatically memorize the broadcasting channels where you... page 13.) 3. Connect the antenna cable to move down . Insert the batteries into the remote control unit. (See page 8.) 2. If you live. Mode 2: Power consumption is quick from among 3 languages: English, French and Spanish. 1 Press a/b to move down. Press c/d to select "Yes" or "No" for CABLE ...
Operation Manual
Page 21
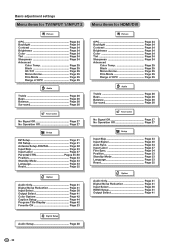
... adjustment settings Menu items for TV/INPUT 1/INPUT 2 Picture OPC Page 24 Backlight Page 24 Contrast Page 24 Brightness Page 24 Color Page 24 Tint Page 24 Sharpness Page 24 Advanced Color Temp ...Page 25 Black Page 25 3D-Y/C Page 25 Monochrome Page 25 Film Mode Page 25 Range of OPC Page 25 Audio Treble Page 26 Bass Page 26 Balance Page 26 Surround Page 26 Power... Backlight Page 24 Contrast Page 24 Brightness Page 24 Color Page 24 Tint Page 24 Sharpness Page 24 Advanced Color Temp Page 25 Black Page 25 Monochrome Page 25 Film Mode ...
... adjustment settings Menu items for TV/INPUT 1/INPUT 2 Picture OPC Page 24 Backlight Page 24 Contrast Page 24 Brightness Page 24 Color Page 24 Tint Page 24 Sharpness Page 24 Advanced Color Temp ...Page 25 Black Page 25 3D-Y/C Page 25 Monochrome Page 25 Film Mode Page 25 Range of OPC Page 25 Audio Treble Page 26 Bass Page 26 Balance Page 26 Surround Page 26 Power... Backlight Page 24 Contrast Page 24 Brightness Page 24 Color Page 24 Tint Page 24 Sharpness Page 24 Advanced Color Temp Page 25 Black Page 25 Monochrome Page 25 Film Mode ...

Operation Manual
Page 27
... to select "Surround", and then press ENTER. Basic adjustment settings Sound adjustment You can adjust the sound quality to the desired level. MENU [Audio] Audio Power Control Treble [ 0] a15 b15 Bass [ 0] a15 b15 Balance [ 0] L R Surround [Off] Reset Treble [ 0] a15 b15 Bass [ 0] a15 b15 Balance [ 0] L R Surround [Off] Reset 3 ...Press a/b to select a specific adjustment item. 4 Press c/d to adjust the item to your DVD player. 5 Press MENU to exit. Surround] Audio Power Control 2 Press c/d to select "Yes", and then press ENTER. 26
... to select "Surround", and then press ENTER. Basic adjustment settings Sound adjustment You can adjust the sound quality to the desired level. MENU [Audio] Audio Power Control Treble [ 0] a15 b15 Bass [ 0] a15 b15 Balance [ 0] L R Surround [Off] Reset Treble [ 0] a15 b15 Bass [ 0] a15 b15 Balance [ 0] L R Surround [Off] Reset 3 ...Press a/b to select a specific adjustment item. 4 Press c/d to adjust the item to your DVD player. 5 Press MENU to exit. Surround] Audio Power Control 2 Press c/d to select "Yes", and then press ENTER. 26
Operation Manual
Page 28
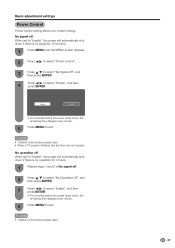
... is the factory preset value. 27 NOTE • "Disable" is the factory preset value. • When a TV program finishes, this function may not operate. Basic adjustment settings Power Control Power control setting allows you to select "Enable", and then press ENTER. No operation off . 2 Press a/b to select..."No Operation Off", and then press ENTER. 3 Press c/d to select "Enable", and then press ENTER. • Five minutes before the power shuts down , the remaining time displays every minute. 4 Press MENU to exit. Enable Disable • Five minutes before the...
... is the factory preset value. 27 NOTE • "Disable" is the factory preset value. • When a TV program finishes, this function may not operate. Basic adjustment settings Power Control Power control setting allows you to select "Enable", and then press ENTER. No operation off . 2 Press a/b to select..."No Operation Off", and then press ENTER. 3 Press c/d to select "Enable", and then press ENTER. • Five minutes before the power shuts down , the remaining time displays every minute. 4 Press MENU to exit. Enable Disable • Five minutes before the...
Operation Manual
Page 34
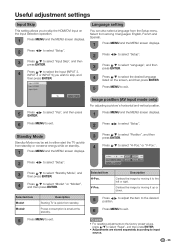
... Press c/d to select "Setup". 3 Press a/b to select "Position", and then press ENTER. 4 Press a/b to select "H-Pos." or "V-Pos.". Power consumption is quick from the Setup menu. Image position (AV input mode only) For adjusting a picture's horizontal and vertical position. 1 Press MENU and the...) Input 4 (HDMI) Input 5 (DVI) Language setting You can also select a language from standby. Selected item Mode1 Mode2 Description Starting TV is small at the standby. Description Centers the image by moving it up or down. 5 Press c/d to adjust the item to the desired...
... Press c/d to select "Setup". 3 Press a/b to select "Position", and then press ENTER. 4 Press a/b to select "H-Pos." or "V-Pos.". Power consumption is quick from the Setup menu. Image position (AV input mode only) For adjusting a picture's horizontal and vertical position. 1 Press MENU and the...) Input 4 (HDMI) Input 5 (DVI) Language setting You can also select a language from standby. Selected item Mode1 Mode2 Description Starting TV is small at the standby. Description Centers the image by moving it up or down. 5 Press c/d to adjust the item to the desired...
Operation Manual
Page 36
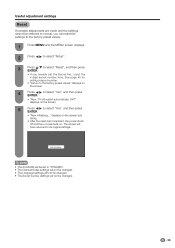
... 2 Press c/d to select "Setup". 3 Press a/b to its original settings. displays on the screen and blinks. • After the reset has completed, the power shuts off and then comes back on the screen. 5 Press c/d to select "Yes", and then press ENTER. • "Now initializing..." NOTE • The... • "Return to the factory preset values" displays on the screen. 4 Press c/d to select "Yes", and then press ENTER. • "Now, TV will have returned to select "Reset", and then press ENTER. • If you already set to "DYNAMIC". • The Channel Setup settings will not be...
... 2 Press c/d to select "Setup". 3 Press a/b to its original settings. displays on the screen and blinks. • After the reset has completed, the power shuts off and then comes back on the screen. 5 Press c/d to select "Yes", and then press ENTER. • "Now initializing..." NOTE • The... • "Return to the factory preset values" displays on the screen. 4 Press c/d to select "Yes", and then press ENTER. • "Now, TV will have returned to select "Reset", and then press ENTER. • If you already set to "DYNAMIC". • The Channel Setup settings will not be...
Operation Manual
Page 51
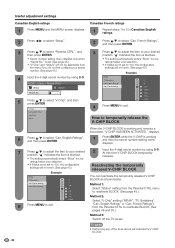
... Ratings") from the Parental CTRL menu PG to reactivate BLOCK. (See page 45.) 14+ 18+ Method 2: NONE Select "V-Chip" setting ("MPAA", "TV Guidelines", 8 Press MENU to your desired position. is working and then the secret number setting menu displays. 7 Press a/b to adjust the item to ...V-CHIP BLOCK temporarily releases. " " indicates the item is not set to reactivate BLOCK. (See pages 48 and 50.) Method 3: Switch off the TV power. Can. English Ratings" or "Can. French Ratings C Method 1: C8+ G Select "Status" setting from the Parental CTRL to "On" the con...
... Ratings") from the Parental CTRL menu PG to reactivate BLOCK. (See page 45.) 14+ 18+ Method 2: NONE Select "V-Chip" setting ("MPAA", "TV Guidelines", 8 Press MENU to your desired position. is working and then the secret number setting menu displays. 7 Press a/b to adjust the item to ...V-CHIP BLOCK temporarily releases. " " indicates the item is not set to reactivate BLOCK. (See pages 48 and 50.) Method 3: Switch off the TV power. Can. English Ratings" or "Can. French Ratings C Method 1: C8+ G Select "Status" setting from the Parental CTRL to "On" the con...

Operation Manual
Page 54
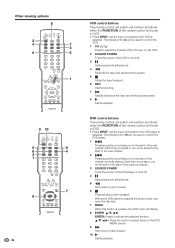
... FUNCTION is set to CBL/SAT, the cable converter connected to the TV can be operated using 1 to 4. 1 SOURCE POWER Turns the cable converter power on the SAT GUIDE screen or SAT MENU screen. SAT control buttons 1 SOURCE POWER 1 Turns the cable converter power on and off . 2 0-9 Press a button (or buttons) that corresponds to the...
... FUNCTION is set to CBL/SAT, the cable converter connected to the TV can be operated using 1 to 4. 1 SOURCE POWER Turns the cable converter power on the SAT GUIDE screen or SAT MENU screen. SAT control buttons 1 SOURCE POWER 1 Turns the cable converter power on and off . 2 0-9 Press a button (or buttons) that corresponds to the...
Operation Manual
Page 55
... the selected function. The following 1 to 10 can be used to control the VCR. 1 CH r/s Press to select the channel of the TV tuner on the VCR. 2 SOURCE POWER Turns the power of the DVD player on and off . 4 F Sets pauses and still pictures. 5 G Hold down to fast forward. 10 I Starts ... of the remote control unit is set to VCR. • Press INPUT until the input connected to the start of the previous chapter. 3 SOURCE POWER Turns the power of the VCR on and off . 3 F Sets pauses and still pictures. 4 G Rewinds the tape and allows picture search. 5 H Stops the tape transport. 6...
... the selected function. The following 1 to 10 can be used to control the VCR. 1 CH r/s Press to select the channel of the TV tuner on the VCR. 2 SOURCE POWER Turns the power of the DVD player on and off . 4 F Sets pauses and still pictures. 5 G Hold down to fast forward. 10 I Starts ... of the remote control unit is set to VCR. • Press INPUT until the input connected to the start of the previous chapter. 3 SOURCE POWER Turns the power of the VCR on and off . 3 F Sets pauses and still pictures. 4 G Rewinds the tape and allows picture search. 5 H Stops the tape transport. 6...
Operation Manual
Page 57
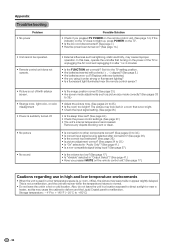
...No sound • Is connection to other components correct? (See pages 30 to 32.) • Is correct input signal source selected after 1 or 2 minutes. • Is the FUNCTION set ? (See page 42.) • Check the power control settings. (See page 27.) • The unit's internal temperature has ...the input signal setting. (See page 36.) • Power is suddenly turned off /with new batteries.) • Are you pressed TV POWER on the remote control unit. (See page 14.) If the indicator on the TV does not light up, press POWER on the TV. • Is the AC cord disconnected? (See page...
...No sound • Is connection to other components correct? (See pages 30 to 32.) • Is correct input signal source selected after 1 or 2 minutes. • Is the FUNCTION set ? (See page 42.) • Check the power control settings. (See page 27.) • The unit's internal temperature has ...the input signal setting. (See page 36.) • Power is suddenly turned off /with new batteries.) • Are you pressed TV POWER on the remote control unit. (See page 14.) If the indicator on the TV does not light up, press POWER on the TV. • Is the AC cord disconnected? (See page...
Operation Manual
Page 58
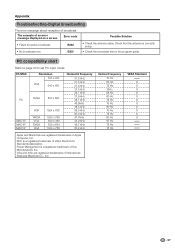
... error message displayed on a screen Error code • Failed to set PC input mode. Check that the antenna is a registered trademark of Sun Microsystems, Inc. Power Management is correctly setup. • No broadcast now.
... error message displayed on a screen Error code • Failed to set PC input mode. Check that the antenna is a registered trademark of Sun Microsystems, Inc. Power Management is correctly setup. • No broadcast now.
Operation Manual
Page 59
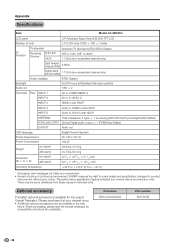
...LC-32D41U LCD panel Number of dots 32o Advanced Super View & BLACK TFT LCD 3,147,264 dots (1366 g 768 g 3 dots) TV Function TV-standard Receiving VHF/UHF Channel CATV American TV Standard ...AUDIO OUTPUT Optical Digital audio output g 1 (PCM/Dolby Digital) OUTPUT Audio out OSD language English/French/Spanish Power Requirement Power Consumption AC 120 V, 60 Hz 164 W Weight w/o stand with stand Dimension (W g H g D) ...figures indicated are nominal values of continuous improvement, SHARP reserves the right to e40°C) * Emergency alert messages via Cable are unreceivable. ...
...LC-32D41U LCD panel Number of dots 32o Advanced Super View & BLACK TFT LCD 3,147,264 dots (1366 g 768 g 3 dots) TV Function TV-standard Receiving VHF/UHF Channel CATV American TV Standard ...AUDIO OUTPUT Optical Digital audio output g 1 (PCM/Dolby Digital) OUTPUT Audio out OSD language English/French/Spanish Power Requirement Power Consumption AC 120 V, 60 Hz 164 W Weight w/o stand with stand Dimension (W g H g D) ...figures indicated are nominal values of continuous improvement, SHARP reserves the right to e40°C) * Emergency alert messages via Cable are unreceivable. ...


