Operation Manual
Page 5
...outside antenna system should be taken to be fatal. 4 do not place the product in an enclosed place such as a fixed point of the TV. • Lightning - in this product near water - Use only the mounting hardware recommended by the manufacturer or sold with two hands - This product is... dropped or applied with 3,147,264 thin film transistors, giving you fine picture details. Be careful not to keep from the wall outlet and disconnect the antenna. Do not place the product on the screen as a bookcase or...
...outside antenna system should be taken to be fatal. 4 do not place the product in an enclosed place such as a fixed point of the TV. • Lightning - in this product near water - Use only the mounting hardware recommended by the manufacturer or sold with two hands - This product is... dropped or applied with 3,147,264 thin film transistors, giving you fine picture details. Be careful not to keep from the wall outlet and disconnect the antenna. Do not place the product on the screen as a bookcase or...
Operation Manual
Page 6
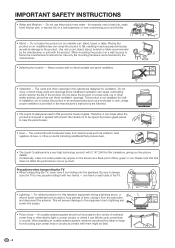
..., liquid cleaners or chemical cloth to the television equipment, be placed on the top or near the TV set. • To prevent fire or shock hazard, do not place the AC cord under the TV set or other heavy items. • Turn off the main power and unplug the AC cord... antenna system is commercially available, to clean it. • To protect the panel, do not use liquid or aerosol cleaners. • Do not display a still picture for the grounding electrode. If an outside antenna is connected to clean it is really dirty. (It may damage the panel surface. • To clean...
..., liquid cleaners or chemical cloth to the television equipment, be placed on the top or near the TV set. • To prevent fire or shock hazard, do not place the AC cord under the TV set or other heavy items. • Turn off the main power and unplug the AC cord... antenna system is commercially available, to clean it. • To protect the panel, do not use liquid or aerosol cleaners. • Do not display a still picture for the grounding electrode. If an outside antenna is connected to clean it is really dirty. (It may damage the panel surface. • To clean...
Operation Manual
Page 10
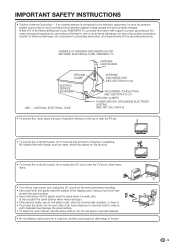
... 1 Trademarks 2 DEAR SHARP CUSTOMER 3 IMPORTANT SAFETY INSTRUCTIONS 3 Supplied accessories 6 QUICK REFERENCE 6 Attaching the stand 6 Contents 9 Part names 10 TV (Front 10 TV (Rear 11 Remote control...Setup 21 Antenna Setup-DIGITAL 22 Favorite channel setting 23 Picture adjustments 24 OPC setting 24 Advanced picture adjustments 25 Color Temperature 25 Black 25 3D-Y/C 25 ...TV STB (Air or Cable 30 Connecting HDMI equipment 31 Displaying an image from HDMI equipment ........ 31 Connecting a PC 32 Connecting a VCR, game console or camcorder 32 Using Digital Audio Output 32...
... 1 Trademarks 2 DEAR SHARP CUSTOMER 3 IMPORTANT SAFETY INSTRUCTIONS 3 Supplied accessories 6 QUICK REFERENCE 6 Attaching the stand 6 Contents 9 Part names 10 TV (Front 10 TV (Rear 11 Remote control...Setup 21 Antenna Setup-DIGITAL 22 Favorite channel setting 23 Picture adjustments 24 OPC setting 24 Advanced picture adjustments 25 Color Temperature 25 Black 25 3D-Y/C 25 ...TV STB (Air or Cable 30 Connecting HDMI equipment 31 Displaying an image from HDMI equipment ........ 31 Connecting a PC 32 Connecting a VCR, game console or camcorder 32 Using Digital Audio Output 32...

Operation Manual
Page 14
... with high humidity. • Do not install or place the remote control unit under direct sunlight or strong lighting. Antennas To enjoy a clearer picture, use an outdoor antenna. F-type connector 75-ohm coaxial cable (round) 2. or 75-ohm coaxial cable (round) 300-ohm twin-lead (... an F-type connector, plug it into the antenna terminal at ) NOTICE F-type connector should be attached to a terminal without a CATV converter Cable TV lead-In Home Antenna terminal (75-ohm) Coaxial cable (commercially available) 2 VHF/UHF antenna 75-ohm coaxial cable (round) 3 Combination VHF/...
... with high humidity. • Do not install or place the remote control unit under direct sunlight or strong lighting. Antennas To enjoy a clearer picture, use an outdoor antenna. F-type connector 75-ohm coaxial cable (round) 2. or 75-ohm coaxial cable (round) 300-ohm twin-lead (... an F-type connector, plug it into the antenna terminal at ) NOTICE F-type connector should be attached to a terminal without a CATV converter Cable TV lead-In Home Antenna terminal (75-ohm) Coaxial cable (commercially available) 2 VHF/UHF antenna 75-ohm coaxial cable (round) 3 Combination VHF/...
Operation Manual
Page 21
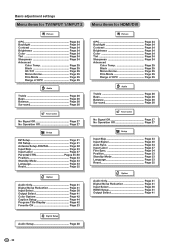
Basic adjustment settings Menu items for TV/INPUT 1/INPUT 2 Picture OPC Page 24 Backlight Page 24 Contrast Page 24 Brightness Page 24 Color Page 24 Tint Page 24 Sharpness Page 24 Advanced Color Temp Page 25 Black Page 25 3D-Y/C Page 25 Monochrome Page 25 Film Mode Page 25 Range of OPC Page 25... Page 44 Program Title Display Page 42 Favorite CH Page 23 Menu items for HDMI/DVI Picture OPC Page 24 Backlight Page 24 Contrast Page 24 Brightness Page 24 Color Page 24 Tint Page 24 Sharpness Page 24 Advanced Color Temp Page 25 Black Page 25 Monochrome Page 25 Film Mode Page...
Basic adjustment settings Menu items for TV/INPUT 1/INPUT 2 Picture OPC Page 24 Backlight Page 24 Contrast Page 24 Brightness Page 24 Color Page 24 Tint Page 24 Sharpness Page 24 Advanced Color Temp Page 25 Black Page 25 3D-Y/C Page 25 Monochrome Page 25 Film Mode Page 25 Range of OPC Page 25... Page 44 Program Title Display Page 42 Favorite CH Page 23 Menu items for HDMI/DVI Picture OPC Page 24 Backlight Page 24 Contrast Page 24 Brightness Page 24 Color Page 24 Tint Page 24 Sharpness Page 24 Advanced Color Temp Page 25 Black Page 25 Monochrome Page 25 Film Mode Page...
Operation Manual
Page 25
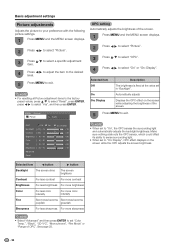
...brightness Color For less color intensity For more color intensity Tint Skin tones become Skin tones become purplish greenish Sharpness For less sharpness For more sharpness NOTE • Select "Advanced" and then press ENTER to set to "On: Display", OPC effect displays... on the screen while adjusting the brightness of OPC". MENU [Picture] Picture Audio 5 Press MENU to select "Yes", and then press ENTER. NOTE • For resetting all Picture...
...brightness Color For less color intensity For more color intensity Tint Skin tones become Skin tones become purplish greenish Sharpness For less sharpness For more sharpness NOTE • Select "Advanced" and then press ENTER to set to "On: Display", OPC effect displays... on the screen while adjusting the brightness of OPC". MENU [Picture] Picture Audio 5 Press MENU to select "Yes", and then press ENTER. NOTE • For resetting all Picture...
Operation Manual
Page 26
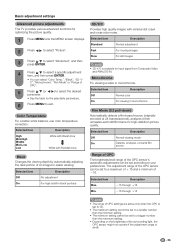
...be set according to a maximum of e16 and a minimum of f16. Basic adjustment settings Advanced picture adjustments This TV provides various advanced functions for optimizing the picture quality. 3D-Y/C Provides high quality images with Reddish tone Selected item Standard Fast Slow Description Normal...White with Bluish tone White with minimal dot crawl and cross color noise. 1 Press MENU and the MENU screen displays. 2 Press c/d to select "Picture". 3 Press a/b to select "Advanced", and then press ENTER. 4 Press a/b to select a specific adjustment item, and then press ENTER...
...be set according to a maximum of e16 and a minimum of f16. Basic adjustment settings Advanced picture adjustments This TV provides various advanced functions for optimizing the picture quality. 3D-Y/C Provides high quality images with Reddish tone Selected item Standard Fast Slow Description Normal...White with Bluish tone White with minimal dot crawl and cross color noise. 1 Press MENU and the MENU screen displays. 2 Press c/d to select "Picture". 3 Press a/b to select "Advanced", and then press ENTER. 4 Press a/b to select a specific adjustment item, and then press ENTER...
Operation Manual
Page 34
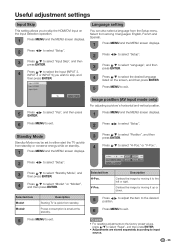
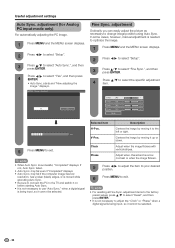
Image position (AV input mode only) For adjusting a picture's horizontal and vertical position. 1 Press MENU and the MENU screen displays. 6 Press MENU to exit. 2 Press c/d to select "H-Pos." Standby Mode Standby Mode may be set to either start the TV quickly from among 3 languages: English, French and ... and then press ENTER. 5 Press MENU to select "Mode1" or "Mode2", and then press ENTER. Selected item Mode1 Mode2 Description Starting TV is small at the standby. Power consumption is quick from the Setup menu. V-Pos. Description Centers the image by moving it up or down...
Image position (AV input mode only) For adjusting a picture's horizontal and vertical position. 1 Press MENU and the MENU screen displays. 6 Press MENU to exit. 2 Press c/d to select "H-Pos." Standby Mode Standby Mode may be set to either start the TV quickly from among 3 languages: English, French and ... and then press ENTER. 5 Press MENU to select "Mode1" or "Mode2", and then press ENTER. Selected item Mode1 Mode2 Description Starting TV is small at the standby. Power consumption is quick from the Setup menu. V-Pos. Description Centers the image by moving it up or down...
Operation Manual
Page 35
adjustment Ordinarily you can easily adjust the picture as necessary to exit. Yes No H-Pos. [ 90] a b V-Pos. [ 39] a b Clock [ 90] a b Phase [ 20] a b Reset 30% 5 Press MENU to change image position using Auto Sync. ... computer image has low resolution, has unclear (black) edges, or is moved while executing Auto Sync. • Be sure to connect the PC to the TV and switch it on before starting Auto Sync. • It is not necessary to select the specific adjustment item. when a digital signal is successful...
adjustment Ordinarily you can easily adjust the picture as necessary to exit. Yes No H-Pos. [ 90] a b V-Pos. [ 39] a b Clock [ 90] a b Phase [ 20] a b Reset 30% 5 Press MENU to change image position using Auto Sync. ... computer image has low resolution, has unclear (black) edges, or is moved while executing Auto Sync. • Be sure to connect the PC to the TV and switch it on before starting Auto Sync. • It is not necessary to select the specific adjustment item. when a digital signal is successful...
Operation Manual
Page 44
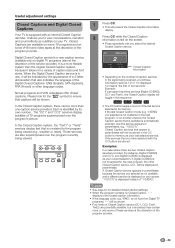
... (also at the discretion of the service provider). Closed Captions are also superimposed over the program's picture. The "CC1" and "CC2" services display subtitles of TV programs superimposed over the program currently being viewed. 1 Press CC. • This will not be displayed in the CC button's ... is a new caption service available only on your last selected service. Useful adjustment settings Closed Captions and Digital Closed Captions Your TV is displayed instead of "1/2/ENG". It is unrelated to ensure that is a more than the original Closed Caption system, because ...
... (also at the discretion of the service provider). Closed Captions are also superimposed over the program's picture. The "CC1" and "CC2" services display subtitles of TV programs superimposed over the program currently being viewed. 1 Press CC. • This will not be displayed in the CC button's ... is a new caption service available only on your last selected service. Useful adjustment settings Closed Captions and Digital Closed Captions Your TV is displayed instead of "1/2/ENG". It is unrelated to ensure that is a more than the original Closed Caption system, because ...
Operation Manual
Page 48
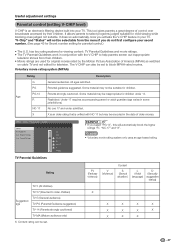
... Guidelines work in some jurisdictions). No one 17 and under 13. V-Chip] MPAA TV Guidelines Can. This tool gives parents a great degree of control over broadcasts accessed by the Motion Picture Association of older movies. Under 17 requires accompanying parent or adult guardian (age varies in ...conjunction with NC-17 but may be encoded in the data of America (MPAA) as watched on cable TV and not edited for television.
... Guidelines work in some jurisdictions). No one 17 and under 13. V-Chip] MPAA TV Guidelines Can. This tool gives parents a great degree of control over broadcasts accessed by the Motion Picture Association of older movies. Under 17 requires accompanying parent or adult guardian (age varies in ...conjunction with NC-17 but may be encoded in the data of America (MPAA) as watched on cable TV and not edited for television.
Operation Manual
Page 55
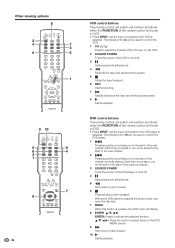
... 2 K Pressing quickly once takes you to select the channel of the TV tuner on the VCR. 2 SOURCE POWER Turns the power of the VCR on and off . 3 F Sets pauses and still pictures. 4 G Rewinds the tape and allows picture search. 5 H Stops the tape transport. 6 REC Starts recording. 7... J Rapidly advances the tape and allows picture search. 8 I Starts playback. The following 1 to 8 can be used to control the...
... 2 K Pressing quickly once takes you to select the channel of the TV tuner on the VCR. 2 SOURCE POWER Turns the power of the VCR on and off . 3 F Sets pauses and still pictures. 4 G Rewinds the tape and allows picture search. 5 H Stops the tape transport. 6 REC Starts recording. 7... J Rapidly advances the tape and allows picture search. 8 I Starts playback. The following 1 to 8 can be used to control the...
Operation Manual
Page 57
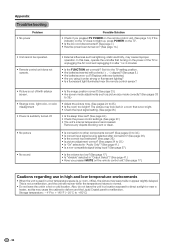
...• The unit's internal temperature has increased. Remove any objects blocking vent or clean. • No picture • No sound • Is connection to other components correct? (See pages 30 to 32.) • Is correct input signal source selected after connection? (See page 36.) • Is the ...setting. (See page 36.) • Power is suddenly turned off /with new batteries.) • Are you pressed MUTE on the power of the TV or unplugging the AC cord and replugging it under strong or fluorescent lighting? • Is a fluorescent light illuminated near a heater,...
...• The unit's internal temperature has increased. Remove any objects blocking vent or clean. • No picture • No sound • Is connection to other components correct? (See pages 30 to 32.) • Is correct input signal source selected after connection? (See page 36.) • Is the ...setting. (See page 36.) • Power is suddenly turned off /with new batteries.) • Are you pressed MUTE on the power of the TV or unplugging the AC cord and replugging it under strong or fluorescent lighting? • Is a fluorescent light illuminated near a heater,...

