Operation Manual
Page 7
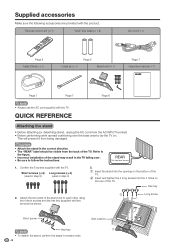
... the two parts of the stand unit to each other using the 4 short screws and the hex key (supplied with the TV. REAR This side faces the rear. 1. Hex key 2. CAUTION • Attach the stand in step 3) 3. 1 Insert the stand into the opening on the bottom... terminal. • Before performing work spread cushioning over . • Be sure to the figure. • Incorrect installation of the TV. 2 Insert and tighten the 4 long screws into the 4 holes on . Remote control unit (g1) "AAA" size battery (g2) AC cord (g1) Page 8 Cable Clamp (g1) Cable tie (g1) Page 8 Stand unit ...
... the two parts of the stand unit to each other using the 4 short screws and the hex key (supplied with the TV. REAR This side faces the rear. 1. Hex key 2. CAUTION • Attach the stand in step 3) 3. 1 Insert the stand into the opening on the bottom... terminal. • Before performing work spread cushioning over . • Be sure to the figure. • Incorrect installation of the TV. 2 Insert and tighten the 4 long screws into the 4 holes on . Remote control unit (g1) "AAA" size battery (g2) AC cord (g1) Page 8 Cable Clamp (g1) Cable tie (g1) Page 8 Stand unit ...
Operation Manual
Page 9
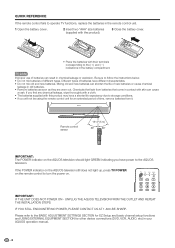
... characteristics. • Do not mix old and new batteries. QUICK REFERENCE If the remote control fails to operate TV functions, replace the batteries in the remote control unit. 1 Open the battery cover. 2 Insert two "AAA" size batteries (supplied... with the product). 3 Close the battery cover. • Place the batteries with their terminals corresponding to the (e) and (f) indications in your AQUOS operation manual. 8 IF YOU STILL ENCOUNTER NO POWER, PLEASE CONTACT US AT 1-800-BE-SHARP...
... characteristics. • Do not mix old and new batteries. QUICK REFERENCE If the remote control fails to operate TV functions, replace the batteries in the remote control unit. 1 Open the battery cover. 2 Insert two "AAA" size batteries (supplied... with the product). 3 Close the battery cover. • Place the batteries with their terminals corresponding to the (e) and (f) indications in your AQUOS operation manual. 8 IF YOU STILL ENCOUNTER NO POWER, PLEASE CONTACT US AT 1-800-BE-SHARP...
Operation Manual
Page 10
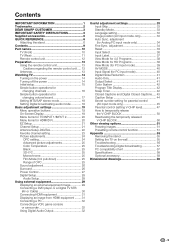
... 32 Using Digital Audio Output 32 Useful adjustment settings 33 Input Skip 33 Standby Mode 33 Language setting 33 Image position (AV input mode only 33 Auto Sync. Contents IMPORTANT INFORMATION 1 Trademarks 2 DEAR SHARP CUSTOMER 3 IMPORTANT SAFETY INSTRUCTIONS 3 Supplied accessories 6 QUICK REFERENCE 6 Attaching the stand 6 Contents 9 Part names 10 TV (Front 10 TV (Rear 11 Remote control...
... 32 Using Digital Audio Output 32 Useful adjustment settings 33 Input Skip 33 Standby Mode 33 Language setting 33 Image position (AV input mode only 33 Auto Sync. Contents IMPORTANT INFORMATION 1 Trademarks 2 DEAR SHARP CUSTOMER 3 IMPORTANT SAFETY INSTRUCTIONS 3 Supplied accessories 6 QUICK REFERENCE 6 Attaching the stand 6 Contents 9 Part names 10 TV (Front 10 TV (Rear 11 Remote control...
Operation Manual
Page 13
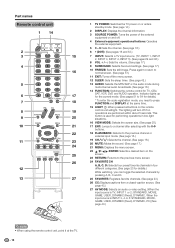
...need to press FUNCTION and DISPLAY at the TV. 12 Press again to return to 54 for TV, CBL/ SAT, VCR, DVD and AUDIO operation. The lighting will light. Part names Remote control unit 1 14 2 3 4 5 6 7 8 9 10 11 12 13 1 TV POWER: Switches the TV power on or enters standby mode. (...See page 14.) 2 DISPLAY: Displays the channel information. 3 SOURCE POWER: Turns the power of the external equipment on the remote 19 control unit will turn off ....
...need to press FUNCTION and DISPLAY at the TV. 12 Press again to return to 54 for TV, CBL/ SAT, VCR, DVD and AUDIO operation. The lighting will light. Part names Remote control unit 1 14 2 3 4 5 6 7 8 9 10 11 12 13 1 TV POWER: Switches the TV power on or enters standby mode. (...See page 14.) 2 DISPLAY: Displays the channel information. 3 SOURCE POWER: Turns the power of the external equipment on the remote 19 control unit will turn off ....

Operation Manual
Page 14
... F-type connector that are used for a coaxial cable. In addition, do not expose the remote control unit to the TV set . (The breaking of the remote control unit. • The remote control unit may not work properly if the remote control sensor on the TV. When connecting the RF cable to liquids, and do not tighten F-type connector with high...
... F-type connector that are used for a coaxial cable. In addition, do not expose the remote control unit to the TV set . (The breaking of the remote control unit. • The remote control unit may not work properly if the remote control sensor on the TV. When connecting the RF cable to liquids, and do not tighten F-type connector with high...
Operation Manual
Page 15
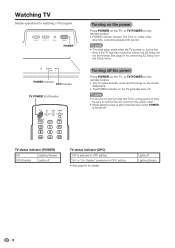
...cord from the Setup menu. See page 21 for the first time. Turning off the power Press POWER on the TV, or TV POWER on the remote control. • The TV enters standby mode and the image on the screen disappears. • The POWER indicator on the... TV gradually turns off Lighting (Green) 14 Watching TV Simple operations for watching a TV program POWER POWER indicator OPC indicator TV POWER (On/Standby) Turning on the power Press POWER on the TV, or TV POWER on the remote control. • POWER indicator (Green): The TV is on. (After a few seconds...
...cord from the Setup menu. See page 21 for the first time. Turning off the power Press POWER on the TV, or TV POWER on the remote control. • The TV enters standby mode and the image on the screen disappears. • The POWER indicator on the... TV gradually turns off Lighting (Green) 14 Watching TV Simple operations for watching a TV program POWER POWER indicator OPC indicator TV POWER (On/Standby) Turning on the power Press POWER on the TV, or TV POWER on the remote control. • POWER indicator (Green): The TV is on. (After a few seconds...
Operation Manual
Page 16
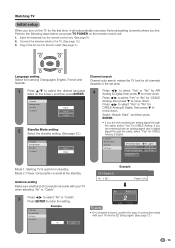
... "No" for CABLE Analog. Antenna setting Make sure what kind of connection made with your TV when selecting "Air" or "Cable". 3 Press c/d to select the desired language listed on the remote control unit. 1. Insert the batteries into the remote control unit. (See page 8.) 2. Language Standby Mode Air/Cable CH Search AIR Analog & Digital Yes No...
... "No" for CABLE Analog. Antenna setting Make sure what kind of connection made with your TV when selecting "Air" or "Cable". 3 Press c/d to select the desired language listed on the remote control unit. 1. Insert the batteries into the remote control unit. (See page 8.) 2. Language Standby Mode Air/Cable CH Search AIR Analog & Digital Yes No...
Operation Manual
Page 17
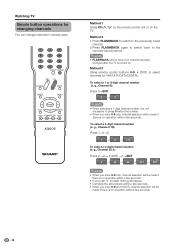
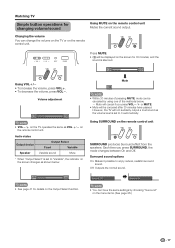
...not necessary to press 0 before the number. • When you enter 0-9 only, channel selection will be made if there is turned on the TV. Watching TV Simple button operations for VHF/UHF/CATV/DIGITAL. g., Channel 115): Press 1s1s5 Cable 1 Cable 11 Cable ANALOG 115 To select a 4-digit channel... several ways. g., Channel 22.1): Press 2 s2s • (DOT) s1sENT Air 2 Air 22 Air 22. Method 1 Using CH r/s on the remote control unit or on . Method 3 Using remote control buttons 0-9, • (DOT) to the currently tuned channel. To select a 1 or 2-digit channel number (e.
...not necessary to press 0 before the number. • When you enter 0-9 only, channel selection will be made if there is turned on the TV. Watching TV Simple button operations for VHF/UHF/CATV/DIGITAL. g., Channel 115): Press 1s1s5 Cable 1 Cable 11 Cable ANALOG 115 To select a 4-digit channel... several ways. g., Channel 22.1): Press 2 s2s • (DOT) s1sENT Air 2 Air 22 Air 22. Method 1 Using CH r/s on the remote control unit or on . Method 3 Using remote control buttons 0-9, • (DOT) to the currently tuned channel. To select a 1 or 2-digit channel number (e.
Operation Manual
Page 18
...the screen changes as VOL k/l on the remote control unit. Using SURROUND on the remote control unit Mutes the current sound output. Surround : Off Surround : On NOTE • You can have passed. Volume adjustment 20 NOTE • VOLl/k on the TV operates the same as shown below . -... can change the volume on the TV or on the remote control unit. Surround sound options On: Makes it possible to enjoy natural, realistic surround sound. Watching TV Simple button operations for changing volume/sound Using MUTE on the remote control unit SURROUND produces Surround effect from ...
...the screen changes as VOL k/l on the remote control unit. Using SURROUND on the remote control unit Mutes the current sound output. Surround : Off Surround : On NOTE • You can have passed. Volume adjustment 20 NOTE • VOLl/k on the TV operates the same as shown below . -... can change the volume on the TV or on the remote control unit. Surround sound options On: Makes it possible to enjoy natural, realistic surround sound. Watching TV Simple button operations for changing volume/sound Using MUTE on the remote control unit SURROUND produces Surround effect from ...
Operation Manual
Page 20
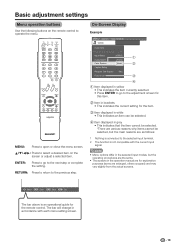
... [Fixed] Color System [Auto] 2 Caption Setup Program Title Display [No] Favorite CH 3 4 1 Item displayed in the operation manual are for the remote control. a/b/c/d: Press to select a desired item on the remote control to operate the menu. Basic adjustment settings Menu operation buttons Use the following buttons on the screen or adjust a selected item. ENTER...
... [Fixed] Color System [Auto] 2 Caption Setup Program Title Display [No] Favorite CH 3 4 1 Item displayed in the operation manual are for the remote control. a/b/c/d: Press to select a desired item on the remote control to operate the menu. Basic adjustment settings Menu operation buttons Use the following buttons on the screen or adjust a selected item. ENTER...
Operation Manual
Page 24
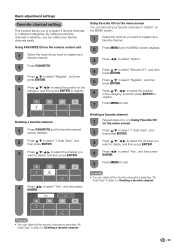
... 2 to 4 in Using Favorite CH on the MENU screen. 1 Select the channel you to program 4 favorite channels, in 4 different categories. Using FAVORITE CH on the remote control unit 1 Select the channel you can delete all the favorite channels by selecting "All Data Clear" in step 2 in Deleting a favorite channel. NOTE • You...
... 2 to 4 in Using Favorite CH on the MENU screen. 1 Select the channel you to program 4 favorite channels, in 4 different categories. Using FAVORITE CH on the remote control unit 1 Select the channel you can delete all the favorite channels by selecting "All Data Clear" in step 2 in Deleting a favorite channel. NOTE • You...

Operation Manual
Page 27
.... Surround Surround effects can choose Surround by pressing SURROUND on your DVD player. MENU [Audio ... NOTE • You can be required on the remote control unit. • Audio menu is grayed out when Output Select is set using the "Audio" menu. 1 Press MENU and the MENU screen displays... values, press a/b to select "Reset", press ENTER, press c/d to select "Surround", and then press ENTER. Surround] Audio Power Control 2 Press c/d to the operation manual of your preference with the following settings. In this case, please refer to select "Audio".
.... Surround Surround effects can choose Surround by pressing SURROUND on your DVD player. MENU [Audio ... NOTE • You can be required on the remote control unit. • Audio menu is grayed out when Output Select is set using the "Audio" menu. 1 Press MENU and the MENU screen displays... values, press a/b to select "Reset", press ENTER, press c/d to select "Surround", and then press ENTER. Surround] Audio Power Control 2 Press c/d to the operation manual of your preference with the following settings. In this case, please refer to select "Audio".
Operation Manual
Page 30
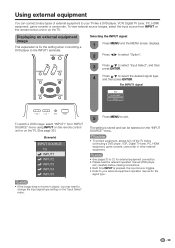
... for the setting when connecting a DVD player to 32 for the signal type. 29 NOTE • See pages 30 to the INPUT1 terminals. For INPUT1 signal Auto COMPONENT VIDEO To watch a DVD image, select "INPUT1" from INPUT on the remote control unit or on the TV. To view external source images, select the input...
... for the setting when connecting a DVD player to 32 for the signal type. 29 NOTE • See pages 30 to the INPUT1 terminals. For INPUT1 signal Auto COMPONENT VIDEO To watch a DVD image, select "INPUT1" from INPUT on the remote control unit or on the TV. To view external source images, select the input...
Operation Manual
Page 32
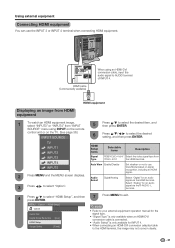
... use the INPUT 3 or INPUT 4 terminal when connecting HDMI equipment. Using external equipment Connecting HDMI equipment You can use INPUT5 View Mode based on the TV. (See page 36.) INPUT SOURCE 5 Press a/b to select the desired item, and then press ENTER. 6 Press a/b/c/d to select the desired setting, and ...8226; "Audio Select" is only available for an audio 3 Press c/d to AUDIO terminal of INPUT 4. HDMI cable (Commercially available) When using INPUT on the remote control unit or on signal recognition, including an HDMI signal. 2 Press MENU and the MENU screen displays.
... use the INPUT 3 or INPUT 4 terminal when connecting HDMI equipment. Using external equipment Connecting HDMI equipment You can use INPUT5 View Mode based on the TV. (See page 36.) INPUT SOURCE 5 Press a/b to select the desired item, and then press ENTER. 6 Press a/b/c/d to select the desired setting, and ...8226; "Audio Select" is only available for an audio 3 Press c/d to AUDIO terminal of INPUT 4. HDMI cable (Commercially available) When using INPUT on the remote control unit or on signal recognition, including an HDMI signal. 2 Press MENU and the MENU screen displays.
Operation Manual
Page 42
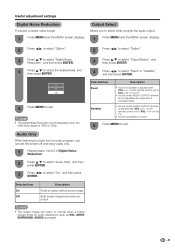
... AUDIO) is output without screen image. Selected item Fixed Variable Description • Sound via speaker is adjusted with VOL k/l on the remote control unit or VOLl/k on the TV. • Sound via the AUDIO OUTPUT terminal is not adjustable and outputs at a consistent level. • Sound via the AUDIO OUTPUT... terminal is adjusted with VOL k/l on the remote control unit or VOL l/k on the TV. • Sound via speaker is 1080i or 720p. Output Select Allows you can set the screen off and enjoy audio only. ...
... AUDIO) is output without screen image. Selected item Fixed Variable Description • Sound via speaker is adjusted with VOL k/l on the remote control unit or VOLl/k on the TV. • Sound via the AUDIO OUTPUT terminal is not adjustable and outputs at a consistent level. • Sound via the AUDIO OUTPUT... terminal is adjusted with VOL k/l on the remote control unit or VOL l/k on the TV. • Sound via speaker is 1080i or 720p. Output Select Allows you can set the screen off and enjoy audio only. ...
Operation Manual
Page 52
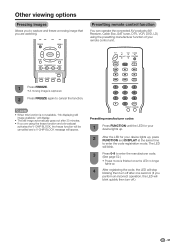
... the code registration mode. Presetting manufacturer codes 1 Press FUNCTION until the LED for your device lights up. 2 After the LED for your remote control unit. 1 Press FREEZE. • A moving image that you are using the presetting manufacturer function of your device lights up . 4 After..."No displaying still image available." The LED will blink quickly then turn off after 30 minutes. • If you are watching. Presetting remote control function You can operate the connected AV products (AV Receiver, Cable Box, SAT tuner, DTV, VCR, DVD, LD) using the freeze ...
... the code registration mode. Presetting manufacturer codes 1 Press FUNCTION until the LED for your device lights up. 2 After the LED for your remote control unit. 1 Press FREEZE. • A moving image that you are using the presetting manufacturer function of your device lights up . 4 After..."No displaying still image available." The LED will blink quickly then turn off after 30 minutes. • If you are watching. Presetting remote control function You can operate the connected AV products (AV Receiver, Cable Box, SAT tuner, DTV, VCR, DVD, LD) using the freeze ...
Operation Manual
Page 53
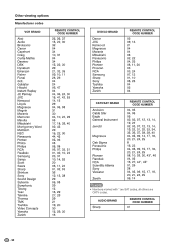
AUDIO BRAND REMOTE CONTROL CODE NUMBER 52 Other viewing options Manufacturer codes VCR BRAND REMOTE CONTROL CODE NUMBER DVD/LD BRAND REMOTE CONTROL CODE NUMBER CATV/SAT BRAND REMOTE CONTROL CODE NUMBER NOTE • Numbers marked with * are SAT codes, all others are CATV codes.
AUDIO BRAND REMOTE CONTROL CODE NUMBER 52 Other viewing options Manufacturer codes VCR BRAND REMOTE CONTROL CODE NUMBER DVD/LD BRAND REMOTE CONTROL CODE NUMBER CATV/SAT BRAND REMOTE CONTROL CODE NUMBER NOTE • Numbers marked with * are SAT codes, all others are CATV codes.
Operation Manual
Page 55
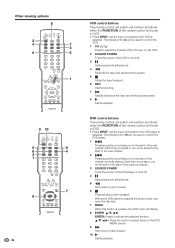
...ENTER, a/b/c/d ENTER: Press to go in reverse. 6 H Playback stops when pressed. Other viewing options 8 2 4 7 3 6 5 1 3 10 5 9 6 4 2 1 7 8 54 VCR control buttons The remote control unit button will function as follows when the FUNCTION of the remote control unit is set to DVD. • Press INPUT until the input connected to the VCR is selected. DVD... playback. a/b/c/d: Press the button to select items on and off . 4 F Sets pauses and still pictures. 5 G Hold down to select the channel of the TV tuner on the VCR. 2 SOURCE POWER Turns the power of the next chapter.
...ENTER, a/b/c/d ENTER: Press to go in reverse. 6 H Playback stops when pressed. Other viewing options 8 2 4 7 3 6 5 1 3 10 5 9 6 4 2 1 7 8 54 VCR control buttons The remote control unit button will function as follows when the FUNCTION of the remote control unit is set to DVD. • Press INPUT until the input connected to the VCR is selected. DVD... playback. a/b/c/d: Press the button to select items on and off . 4 F Sets pauses and still pictures. 5 G Hold down to select the channel of the TV tuner on the VCR. 2 SOURCE POWER Turns the power of the next chapter.
Operation Manual
Page 57
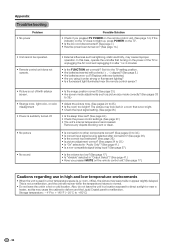
...Remove any objects blocking vent or clean. • No picture • No sound • Is connection to other components correct? (See pages 30 to 32.) • Is correct input signal source selected after connection? (See page 36.) • Is the correct input selected? (See page 36.) • ...bright? Appendix Troubleshooting Problem • No power Possible Solution • Check if you pressed TV POWER on the remote control unit. (See page 14.) If the indicator on the TV does not light up, press POWER on the TV. • Is the AC cord disconnected? (See page 7.) • Has the power...
...Remove any objects blocking vent or clean. • No picture • No sound • Is connection to other components correct? (See pages 30 to 32.) • Is correct input signal source selected after connection? (See page 36.) • Is the correct input selected? (See page 36.) • ...bright? Appendix Troubleshooting Problem • No power Possible Solution • Check if you pressed TV POWER on the remote control unit. (See page 14.) If the indicator on the TV does not light up, press POWER on the TV. • Is the AC cord disconnected? (See page 7.) • Has the power...


