Operation Manual
Page 2
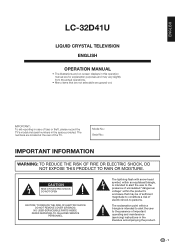
...located at the rear of electric shock to constitute a risk of the TV. IMPORTANT: To aid reporting in case of loss or theft, please record the TV's model and serial numbers in this operation manual are for explanation purposes and may vary slightly from the actual operations. &#...8226; Menu items that may be of sufficient magnitude to persons. ENGLISH LC-32D41U LIQUID CRYSTAL TELEVISION ENGLISH OPERATION MANUAL • The ...
...located at the rear of electric shock to constitute a risk of the TV. IMPORTANT: To aid reporting in case of loss or theft, please record the TV's model and serial numbers in this operation manual are for explanation purposes and may vary slightly from the actual operations. &#...8226; Menu items that may be of sufficient magnitude to persons. ENGLISH LC-32D41U LIQUID CRYSTAL TELEVISION ENGLISH OPERATION MANUAL • The ...
Operation Manual
Page 7
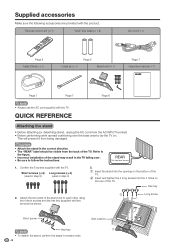
... . Remote control unit (g1) "AAA" size battery (g2) AC cord (g1) Page 8 Cable Clamp (g1) Cable tie (g1) Page 8 Stand unit (g1) Page 7 Operation manual (g1) Page 7 Page 7 NOTE • Always use the AC cord supplied with the product. Attach the two parts of the...it from the AC INPUT terminal. • Before performing work spread cushioning over . • Be sure to the figure. • Incorrect installation of the TV. Confirm the 8 screws supplied with the product) as shown. 2 Long screw Short screw NOTE Hex key • To detach the stand, perform the...
... . Remote control unit (g1) "AAA" size battery (g2) AC cord (g1) Page 8 Cable Clamp (g1) Cable tie (g1) Page 8 Stand unit (g1) Page 7 Operation manual (g1) Page 7 Page 7 NOTE • Always use the AC cord supplied with the product. Attach the two parts of the...it from the AC INPUT terminal. • Before performing work spread cushioning over . • Be sure to the figure. • Incorrect installation of the TV. Confirm the 8 screws supplied with the product) as shown. 2 Long screw Short screw NOTE Hex key • To detach the stand, perform the...
Operation Manual
Page 9
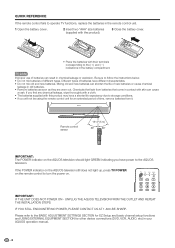
... THE INSTALLATION STEPS. IF YOU STILL ENCOUNTER NO POWER, PLEASE CONTACT US AT 1-800-BE-SHARP. Mixing old and new batteries can cause a rash. QUICK REFERENCE If the remote control fails to operate TV functions, replace the batteries in the remote control unit. 1 Open the battery cover. 2 Insert...leakage in old batteries. • Remove batteries as soon as they are worn out. Different types of batteries can result in your AQUOS operation manual. 8 If you will not be using the remote control unit for other device connections (DVD, VCR, AUDIO, etc) in chemical leakage or ...
... THE INSTALLATION STEPS. IF YOU STILL ENCOUNTER NO POWER, PLEASE CONTACT US AT 1-800-BE-SHARP. Mixing old and new batteries can cause a rash. QUICK REFERENCE If the remote control fails to operate TV functions, replace the batteries in the remote control unit. 1 Open the battery cover. 2 Insert...leakage in old batteries. • Remove batteries as soon as they are worn out. Different types of batteries can result in your AQUOS operation manual. 8 If you will not be using the remote control unit for other device connections (DVD, VCR, AUDIO, etc) in chemical leakage or ...
Operation Manual
Page 19
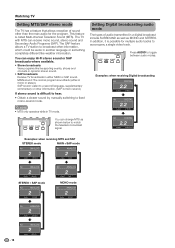
... be audio in another language or something completely different like live sporting events, shows and concerts in dynamic stereo sound. • SAP broadcasts Receive TV broadcasts in either in mono or stereo). SAP sound: Listen to a second language, supplementary commentary or other information. (SAP is mono sound.) ...signal. In addition, it is possible for the program. This feature is difficult to hear. • Obtain a clearer sound by manually switching to fixed mono-sound mode. You can receive mono sound, stereo sound and Secondary Audio Programs (SAP). Watching...
... be audio in another language or something completely different like live sporting events, shows and concerts in dynamic stereo sound. • SAP broadcasts Receive TV broadcasts in either in mono or stereo). SAP sound: Listen to a second language, supplementary commentary or other information. (SAP is mono sound.) ...signal. In addition, it is possible for the program. This feature is difficult to hear. • Obtain a clearer sound by manually switching to fixed mono-sound mode. You can receive mono sound, stereo sound and Secondary Audio Programs (SAP). Watching...
Operation Manual
Page 20
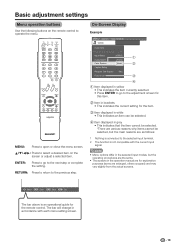
... [Option ... Basic adjustment settings Menu operation buttons Use the following buttons on the screen or adjust a selected item. The bar will change in the operation manual are for the item. 3 Item displayed in white • This indicates an item can be selected. 4 Item displayed in grey • This indicates that the...
... [Option ... Basic adjustment settings Menu operation buttons Use the following buttons on the screen or adjust a selected item. The bar will change in the operation manual are for the item. 3 Item displayed in white • This indicates an item can be selected. 4 Item displayed in grey • This indicates that the...
Operation Manual
Page 22
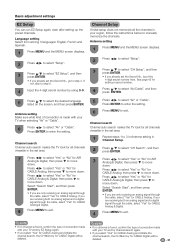
...press b to move down . Antenna setting Make sure what kind of connection is found , confirm the type of connection made with your TV when selecting "Air" or "Cable". 6 Press c/d to move down . Basic adjustment settings EZ Setup You can run EZ Setup again, even ...after setting up the preset channels. If not, skip to manually memorize the channels. If you select "Yes" for CABLE Analog & Digital, then press b to move down . Channel search Channel auto search makes the...
...press b to move down . Antenna setting Make sure what kind of connection is found , confirm the type of connection made with your TV when selecting "Air" or "Cable". 6 Press c/d to move down . Basic adjustment settings EZ Setup You can run EZ Setup again, even ...after setting up the preset channels. If not, skip to manually memorize the channels. If you select "Yes" for CABLE Analog & Digital, then press b to move down . Channel search Channel auto search makes the...

Operation Manual
Page 27
... set to "Variable". • For resetting all Audio adjustment items to the factory preset values, press a/b to select "Reset", press ENTER, press c/d to the operation manual of your preference with the following settings. Selected item c button d button Treble For weaker treble For stronger treble Bass For weaker bass For stronger bass...
... set to "Variable". • For resetting all Audio adjustment items to the factory preset values, press a/b to select "Reset", press ENTER, press c/d to the operation manual of your preference with the following settings. Selected item c button d button Treble For weaker treble For stronger treble Bass For weaker bass For stronger bass...
Operation Manual
Page 30
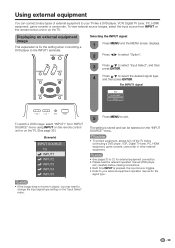
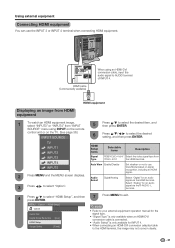
...of external equipment to your external equipment operation manual for the setting when connecting a DVD player to 32 for external equipment connection. • Please read the relevant operation manual (DVD player, etc.) carefully before connecting a DVD player, VCR, Digital TV tuner, PC, HDMI equipment, game console,...select "INPUT1" from INPUT on the remote control unit or on the "Input Select" menu. 5 Press MENU to your TV like a DVD player, VCR, Digital TV tuner, PC, HDMI equipment, game console or camcorder. Using external equipment You can be selected on the "INPUT SOURCE" ...
...of external equipment to your external equipment operation manual for the setting when connecting a DVD player to 32 for external equipment connection. • Please read the relevant operation manual (DVD player, etc.) carefully before connecting a DVD player, VCR, Digital TV tuner, PC, HDMI equipment, game console,...select "INPUT1" from INPUT on the remote control unit or on the "Input Select" menu. 5 Press MENU to your TV like a DVD player, VCR, Digital TV tuner, PC, HDMI equipment, game console or camcorder. Using external equipment You can be selected on the "INPUT SOURCE" ...
Operation Manual
Page 32
...HDMI Setup] Option Audio Only Digital Noise Reduction [Low] HDMI Setup Output Select [Fixed] NOTE • Refer to your external equipment operation manual for the signal type. • "Signal Type" is only available when an HDMI-DVI conversion cable is connected. • "Audio Select..." is only available for INPUT 4. • When connecting an HDMI-DVI conversion adapter/cable to select "Option". TV INPUT1 INPUT2 HDMI Setup items Selectable items Description INPUT3 Signal Type RGB/YCbCr 4:4:4/ Select the video signal type from "INPUT SOURCE" menu using an...
...HDMI Setup] Option Audio Only Digital Noise Reduction [Low] HDMI Setup Output Select [Fixed] NOTE • Refer to your external equipment operation manual for the signal type. • "Signal Type" is only available when an HDMI-DVI conversion cable is connected. • "Audio Select..." is only available for INPUT 4. • When connecting an HDMI-DVI conversion adapter/cable to select "Option". TV INPUT1 INPUT2 HDMI Setup items Selectable items Description INPUT3 Signal Type RGB/YCbCr 4:4:4/ Select the video signal type from "INPUT SOURCE" menu using an...
Operation Manual
Page 35
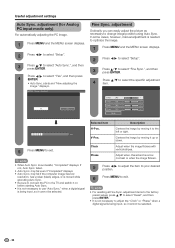
.... • Auto Sync. V-Pos. Clock Phase Description Centers the image by moving it cannot be selected. displays. Auto Sync.] Fine Sync. In some cases, however, manual adjustment is successful, "Completed" displays. Yes No H-Pos. [ 90] a b V-Pos. [ 39] a b Clock [ 90] a b Phase [ 20] a b Reset 30% 5 Press ...items to the factory preset values, press a/b to select "Reset", and then press ENTER. • It is not necessary to the TV and switch it on before starting Auto Sync. • It is being input, so it to change image position using Auto Sync. may...
.... • Auto Sync. V-Pos. Clock Phase Description Centers the image by moving it cannot be selected. displays. Auto Sync.] Fine Sync. In some cases, however, manual adjustment is successful, "Completed" displays. Yes No H-Pos. [ 90] a b V-Pos. [ 39] a b Clock [ 90] a b Phase [ 20] a b Reset 30% 5 Press ...items to the factory preset values, press a/b to select "Reset", and then press ENTER. • It is not necessary to the TV and switch it on before starting Auto Sync. • It is being input, so it to change image position using Auto Sync. may...
Operation Manual
Page 37
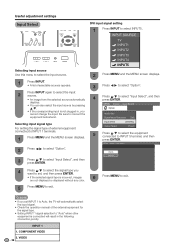
... input source by pressing a/b. • If the corresponding input is connected will automatically select the input signal. • Check the operation manual of the external equipment for the signal type. • Setting INPUT 1 signal selection to exit. MENU [Option ... VIDEO 36 MENU ...1 Press INPUT. • A list of selectable sources appears. 2 Press INPUT again to select "Input Select", and then press ENTER. INPUT SOURCE TV INPUT1 INPUT2 INPUT3 INPUT4 INPUT5 2 Press MENU and the MENU screen displays. 3 Press c/d to select "Option". 4 Press a/b to INPUT 5 terminal...
... input source by pressing a/b. • If the corresponding input is connected will automatically select the input signal. • Check the operation manual of the external equipment for the signal type. • Setting INPUT 1 signal selection to exit. MENU [Option ... VIDEO 36 MENU ...1 Press INPUT. • A list of selectable sources appears. 2 Press INPUT again to select "Input Select", and then press ENTER. INPUT SOURCE TV INPUT1 INPUT2 INPUT3 INPUT4 INPUT5 2 Press MENU and the MENU screen displays. 3 Press c/d to select "Option". 4 Press a/b to INPUT 5 terminal...
Operation Manual
Page 41
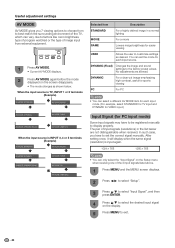
... source. No adjustments are not distinguishable when received. Useful adjustment settings AV MODE AV MODE gives you have to be registered manually to display properly. When the input source is TV, INPUT 1 or 2 terminals (Example) AV MODE: STANDARD AV MODE: MOVIE AV MODE: DYNAMIC AV MODE: GAME AV ...settings to factors like room brightness, type of program watched or the type of image input from to best match the surrounding environment of the TV, which can vary due to the factory preset values. In such case, you 7 viewing options to choose from external equipment. 1 Press AV...
... source. No adjustments are not distinguishable when received. Useful adjustment settings AV MODE AV MODE gives you have to be registered manually to display properly. When the input source is TV, INPUT 1 or 2 terminals (Example) AV MODE: STANDARD AV MODE: MOVIE AV MODE: DYNAMIC AV MODE: GAME AV ...settings to factors like room brightness, type of program watched or the type of image input from to best match the surrounding environment of the TV, which can vary due to the factory preset values. In such case, you 7 viewing options to choose from external equipment. 1 Press AV...
Operation Manual
Page 61
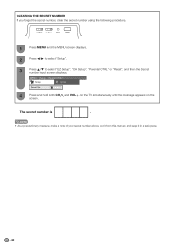
aaaa 4 Press and hold both CHr and VOLk on the TV simultaneously until the message appears on the screen. MENU [Setup ... NOTE • As a precautionary measure, make a note of your secret number above, cut it from this manual, and keep it in a safe place. 60 CLEARING THE SECRET NUMBER If you forget the...
aaaa 4 Press and hold both CHr and VOLk on the TV simultaneously until the message appears on the screen. MENU [Setup ... NOTE • As a precautionary measure, make a note of your secret number above, cut it from this manual, and keep it in a safe place. 60 CLEARING THE SECRET NUMBER If you forget the...


