

Operation Manual
Page 3
Contents Contents 1 Introduction 2 Dear SHARP customer 2 Important Safety Precautions 2 Trademarks 2 Remote control unit 3 TV (Front view 4 TV (Rear view 4 Preparation 5 Supplied accessories 5 Attaching the stand unit 5 ...What is the MENU 23 Common operations 23 Basic adjustment 24 Picture Settings 24 AV MODE 25 Audio Settings 25 Power Save Settings 26 Channel Settings 27 Auto Installation 27 Digital channel settings 27 Analogue channel settings 28 Password/Parental lock settings 29 Language Settings (language, subtitle, multi audio) ..... 29 Useful Viewing functions 30...
Contents Contents 1 Introduction 2 Dear SHARP customer 2 Important Safety Precautions 2 Trademarks 2 Remote control unit 3 TV (Front view 4 TV (Rear view 4 Preparation 5 Supplied accessories 5 Attaching the stand unit 5 ...What is the MENU 23 Common operations 23 Basic adjustment 24 Picture Settings 24 AV MODE 25 Audio Settings 25 Power Save Settings 26 Channel Settings 27 Auto Installation 27 Digital channel settings 27 Analogue channel settings 28 Password/Parental lock settings 29 Language Settings (language, subtitle, multi audio) ..... 29 Useful Viewing functions 30...
Operation Manual
Page 4
...never place any other heavy items. • Do not display a still picture for ventilation. Do not place the product on each side of the SHARP LCD colour TV product. This is a very high technology product, giving you fine picture details. NOTE • LC-46D65E and LC-52D65E models are..., swimming pool and in a wet basement. • Do not place vases or any type of HDMI Licensing LLC." • Manufactured under the TV set or other water-filled containers on a wall, be injured by two people holding onto the speakers. Request a qualified person to clean the product. The ...
...never place any other heavy items. • Do not display a still picture for ventilation. Do not place the product on each side of the SHARP LCD colour TV product. This is a very high technology product, giving you fine picture details. NOTE • LC-46D65E and LC-52D65E models are..., swimming pool and in a wet basement. • Do not place vases or any type of HDMI Licensing LLC." • Manufactured under the TV set or other water-filled containers on a wall, be injured by two people holding onto the speakers. Request a qualified person to clean the product. The ...
Operation Manual
Page 5
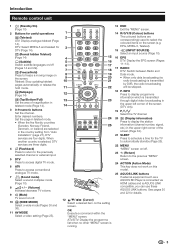
... sound on the screen (e.g. Teletext: Stop updating teletext pages automatically or release the hold mode. 1 (Subpage) (Page 14) v (Top/Bottom/Full) Set the area of the screen (DTV only). Enter desired numbers. DTV: Select MHEG-5 and teletext for useful operations m (Teletext) ATV: Display analogue teletext ...Press to automatically standby (Page 26). S MENU "MENU" screen on the screen. F ACTION (Action Mode) This key does not work on the setting screen. See pages 20 and 22 for the TV to display the station information (channel number, signal, etc.) in teletext mode (Page 14). 3...
... sound on the screen (e.g. Teletext: Stop updating teletext pages automatically or release the hold mode. 1 (Subpage) (Page 14) v (Top/Bottom/Full) Set the area of the screen (DTV only). Enter desired numbers. DTV: Select MHEG-5 and teletext for useful operations m (Teletext) ATV: Display analogue teletext ...Press to automatically standby (Page 26). S MENU "MENU" screen on the screen. F ACTION (Action Mode) This key does not work on the setting screen. See pages 20 and 22 for the TV to display the station information (channel number, signal, etc.) in teletext mode (Page 14). 3...
Operation Manual
Page 8
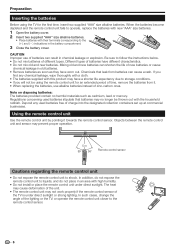
... batteries. Objects between the remote control unit and sensor may not work properly if the remote control sensor of charge into the designated collection containers set up at commercial businesses. The heat may cause deformation of the unit. • The remote control unit may prevent proper operation. 5 m 30° 30°...
... batteries. Objects between the remote control unit and sensor may not work properly if the remote control sensor of charge into the designated collection containers set up at commercial businesses. The heat may cause deformation of the unit. • The remote control unit may prevent proper operation. 5 m 30° 30°...
Operation Manual
Page 9
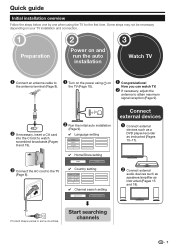
... installation 3 Watch TV n Connect an antenna cable to the TV (Page 8). ✔ Home/Store setting HOME STORE ✔ Country setting Austria A B/G Finland FIN B/G Greece GR B/G ✔ Channel search setting Digital Search Analogue Search Connect external devices n Connect external devices such as a DVD player/recorder as instructed...maximum signal reception (Page 9). Product shape varies in some countries. o Run the initial auto installation (Page 9). ✔ Language setting English Italiano Svenska p Connect the AC cord to the antenna terminal (Page 8).
... installation 3 Watch TV n Connect an antenna cable to the TV (Page 8). ✔ Home/Store setting HOME STORE ✔ Country setting Austria A B/G Finland FIN B/G Greece GR B/G ✔ Channel search setting Digital Search Analogue Search Connect external devices n Connect external devices such as a DVD player/recorder as instructed...maximum signal reception (Page 9). Product shape varies in some countries. o Run the initial auto installation (Page 9). ✔ Language setting English Italiano Svenska p Connect the AC cord to the antenna terminal (Page 8).

Operation Manual
Page 11
... (Fixed)" when there is changed, the TV will go off the power on the TV. • The initial auto installation wizard appears. 2 Setting the OSD language. Austria A B/G Finland FIN B/G Greece GR B/G Press a/b/c/d to select "Signal Strength". E Checking signal strength Press a/b to...0 4 Position and align the antenna so that the maximum possible values for channels in step 6. Follow the menus and make the necessary settings one after purchase, the initial auto installation wizard appears. English Italiano Svenska Press a/b/c/d to select "Digital Search" or "Analogue Search", and...
... (Fixed)" when there is changed, the TV will go off the power on the TV. • The initial auto installation wizard appears. 2 Setting the OSD language. Austria A B/G Finland FIN B/G Greece GR B/G Press a/b/c/d to select "Signal Strength". E Checking signal strength Press a/b to...0 4 Position and align the antenna so that the maximum possible values for channels in step 6. Follow the menus and make the necessary settings one after purchase, the initial auto installation wizard appears. English Italiano Svenska Press a/b/c/d to select "Digital Search" or "Analogue Search", and...

Operation Manual
Page 13
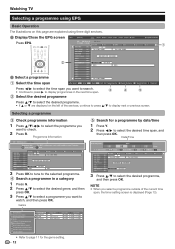
...) E Search for a programme by category (Page 12) E Search for a programme by date and time (Page 12) E Timer recording using EPG (Page 13) Useful settings for digital stations, select "Yes". E Display Range Setup The "Display Range Setup" allows you to select three types of time spans for display on -air... will not be automatically captured while the TV is in standby mode. Item Mode1: Displays six hours of programme information. EPG display settings E EPG Setup (setting for receiving EPG data) If you want to use the EPG for using the remote control unit due to the process of DTV/...
...) E Search for a programme by category (Page 12) E Search for a programme by date and time (Page 12) E Timer recording using EPG (Page 13) Useful settings for digital stations, select "Yes". E Display Range Setup The "Display Range Setup" allows you to select three types of time spans for display on -air... will not be automatically captured while the TV is in standby mode. Item Mode1: Displays six hours of programme information. EPG display settings E EPG Setup (setting for receiving EPG data) If you want to use the EPG for using the remote control unit due to the process of DTV/...
Operation Manual
Page 14
... 6 PM 6 P0MA-M 0 AM Next Next Y Y+1+W1eWekeek B NBextNext 2 3 3 Press a/b to check. 2 Press R. Programme Info. Genre 5 Search for the genre setting. 12 Watching TV Selecting a programme using three digit services. B B Next Next 10 AM 11 0 PM 1 2 3 BBC TWO 002 BBC THREE 007 This is BBC ... or b are displayed on this page are explained using EPG Basic Operation The illustrations on the left of the current time span, the timer setting screen is displayed (Page 13). Programme Information 040 BBC News 24 BBC News 10 : 00AM - 1 : 00 AM Programme Info. E ...
... 6 PM 6 P0MA-M 0 AM Next Next Y Y+1+W1eWekeek B NBextNext 2 3 3 Press a/b to check. 2 Press R. Programme Info. Genre 5 Search for the genre setting. 12 Watching TV Selecting a programme using three digit services. B B Next Next 10 AM 11 0 PM 1 2 3 BBC TWO 002 BBC THREE 007 This is BBC ... or b are displayed on this page are explained using EPG Basic Operation The illustrations on the left of the current time span, the timer setting screen is displayed (Page 13). Programme Information 040 BBC News 24 BBC News 10 : 00AM - 1 : 00 AM Programme Info. E ...
Operation Manual
Page 15
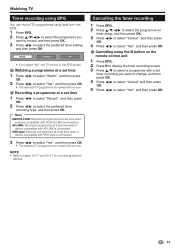
... select "Cancel", and then press OK. 4 Press c/d to select "Yes", and then press OK. E Recording a programme at a set time when a device compatible with an icon. AV LINK: Records a programme at a set time when a device compatible with VHS tape is connected. 3 Press c/d to select "Yes", and then press OK. • The...• If you select "No", the TV returns to pages 15-17 and 20-21 for connecting external devices. VHS tape: Records a programme at a set timer recording you want to change, and then press OK. 4 Press c/d to select "Cancel" and then press OK. 5 Press c/d to select the ...
... select "Cancel", and then press OK. 4 Press c/d to select "Yes", and then press OK. E Recording a programme at a set time when a device compatible with an icon. AV LINK: Records a programme at a set time when a device compatible with VHS tape is connected. 3 Press c/d to select "Yes", and then press OK. • The...• If you select "No", the TV returns to pages 15-17 and 20-21 for connecting external devices. VHS tape: Records a programme at a set timer recording you want to change, and then press OK. 4 Press c/d to select "Cancel" and then press OK. 5 Press c/d to select the ...
Operation Manual
Page 18
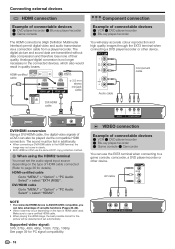
... AUDIO Y PB PR (CB) (CR) COMPONENT DVI/HDMI conversion Using a DVI/HDMI cable, the digital video signals of a DVD can also be detected and set the audio signal input source depending on the type of HDMI cable used. HDMI-certified cable Go to "MENU" > "Option" > "PC Audio Select" > ...player/recorder or other device. Make sure to use the EXT8 terminal when connecting to page 36 for PC signal compatibility. 16 The sound must set automatically. VIDEO connection Example of connectable devices E VCR E DVD player/recorder E Blu-ray player/recorder E Game console E Camcorder You can ...
... AUDIO Y PB PR (CB) (CR) COMPONENT DVI/HDMI conversion Using a DVI/HDMI cable, the digital video signals of a DVD can also be detected and set the audio signal input source depending on the type of HDMI cable used. HDMI-certified cable Go to "MENU" > "Option" > "PC Audio Select" > ...player/recorder or other device. Make sure to use the EXT8 terminal when connecting to page 36 for PC signal compatibility. 16 The sound must set automatically. VIDEO connection Example of connectable devices E VCR E DVD player/recorder E Blu-ray player/recorder E Game console E Camcorder You can ...

Operation Manual
Page 19
... to the EXT2 terminal with a fully wired SCART cable. • The use of the AV Link function is connected in "Manual Adjust" in the "Analogue Setting" menu (Page 28). • TV-VCR advanced AV Link systems may be compatible with some external sources. • You cannot connect the VCR with decoder...
... to the EXT2 terminal with a fully wired SCART cable. • The use of the AV Link function is connected in "Manual Adjust" in the "Analogue Setting" menu (Page 28). • TV-VCR advanced AV Link systems may be compatible with some external sources. • You cannot connect the VCR with decoder...
Operation Manual
Page 20
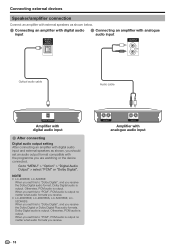
... to "Dolby Digital", and you receive the Dolby Digital audio format, Dolby Digital audio is output. NOTE • LC-46D65E, LC-52D65E: When you set this to "MENU" > "Option" > "Digital Audio Output" > select "PCM" or "Dolby Digital". When you are watching or the device connected....with analogue input audio input Optical audio cable Audio cable DIGITAL AUDIO IN Amplifier with digital audio input E After connecting Digital audio output setting After connecting an amplifier with digital audio input and external speakers as shown below. Otherwise, PCM audio is output. Go to "PCM...
... to "Dolby Digital", and you receive the Dolby Digital audio format, Dolby Digital audio is output. NOTE • LC-46D65E, LC-52D65E: When you set this to "MENU" > "Option" > "Digital Audio Output" > select "PCM" or "Dolby Digital". When you are watching or the device connected....with analogue input audio input Optical audio cable Audio cable DIGITAL AUDIO IN Amplifier with digital audio input E After connecting Digital audio output setting After connecting an amplifier with digital audio input and external speakers as shown below. Otherwise, PCM audio is output. Go to "PCM...

Operation Manual
Page 23
... Control", and then press OK. 5 Press c/d to select "Selecting Recorder", and then press OK. 3 Select the recorder, and then press OK. While the TV is set to "On", the connected HDMI devises' power will be turned on in AQUOS LINK Control. 2 Press a/b to select "Auto Power On", and then press OK...-certified cable HDMI-certified cable AQUOS BD Player/ AQUOS Recorder AQUOS LINK Setup AQUOS AUDIO speaker system AQUOS BD Player/ AQUOS Recorder AQUOS LINK Control Set to "On" to select "On", and then press OK. 21
... Control", and then press OK. 5 Press c/d to select "Selecting Recorder", and then press OK. 3 Select the recorder, and then press OK. While the TV is set to "On", the connected HDMI devises' power will be turned on in AQUOS LINK Control. 2 Press a/b to select "Auto Power On", and then press OK...-certified cable HDMI-certified cable AQUOS BD Player/ AQUOS Recorder AQUOS LINK Setup AQUOS AUDIO speaker system AQUOS BD Player/ AQUOS Recorder AQUOS LINK Control Set to "On" to select "On", and then press OK. 21
Operation Manual
Page 25
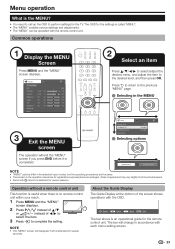
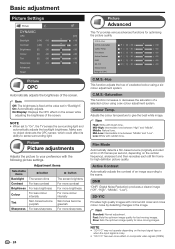
... the bottom of c/d to select the item. 3 Press b to complete the setting. Picture DYNAMIC OPC [Off] Backlight [+14] -16 +16 Contrast [+30] 0 +40 Brightness [0] -30 +30 Colour [0] -30 +30 Tint [0] -30 +30 Sharpness [0] -10 +10 Advanced Reset 2 Select an item Press a/b/c/d to select/adjust... OSD. : Select OK : Enter 6 : Back MENU : End The bar above is an operational guide for the settings is called "MENU". • The "MENU" enables various settings and adjustments. • The "MENU" can be selected for the TV. Digital Search Analogue Search NOTE • "...
... the bottom of c/d to select the item. 3 Press b to complete the setting. Picture DYNAMIC OPC [Off] Backlight [+14] -16 +16 Contrast [+30] 0 +40 Brightness [0] -30 +30 Colour [0] -30 +30 Tint [0] -30 +30 Sharpness [0] -10 +10 Advanced Reset 2 Select an item Press a/b/c/d to select/adjust... OSD. : Select OK : Enter 6 : Back MENU : End The bar above is an operational guide for the settings is called "MENU". • The "MENU" enables various settings and adjustments. • The "MENU" can be selected for the TV. Digital Search Analogue Search NOTE • "...
Operation Manual
Page 26
... colour noise by detecting changes in "Backlight". Low: White with the following picture settings. Item Off: The brightness is noisy. • "3D-Y/C" has even more sharpness 24 Picture Advanced This TV provides various advanced functions for fast-moving images. Colour Temp... picture to your preference with reddish tone. Basic adjustment Picture Settings Picture DYNAMIC OPC [Off] Backlight [+14] -16 +16 Contrast [+30] 0 +40 Brightness [0] -30 +30 Colour [0] -30 +30 Tint [0] -30 +30 Sharpness [0] -10 +10 Advanced Reset Picture OPC Automatically adjusts the...
... colour noise by detecting changes in "Backlight". Low: White with the following picture settings. Item Off: The brightness is noisy. • "3D-Y/C" has even more sharpness 24 Picture Advanced This TV provides various advanced functions for fast-moving images. Colour Temp... picture to your preference with reddish tone. Basic adjustment Picture Settings Picture DYNAMIC OPC [Off] Backlight [+14] -16 +16 Contrast [+30] 0 +40 Brightness [0] -30 +30 Colour [0] -30 +30 Tint [0] -30 +30 Sharpness [0] -10 +10 Advanced Reset Picture OPC Automatically adjusts the...
Operation Manual
Page 27
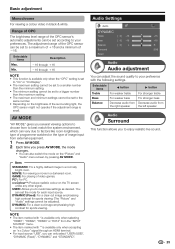
... on the brightness of image input from to best match the system environment, which can only select "USER (USB)", "DYNAMIC (Fixed)", "DYNAMIC" and "STANDARD". Audio Settings Audio DYNAMIC Treble [ 0] -15 +15 Bass [ 0] -15 +15 Balance [ 0] L R Surround [Off] Reset Audio Audio adjustment You can adjust the sound quality to factors like room...
... on the brightness of image input from to best match the system environment, which can only select "USER (USB)", "DYNAMIC (Fixed)", "DYNAMIC" and "STANDARD". Audio Settings Audio DYNAMIC Treble [ 0] -15 +15 Bass [ 0] -15 +15 Balance [ 0] L R Surround [Off] Reset Audio Audio adjustment You can adjust the sound quality to factors like room...

Operation Manual
Page 28
...time expires, the remaining time displays each minute. 26 ECO No Operation Off The TV will automatically enter standby mode if there is set a time when the TV automatically enters standby mode. Advanced: Reduces the backlight brightness by 20%. E "Energy Save" status icons... Icon Description "Energy Save" is no operations are performed during the time span you set , countdown automatically starts. • Five minutes before the preset of "Backlight" in the "Picture" menu and channel information windows as shown...
...time expires, the remaining time displays each minute. 26 ECO No Operation Off The TV will automatically enter standby mode if there is set a time when the TV automatically enters standby mode. Advanced: Reduces the backlight brightness by 20%. E "Energy Save" status icons... Icon Description "Energy Save" is no operations are performed during the time span you set , countdown automatically starts. • Five minutes before the preset of "Backlight" in the "Picture" menu and channel information windows as shown...

Operation Manual
Page 29
.... Service Service No. Buttons for each service using 0-9 numeric buttons. • You can set the Home/Store setting and the country setting in "Auto Installation" in the country setting. E Manual Adjust Configure various settings for Manual Adjust operation Lock: Press R button. DTV 994 SIT 2 DTV 995 SIT 1... a service number only when the five Nordic countries have been selected in the "Setup" menu. Basic adjustment Channel Settings Auto Installation Setup Auto Installation The TV automatically detects and stores all desired service items are passed over when pressing Pr...
.... Service Service No. Buttons for each service using 0-9 numeric buttons. • You can set the Home/Store setting and the country setting in "Auto Installation" in the country setting. E Manual Adjust Configure various settings for Manual Adjust operation Lock: Press R button. DTV 994 SIT 2 DTV 995 SIT 1... a service number only when the five Nordic countries have been selected in the "Setup" menu. Basic adjustment Channel Settings Auto Installation Setup Auto Installation The TV automatically detects and stores all desired service items are passed over when pressing Pr...

Operation Manual
Page 30
...the selected channel. NOTE • Adjust while checking the background picture as a reference. • Instead of the channel with "Skip" set the channel name. Select the optimum colour system to "On" are erased. 28 NOTE • The name can be erased individually. ...Sound sys. (Broadcasting systems) Select the optimum sound systems (Broadcasting systems) to the desired position. Basic adjustment Analogue channel settings Setup Programme Setup Analogue Setting You can change channel names individually. 1 Press a/b/c/d to select each character of the new name for a channel, "Child...
...the selected channel. NOTE • Adjust while checking the background picture as a reference. • Instead of the channel with "Skip" set the channel name. Select the optimum colour system to "On" are erased. 28 NOTE • The name can be erased individually. ...Sound sys. (Broadcasting systems) Select the optimum sound systems (Broadcasting systems) to the desired position. Basic adjustment Analogue channel settings Setup Programme Setup Analogue Setting You can change channel names individually. 1 Press a/b/c/d to select each character of the new name for a channel, "Child...

Operation Manual
Page 31
... you press 2 on the remote control unit. It prevents children from viewing in DTV and ATV mode). Off 1st Language 2nd Language E Set "For hearing impaired" to display the PIN input window. NOTE • "Universal viewing" and "Parental approval pref." Press 6 to "...Off: Unlocks the buttons. Button Control Lock: Locks the buttons on the remote control unit, the subtitle switches. Digital Setup Subtitle Set up to two preferred subtitle languages (including subtitles for locking channels from watching violent or sexual scenes that children cannot reach. NOTE ...
... you press 2 on the remote control unit. It prevents children from viewing in DTV and ATV mode). Off 1st Language 2nd Language E Set "For hearing impaired" to display the PIN input window. NOTE • "Universal viewing" and "Parental approval pref." Press 6 to "...Off: Unlocks the buttons. Button Control Lock: Locks the buttons on the remote control unit, the subtitle switches. Digital Setup Subtitle Set up to two preferred subtitle languages (including subtitles for locking channels from watching violent or sexual scenes that children cannot reach. NOTE ...


