

Operation Manual
Page 3
... Controlling HDMI devices using AQUOS LINK 20 AQUOS LINK connection 20 AQUOS LINK Setup 21 Operating an AQUOS LINK device 22 Menu operation 23 What is the MENU 23 Common operations 23 Basic adjustment 24 Picture Settings 24 AV MODE 25 Audio Settings 25 Power Save Settings 26 Channel Settings 27 Auto Installation 27 Digital channel settings 27 Analogue channel settings 28 Password/Parental lock settings 29 Language Settings (language, subtitle, multi audio) ..... 29 Useful Viewing functions 30 Selecting the picture size 30 Selecting the WSS (Wide Screen Signalling) picture...
... Controlling HDMI devices using AQUOS LINK 20 AQUOS LINK connection 20 AQUOS LINK Setup 21 Operating an AQUOS LINK device 22 Menu operation 23 What is the MENU 23 Common operations 23 Basic adjustment 24 Picture Settings 24 AV MODE 25 Audio Settings 25 Power Save Settings 26 Channel Settings 27 Auto Installation 27 Digital channel settings 27 Analogue channel settings 28 Password/Parental lock settings 29 Language Settings (language, subtitle, multi audio) ..... 29 Useful Viewing functions 30 Selecting the picture size 30 Selecting the WSS (Wide Screen Signalling) picture...
Operation Manual
Page 4
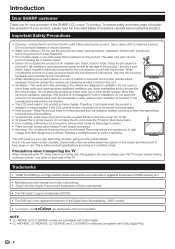
... containers on a wall, be moved with the product. To ensure safety and many years of troublefree operation of candle or naked flames on each side of blue, green or red. Use only a cart, stand, tripod, bracket or table recommended by holding it...power consumption always if main plug is within product specifications and does not constitute a fault. The LCD panel is dropped or impact applied. Be sure to the product. Important Safety Precautions • Cleaning-Unplug the AC cord from Dolby Laboratories. • "Dolby" and the double-D symbol are compatible with Dolby Digital...
... containers on a wall, be moved with the product. To ensure safety and many years of troublefree operation of candle or naked flames on each side of blue, green or red. Use only a cart, stand, tripod, bracket or table recommended by holding it...power consumption always if main plug is within product specifications and does not constitute a fault. The LCD panel is dropped or impact applied. Be sure to the product. Important Safety Precautions • Cleaning-Unplug the AC cord from Dolby Laboratories. • "Dolby" and the double-D symbol are compatible with Dolby Digital...
Operation Manual
Page 5
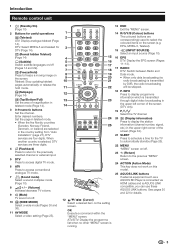
... "MENU" screen. R R/G/Y/B (Colour) buttons The coloured buttons are four digits. G AQUOS LINK buttons If external equipment such as a AQUOS BD Player is connected via HDMI cables and is transmitted through digital video broadcasting in the country setting from "Auto Installation" (page 27), DTV services are correspondingly used to freeze a moving image on the screen (e.g. See pages 20 and 22 for DTV (Page 14). I P. INFO Press to access conventional analogue TV mode. 7 2 (Sound mode...
... "MENU" screen. R R/G/Y/B (Colour) buttons The coloured buttons are four digits. G AQUOS LINK buttons If external equipment such as a AQUOS BD Player is connected via HDMI cables and is transmitted through digital video broadcasting in the country setting from "Auto Installation" (page 27), DTV services are correspondingly used to freeze a moving image on the screen (e.g. See pages 20 and 22 for DTV (Page 14). I P. INFO Press to access conventional analogue TV mode. 7 2 (Sound mode...
Operation Manual
Page 9
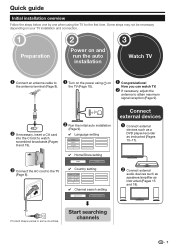
... searching channels 7 n Turn on the power using the TV for the first time. Quick guide Initial installation overview Follow the steps below one by one when using a on and run the auto installation 3 Watch TV n Connect an antenna cable to the antenna terminal (Page 8). o Connect external audio devices such as speakers/amplifier as instructed (Pages 15-17). o If necessary, insert a CA card into the CI slot to attain maximum signal reception...
... searching channels 7 n Turn on the power using the TV for the first time. Quick guide Initial installation overview Follow the steps below one by one when using a on and run the auto installation 3 Watch TV n Connect an antenna cable to the antenna terminal (Page 8). o Connect external audio devices such as speakers/amplifier as instructed (Pages 15-17). o If necessary, insert a CA card into the CI slot to attain maximum signal reception...
Operation Manual
Page 10
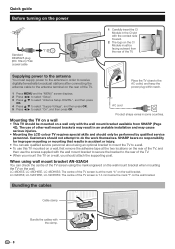
... skills and should be facing outward from SHARP (Page 42). Supplying power to the antenna You must supply power to the antenna in order to receive digitally/terrestrially broadcast stations after connecting the antenna cable to the rear of the TV. • When you mount the TV on the wall. Quick guide Before turning on the power Standard DIN45325 plug (IEC 169-2) 75 q coaxial cable 1 Carefully insert the CI Module in...
... skills and should be facing outward from SHARP (Page 42). Supplying power to the antenna You must supply power to the antenna in order to receive digitally/terrestrially broadcast stations after connecting the antenna cable to the rear of the TV. • When you mount the TV on the wall. Quick guide Before turning on the power Standard DIN45325 plug (IEC 169-2) 75 q coaxial cable 1 Carefully insert the CI Module in...

Operation Manual
Page 11
...: "DYNAMIC (Fixed)" will go off the power on the TV. • The initial auto installation wizard appears. 2 Setting the OSD language. If the "AV MODE" is no signal input from the TV or remote control unit for 30 minutes. 4 Setting the country. NOTE • If you should adjust the alignment of the antenna to receive a good reception while checking the antenna setup screen. 1 Press MENU and the "MENU" screen displays. 2 Press...
...: "DYNAMIC (Fixed)" will go off the power on the TV. • The initial auto installation wizard appears. 2 Setting the OSD language. If the "AV MODE" is no signal input from the TV or remote control unit for 30 minutes. 4 Setting the country. NOTE • If you should adjust the alignment of the antenna to receive a good reception while checking the antenna setup screen. 1 Press MENU and the "MENU" screen displays. 2 Press...

Operation Manual
Page 13
... check the schedule of DTV/RADIO/DATA, view detailed information about them, tune to the process of time spans for display on the screen. EPG display settings E EPG Setup (setting for digital stations, select "Yes". Watching TV EPG (Electronic Programme Guide) EPG (Electronic Programme Guide) is a programme list that is in standby mode. Mode3: Changes to use the EPG for receiving EPG data) If you frequently watch...
... check the schedule of DTV/RADIO/DATA, view detailed information about them, tune to the process of time spans for display on the screen. EPG display settings E EPG Setup (setting for digital stations, select "Yes". Watching TV EPG (Electronic Programme Guide) EPG (Electronic Programme Guide) is a programme list that is in standby mode. Mode3: Changes to use the EPG for receiving EPG data) If you frequently watch...
Operation Manual
Page 18
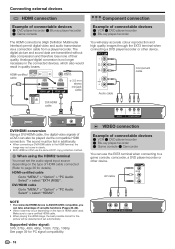
... type of HDMI cable connected (Refer to a game console, camcorder, a DVD player/recorder or other device. DVI/HDMI cable Go to "MENU" > "Option" > "PC Audio Select" > select "EXT4 (RGB)". Make sure to use the EXT8 terminal when connecting to page 36 for details). Component cable Audio cable DVI/HDMI cable R L AUDIO Y PB PR (CB) (CR) COMPONENT DVI/HDMI conversion Using a DVI/HDMI cable, the digital video signals of a DVD can use a certified HDMI cable. • When playing the HDMI image, the best possible format for PC signal compatibility...
... type of HDMI cable connected (Refer to a game console, camcorder, a DVD player/recorder or other device. DVI/HDMI cable Go to "MENU" > "Option" > "PC Audio Select" > select "EXT4 (RGB)". Make sure to use the EXT8 terminal when connecting to page 36 for details). Component cable Audio cable DVI/HDMI cable R L AUDIO Y PB PR (CB) (CR) COMPONENT DVI/HDMI conversion Using a DVI/HDMI cable, the digital video signals of a DVD can use a certified HDMI cable. • When playing the HDMI image, the best possible format for PC signal compatibility...

Operation Manual
Page 19
... compatible with some external sources. • You cannot connect the VCR with decoder using a fully wired SCART cable when selecting "Y/C" under "EXT2" in standby mode, it is in the "Input Select" menu. NOTE • Refer to the operation manuals of external equipment for smooth connections between the TV and other audiovisual equipment. VCR, DVD player/recorder). WYSIWYR (What You See Is What You Record) When the remote control...
... compatible with some external sources. • You cannot connect the VCR with decoder using a fully wired SCART cable when selecting "Y/C" under "EXT2" in standby mode, it is in the "Input Select" menu. NOTE • Refer to the operation manuals of external equipment for smooth connections between the TV and other audiovisual equipment. VCR, DVD player/recorder). WYSIWYR (What You See Is What You Record) When the remote control...
Operation Manual
Page 22
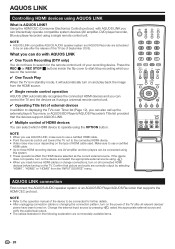
... cables illustrated in standby mode, it will automatically turn on the power of the TV after all connected HDMI devices before turning on sale after the release of this system. • These operations affect the HDMI device selected as if using a universal remote control unit. ✔ Operating Title list of HDMI devices You can interactively operate compatible system devices (AV amplifier, DVD player/recorder, Blu-ray player/recorder) using a single remote control unit. Change the external input source by...
... cables illustrated in standby mode, it will automatically turn on the power of the TV after all connected HDMI devices before turning on sale after the release of this system. • These operations affect the HDMI device selected as if using a universal remote control unit. ✔ Operating Title list of HDMI devices You can interactively operate compatible system devices (AV amplifier, DVD player/recorder, Blu-ray player/recorder) using a single remote control unit. Change the external input source by...
Operation Manual
Page 24
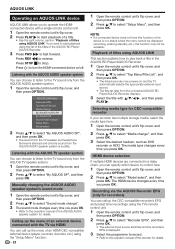
... media type here. 1 Open the remote control unit's flip cover, and then press OPTION. 2 Press a/b to select "Media change Setup Menu Model select 2 Press a/b to select "By AQUOS AUDIO SP", and then press OK. • The sound from the TV speaker and headphone terminal is silenced and only the sound from the connected AQUOS BD Player/AQUOS Recorder displays. 3 Select the title with a/b/c/d, and then press PLAY...
... media type here. 1 Open the remote control unit's flip cover, and then press OPTION. 2 Press a/b to select "Media change Setup Menu Model select 2 Press a/b to select "By AQUOS AUDIO SP", and then press OK. • The sound from the TV speaker and headphone terminal is silenced and only the sound from the connected AQUOS BD Player/AQUOS Recorder displays. 3 Select the title with a/b/c/d, and then press PLAY...

Operation Manual
Page 29
... Use this menu to reconfigure those settings, automatically execute initial auto installation after executing "Reset" from the "Setup" menu. • The current country setting is set to the desired position, and then press OK. Services with a service number only when the five Nordic countries have been selected in the country setting. CH Skip: Press G button. Each time the colour button is locked, you must enter your area. Basic adjustment Channel Settings Auto Installation Setup Auto Installation...
... Use this menu to reconfigure those settings, automatically execute initial auto installation after executing "Reset" from the "Setup" menu. • The current country setting is set to the desired position, and then press OK. Services with a service number only when the five Nordic countries have been selected in the country setting. CH Skip: Press G button. Each time the colour button is locked, you must enter your area. Basic adjustment Channel Settings Auto Installation Setup Auto Installation...

Operation Manual
Page 30
... is turned off. E Erase Programme Channels can change channel names individually. 1 Press a/b/c/d to select each character of the new name for a channel, "Child lock has been activated" displays, and the image and sound of any channel. Sound sys. (Broadcasting systems) Select the optimum sound systems (Broadcasting systems) to receive ("Auto", "PAL", "SECAM"). Decoder When connecting a decoder to the TV, you want to set the channel name...
... is turned off. E Erase Programme Channels can change channel names individually. 1 Press a/b/c/d to select each character of the new name for a channel, "Child lock has been activated" displays, and the image and sound of any channel. Sound sys. (Broadcasting systems) Select the optimum sound systems (Broadcasting systems) to receive ("Auto", "PAL", "SECAM"). Decoder When connecting a decoder to the TV, you want to set the channel name...

Operation Manual
Page 31
... settings from changing the channel or volume. Off 1st Language 2nd Language E Set "For hearing impaired" to display the PIN input window. Press 6 to "Yes" Subtitles for menu operation using 0-9 numeric buttons. 2 Enter the same four-digit number as in France. • Refer to be restricted. NOTE • "Universal viewing" and "Parental approval pref." Item Off: Unlocks the buttons. Press the MENU button on the TV. Language Settings (language, subtitle, multi audio) Setup...
... settings from changing the channel or volume. Off 1st Language 2nd Language E Set "For hearing impaired" to display the PIN input window. Press 6 to "Yes" Subtitles for menu operation using 0-9 numeric buttons. 2 Enter the same four-digit number as in France. • Refer to be restricted. NOTE • "Universal viewing" and "Parental approval pref." Item Off: Unlocks the buttons. Press the MENU button on the TV. Language Settings (language, subtitle, multi audio) Setup...
Operation Manual
Page 35
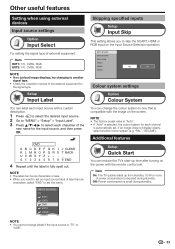
... input source. 2 Go to "MENU" > "Setup" > "Input Label". 3 Press a/b/c/d to select each input source with the image on the power with the remote control unit. Item On: The TV quickly starts up time after turning on the screen. If an image does not display clearly, select another signal type. • Check the operation manual of the external equipment for each channel is "TV" or "USB". "PAL", "SECAM"). Off: Power consumption is required during standby...
... input source. 2 Go to "MENU" > "Setup" > "Input Label". 3 Press a/b/c/d to select each input source with the image on the power with the remote control unit. Item On: The TV quickly starts up time after turning on the screen. If an image does not display clearly, select another signal type. • Check the operation manual of the external equipment for each channel is "TV" or "USB". "PAL", "SECAM"). Off: Power consumption is required during standby...
Operation Manual
Page 36
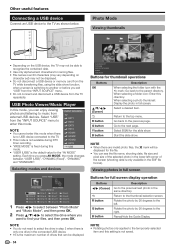
... MODE, the mode changes between "Photo Mode" and "Music Mode", and then press OK. 2 Press a/b/c/d to select the drive where you exit "USB" from the "INPUT SOURCE" menu. • Do not connect and disconnect a USB device from the TV while transferring files, using the slide show function, when a screen is switching to the temporarily selected item and this mode. Viewing photos in full screen. Reveal/hide the Guide Display. USB...
... MODE, the mode changes between "Photo Mode" and "Music Mode", and then press OK. 2 Press a/b/c/d to select the drive where you exit "USB" from the "INPUT SOURCE" menu. • Do not connect and disconnect a USB device from the TV while transferring files, using the slide show function, when a screen is switching to the temporarily selected item and this mode. Viewing photos in full screen. Reveal/hide the Guide Display. USB...
Operation Manual
Page 41
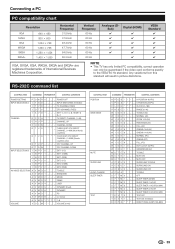
... limited PC compatibility, correct operation can only be guaranteed if the video card conforms exactly to the VESA 60 Hz standard. RS-232C command list CONTROL ITEM COMMAND PARAMETER CONTROL CONTENTS POWER SETTING P O W R 0 _ _ _ POWER OFF INPUT SELECTION A I T G D _ _ _ _ INPUT SWITCHING (TOGGLE) I T V D _ _ _ _ TV (CHANNEL FIXED) I D T V _ _ _ _ DTV (CHANNEL FIXED) I A V D * _ _ _ EXT1-4, 8 (1-4, 8), HDMI1-3 (5-7) CHANNEL D C C H * * _ _ TV DIRECT CHANNEL (1-99) C H U P _ _ _ _ CHANNEL UP C H D W _ _ _ _ CHANNEL DOWN D T V D * * * _ THREE DIGIT DTV DIRECT CHANNEL (1-999) (Non...
... limited PC compatibility, correct operation can only be guaranteed if the video card conforms exactly to the VESA 60 Hz standard. RS-232C command list CONTROL ITEM COMMAND PARAMETER CONTROL CONTENTS POWER SETTING P O W R 0 _ _ _ POWER OFF INPUT SELECTION A I T G D _ _ _ _ INPUT SWITCHING (TOGGLE) I T V D _ _ _ _ TV (CHANNEL FIXED) I D T V _ _ _ _ DTV (CHANNEL FIXED) I A V D * _ _ _ EXT1-4, 8 (1-4, 8), HDMI1-3 (5-7) CHANNEL D C C H * * _ _ TV DIRECT CHANNEL (1-99) C H U P _ _ _ _ CHANNEL UP C H D W _ _ _ _ CHANNEL DOWN D T V D * * * _ THREE DIGIT DTV DIRECT CHANNEL (1-999) (Non...
Operation Manual
Page 42
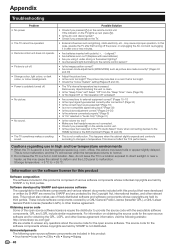
... product Software composition The software included in this may leave trails or appear slightly delayed. Appendix Troubleshooting Problem • No power. • The TV cannot be operated. • Remote control unit does not operate. • Picture is cut off. • Strange colour, light colour, or dark colour, or colour misalignment. • Power is suddenly turned off the power, or unplugging the AC cord and re-plugging...
... product Software composition The software included in this may leave trails or appear slightly delayed. Appendix Troubleshooting Problem • No power. • The TV cannot be operated. • Remote control unit does not operate. • Picture is cut off. • Strange colour, light colour, or dark colour, or colour misalignment. • Power is suddenly turned off the power, or unplugging the AC cord and re-plugging...
Operation Manual
Page 43
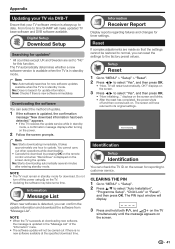
... download the software from "Message List". You cannot carry out other operations while downloading. • Cancels the download by pressing OK on the remote control unit when "Discontinue" is in standby mode. Do not turn off and then comes back on. Information Receiver Report Display reports regarding failures and changes for update information. displays on the screen. 3 Press c/d to select "Auto Installation", "Programme Setup", "Child Lock" or "Reset", and then press OK. Digital Setup Download Setup...
... download the software from "Message List". You cannot carry out other operations while downloading. • Cancels the download by pressing OK on the remote control unit when "Discontinue" is in standby mode. Do not turn off and then comes back on. Information Receiver Report Display reports regarding failures and changes for update information. displays on the screen. 3 Press c/d to select "Auto Installation", "Programme Setup", "Child Lock" or "Reset", and then press OK. Digital Setup Download Setup...
Operation Manual
Page 44
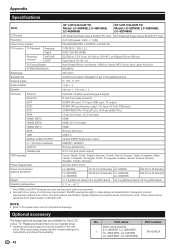
... Specifications Item LCD panel Resolution Video Colour System TV Function TV-Standard Analogue Digital Receiving Channel VHF/UHF CATV TV-Tuning System STEREO/BILINGUAL Brightness Backlight life Viewing angles Audio amplifier Speaker Terminals Antenna RS-232C EXT1 EXT2 EXT3 EXT4 HDMI1 (EXT5) HDMI2 (EXT6) HDMI3 (EXT7) EXT8 USB DIGITAL AUDIO OUTPUT C. NOTE • Refer to make design and specification changes for dimensional drawings. I. (Common Interface) OUTPUT Headphones OSD language Power...
... Specifications Item LCD panel Resolution Video Colour System TV Function TV-Standard Analogue Digital Receiving Channel VHF/UHF CATV TV-Tuning System STEREO/BILINGUAL Brightness Backlight life Viewing angles Audio amplifier Speaker Terminals Antenna RS-232C EXT1 EXT2 EXT3 EXT4 HDMI1 (EXT5) HDMI2 (EXT6) HDMI3 (EXT7) EXT8 USB DIGITAL AUDIO OUTPUT C. NOTE • Refer to make design and specification changes for dimensional drawings. I. (Common Interface) OUTPUT Headphones OSD language Power...


