

Operation Manual
Page 9
... (commercially available 14 Connecting the monitor to a power source 14 Turning the power on 14 Turning the power off 15 Adjusting the screen display and speaker volume 16 Adjusting the backlight 16 Adjusting the speaker volume 17 Setting display mode 17 Checking product information 17 Adjusting the screen display 18 Automatic screen adjustment 18 Manual screen adjustment 19 Monitor care 22 Monitor care 22 Storage 22 Troubleshooting 22 Information for customers on environmentally friendly disposal of this SHARP product 23 Specifications 24 Installing set-up information and...
... (commercially available 14 Connecting the monitor to a power source 14 Turning the power on 14 Turning the power off 15 Adjusting the screen display and speaker volume 16 Adjusting the backlight 16 Adjusting the speaker volume 17 Setting display mode 17 Checking product information 17 Adjusting the screen display 18 Automatic screen adjustment 18 Manual screen adjustment 19 Monitor care 22 Monitor care 22 Storage 22 Troubleshooting 22 Information for customers on environmentally friendly disposal of this SHARP product 23 Specifications 24 Installing set-up information and...

Operation Manual
Page 10
... not add extension cords. Operation manual (1) Notes: - Macintosh is high, or where the monitor may come into contact with oil or steam, as "Windows 3.1". The TFT color LCD panel used . - The Power Cord - Please check that these are included in this could lead to come into the AC outlet. However, there may be difficult to remain. - The quality of the monitor. - Analog signal cable (1) (model name: 0NIT15G4...
... not add extension cords. Operation manual (1) Notes: - Macintosh is high, or where the monitor may come into contact with oil or steam, as "Windows 3.1". The TFT color LCD panel used . - The Power Cord - Please check that these are included in this could lead to come into the AC outlet. However, there may be difficult to remain. - The quality of the monitor. - Analog signal cable (1) (model name: 0NIT15G4...

Operation Manual
Page 11
buttons When the OSD Menu is fixed so that it cannot be connected here. 7. Press the button again to the security lock anchor, the monitor is displayed: These buttons are used to adjust backlight brightness and speaker volume. 5. Analog RGB input terminal ..... The analog signal cable is lit green when in use and orange when in power-saving mode. 9. Ventilation openings Never block the ventilation openings as this button turns the power on. AUTO button This button is used to select menu options. MENU button This button is used to pop-up...
buttons When the OSD Menu is fixed so that it cannot be connected here. 7. Press the button again to the security lock anchor, the monitor is displayed: These buttons are used to adjust backlight brightness and speaker volume. 5. Analog RGB input terminal ..... The analog signal cable is lit green when in use and orange when in power-saving mode. 9. Ventilation openings Never block the ventilation openings as this button turns the power on. AUTO button This button is used to select menu options. MENU button This button is used to pop-up...

Operation Manual
Page 13
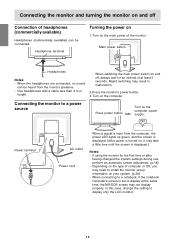
.... Connect the accessory audio cable When the accessory audio cable is connected to the analog RGB output terminal of the connected computer is output from the monitor speakers. Connecting the monitor to a computer Connect the accessory analog signal cable to the audio output terminal of the computer, the sound of the computer. Paying attention to the analog signal cable. Macintosh conversion adapter Note: - You can also use the headphone jack of the display. English Connecting the monitor and turning...
.... Connect the accessory audio cable When the accessory audio cable is connected to the analog RGB output terminal of the connected computer is output from the monitor speakers. Connecting the monitor to a computer Connect the accessory analog signal cable to the audio output terminal of the computer, the sound of the computer. Paying attention to the analog signal cable. Macintosh conversion adapter Note: - You can also use the headphone jack of the display. English Connecting the monitor and turning...
Operation Manual
Page 14
... the computer, the power LED lights up green, and the screen is displayed. (After power is turned on, it may take a little time until the screen is set -up information on your system. (p.26) - Turn on 1. ON Power terminal AC outlet Power cord When a signal is input from the monitor speakers. - When connecting to display at least 5 seconds. Main power switch Headphones Notes: - In this case, change the setting to a power source Press power button. Turn on the main...
... the computer, the power LED lights up green, and the screen is displayed. (After power is turned on, it may take a little time until the screen is set -up information on your system. (p.26) - Turn on 1. ON Power terminal AC outlet Power cord When a signal is input from the monitor speakers. - When connecting to display at least 5 seconds. Main power switch Headphones Notes: - In this case, change the setting to a power source Press power button. Turn on the main...

Operation Manual
Page 16
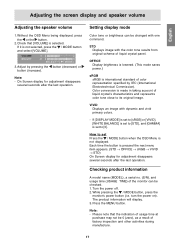
Adjusting the screen display and speaker volume Note: - Adjustment lock function By disabling the control buttons (i.e. While [ALL RESET] is selected. Remove the adjustment lock before attempting to operate control buttons. Check that [BRIGHT] is displayed, the control buttons are disabled. - Note: - On Screen display for adjustment disappears several seconds after turning the power off the monitor power. 2. While pressing the MENU button, press the power button (i.e. When the lock is in place. Turn off the monitor power. 2. Turn on the screen, the reset ...
Adjusting the screen display and speaker volume Note: - Adjustment lock function By disabling the control buttons (i.e. While [ALL RESET] is selected. Remove the adjustment lock before attempting to operate control buttons. Check that [BRIGHT] is displayed, the control buttons are disabled. - Note: - On Screen display for adjustment disappears several seconds after turning the power off the monitor power. 2. While pressing the MENU button, press the power button (i.e. When the lock is in place. Turn off the monitor power. 2. Turn on the screen, the reset ...
Operation Manual
Page 17
... the / MODE button and select [VOLUME]. 3. Please note that [VOLUME] is not displayed. VIVID Displays an image with the color tone results from original scheme of liquid crystal's characteristics and represents color tone close to set Press the / MODE button when the OSD Menu is selected. While pressing the / MODE button, press the monitor's power button (i.e. Adjusting the screen display and speaker volume English Adjusting the speaker volume 1. Setting display mode Color tone or brightness can be changed with one command. If [DISPLAY MODE] is set to...
... the / MODE button and select [VOLUME]. 3. Please note that [VOLUME] is not displayed. VIVID Displays an image with the color tone results from original scheme of liquid crystal's characteristics and represents color tone close to set Press the / MODE button when the OSD Menu is selected. While pressing the / MODE button, press the monitor's power button (i.e. Adjusting the screen display and speaker volume English Adjusting the speaker volume 1. Setting display mode Color tone or brightness can be changed with one command. If [DISPLAY MODE] is set to...

Operation Manual
Page 18
... such a case, try displaying an image that makes the entire screen very bright.) - When further fine adjustment is "D" drive. 1. When the computer's video input signals are using Windows, you may see the different color levels in the ADJUSTMENT Menu can use the Adjustment Pattern on the screen, and after the automatic adjustment. - Press the AUTO button. 2. It may not be possible to the specification of the computer. 2. moving pictures or the MS...
... such a case, try displaying an image that makes the entire screen very bright.) - When further fine adjustment is "D" drive. 1. When the computer's video input signals are using Windows, you may see the different color levels in the ADJUSTMENT Menu can use the Adjustment Pattern on the screen, and after the automatic adjustment. - Press the AUTO button. 2. It may not be possible to the specification of the computer. 2. moving pictures or the MS...

Operation Manual
Page 19
... by using Adjustment Pattern (for Windows). 19 Select the option by pressing the / MODE button. ADJUSTMENT Menu AUTO When [AUTO] is not emitted. ( buttons) Note: - Select the option by pressing the / MODE button. Horizontal flicker noise H-POS (horizontal positioning) and V-POS (vertical positioning) To center the Adjustment Pattern within the boundaries of the screen, adjust the left-right (HPOS) values and the up-down (V-POS) values. ( buttons) Screen frame Adjustment Pattern Notes: - English Adjusting the screen display Manual screen adjustment 1. Vertical flicker noise...
... by using Adjustment Pattern (for Windows). 19 Select the option by pressing the / MODE button. ADJUSTMENT Menu AUTO When [AUTO] is not emitted. ( buttons) Note: - Select the option by pressing the / MODE button. Horizontal flicker noise H-POS (horizontal positioning) and V-POS (vertical positioning) To center the Adjustment Pattern within the boundaries of the screen, adjust the left-right (HPOS) values and the up-down (V-POS) values. ( buttons) Screen frame Adjustment Pattern Notes: - English Adjusting the screen display Manual screen adjustment 1. Vertical flicker noise...

Operation Manual
Page 20
BLACK LEVEL Total screen brightness can be displayed. The WHITE BALANCE menu will display the setting values for green B-CONTRAST ...... Adjustment may not be displayed. Please perform manual adjustment instead. - COOL ... Color tone standard setting Color tone slightly redder than standard USER - button for blue-green button for blue 3. button for yellow button for red G-CONTRAST ..... On settings other setting than [STD] can not be made so that dark and bright images are easy to [STD]. - To display all gradations, set to see . If...
BLACK LEVEL Total screen brightness can be displayed. The WHITE BALANCE menu will display the setting values for green B-CONTRAST ...... Adjustment may not be displayed. Please perform manual adjustment instead. - COOL ... Color tone standard setting Color tone slightly redder than standard USER - button for blue-green button for blue 3. button for yellow button for red G-CONTRAST ..... On settings other setting than [STD] can not be made so that dark and bright images are easy to [STD]. - To display all gradations, set to see . If...

Operation Manual
Page 21
... 1 and 23 hours may not change ). 400LINES (degree of resolution) You can be adjusted. ( buttons) Note: - If selecting [ON], press the / MODE button and set the shut-off when the set it. The Language Selection Menu will display. 2. English Adjusting the screen display MODE SELECT-1 Menu MODE SELECT-2 Menu Note: - OSD H-POSITION (OSD horizontal position) The position of the monitor can specify the horizontal resolution of the screen during the last 5 minutes before the power shuts off, the OFF TIMER...
... 1 and 23 hours may not change ). 400LINES (degree of resolution) You can be adjusted. ( buttons) Note: - If selecting [ON], press the / MODE button and set the shut-off when the set it. The Language Selection Menu will display. 2. English Adjusting the screen display MODE SELECT-1 Menu MODE SELECT-2 Menu Note: - OSD H-POSITION (OSD horizontal position) The position of the monitor can specify the horizontal resolution of the screen during the last 5 minutes before the power shuts off, the OFF TIMER...
Operation Manual
Page 22
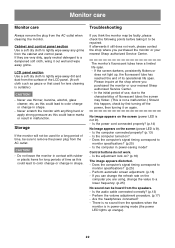
... this happen, check by first turning off the power, then turning it to monitor specifications? (p.25) - The monitor's fluorescent tubes have a limited life span. - No image appears on the screen (power LED is in shape. Control buttons do not work , please contact the shop where you purchased the monitor or your nearest Sharp authorized Service Center. - If they are using, change the value to color change or change in power-saving mode (the power LED lights up , the...
... this happen, check by first turning off the power, then turning it to monitor specifications? (p.25) - The monitor's fluorescent tubes have a limited life span. - No image appears on the screen (power LED is in shape. Control buttons do not work , please contact the shop where you purchased the monitor or your nearest Sharp authorized Service Center. - If they are using, change the value to color change or change in power-saving mode (the power LED lights up , the...

Operation Manual
Page 24
... excluding stand) (Excluding cables.) Dimensions (Units: mm) - to make design and specification changes for product improvement without prior notice. Analog signal cable: approx. 1.8 m - As a part of our policy of operating environment 5 - 35°C Power consumption 33 W (with no audio input) (36 W maximum, 1.8 W when in individual units. 24 Specifications Product specifications Model name LL-191A-W (White)/LL-191A-B (Black) LCD display 48 cm measured diagonally TFT LCD module Resolution (max.) SXGA 1280 x 1024 pixels Displayable colors...
... excluding stand) (Excluding cables.) Dimensions (Units: mm) - to make design and specification changes for product improvement without prior notice. Analog signal cable: approx. 1.8 m - As a part of our policy of operating environment 5 - 35°C Power consumption 33 W (with no audio input) (36 W maximum, 1.8 W when in individual units. 24 Specifications Product specifications Model name LL-191A-W (White)/LL-191A-B (Black) LCD display 48 cm measured diagonally TFT LCD module Resolution (max.) SXGA 1280 x 1024 pixels Displayable colors...

Operation Manual
Page 25
... DDC data 13 For Hsync signal input 14 For Vsync signal input 15 DDC clock - To activate the monitor's power management function, both the video card and the computer must conform to set the timing so that it can use this function if your computer's instruction manual to the VESA DPMS standard. Specifications Relevant signal timings Display mode VESA Hsync Vsync Dot frequency The analog RGB input connector pin (Mini D-sub connector with the...
... DDC data 13 For Hsync signal input 14 For Vsync signal input 15 DDC clock - To activate the monitor's power management function, both the video card and the computer must conform to set the timing so that it can use this function if your computer's instruction manual to the VESA DPMS standard. Specifications Relevant signal timings Display mode VESA Hsync Vsync Dot frequency The analog RGB input connector pin (Mini D-sub connector with the...

Operation Manual
Page 26
... on [Display a list of all use the ICC profile. - When [Models] is [D:], and click [OK]. 9. Using an application compatible with an ICC profile, highly accurate color reproduction can be realized. - Windows 98/2000/Me/XP all the drivers in a specific location, so you can select the driver you would like to install the ICC profile only, please refer to install the monitor set -up...
... on [Display a list of all use the ICC profile. - When [Models] is [D:], and click [OK]. 9. Using an application compatible with an ICC profile, highly accurate color reproduction can be realized. - Windows 98/2000/Me/XP all the drivers in a specific location, so you can select the driver you would like to install the ICC profile only, please refer to install the monitor set -up...

Operation Manual
Page 27
... [Properties], [Driver] and [Update Driver]. 6. Select the monitor details from :] is "D" drive. If [The Digital Signature Not Found] appears, click [Yes]. 11. Select the monitor details, then click [Next], [Next], and [Finish]. 10. Click [OK], and close the window. Click on [Display]. 4. Click [OK], and close the window. 27 English Installing set-up information and the ICC profile (For Windows) For Windows 2000 Installing monitor set -up...
... [Properties], [Driver] and [Update Driver]. 6. Select the monitor details from :] is "D" drive. If [The Digital Signature Not Found] appears, click [Yes]. 11. Select the monitor details, then click [Next], [Next], and [Finish]. 10. Click [OK], and close the window. Click on [Display]. 4. Click [OK], and close the window. 27 English Installing set-up information and the ICC profile (For Windows) For Windows 2000 Installing monitor set -up...
Operation Manual
Page 28
.... This explanation assumes that the CD-ROM drive is "D" drive. 1. Click [OK], and close the window. - Installing the ICC profile Installing the monitor's ICC profile. (If the set as follows: - [DISPLAY MODE]: [STD] or [OFFICE] - [WHITE BALANCE]: [STD] - [GAMMA]: [0] 28 Click on [Display]. 4. Choose [Control Panel]. 3. Click on [Set As Default]. 9. Choose the profile and click on the [Start] button. I will choose the driver to "Classic View". 4.
.... This explanation assumes that the CD-ROM drive is "D" drive. 1. Click [OK], and close the window. - Installing the ICC profile Installing the monitor's ICC profile. (If the set as follows: - [DISPLAY MODE]: [STD] or [OFFICE] - [WHITE BALANCE]: [STD] - [GAMMA]: [0] 28 Click on [Display]. 4. Choose [Control Panel]. 3. Click on [Set As Default]. 9. Choose the profile and click on the [Start] button. I will choose the driver to "Classic View". 4.

Operation Manual
Page 136
... New Hardware Wizard 1 D 2. 单击[Start Settings Control Panel 3. 双击[Display 4. 单击[Settings Advanced 然后[Monitor 5. 在[Options Automatically detect Plug & Play monitors Change 6. 单击[Next 7. 单击[Display a list of all the drivers in a specific location, so you can select the driver you want Next 8 Models Have disk Copy manufacturer's files from D OK...
... New Hardware Wizard 1 D 2. 单击[Start Settings Control Panel 3. 双击[Display 4. 单击[Settings Advanced 然后[Monitor 5. 在[Options Automatically detect Plug & Play monitors Change 6. 单击[Next 7. 单击[Display a list of all the drivers in a specific location, so you can select the driver you want Next 8 Models Have disk Copy manufacturer's files from D OK...

Operation Manual
Page 137
ICC Windows") 对于"Windows 2000" Windows 2000 ICC Windows D 对于"Windows Me" Windows Me ICC Windows D 1 D 2. 单击[Start Settings Control Panel 3. 双击[Display 4. 单击[Settings Advanced 然后[Monitor 5. 单击[Properties Driver Update Driver 6. 当[Upgrade Device Driver Wizard Next 7. 选择[Display a list of the known drivers for this device so that I can choose a specific driver Next 8 Models ...
ICC Windows") 对于"Windows 2000" Windows 2000 ICC Windows D 对于"Windows Me" Windows Me ICC Windows D 1 D 2. 单击[Start Settings Control Panel 3. 双击[Display 4. 单击[Settings Advanced 然后[Monitor 5. 单击[Properties Driver Update Driver 6. 当[Upgrade Device Driver Wizard Next 7. 选择[Display a list of the known drivers for this device so that I can choose a specific driver Next 8 Models ...
Operation Manual
Page 138
ICC Windows") 对于"Windows XP" Windows XP ICC "Windows D 1 D 2. 单击[Start Control Panel] 3. 切换到"Classic View 4. 双击[Display 5. 单击[Settings Advanced 然后[Monitor 6. 单击[Properties Driver Update Driver 7 Hardware Update Wizard Install from a list or specific location[Advanced Next 8. 选择[Don't search, I will choose the drive to install Next 9. 单击...
ICC Windows") 对于"Windows XP" Windows XP ICC "Windows D 1 D 2. 单击[Start Control Panel] 3. 切换到"Classic View 4. 双击[Display 5. 单击[Settings Advanced 然后[Monitor 6. 单击[Properties Driver Update Driver 7 Hardware Update Wizard Install from a list or specific location[Advanced Next 8. 选择[Don't search, I will choose the drive to install Next 9. 单击...


