
Operation Manual
Page 5
... your new SHARP Projector, using the projector, please read this operation manual carefully. REFER SERVICING TO QUALIFIED SERVICE PERSONNEL. U.S.A. U.S.A. Introduction ENGLISH There are designed to provide reasonable protection against harmful interference when the equipment is intended to alert the user to take adequate measures. DO NOT REMOVE SCREWS EXCEPT SPECIFIED USER SERVICE SCREW. ONLY WARNING: High brightness light source. CAUTION: TO REDUCE THE RISK OF ELECTRIC SHOCK, DO NOT REMOVE COVER. WARNING...
... your new SHARP Projector, using the projector, please read this operation manual carefully. REFER SERVICING TO QUALIFIED SERVICE PERSONNEL. U.S.A. U.S.A. Introduction ENGLISH There are designed to provide reasonable protection against harmful interference when the equipment is intended to alert the user to take adequate measures. DO NOT REMOVE SCREWS EXCEPT SPECIFIED USER SERVICE SCREW. ONLY WARNING: High brightness light source. CAUTION: TO REDUCE THE RISK OF ELECTRIC SHOCK, DO NOT REMOVE COVER. WARNING...

Operation Manual
Page 6
... PARTICLES IF LAMP HAS RUPTURED. SEE OPERATION MANUAL. A MANIPULER AVEC PRECAUTION, SE REPORTER AU MODE D'EMPLOI. When you check the setup procedure. Caution Concerning Lamp Replacement See "Replacing the Lamp" on the projector will help you attach the "QUICK GUIDE" Label on the projector, be regulated due to run for about 90 seconds after the projector is turned off always use the POWER OFF button on the projector or on...
... PARTICLES IF LAMP HAS RUPTURED. SEE OPERATION MANUAL. A MANIPULER AVEC PRECAUTION, SE REPORTER AU MODE D'EMPLOI. When you check the setup procedure. Caution Concerning Lamp Replacement See "Replacing the Lamp" on the projector will help you attach the "QUICK GUIDE" Label on the projector, be regulated due to run for about 90 seconds after the projector is turned off always use the POWER OFF button on the projector or on...

Operation Manual
Page 7
..., 720P and 480P) • Computer input compatible (VGA, SVGA, XGA, SXGA and SXGA+) 6. Simply and Easy Operation • Color-coded connections allows for hassle-free set-up. • Frequently used buttons, lens placement are positioned for image size of 165 W SHP lamp achieves excellent color uniformity and high brightness. • The Eco mode function reduces noise levels and power consumption while also extending lamp life. 5. Comfortable Operation, Classroom and Meeting Room Friendly •...
..., 720P and 480P) • Computer input compatible (VGA, SVGA, XGA, SXGA and SXGA+) 6. Simply and Easy Operation • Color-coded connections allows for hassle-free set-up. • Frequently used buttons, lens placement are positioned for image size of 165 W SHP lamp achieves excellent color uniformity and high brightness. • The Eco mode function reduces noise levels and power consumption while also extending lamp life. 5. Comfortable Operation, Classroom and Meeting Room Friendly •...

Operation Manual
Page 8
... Adjustment Settings 37 Computer Image Adjustment 38 Adjusting the Computer Image 38 Special Modes (Special Mode Settings 38 Signal Info (Checking the Input Signal 39 4 Easy to Use Functions Picture Display Mode 40 Switching the Picture Display Mode 40 Still and Zoom Image 42 Freezing a Moving Image 42 Displaying an Enlarged Portion of an Image 42 Keylock Function 43 Locking the operation Buttons 43 Taking the Keylock off 43 Using the "Options" Menu 44 Lamp Timer (Life) (Checking the Lamp Life Status 44 OSD Display (Setting On-screen Display 44 Video System (Setting the Video...
... Adjustment Settings 37 Computer Image Adjustment 38 Adjusting the Computer Image 38 Special Modes (Special Mode Settings 38 Signal Info (Checking the Input Signal 39 4 Easy to Use Functions Picture Display Mode 40 Switching the Picture Display Mode 40 Still and Zoom Image 42 Freezing a Moving Image 42 Displaying an Enlarged Portion of an Image 42 Keylock Function 43 Locking the operation Buttons 43 Taking the Keylock off 43 Using the "Options" Menu 44 Lamp Timer (Life) (Checking the Lamp Life Status 44 OSD Display (Setting On-screen Display 44 Video System (Setting the Video...
Operation Manual
Page 9
... Maintenance 52 Replacing the Air Filter 53 Cleaning and Replacing the Air Filter 53 Maintenance Indicators 55 Regarding the Lamp 57 Lamp 57 Caution Concerning the Lamp 57 Replacing the Lamp 57 Removing and Installing the Lamp Unit 58 Resetting the Lamp Timer 59 Connecting Pin Assignments 60 RS-232C Specifications and Command Settings 61 Computer Compatibility Chart 62 Troubleshooting 63 For SHARP Assistance 65 Specifications 66 Dimensions 67 Glossary 68 Index 69 This operation manual includes "Introduction...
... Maintenance 52 Replacing the Air Filter 53 Cleaning and Replacing the Air Filter 53 Maintenance Indicators 55 Regarding the Lamp 57 Lamp 57 Caution Concerning the Lamp 57 Replacing the Lamp 57 Removing and Installing the Lamp Unit 58 Resetting the Lamp Timer 59 Connecting Pin Assignments 60 RS-232C Specifications and Command Settings 61 Computer Compatibility Chart 62 Troubleshooting 63 For SHARP Assistance 65 Specifications 66 Dimensions 67 Glossary 68 Index 69 This operation manual includes "Introduction...

Operation Manual
Page 12
... the power cord back in other audio-visual equipment to the projector, make the connections. Take extra care with extremes of temperature. age of the air vents, " " and " " will return the projector to the normal operating condition. See "Replacing the Lamp" on the screen washes out the colors, making viewing difficult. The projector may change during projection or cooling fan operation. Rest your nearest Sharp Authorized Projector Dealer or Service Center for...
... the power cord back in other audio-visual equipment to the projector, make the connections. Take extra care with extremes of temperature. age of the air vents, " " and " " will return the projector to the normal operating condition. See "Replacing the Lamp" on the screen washes out the colors, making viewing difficult. The projector may change during projection or cooling fan operation. Rest your nearest Sharp Authorized Projector Dealer or Service Center for...
Operation Manual
Page 14
... 03.2.4, 2:01 PM AUTO SYNC button 38 For automatically adjusting images when connected to a computer. 55 Lamp replacement indicator Illuminates green indicating normal function. Part Names Numbers in refer to the main pages in place. • Press on the two buttons of the lens cap and remove it from the lens. 22 Zoom knob 22 Focus ring Speaker 21 Foot release 21 Front adjustment foot 53 Air filter/cooling fan (Intake vent) (on...
... 03.2.4, 2:01 PM AUTO SYNC button 38 For automatically adjusting images when connected to a computer. 55 Lamp replacement indicator Illuminates green indicating normal function. Part Names Numbers in refer to the main pages in place. • Press on the two buttons of the lens cap and remove it from the lens. 22 Zoom knob 22 Focus ring Speaker 21 Foot release 21 Front adjustment foot 53 Air filter/cooling fan (Intake vent) (on...
Operation Manual
Page 27
... image. If the projected im- Connections and Setup Setting up the screen in a sunny or bright room. • A polarizing screen cannot be used , when placing the projector in front of the screen. Light falling directly on the size of the screen. A10X_A10S#E_Print#p21_25.p65 23 23 03.2.4, 2:02 PM Note • The projector lens should be centered in the "PRJ Mode" menu. P.50 • Place the projector...
... image. If the projected im- Connections and Setup Setting up the screen in a sunny or bright room. • A polarizing screen cannot be used , when placing the projector in front of the screen. Light falling directly on the size of the screen. A10X_A10S#E_Print#p21_25.p65 23 23 03.2.4, 2:02 PM Note • The projector lens should be centered in the "PRJ Mode" menu. P.50 • Place the projector...

Operation Manual
Page 30
..., indicating the status of the lamp. Green: The lamp is turned off and immediately switched on page 48. Image Projection Basic Procedure Connect the required external equipment to illuminate. • When controlling the projector using RS-232C commands from a computer, wait for at the factory is English. Power ON button Power OFF button Lamp Power replacement indicator indicator INPUT button Volume buttons MWarming up and shutting down. Blinking in green: The lamp is warming up message Volume buttons MKeycode input box Power ON button AV MUTE button INPUT buttons...
..., indicating the status of the lamp. Green: The lamp is turned off and immediately switched on page 48. Image Projection Basic Procedure Connect the required external equipment to illuminate. • When controlling the projector using RS-232C commands from a computer, wait for at the factory is English. Power ON button Power OFF button Lamp Power replacement indicator indicator INPUT button Volume buttons MWarming up and shutting down. Blinking in green: The lamp is warming up message Volume buttons MKeycode input box Power ON button AV MUTE button INPUT buttons...
Operation Manual
Page 48
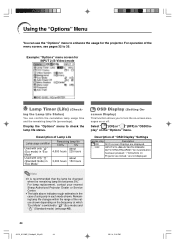
... turn the on-screen messages on Projector are locked." Remaining lamp life changes within the range of the values shown depending on the "Options" menu. Display the "Options" menu to enhance the usage for INPUT 2 (S-Video) mode Lamp Timer (Life) (Check- Description of using only in "Eco Mode" Remaining lamp life 100% 5% about 4,500 hours 225 hours about 3,000 hours 150 hours OSD Display (Setting On- ing the Lamp Life Status) You can use the "Options" menu to check the lamp life status. For lamp replacement, contact your nearest Sharp...
... turn the on-screen messages on Projector are locked." Remaining lamp life changes within the range of the values shown depending on the "Options" menu. Display the "Options" menu to enhance the usage for INPUT 2 (S-Video) mode Lamp Timer (Life) (Check- Description of using only in "Eco Mode" Remaining lamp life 100% 5% about 4,500 hours 225 hours about 3,000 hours 150 hours OSD Display (Setting On- ing the Lamp Life Status) You can use the "Options" menu to check the lamp life status. For lamp replacement, contact your nearest Sharp...

Operation Manual
Page 52
... images to set , the keycode inputting box appears after the right password is turned on the projector are used for setting the keycode. Select "Anti-Theft" on the remote control are used for setting the keycode. Note •"Anti-Theft" cannot be selected unless "Password" is set as keycodes: • POWER ON/OFF buttons • ENTER button • UNDO button • MENU button • FORWARD button • BACK button 2 Enter the remaining 3 digits...
... images to set , the keycode inputting box appears after the right password is turned on the projector are used for setting the keycode. Select "Anti-Theft" on the remote control are used for setting the keycode. Note •"Anti-Theft" cannot be selected unless "Password" is set as keycodes: • POWER ON/OFF buttons • ENTER button • UNDO button • MENU button • FORWARD button • BACK button 2 Enter the remaining 3 digits...

Operation Manual
Page 57
... out of use. Pressing the tab (2), remove the filter/lamp unit cover (3). 3 Remove the air filter. • Pick the air filter up with air filters to ensure the optimal operating condition of the projector. • The air filters should be cleaned every 100 hours of the filter/lamp unit cover. 3 2 1 User service screw Tab Appendix A10X_A10S#E_Print#p51_62.p65 53 53 03.2.4, 2:07 PM Power OFF button Power OFF button 2 Remove the filter/lamp unit cover. • Turn the projector over. ing fan stops. Wait...
... out of use. Pressing the tab (2), remove the filter/lamp unit cover (3). 3 Remove the air filter. • Pick the air filter up with air filters to ensure the optimal operating condition of the projector. • The air filters should be cleaned every 100 hours of the filter/lamp unit cover. 3 2 1 User service screw Tab Appendix A10X_A10S#E_Print#p51_62.p65 53 53 03.2.4, 2:07 PM Power OFF button Power OFF button 2 Remove the filter/lamp unit cover. • Turn the projector over. ing fan stops. Wait...

Operation Manual
Page 59
... air intake • Relocate the projector to blockage of the picture. Red on Time to change to " " (red), the lamp will illuminate in red when the projector is on the projector indicate problems inside the projector increases, due to an area with "Standard Mode" (see page 45). If the temperature keeps on the screen. I When the remaining lamp life becomes 5% or less, " " (yellow) will be shut off and the temperature warning indicator will blink, the cooling fan...
... air intake • Relocate the projector to blockage of the picture. Red on Time to change to " " (red), the lamp will illuminate in red when the projector is on the projector indicate problems inside the projector increases, due to an area with "Standard Mode" (see page 45). If the temperature keeps on the screen. I When the remaining lamp life becomes 5% or less, " " (yellow) will be shut off and the temperature warning indicator will blink, the cooling fan...

Operation Manual
Page 61
... by following the instructions described in the picture and color quality. Then carefully change the lamp by a 90-day parts and labor limited warranty. U.S.A. Purchase a replacement lamp unit of exposure to the gas, consult a doctor as soon as : excessive shock, improper cooling, surface scratches or deterioration of the lamp due to be operating normally. I When the lamp replacement indicator and on-screen display icon are...
... by following the instructions described in the picture and color quality. Then carefully change the lamp by a 90-day parts and labor limited warranty. U.S.A. Purchase a replacement lamp unit of exposure to the gas, consult a doctor as soon as : excessive shock, improper cooling, surface scratches or deterioration of the lamp due to be operating normally. I When the lamp replacement indicator and on-screen display icon are...

Operation Manual
Page 63
... power cord. • Plug the power cord into the lamp unit compartment. Info • Make sure to secure the filter/ lamp unit cover. Info • If the lamp unit and filter/lamp unit cover are not correctly installed, the power will not turn on the projector. • "LAMP 0000H" is displayed, indicating that the lamp timer is connected to become damaged or explode. A10X_A10S#E_Print#p51_62.p65 59 AC socket Power ON button Volume buttons AUTO SYNC button...
... power cord. • Plug the power cord into the lamp unit compartment. Info • Make sure to secure the filter/ lamp unit cover. Info • If the lamp unit and filter/lamp unit cover are not correctly installed, the power will not turn on the projector. • "LAMP 0000H" is displayed, indicating that the lamp timer is connected to become damaged or explode. A10X_A10S#E_Print#p51_62.p65 59 AC socket Power ON button Volume buttons AUTO SYNC button...
Operation Manual
Page 65
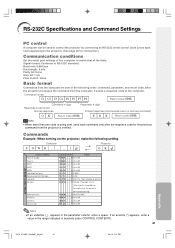
... the computer are sent in the following setting. Commands Example: When turning on the projector, make the following order: command, parameter, and return code. Computer P OWR _ _ _ 1 → ← Projector OK BUTTONS & REMOTE CONTROL KEY CONTROL CONTENTS Power Off (Standby) Power On INPUT1 INPUT2 INPUT3 Lamp Usage Time (hour) Remaining Lamp Life (Percentage) Lamp Status Unit Status Model Name Check AV Mute Off AV Mute On Auto Sync Start COMMAND PARAMETER RETURN P O W R _ _ _ 0 OK or ERR P O W R _ _ _ 1 OK or ERR I R G B _ _ _ 1 OK...
... the computer are sent in the following setting. Commands Example: When turning on the projector, make the following order: command, parameter, and return code. Computer P OWR _ _ _ 1 → ← Projector OK BUTTONS & REMOTE CONTROL KEY CONTROL CONTENTS Power Off (Standby) Power On INPUT1 INPUT2 INPUT3 Lamp Usage Time (hour) Remaining Lamp Life (Percentage) Lamp Status Unit Status Model Name Check AV Mute Off AV Mute On Auto Sync Start COMMAND PARAMETER RETURN P O W R _ _ _ 0 OK or ERR P O W R _ _ _ 1 OK or ERR I R G B _ _ _ 1 OK...

Operation Manual
Page 67
... sound or projector does not start. Troubleshooting Problem No picture and no picture appears. Power cannot be turned • The keylock is set. 43 on or off . • The selected input mode is wrong. • The AV MUTE function is working. • Cables incorrectly connected to rear panel of the projector. • Remote control batteries have run out. • External output has not been set when connecting notebook computer. • The filter/lamp...
... sound or projector does not start. Troubleshooting Problem No picture and no picture appears. Power cannot be turned • The keylock is set. 43 on or off . • The selected input mode is wrong. • The AV MUTE function is working. • Cables incorrectly connected to rear panel of the projector. • Remote control batteries have run out. • External output has not been set when connecting notebook computer. • The filter/lamp...

Operation Manual
Page 69
... [email protected].sharp.co.jp http://www.sharp-th.com Sharp Electronics Incorporated of New Zealand (09) 634-2059, (09) 636-6972 http://www.sharpnz.co.nz Sharp-Roxy Sales (S) Pte. For SHARP Assistance If you encounter any problems during setup or operation of this operation manual does not answer your question, please contact the SHARP Service departments listed below. Sharp Electronics (U.K.) Ltd...
... [email protected].sharp.co.jp http://www.sharp-th.com Sharp Electronics Incorporated of New Zealand (09) 634-2059, (09) 636-6972 http://www.sharpnz.co.nz Sharp-Roxy Sales (S) Pte. For SHARP Assistance If you encounter any problems during setup or operation of this operation manual does not answer your question, please contact the SHARP Service departments listed below. Sharp Electronics (U.K.) Ltd...

Operation Manual
Page 70
...(including adjustment foot and projecting parts) Weight (approx.) 6.4 lbs. (2.9 kg) Supplied accessories Remote control, Two R-6 batteries, Power cord for U.S., Canada etc. (6', 1.8 m), Power cord for Europe, except U.K. (6', 1.8 m), Power cord for U.K., Hong Kong and Singapore (6', 1.8 m), Power cord for Australia, New Zealand and Oceania (6', 1.8 m), RGB cable (9'10", 3.0 m), DIN-D-sub RS-232C adaptor (5 57/64", 15 cm), Carrying case, Lens cap (attached), Extra air filter, Projector manual and technical reference CD-ROM, "QUICK GUIDE" label, Operation manual Replacement parts Lamp unit (Lamp...
...(including adjustment foot and projecting parts) Weight (approx.) 6.4 lbs. (2.9 kg) Supplied accessories Remote control, Two R-6 batteries, Power cord for U.S., Canada etc. (6', 1.8 m), Power cord for Europe, except U.K. (6', 1.8 m), Power cord for U.K., Hong Kong and Singapore (6', 1.8 m), Power cord for Australia, New Zealand and Oceania (6', 1.8 m), RGB cable (9'10", 3.0 m), DIN-D-sub RS-232C adaptor (5 57/64", 15 cm), Carrying case, Lens cap (attached), Extra air filter, Projector manual and technical reference CD-ROM, "QUICK GUIDE" label, Operation manual Replacement parts Lamp unit (Lamp...

Operation Manual
Page 73
... INPUT button 27 Intake vent 52 Kensington Security Standard connector 11 Keylock 43 KEYSTONE button 29 Keystone correction 29 Lamp 57 Lamp replacement indicator 55 Lamp Timer (Life 44 Language (on-screen display language 28 Lens cap 10 Memory 37 MENU button 32 Menu Color 46 Menu Position 46 NORMAL 40 Optional accessories 14 Options 44 OSD Display 44 Password 47 PDF 9 Phase 38 Picture Adjustment 36 Power buttons 26 Power cord 15 Power indicator 26 PRJ mode (Reversing/Inverting Projected Images) .... 50 Red 36 Remote control 12 Remote control...
... INPUT button 27 Intake vent 52 Kensington Security Standard connector 11 Keylock 43 KEYSTONE button 29 Keystone correction 29 Lamp 57 Lamp replacement indicator 55 Lamp Timer (Life 44 Language (on-screen display language 28 Lens cap 10 Memory 37 MENU button 32 Menu Color 46 Menu Position 46 NORMAL 40 Optional accessories 14 Options 44 OSD Display 44 Password 47 PDF 9 Phase 38 Picture Adjustment 36 Power buttons 26 Power cord 15 Power indicator 26 PRJ mode (Reversing/Inverting Projected Images) .... 50 Red 36 Remote control 12 Remote control...

