Operation Manual
Page 1
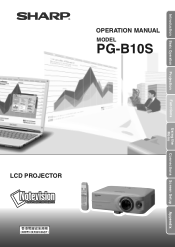
OPERATION MANUAL MODEL PG-B10S LCD PROJECTOR Introduction Basic Operation Projection Functions Using the Menu Connections Screen Setup Appendix
OPERATION MANUAL MODEL PG-B10S LCD PROJECTOR Introduction Basic Operation Projection Functions Using the Menu Connections Screen Setup Appendix
Operation Manual
Page 5
... ACT To ensure that you immediately receive the full benefit of the parts, service and labor warranty applicable to your new SHARP Projector, using the projector, please read this product to rain or moisture. CAUTION RISK OF ELECTRIC SHOCK. DO NOT REMOVE SCREWS EXCEPT SPECIFIED USER... correct the interference at his own expense. The exclamation point within the product's enclosure that children do not expose this operation manual carefully. Operation of the FCC Rules. WARNING: FCC Regulations state that the device complies with the limits for prompt warranty registration...
... ACT To ensure that you immediately receive the full benefit of the parts, service and labor warranty applicable to your new SHARP Projector, using the projector, please read this product to rain or moisture. CAUTION RISK OF ELECTRIC SHOCK. DO NOT REMOVE SCREWS EXCEPT SPECIFIED USER... correct the interference at his own expense. The exclamation point within the product's enclosure that children do not expose this operation manual carefully. Operation of the FCC Rules. WARNING: FCC Regulations state that the device complies with the limits for prompt warranty registration...

Operation Manual
Page 6
... D'ALIMENTATION AVANT DE RETIRER LA VIS. NE REMPLACER QUE PAR UNE LAMPE SHARP DE TYPE BQC-PGB10S//1. When Attaching the "QUICK GUIDE" Label Attaching the "QUICK GUIDE" Label (supplied) on the projector will not affect the picture quality or the life expectancy of Apple Computer...LAMPE A HAUTE PRESSION : RISQUE D'EXPLOSION. DANGER POTENTIEL DE PARTICULES DE VERRE EN CAS D'ECLATEMENT DE LA LAMPE. SEE OPERATION MANUAL. This SHARP projector uses an LCD (Liquid Crystal Display) panel. This unit has some inactive pixels within acceptable tolerances which may be regulated due to attach the ...
... D'ALIMENTATION AVANT DE RETIRER LA VIS. NE REMPLACER QUE PAR UNE LAMPE SHARP DE TYPE BQC-PGB10S//1. When Attaching the "QUICK GUIDE" Label Attaching the "QUICK GUIDE" Label (supplied) on the projector will not affect the picture quality or the life expectancy of Apple Computer...LAMPE A HAUTE PRESSION : RISQUE D'EXPLOSION. DANGER POTENTIEL DE PARTICULES DE VERRE EN CAS D'ECLATEMENT DE LA LAMPE. SEE OPERATION MANUAL. This SHARP projector uses an LCD (Liquid Crystal Display) panel. This unit has some inactive pixels within acceptable tolerances which may be regulated due to attach the ...

Operation Manual
Page 7
Introduction How to Read this Operation Manual • In this operation Info ........Indicates safeguards when using the buttons on the projector. 1 Press . • The "Picture" menu screen for INPUT 2 or 3. • For items on the menus, see the tree charts on pages 30 and 31.... "Fine Sync" menu is not available for the selected input mode is highlighted. The menu can also be operated to adjust the image and various projector settings. Note ........Indicates additional information on the right is displayed when the INPUT 1 (RGB) mode is selected. 2 Press \ or | to display the ...
Introduction How to Read this Operation Manual • In this operation Info ........Indicates safeguards when using the buttons on the projector. 1 Press . • The "Picture" menu screen for INPUT 2 or 3. • For items on the menus, see the tree charts on pages 30 and 31.... "Fine Sync" menu is not available for the selected input mode is highlighted. The menu can also be operated to adjust the image and various projector settings. Note ........Indicates additional information on the right is displayed when the INPUT 1 (RGB) mode is selected. 2 Press \ or | to display the ...
Operation Manual
Page 8
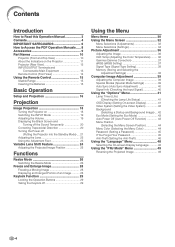
Contents Introduction How to Read this Operation Manual 3 Contents 4 IMPORTANT SAFEGUARDS 6 How to Access the PDF Operation Manuals ..... 8 Accessories 9 Part Names 10 Projector (Front and Top View 10 About the Indicators on the Projector 11 Projector (Rear View 12 INPUT/OUTPUT Terminals and Connectable Main Equipment 13 ...Control 15 Usable Range 15 Inserting the Batteries 15 Basic Operation Setup and Projection 16 Projection Image Projection 18 Turning the Projector on 18 Switching the INPUT Mode 19 Adjusting the Volume 19 Displaying the Black Screen and Turning off the Sound ...
Contents Introduction How to Read this Operation Manual 3 Contents 4 IMPORTANT SAFEGUARDS 6 How to Access the PDF Operation Manuals ..... 8 Accessories 9 Part Names 10 Projector (Front and Top View 10 About the Indicators on the Projector 11 Projector (Rear View 12 INPUT/OUTPUT Terminals and Connectable Main Equipment 13 ...Control 15 Usable Range 15 Inserting the Batteries 15 Basic Operation Setup and Projection 16 Projection Image Projection 18 Turning the Projector on 18 Switching the INPUT Mode 19 Adjusting the Volume 19 Displaying the Black Screen and Turning off the Sound ...
Operation Manual
Page 11
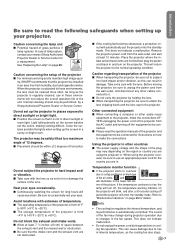
... vents. I Please read the following safeguards when setting up the screen in direct sunlight or room light. I Do not carry the projector by a Sharp Authorized Projector Dealer or Service Center. I For minimal servicing and to +35°C). BQC-PGB10S//1 Caution concerning the setup of the...to overheat due to changes in damage. Introduction Be sure to read the operation manuals of the projector and the equipment to be safely tilted to a maximum angle of 12 degrees. As long as this projector be installed in and turn off, the temperature warning indicator on how to ...
... vents. I Please read the following safeguards when setting up the screen in direct sunlight or room light. I Do not carry the projector by a Sharp Authorized Projector Dealer or Service Center. I For minimal servicing and to +35°C). BQC-PGB10S//1 Caution concerning the setup of the...to overheat due to changes in damage. Introduction Be sure to read the operation manuals of the projector and the equipment to be safely tilted to a maximum angle of 12 degrees. As long as this projector be installed in and turn off, the temperature warning indicator on how to ...
Operation Manual
Page 12
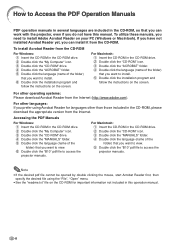
... projector manuals. For other operating systems: Please download Acrobat Reader from the CD-ROM. How to Access the PDF Operation Manuals PDF operation manuals in several languages are included in the CD-ROM, please download the appropriate version from the Internet. If you have this operation manual.... Computer" icon. 3 Double click the "CD-ROM" drive. 4 Double click the "MANUALS" folder. 5 Double click the language (name of the folder) that you want to view. 6 Double click the "B10" pdf file to install. 5 Double click the installation program and follow the instructions on...
... projector manuals. For other operating systems: Please download Acrobat Reader from the CD-ROM. How to Access the PDF Operation Manuals PDF operation manuals in several languages are included in the CD-ROM, please download the appropriate version from the Internet. If you have this operation manual.... Computer" icon. 3 Double click the "CD-ROM" drive. 4 Double click the "MANUALS" folder. 5 Double click the language (name of the folder) that you want to view. 6 Double click the "B10" pdf file to install. 5 Double click the installation program and follow the instructions on...
Operation Manual
Page 13
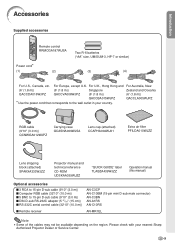
...case GCASNA009WJSA Lens cap (attached) CCAPHA004WJ01 Extra air filter PFILDA010WJZZ Lens shipping block (attached) SPAKXA333WJZZ Projector manual and technical reference CD-ROM UDSKAA039WJZZ "QUICK GUIDE" label TLABZA439WJZZ Operation manual (this manual) Optional accessories I 3 RCA to 15-pin D-sub cable (9'10'' (3.0 m)) I ...Computer RGB cable (32'10'' (10.0 m)) I 5 BNC to the wall outlet in your nearest Sharp Authorized Projector Dealer or Service Center....
...case GCASNA009WJSA Lens cap (attached) CCAPHA004WJ01 Extra air filter PFILDA010WJZZ Lens shipping block (attached) SPAKXA333WJZZ Projector manual and technical reference CD-ROM UDSKAA039WJZZ "QUICK GUIDE" label TLABZA439WJZZ Operation manual (this manual) Optional accessories I 3 RCA to 15-pin D-sub cable (9'10'' (3.0 m)) I ...Computer RGB cable (32'10'' (10.0 m)) I 5 BNC to the wall outlet in your nearest Sharp Authorized Projector Dealer or Service Center....
Operation Manual
Page 14
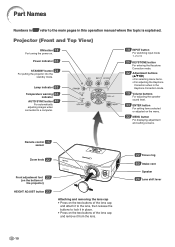
Power indicator 63 STANDBY button 21 For putting the projector into the standby mode. Projector (Front and Top View) ON button 18 For turning the power on the menu. 32 MENU button For displaying ... setting items selected or adjusted on . Remote control 15 sensor Zoom knob 22 Front adjustment foot 23 (on the bottom of the projector) HEIGHT ADJUST button 23 Attaching and removing the lens cap • Press on the two buttons of the lens cap and remove...of the lens cap and attach it to the lens, then release the buttons to lock it in this operation manual where the topic is explained.
Power indicator 63 STANDBY button 21 For putting the projector into the standby mode. Projector (Front and Top View) ON button 18 For turning the power on the menu. 32 MENU button For displaying ... setting items selected or adjusted on . Remote control 15 sensor Zoom knob 22 Front adjustment foot 23 (on the bottom of the projector) HEIGHT ADJUST button 23 Attaching and removing the lens cap • Press on the two buttons of the lens cap and remove...of the lens cap and attach it to the lens, then release the buttons to lock it in this operation manual where the topic is explained.
Operation Manual
Page 16
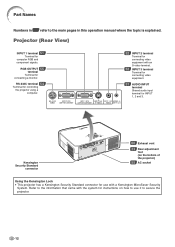
RGB OUTPUT 55 terminal Terminal for computer RGB and component signals. Projector (Rear View) INPUT 1 terminal 51 Terminal for connecting a monitor. Kensington Security Standard connector 60 Exhaust vent 23 Rear adjustment foot (on how ...of the projector) 55 AC socket Using the Kensington Lock • This projector has a Kensington Security Standard connector for use it to secure the projector. -12 RS-232C terminal 54 Terminal for controlling the projector using a computer. 52 INPUT 2 terminal Terminal for INPUT 1, 2 and 3. Part Names Numbers in this operation manual where ...
RGB OUTPUT 55 terminal Terminal for computer RGB and component signals. Projector (Rear View) INPUT 1 terminal 51 Terminal for connecting a monitor. Kensington Security Standard connector 60 Exhaust vent 23 Rear adjustment foot (on how ...of the projector) 55 AC socket Using the Kensington Lock • This projector has a Kensington Security Standard connector for use it to secure the projector. -12 RS-232C terminal 54 Terminal for controlling the projector using a computer. 52 INPUT 2 terminal Terminal for INPUT 1, 2 and 3. Part Names Numbers in this operation manual where ...
Operation Manual
Page 18
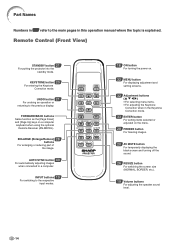
...displaying adjustment and setting screens. 32 Adjustment buttons For selecting menu items. • For adjusting the Keystone Correction when in this operation manual where the topic is explained. FORWARD/BACK buttons Same function as the [Page Down] and [Page Up] keys on a computer ...keyboard when using the optional Remote Receiver (AN-MR1EL). Remote Control (Front View) STANDBY button 21 For putting the projector into the standby mode. KEYSTONE button 20 For entering the Keystone Correction mode. UNDO button 21 For undoing an operation or returning to a...
...displaying adjustment and setting screens. 32 Adjustment buttons For selecting menu items. • For adjusting the Keystone Correction when in this operation manual where the topic is explained. FORWARD/BACK buttons Same function as the [Page Down] and [Page Up] keys on a computer ...keyboard when using the optional Remote Receiver (AN-MR1EL). Remote Control (Front View) STANDBY button 21 For putting the projector into the standby mode. KEYSTONE button 20 For entering the Keystone Correction mode. UNDO button 21 For undoing an operation or returning to a...
Operation Manual
Page 44
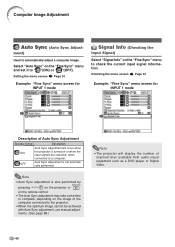
... "Signal Info" on the "Fine Sync" menu and set it to the projector. • When the optimum image cannot be achieved with Auto Sync adjustment, use manual adjust- Note • Auto Sync adjustment is also performed by pressing on the projector or on the remote control. • The Auto Sync adjustment may take... the number of scanned lines available from audio-visual equipment such as a DVD player or Digital Video. -40 ments. (See page 39.) Note • The projector will occur when the projector is not automatically performed.
... "Signal Info" on the "Fine Sync" menu and set it to the projector. • When the optimum image cannot be achieved with Auto Sync adjustment, use manual adjust- Note • Auto Sync adjustment is also performed by pressing on the projector or on the remote control. • The Auto Sync adjustment may take... the number of scanned lines available from audio-visual equipment such as a DVD player or Digital Video. -40 ments. (See page 39.) Note • The projector will occur when the projector is not automatically performed.
Operation Manual
Page 54
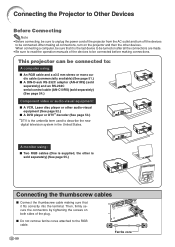
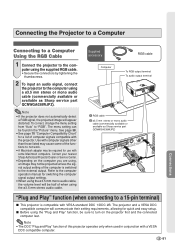
...using : I Connect the thumbscrew cable making sure that it fits correctly into the terminal. Then, firmly secure the connectors by tightening the screws on the projector and then the other is sold separately) (See page 55.) Connecting the thumbscrew cables I Two RGB cables (One is the last device to be turned... on after all the connections are made. • Be sure to read the operation manuals of the devices to be connected before making all connections, turn off the devices to the RGB cable. I An RGB cable and a ø3.5 mm...
...using : I Connect the thumbscrew cable making sure that it fits correctly into the terminal. Then, firmly secure the connectors by tightening the screws on the projector and then the other is sold separately) (See page 55.) Connecting the thumbscrew cables I Two RGB cables (One is the last device to be turned... on after all the connections are made. • Be sure to read the operation manuals of the devices to be connected before making all connections, turn off the devices to the RGB cable. I An RGB cable and a ø3.5 mm...
Operation Manual
Page 55
... 2 ø3.5 mm stereo or mono audio cable (commercially available or available as Sharp service part QCNWGA038WJPZ). The projector and a VESA DDC compatible computer will appear distorted. The menu setting can be found in conjunction with the projector. Refer to the computer operation manual for switching the computer signal output settings. • When using the...
... 2 ø3.5 mm stereo or mono audio cable (commercially available or available as Sharp service part QCNWGA038WJPZ). The projector and a VESA DDC compatible computer will appear distorted. The menu setting can be found in conjunction with the projector. Refer to the computer operation manual for switching the computer signal output settings. • When using the...
Operation Manual
Page 58
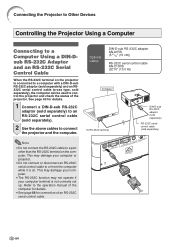
... an RS232C serial control cable (cross type, sold separately), the computer can be used to control the projector and check the status of an RS-232C serial control cable. -54 Refer to the operation manual of the computer for details. • See page 68 for details. 1 Connect a DIN-D-sub RS-...232C adaptor (sold separately) to an RS-232C serial control cable (sold separately). 2 Use the above cables to connect the projector and the computer. See page 69 for...
... an RS232C serial control cable (cross type, sold separately), the computer can be used to control the projector and check the status of an RS-232C serial control cable. -54 Refer to the operation manual of the computer for details. • See page 68 for details. 1 Connect a DIN-D-sub RS-...232C adaptor (sold separately) to an RS-232C serial control cable (sold separately). 2 Use the above cables to connect the projector and the computer. See page 69 for...

Operation Manual
Page 70
...other screws except for the lamp unit cover and lamp unit. • Please refer to the installation manual included with the lamp unit. 1 Press on the projector STANDBY or on the remote control to put the projector into the standby mode. • Wait until it has fully cooled down (about 1 hour). ...very hot and may cause burn or injury. STANDBY button STANDBY STANDBY button 2 Disconnect the power cord. • Unplug the power cord from the projector right after use. Warning! • Do not remove the lamp unit from the AC socket. • Leave the lamp until the cooling fan stops...
...other screws except for the lamp unit cover and lamp unit. • Please refer to the installation manual included with the lamp unit. 1 Press on the projector STANDBY or on the remote control to put the projector into the standby mode. • Wait until it has fully cooled down (about 1 hour). ...very hot and may cause burn or injury. STANDBY button STANDBY STANDBY button 2 Disconnect the power cord. • Unplug the power cord from the projector right after use. Warning! • Do not remove the lamp unit from the AC socket. • Leave the lamp until the cooling fan stops...
Operation Manual
Page 74
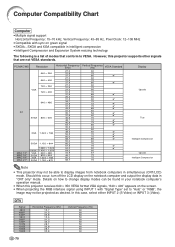
...PC/MAC/WS Resolution Horizontal Frequency (kHz) 640 × 350 640 × 400 VGA 720 × 350 720 × 400 640 × 480 PC SVGA 800 × 600 XGA 1,024 × 768 SXGA 1,152 × 864 MAC 13" MAC 16" MAC 19" MAC 21" 1,280 × 1,024 ... True Intelligent Compression Upscale Intelligent Compression Note • This projector may not be found in your notebook computer's operation manual. • When this projector supports other signals that conform to display images from notebook computers in simultaneous (CRT/LCD) mode. Details on how to change display modes can ...
...PC/MAC/WS Resolution Horizontal Frequency (kHz) 640 × 350 640 × 400 VGA 720 × 350 720 × 400 640 × 480 PC SVGA 800 × 600 XGA 1,024 × 768 SXGA 1,152 × 864 MAC 13" MAC 16" MAC 19" MAC 21" 1,280 × 1,024 ... True Intelligent Compression Upscale Intelligent Compression Note • This projector may not be found in your notebook computer's operation manual. • When this projector supports other signals that conform to display images from notebook computers in simultaneous (CRT/LCD) mode. Details on how to change display modes can ...
Operation Manual
Page 77
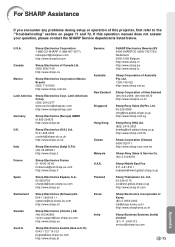
....jp http://www.sharp-th.com Sharp Electronics Incorporated of Canada Ltd. (905) 568-7140 http://www.sharp.ca Mexico Sharp Electronics Corporation Mexico Branch (525) 716-9000 http://www.sharp.com.mx Latin America Sharp Electronics Corp. For SHARP Assistance If you encounter any problems during setup or operation of this operation manual does not answer your...
....jp http://www.sharp-th.com Sharp Electronics Incorporated of Canada Ltd. (905) 568-7140 http://www.sharp.ca Mexico Sharp Electronics Corporation Mexico Branch (525) 716-9000 http://www.sharp.com.mx Latin America Sharp Electronics Corp. For SHARP Assistance If you encounter any problems during setup or operation of this operation manual does not answer your...
Operation Manual
Page 78
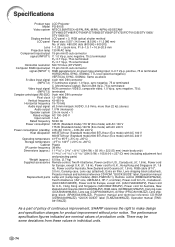
... are nominal values of continuous improvement, SHARP reserves the right to make design and...3.0 m), Carrying case, Lens cap (attached), Extra air filter, Lens shipping block (attached), Projector manual and technical reference CD-ROM, "QUICK GUIDE" label, Operation manual Replacement parts Lamp unit (Lamp/cage module) (BQC-PGB10S//1), Remote control (RRMCGA187WJSA), Two R-6... analog input: 0-0.7 Vp-p, positive, 75 Ω terminated HORIZONTAL SYNC. Specifications Product type LCD Projector Model PG-B10S Video system NTSC3.58/NTSC4.43/PAL/PAL-M/PAL-N/PAL-60/SECAM/ DTV480I/DTV480P/DTV540P/DTV580I...
... are nominal values of continuous improvement, SHARP reserves the right to make design and...3.0 m), Carrying case, Lens cap (attached), Extra air filter, Lens shipping block (attached), Projector manual and technical reference CD-ROM, "QUICK GUIDE" label, Operation manual Replacement parts Lamp unit (Lamp/cage module) (BQC-PGB10S//1), Remote control (RRMCGA187WJSA), Two R-6... analog input: 0-0.7 Vp-p, positive, 75 Ω terminated HORIZONTAL SYNC. Specifications Product type LCD Projector Model PG-B10S Video system NTSC3.58/NTSC4.43/PAL/PAL-M/PAL-N/PAL-60/SECAM/ DTV480I/DTV480P/DTV540P/DTV580I...


