

PG-D2510X Operation Manual
Page 4
... from the projector right after the power cord is also a possibility that glass particles may spread inside of these materials may be attributed to numerous sources such as possible. Operation of the FCC Rules. Disposal of the projector. U.S.A. It is important to note that failure can often result in the bulb cracking. ■ When the lamp replacement indicator and on-screen display icon...
... from the projector right after the power cord is also a possibility that glass particles may spread inside of these materials may be attributed to numerous sources such as possible. Operation of the FCC Rules. Disposal of the projector. U.S.A. It is important to note that failure can often result in the bulb cracking. ■ When the lamp replacement indicator and on-screen display icon...
PG-D2510X Operation Manual
Page 5
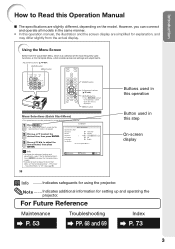
... performed by using the projector. Using the Menu Screen Select from the actual display. Info • To display the advanced settings and adjustments, select "Go To Complete Menu". Example Quick Start Menu Input Search Start Resolution Resize Keystone Eco+Quiet Language Information 1024×768 Normal 0 Off English Go To Complete Menu... Introduction How to Read this step On-screen display Info .........Indicates safeguards for using the buttons on the model. However, you...
... performed by using the projector. Using the Menu Screen Select from the actual display. Info • To display the advanced settings and adjustments, select "Go To Complete Menu". Example Quick Start Menu Input Search Start Resolution Resize Keystone Eco+Quiet Language Information 1024×768 Normal 0 Off English Go To Complete Menu... Introduction How to Read this step On-screen display Info .........Indicates safeguards for using the buttons on the model. However, you...
PG-D2510X Operation Manual
Page 6
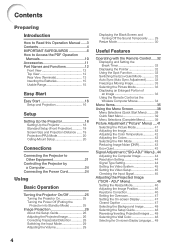
... 18 Screen Size and Projection Distance ...... 19 Projection (PRJ) Mode 20 Ceiling-Mount Setup 20 Connections Connecting the Projector to Other Equipment 21 Controlling the Projector by a Computer 24 Connecting the Power Cord 24 Using Basic Operation Turning the Projector On/Off 25 Turning the Projector On 25 Turning the Power Off (Putting the Projector into Standby Mode 25 Image Projection 26 About the Setup Guide 26 Adjusting the Projected Image 26 Correcting Trapezoidal Distortion 28 Switching the Input Mode 29 Adjusting the Volume 29 Displaying the Black Screen and Turning...
... 18 Screen Size and Projection Distance ...... 19 Projection (PRJ) Mode 20 Ceiling-Mount Setup 20 Connections Connecting the Projector to Other Equipment 21 Controlling the Projector by a Computer 24 Connecting the Power Cord 24 Using Basic Operation Turning the Projector On/Off 25 Turning the Projector On 25 Turning the Power Off (Putting the Projector into Standby Mode 25 Image Projection 26 About the Setup Guide 26 Adjusting the Projected Image 26 Correcting Trapezoidal Distortion 28 Switching the Input Mode 29 Adjusting the Volume 29 Displaying the Black Screen and Turning...
PG-D2510X Operation Manual
Page 7
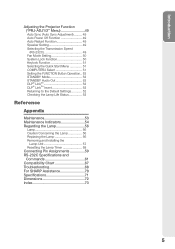
... Selecting the Quick Start Menu 51 COMPUTER2 Select 51 Setting the FUNCTION Button Operation.. 52 STANDBY Mode 52 STANDBY Audio Out 52 DLP® LinkTM 52 DLP® LinkTM Invert 52 Returning to the Default Settings 52 Checking the Lamp Life Status 52 Reference Appendix Maintenance 53 Maintenance Indicators 54 Regarding the Lamp 56 Lamp 56 Caution Concerning the Lamp 56 Replacing the Lamp 56 Removing and Installing the Lamp Unit 57 Resetting the Lamp Timer 58 Connecting Pin Assignments 59...
... Selecting the Quick Start Menu 51 COMPUTER2 Select 51 Setting the FUNCTION Button Operation.. 52 STANDBY Mode 52 STANDBY Audio Out 52 DLP® LinkTM 52 DLP® LinkTM Invert 52 Returning to the Default Settings 52 Checking the Lamp Life Status 52 Reference Appendix Maintenance 53 Maintenance Indicators 54 Regarding the Lamp 56 Lamp 56 Caution Concerning the Lamp 56 Replacing the Lamp 56 Removing and Installing the Lamp Unit 57 Resetting the Lamp Timer 58 Connecting Pin Assignments 59...

PG-D2510X Operation Manual
Page 10
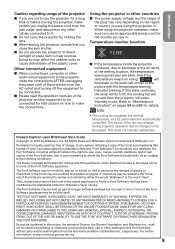
... and lens must be installed in and turn on the projector. Caution regarding placing of the projector ■ Place the projector on . Warning about placing the projector in a high position ■ When placing the projector in high-altitude areas with extremes of temperature. ■ The operating temperature of the projector is used for a while. Avoid locations with thin air, set up your eyes occasionally. ■ Continuously watching the screen for replacement...
... and lens must be installed in and turn on the projector. Caution regarding placing of the projector ■ Place the projector on . Warning about placing the projector in a high position ■ When placing the projector in high-altitude areas with extremes of temperature. ■ The operating temperature of the projector is used for a while. Avoid locations with thin air, set up your eyes occasionally. ■ Continuously watching the screen for replacement...
PG-D2510X Operation Manual
Page 11
... as part of a larger software package but no copy of one or more of the picture with the temperature warning indicator blinking. And if the temperature keeps on rising, " " will blink. Bitstream Vera is automatically controlled. Introduction Caution regarding usage of the projector ■ If you are not to use the projector for a long time or before moving the projector, make certain you unplug the power cord from...
... as part of a larger software package but no copy of one or more of the picture with the temperature warning indicator blinking. And if the temperature keeps on rising, " " will blink. Bitstream Vera is automatically controlled. Introduction Caution regarding usage of the projector ■ If you are not to use the projector for a long time or before moving the projector, make certain you unplug the power cord from...
PG-D2510X Operation Manual
Page 14
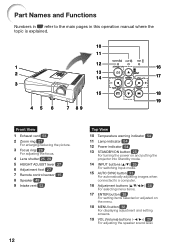
... the picture. 3 Focus ring 26 For adjusting the focus. 4 Lens shutter 25, 29 5 HEIGHT ADJUST lever 27 6 Adjustment foot 27 7 Remote control sensor 15 8 Speaker 49 9 Intake vent 53 12 Top View 10 Temperature warning indicator 54 11 Lamp indicator 54 12 Power indicator 54 13 STANDBY/ON button 25 For turning the power on and putting the projector into Standby mode. 14 INPUT buttons (P/R) 29 For switching Input mode. 15 AUTO SYNC button 33 For automatically adjusting images when connected to a computer. 16 Adjustment buttons (P/R/O/Q) 38...
... the picture. 3 Focus ring 26 For adjusting the focus. 4 Lens shutter 25, 29 5 HEIGHT ADJUST lever 27 6 Adjustment foot 27 7 Remote control sensor 15 8 Speaker 49 9 Intake vent 53 12 Top View 10 Temperature warning indicator 54 11 Lamp indicator 54 12 Power indicator 54 13 STANDBY/ON button 25 For turning the power on and putting the projector into Standby mode. 14 INPUT buttons (P/R) 29 For switching Input mode. 15 AUTO SYNC button 33 For automatically adjusting images when connected to a computer. 16 Adjustment buttons (P/R/O/Q) 38...
PG-D2510X Operation Manual
Page 16
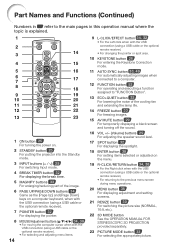
... USB connection (using a USB cable or the optional remote receiver). • For selecting and adjusting menu items. 14 9 L-CLICK/EFFECT button 34, 32 • For the Left click when with the USB connection (using a USB cable or the optional remote receiver). • For changing the pointer or spot area. 10 KEYSTONE button 28 For entering the Keystone Correction mode. 11 AUTO SYNC button 33, 49 For automatically adjusting images when connected to a computer. 12 FUNCTION button 52 For operating...
... USB connection (using a USB cable or the optional remote receiver). • For selecting and adjusting menu items. 14 9 L-CLICK/EFFECT button 34, 32 • For the Left click when with the USB connection (using a USB cable or the optional remote receiver). • For changing the pointer or spot area. 10 KEYSTONE button 28 For entering the Keystone Correction mode. 11 AUTO SYNC button 33, 49 For automatically adjusting images when connected to a computer. 12 FUNCTION button 52 For operating...
PG-D2510X Operation Manual
Page 27
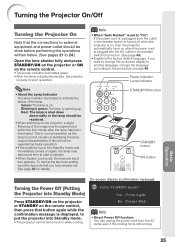
... lamp indicator illuminates to indicate the status of the image may take some time to start operation. Green: The lamp is the factory default language. This is normal operation as faulty operation. • If the projector is put the projector into Standby mode. • The projector cannot be turned on while cooling. Power indicator Lamp indicator STANDBY/ON button STANDBY button ON button On-screen display (confirmation message) Turning the Power Off (Putting the Projector into Standby Mode) Press STANDBY/ON on the projector or STANDBY on the remote control...
... lamp indicator illuminates to indicate the status of the image may take some time to start operation. Green: The lamp is the factory default language. This is normal operation as faulty operation. • If the projector is put the projector into Standby mode. • The projector cannot be turned on while cooling. Power indicator Lamp indicator STANDBY/ON button STANDBY button ON button On-screen display (confirmation message) Turning the Power Off (Putting the Projector into Standby Mode) Press STANDBY/ON on the projector or STANDBY on the remote control...
PG-D2510X Operation Manual
Page 51
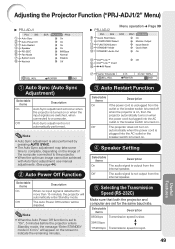
... the screen to a computer. ENTER END Lamp Timer(Life) SEL./ADJ. 0h ENTER 0 min 100% END 1 Auto Sync (Auto Sync Adjustment) Selectable items Description On Auto Sync adjustment will automatically enter Standby mode. Off The Auto Power Off function will be achieved with Auto Sync adjustment, use manual adjustments. (See page 44.) 2 Auto Power Off Function Selectable items Description On When no input signal is turned on or when the input signals are set to the projector. • When the optimum image...
... the screen to a computer. ENTER END Lamp Timer(Life) SEL./ADJ. 0h ENTER 0 min 100% END 1 Auto Sync (Auto Sync Adjustment) Selectable items Description On Auto Sync adjustment will automatically enter Standby mode. Off The Auto Power Off function will be achieved with Auto Sync adjustment, use manual adjustments. (See page 44.) 2 Auto Power Off Function Selectable items Description On When no input signal is turned on or when the input signals are set to the projector. • When the optimum image...
PG-D2510X Operation Manual
Page 53
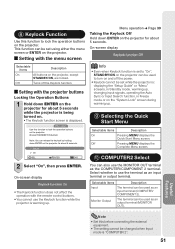
... MENU displays the Quick Start Menu screen. Useful Features Note • Set this function to "On", STANDBY/ON on the projector can release the keylock by holding down ENTER on the projector for about 5 seconds while the projector is being turned on. • The Keylock function screen is : displaying the "Setup Guide" or "Menu" screens, in Standby mode, warming up, changing input signals, operating the Auto Sync or Input Search function, in Freeze mode or on the "System Lock" screen...
... MENU displays the Quick Start Menu screen. Useful Features Note • Set this function to "On", STANDBY/ON on the projector can release the keylock by holding down ENTER on the projector for about 5 seconds while the projector is being turned on. • The Keylock function screen is : displaying the "Setup Guide" or "Menu" screens, in Standby mode, warming up, changing input signals, operating the Auto Sync or Input Search function, in Freeze mode or on the "System Lock" screen...
PG-D2510X Operation Manual
Page 57
... care when replacing the lamp. • Securely install the cover. Lamp indicator Green on (Green blinks when the lamp is warming up.) Red on again. • The cooling fan keeps the internal temperature of the projector constant and this is shut down completely before plugging in red even when the lamp unit cover are high. Appendix 55 Red on (Standby) Time to power outage or some other cause while using the projector, and the power supply recovers immediately...
... care when replacing the lamp. • Securely install the cover. Lamp indicator Green on (Green blinks when the lamp is warming up.) Red on again. • The cooling fan keeps the internal temperature of the projector constant and this is shut down completely before plugging in red even when the lamp unit cover are high. Appendix 55 Red on (Standby) Time to power outage or some other cause while using the projector, and the power supply recovers immediately...
PG-D2510X Operation Manual
Page 58
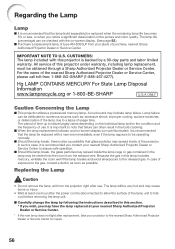
... from the projector right after the power cord is disconnected to allow the surface of the lamp unit to fully cool before removing the lamp unit. ■ Carefully change the lamp by a 90-day parts and labor limited warranty. CUSTOMERS: The lamp included with a new one hour after use . IMPORTANT NOTE TO U.S. Lamp failure can be obtained through a Sharp Authorized Projector Dealer or Service Center. The lamp will be...
... from the projector right after the power cord is disconnected to allow the surface of the lamp unit to fully cool before removing the lamp unit. ■ Carefully change the lamp by a 90-day parts and labor limited warranty. CUSTOMERS: The lamp included with a new one hour after use . IMPORTANT NOTE TO U.S. Lamp failure can be obtained through a Sharp Authorized Projector Dealer or Service Center. The lamp will be...
PG-D2510X Operation Manual
Page 60
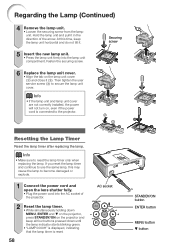
... lamp timer only when replacing the lamp. If you reset the lamp timer and continue to use the same lamp, this time, keep all four buttons pressed down until the lamp indicator starts blinking green. • "LAMP 0000H" is displayed, indicating that the lamp timer is connected to become damaged or explode. 1 Connect the power cord and open the lens shutter fully. • Plug the power cord into the lamp unit compartment. Hold the lamp unit and pull it (2). Securing screw 5 Insert the new lamp...
... lamp timer only when replacing the lamp. If you reset the lamp timer and continue to use the same lamp, this time, keep all four buttons pressed down until the lamp indicator starts blinking green. • "LAMP 0000H" is displayed, indicating that the lamp timer is connected to become damaged or explode. 1 Connect the power cord and open the lens shutter fully. • Plug the power cord into the lamp unit compartment. Hold the lamp unit and pull it (2). Securing screw 5 Insert the new lamp...
PG-D2510X Operation Manual
Page 64
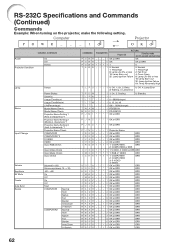
Computer o P OWR _ _ _ 1 m Projector OK CONTROL CONTENTS Power Projector Condition On Off Status Lamp Name Input Change Volume Keystone AV Mute Freeze Auto Sync Resize Status Power Status Quantity Usage Time(Hour) Usage Time(Minute) Life(Percentage) Model Name Check Model Name Check Projector Name Setting 1 (First 4 characters) *1 Projector Name Setting 2 (Middle 4 characters) *1 Projector Name Setting 3 (Last 4 characters) *1 Projector Name Check COMPUTER1 COMPUTER2 *2 S-VIDEO VIDEO Input RGB Check Input Video Check Input Mode Check Input Check Volume(0 - 60) Volume up/down(-10 - ...
Computer o P OWR _ _ _ 1 m Projector OK CONTROL CONTENTS Power Projector Condition On Off Status Lamp Name Input Change Volume Keystone AV Mute Freeze Auto Sync Resize Status Power Status Quantity Usage Time(Hour) Usage Time(Minute) Life(Percentage) Model Name Check Model Name Check Projector Name Setting 1 (First 4 characters) *1 Projector Name Setting 2 (Middle 4 characters) *1 Projector Name Setting 3 (Last 4 characters) *1 Projector Name Check COMPUTER1 COMPUTER2 *2 S-VIDEO VIDEO Input RGB Check Input Video Check Input Mode Check Input Check Volume(0 - 60) Volume up/down(-10 - ...
PG-D2510X Operation Manual
Page 66
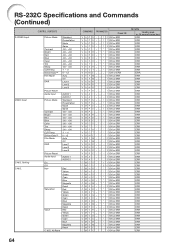
CONTROL CONTENTS Picture Mode Contrast Bright Red Blue Color Tint Sharp CLR Temp BrilliantColor™ Film Mode DNR Picture Reset Audio Input Picture Mode Contrast Bright Red Blue Color Tint Sharp CLR Temp BrilliantColor™ Film Mode DNR Picture Reset Audio Input On Off Hue Saturation Value C.M.S. All Reset Standard Presentation Movie Game -30 - +30 -30 - +30 -30 - +30 -30 - +30 -30 - +30 -30 - +30 -30 - +30 -1 - +1 0 - +2 Auto Off Level 1 Level 2 Level 3 AUDIO 1 AUDIO 2 Standard Presentation Movie Game -30 - +30...
CONTROL CONTENTS Picture Mode Contrast Bright Red Blue Color Tint Sharp CLR Temp BrilliantColor™ Film Mode DNR Picture Reset Audio Input Picture Mode Contrast Bright Red Blue Color Tint Sharp CLR Temp BrilliantColor™ Film Mode DNR Picture Reset Audio Input On Off Hue Saturation Value C.M.S. All Reset Standard Presentation Movie Game -30 - +30 -30 - +30 -30 - +30 -30 - +30 -30 - +30 -30 - +30 -30 - +30 -1 - +1 0 - +2 Auto Off Level 1 Level 2 Level 3 AUDIO 1 AUDIO 2 Standard Presentation Movie Game -30 - +30...
PG-D2510X Operation Manual
Page 70
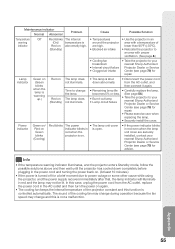
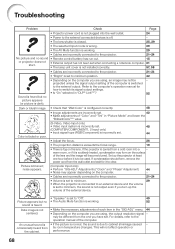
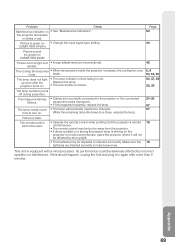
... sound • Remote control battery has run out. 15 or projector does not start. • External output has not been set when connecting a notebook computer. 21 • The lamp unit cover is not installed correctly. 57, 58 • Cables are incorrectly connected to the projector. 21-24 • "Bright" is carried from a cold room into a - If condensation should form, remove the power cord from by room temperature changes. Troubleshooting Problem Check...
... sound • Remote control battery has run out. 15 or projector does not start. • External output has not been set when connecting a notebook computer. 21 • The lamp unit cover is not installed correctly. 57, 58 • Cables are incorrectly connected to the projector. 21-24 • "Bright" is carried from a cold room into a - If condensation should form, remove the power cord from by room temperature changes. Troubleshooting Problem Check...
PG-D2510X Operation Manual
Page 71
... 21-24 57 57 15 15 This unit is green on . The image sometimes • Cables are inserted correctly or insert new ones. Picture is illuminating in red. Problem Check Maintenance indicator on . • The lens shutter is closed. the projector illuminates or blinks in red. The lamp does not light • The lamp indicator is dark. time to be depleted or inserted incorrectly. projector turns on • See "Maintenance...
... 21-24 57 57 15 15 This unit is green on . The image sometimes • Cables are inserted correctly or insert new ones. Picture is illuminating in red. Problem Check Maintenance indicator on . • The lens shutter is closed. the projector illuminates or blinks in red. The lamp does not light • The lamp indicator is dark. time to be depleted or inserted incorrectly. projector turns on • See "Maintenance...
PG-D2510X Operation Manual
Page 72
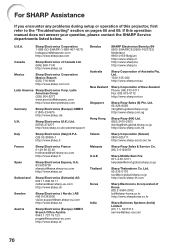
... encounter any problems during setup or operation of this operation manual does not answer your question, please contact the SHARP Service departments listed below. Sharp Middle East Fze 971-4-81-5311 [email protected].sharp.co.jp Thailand Sharp Thebnakorn Co. Sharp Electronics Corporation 1-888-GO-SHARP (1-888-467-4277) [email protected] http://www.sharpusa.com Canada Sharp Electronics of New Zealand Phone...
... encounter any problems during setup or operation of this operation manual does not answer your question, please contact the SHARP Service departments listed below. Sharp Middle East Fze 971-4-81-5311 [email protected].sharp.co.jp Thailand Sharp Thebnakorn Co. Sharp Electronics Corporation 1-888-GO-SHARP (1-888-467-4277) [email protected] http://www.sharpusa.com Canada Sharp Electronics of New Zealand Phone...
PG-D2510X Operation Manual
Page 75
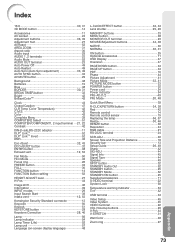
... Remote control sensor 15 Replacing the lamp 56, 57 Resize 30, 46 RESIZE button 30 Resolution 44 RGB cable 21 RS-232C terminal 24 SCR-ADJ 46 Screen Size and Projection Distance 19 Security bar 13 Setup Guide 26, 48 Sharp 42 SIG-ADJ 44 Signal Info 45 Signal Type 44 Speaker 49 SPOT button 32 STANDBY Audio Out 52 STANDBY button 25 STANDBY Mode 52 STANDBY/ON button 25 Supplied accessories 11 S-VIDEO terminal 22 System Lock 50 Temperature warning indicator...
... Remote control sensor 15 Replacing the lamp 56, 57 Resize 30, 46 RESIZE button 30 Resolution 44 RGB cable 21 RS-232C terminal 24 SCR-ADJ 46 Screen Size and Projection Distance 19 Security bar 13 Setup Guide 26, 48 Sharp 42 SIG-ADJ 44 Signal Info 45 Signal Type 44 Speaker 49 SPOT button 32 STANDBY Audio Out 52 STANDBY button 25 STANDBY Mode 52 STANDBY/ON button 25 Supplied accessories 11 S-VIDEO terminal 22 System Lock 50 Temperature warning indicator...


