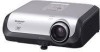

PG-F320W Operation Manual
Page 8
... 24 Connecting the Power Cord 25 Using Basic Operation Turning the Projector On/Off 26 Turning the Projector on 26 Turning the Power off (Putting the Projector into Standby Mode 26 Image Projection 27 About the Setup Guide 27 Adjusting the Projected Image 27 Correcting Trapezoidal Distortion ........ 29 Switching the Input Mode 30 Adjusting the Volume 30 Displaying the Black Screen and Turning off the Sound Temporarily .... 30 Resize Mode 31 4 Useful Features Operating with the Remote Control .... 33 Displaying and Setting the Break Timer 33 Displaying the...
... 24 Connecting the Power Cord 25 Using Basic Operation Turning the Projector On/Off 26 Turning the Projector on 26 Turning the Power off (Putting the Projector into Standby Mode 26 Image Projection 27 About the Setup Guide 27 Adjusting the Projected Image 27 Correcting Trapezoidal Distortion ........ 29 Switching the Input Mode 30 Adjusting the Volume 30 Displaying the Black Screen and Turning off the Sound Temporarily .... 30 Resize Mode 31 4 Useful Features Operating with the Remote Control .... 33 Displaying and Setting the Break Timer 33 Displaying the...

PG-F320W Operation Manual
Page 9
... ("Network" menu) ........ 49 Setting a Password 49 DHCP Client Setting 50 TCP/IP Setting 50 Confirming the Projector Information ... 50 Troubleshooting with the "Help" Menu 51 Utilizing the "Help" Menu Functions .... 51 Reference Appendix Maintenance 52 Cleaning and Replacing the Dust Filters 53 Cleaning the Dust Filters 53 Replacing the Dust Filters 54 Maintenance Indicators 55 Regarding the Lamp 57 Lamp 57 Caution Concerning the Lamp 57 Replacing the Lamp 57 Removing and Installing the Lamp Unit 58 Resetting the Lamp Timer...
... ("Network" menu) ........ 49 Setting a Password 49 DHCP Client Setting 50 TCP/IP Setting 50 Confirming the Projector Information ... 50 Troubleshooting with the "Help" Menu 51 Utilizing the "Help" Menu Functions .... 51 Reference Appendix Maintenance 52 Cleaning and Replacing the Dust Filters 53 Cleaning the Dust Filters 53 Replacing the Dust Filters 54 Maintenance Indicators 55 Regarding the Lamp 57 Lamp 57 Caution Concerning the Lamp 57 Replacing the Lamp 57 Removing and Installing the Lamp Unit 58 Resetting the Lamp Timer...

PG-F320W Operation Manual
Page 12
... adjustment range (8 degrees) of the projector ■ For minimal servicing and to maintain high image quality, SHARP recommends that the intake vent and the exhaust vent are not blocked, plug the power cord back in an area free from the vent may appear when the power is first turned on page 57. Warning about placing the projector in a high position ■ When placing the projector...
... adjustment range (8 degrees) of the projector ■ For minimal servicing and to maintain high image quality, SHARP recommends that the intake vent and the exhaust vent are not blocked, plug the power cord back in an area free from the vent may appear when the power is first turned on page 57. Warning about placing the projector in a high position ■ When placing the projector...

PG-F320W Operation Manual
Page 13
... projector, make the connections AFTER unplugging the power cord of the projector from the wall outlet, and disconnect any other audio- Refer to run for the country you are not to setup problems or blockage of the air vents, " " and " " will turn off period the projector will enter standby mode. This does not indicate malfunction. • Even if you attach the lens cap to the projector...
... projector, make the connections AFTER unplugging the power cord of the projector from the wall outlet, and disconnect any other audio- Refer to run for the country you are not to setup problems or blockage of the air vents, " " and " " will turn off period the projector will enter standby mode. This does not indicate malfunction. • Even if you attach the lens cap to the projector...

PG-F320W Operation Manual
Page 14
..., start Adobe® Reader® first, then specify the desired file using the "File", "Open" menu. Connecting Pin Assignments 2 RS-232C Specifications and Commands 4 Setting up the Projector Network Environment 9 Controlling the Projector via LAN 15 Setting up the Projector Using RS-232C or Telnet 20 Resetting the Lamp Timer of the folder) that you want to view. 3) Double click the pdf file to access the projector manuals. When you want to view the SETUP MANUAL...
..., start Adobe® Reader® first, then specify the desired file using the "File", "Open" menu. Connecting Pin Assignments 2 RS-232C Specifications and Commands 4 Setting up the Projector Network Environment 9 Controlling the Projector via LAN 15 Setting up the Projector Using RS-232C or Telnet 20 Resetting the Lamp Timer of the folder) that you want to view. 3) Double click the pdf file to access the projector manuals. When you want to view the SETUP MANUAL...

PG-F320W Operation Manual
Page 16
... View 26 Lamp indicator 55 55 Temperature warning indicator 30 VOL (Volume) buttons (-O/Q+) For adjusting the speaker sound level. 30 INPUT buttons (P/R) For switching input mode. 39 MENU/HELP 51 button For displaying adjustment and setting screens, and help screen. 39 Adjustment buttons (P/R/O/Q) For selecting menu items. Focus ring For adjusting 27 the focus. KEYSTONE button 29 For entering the Keystone Correction mode. ENTER button For setting 39 items selected or adjusted on and putting the projector into standby mode. Projector Top View Power...
... View 26 Lamp indicator 55 55 Temperature warning indicator 30 VOL (Volume) buttons (-O/Q+) For adjusting the speaker sound level. 30 INPUT buttons (P/R) For switching input mode. 39 MENU/HELP 51 button For displaying adjustment and setting screens, and help screen. 39 Adjustment buttons (P/R/O/Q) For selecting menu items. Focus ring For adjusting 27 the focus. KEYSTONE button 29 For entering the Keystone Correction mode. ENTER button For setting 39 items selected or adjusted on and putting the projector into standby mode. Projector Top View Power...

PG-F320W Operation Manual
Page 18
... help screen. 31 RESIZE button For switching the picture size (NORMAL, STRETCH, etc.). 34 PICTURE MODE button For selecting the appropriate picture. KEYSTONE button 29 For entering the Keystone Correction mode. Part Names and Functions (Continued) STANDBY button 26 For putting the projector into the standby mode. AUTO SYNC button 34 For automatically adjusting images when connected to the respective input modes. BREAK TIMER button 33 For displaying the break time. MAGNIFY buttons 34 For enlarging/reducing part of the cooling fan and extending the lamp life...
... help screen. 31 RESIZE button For switching the picture size (NORMAL, STRETCH, etc.). 34 PICTURE MODE button For selecting the appropriate picture. KEYSTONE button 29 For entering the Keystone Correction mode. Part Names and Functions (Continued) STANDBY button 26 For putting the projector into the standby mode. AUTO SYNC button 34 For automatically adjusting images when connected to the respective input modes. BREAK TIMER button 33 For displaying the break time. MAGNIFY buttons 34 For enlarging/reducing part of the cooling fan and extending the lamp life...

PG-F320W Operation Manual
Page 25
... on connected equipment Cable RGB output terminal RGB cable (supplied) Terminal on (e.g. Contact your computer's external output port. 21 tor. Use with computer signals other cables or connectors not listed below. Connecting the Projector to Other Equipment Before connecting, ensure that the power cord of computer signals compatible with the projec- After making all the connections are using a SHARP notebook computer). Refer to the specific instructions in your computer's operation manual...
... on connected equipment Cable RGB output terminal RGB cable (supplied) Terminal on (e.g. Contact your computer's external output port. 21 tor. Use with computer signals other cables or connectors not listed below. Connecting the Projector to Other Equipment Before connecting, ensure that the power cord of computer signals compatible with the projec- After making all the connections are using a SHARP notebook computer). Refer to the specific instructions in your computer's operation manual...

PG-F320W Operation Manual
Page 30
... before performing the operations written below. (See pages 21 to 25.) Remove the lens cap and press STANDBY/ON on the projector or ON on the remote control. • The power indicator illuminates green. • After the lamp indicator illuminates, the projec- STANDBY/ON button STANDBY button ON button On-screen display (confirmation message) Turning the Power off when the projector is on, then the projector automatically turns on when the power cord is the factory default language. Info...
... before performing the operations written below. (See pages 21 to 25.) Remove the lens cap and press STANDBY/ON on the projector or ON on the remote control. • The power indicator illuminates green. • After the lamp indicator illuminates, the projec- STANDBY/ON button STANDBY button ON button On-screen display (confirmation message) Turning the Power off when the projector is on, then the projector automatically turns on when the power cord is the factory default language. Info...

PG-F320W Operation Manual
Page 50
... 4 STANDBY Mode 5 System Sound 6 Speaker 7 Audio Input 8 RS-232C 9 Fan Mode 0 System Lock Lamp Timer(Life) 0h Net. will occur when the projector is also performed by pressing AUTO SYNC on the remote control. • The Auto Sync adjustment may take some time to complete, depending on . 4 STANDBY Mode When set to a computer. Selectable items Eco Standard Description The monitor output, RS-232C and Network functions are activated even if the projector is turned on the image...
... 4 STANDBY Mode 5 System Sound 6 Speaker 7 Audio Input 8 RS-232C 9 Fan Mode 0 System Lock Lamp Timer(Life) 0h Net. will occur when the projector is also performed by pressing AUTO SYNC on the remote control. • The Auto Sync adjustment may take some time to complete, depending on . 4 STANDBY Mode When set to a computer. Selectable items Eco Standard Description The monitor output, RS-232C and Network functions are activated even if the projector is turned on the image...

PG-F320W Operation Manual
Page 52
.... On-screen display Lamp usage condition "Life" Operated exclusively with Lamp Setting set , the keycode input screen appears after the power is warming up , changing input signals, operating "Auto Sync" function, in steps 4 and 5 above. Info • Keylock cannot be changed when the remaining lamp life becomes 5%. • The lamp life may vary depending on the usage condition. • When the projector is : displaying the "Setup Guide" or "Menu" screens, in standby mode, warming up . Adjusting the Projector Function ("PRJ - A Checking the Lamp Life Status You...
.... On-screen display Lamp usage condition "Life" Operated exclusively with Lamp Setting set , the keycode input screen appears after the power is warming up , changing input signals, operating "Auto Sync" function, in steps 4 and 5 above. Info • Keylock cannot be changed when the remaining lamp life becomes 5%. • The lamp life may vary depending on the usage condition. • When the projector is : displaying the "Setup Guide" or "Menu" screens, in standby mode, warming up . Adjusting the Projector Function ("PRJ - A Checking the Lamp Life Status You...

PG-F320W Operation Manual
Page 54
.... Setting up the Projector Network Environment ("Network" menu) (Continued) Menu operation n Page 39 2 DHCP Client Setting Connect the LAN cable before turning the projector on the TCP/IP screen. In this case, set to avoid setting an IP address that of "192.168.150.XXX", you don't have to change the projector IP address. • For details about each setting, consult your network administrator. 1 Select "Off" for the network. Setting the TCP/IP Network IP Address...
.... Setting up the Projector Network Environment ("Network" menu) (Continued) Menu operation n Page 39 2 DHCP Client Setting Connect the LAN cable before turning the projector on the TCP/IP screen. In this case, set to avoid setting an IP address that of "192.168.150.XXX", you don't have to change the projector IP address. • For details about each setting, consult your network administrator. 1 Select "Off" for the network. Setting the TCP/IP Network IP Address...
PG-F320W Operation Manual
Page 60
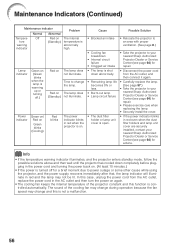
... Green blinks (Cooling) Red blinks Problem The internal temperature is turned off .) Red on Red on (Standby) Power indicator Green on/ Red on . In this is open. Info • If the temperature warning indicator illuminates, and the projector enters standby mode, follow the possible solutions above and then wait until the projector has cooled down abnormally. • Remaining lamp life becomes 5% or less. • Burnt-out lamp • Lamp circuit failure • The dust filter holder or lamp unit cover...
... Green blinks (Cooling) Red blinks Problem The internal temperature is turned off .) Red on Red on (Standby) Power indicator Green on/ Red on . In this is open. Info • If the temperature warning indicator illuminates, and the projector enters standby mode, follow the possible solutions above and then wait until the projector has cooled down abnormally. • Remaining lamp life becomes 5% or less. • Burnt-out lamp • Lamp circuit failure • The dust filter holder or lamp unit cover...

PG-F320W Operation Manual
Page 61
... result in the picture and color quality. In such a case, it is recommended that the lamp be replaced with a new one hour after the power cord is recommended that the lamp (sold separately) be replaced when the remaining lamp life becomes 5% or less, or when you contact your nearest Sharp Authorized Projector Dealer or Service Center to assure safe operation. ■ Should the lamp break, the glass...
... result in the picture and color quality. In such a case, it is recommended that the lamp be replaced with a new one hour after the power cord is recommended that the lamp (sold separately) be replaced when the remaining lamp life becomes 5% or less, or when you contact your nearest Sharp Authorized Projector Dealer or Service Center to assure safe operation. ■ Should the lamp break, the glass...

PG-F320W Operation Manual
Page 63
... installed, the power will not turn on the lamp unit cover (1) and place it while pressing the tab (2) to close it in the direction of the projector. 2 Reset the lamp timer. • While simultaneously holding down MENU/HELP, ENTER and R on the projector, press STANDBY/ON on the projector. • "LAMP 0000H" is displayed, indicating that the lamp timer is connected to become damaged or explode. 1 Connect the power cord. • Plug the power cord...
... installed, the power will not turn on the lamp unit cover (1) and place it while pressing the tab (2) to close it in the direction of the projector. 2 Reset the lamp timer. • While simultaneously holding down MENU/HELP, ENTER and R on the projector, press STANDBY/ON on the projector. • "LAMP 0000H" is displayed, indicating that the lamp timer is connected to become damaged or explode. 1 Connect the power cord. • Plug the power cord...

PG-F320W Operation Manual
Page 66
... sound is heard. • "Speaker" is set to "Off". 46 Data image is not centered. • Select "Data image is not centered" in "Picture Mode" and lower the "BrilliantColorTM" value. (Video Input only) • Video input system is incorrectly set. 51 Color is fog on the computer you turn on the connected equipment. • Cables are incorrectly connected to the operation manual of the computer is set . noise appears. • Adjust the focus...
... sound is heard. • "Speaker" is set to "Off". 46 Data image is not centered. • Select "Data image is not centered" in "Picture Mode" and lower the "BrilliantColorTM" value. (Video Input only) • Video input system is incorrectly set. 51 Color is fog on the computer you turn on the connected equipment. • Cables are incorrectly connected to the operation manual of the computer is set . noise appears. • Adjust the focus...

PG-F320W Operation Manual
Page 67
... sound is due to "ON", all the buttons are locked. Maintenance indicator on the projector. the standby mode using STANDBY/ON on • See "Maintenance Indicators". 55 the projector illuminates or blinks in "Picture Mode", and then select an input signal type. 51 41, 51 Picture is pink (no green) on . runs faster. 8, 9 52, 55, 56 The lamp does not light • The lamp indicator is too bright and • Image adjustments are incorrectly set...
... sound is due to "ON", all the buttons are locked. Maintenance indicator on the projector. the standby mode using STANDBY/ON on • See "Maintenance Indicators". 55 the projector illuminates or blinks in "Picture Mode", and then select an input signal type. 51 41, 51 Picture is pink (no green) on . runs faster. 8, 9 52, 55, 56 The lamp does not light • The lamp indicator is too bright and • Image adjustments are incorrectly set...

PG-F320W Operation Manual
Page 68
....sharp.com.mx Latin America Sharp Electronics Corp. Sharp Middle East Fze 971-4-81-5311 [email protected].sharp.co.jp Thailand Sharp Thebnakorn Co. If this projector, first refer to the "Troubleshooting" section on pages 62 and 63. For SHARP Assistance If you encounter any problems during setup or operation of this operation manual does not answer your question, please contact the SHARP Service...
....sharp.com.mx Latin America Sharp Electronics Corp. Sharp Middle East Fze 971-4-81-5311 [email protected].sharp.co.jp Thailand Sharp Thebnakorn Co. If this projector, first refer to the "Troubleshooting" section on pages 62 and 63. For SHARP Assistance If you encounter any problems during setup or operation of this operation manual does not answer your question, please contact the SHARP Service...

PG-F320W Operation Manual
Page 69
...) Video (RCA) Audio (ø3.5 mm stereo minijack) Audio (RCA) Output terminals Computer/Component (mini D-sub 15 pin) Audio (ø3.5 mm stereo minijack) Control and communication terminals LAN (RJ-45) USB (Type B) RS-232C (mini DIN 9 pin) Speakers Projection lamp Rated voltage Rated frequency Input current Power consumption (Standby) Operation temperature Cabinet Dimensions (main body only) [W × H × D] Weight (approx.) PG-F320W 0.65" DLP® Chip WXGA (1280 × 800) F 2.4 - 2.6 Manual...
...) Video (RCA) Audio (ø3.5 mm stereo minijack) Audio (RCA) Output terminals Computer/Component (mini D-sub 15 pin) Audio (ø3.5 mm stereo minijack) Control and communication terminals LAN (RJ-45) USB (Type B) RS-232C (mini DIN 9 pin) Speakers Projection lamp Rated voltage Rated frequency Input current Power consumption (Standby) Operation temperature Cabinet Dimensions (main body only) [W × H × D] Weight (approx.) PG-F320W 0.65" DLP® Chip WXGA (1280 × 800) F 2.4 - 2.6 Manual...

PG-F320W Operation Manual
Page 71
... Help 51 H-Pos 38, 51 Image shift 44 INPUT modes 30 Intake vent 12, 52 Kensington Security Standard connector 13 Keycode 47 Keylock 48 KEYSTONE button 29 Keystone Correction 29, 44 Lamp 57 Lamp indicator 55 Lamp Setting 43 Lamp Timer (Life 48 Lamp unit 58 Language (on-screen display language 45 LAN terminal 25 L-CLICK button 35 Lens Cap 12 MAC Address 50 MAGNIFY buttons 34 MENU/HELP button 39, 51 MONITOR OUT terminal 23 MOUSE/Adjustment buttons...
... Help 51 H-Pos 38, 51 Image shift 44 INPUT modes 30 Intake vent 12, 52 Kensington Security Standard connector 13 Keycode 47 Keylock 48 KEYSTONE button 29 Keystone Correction 29, 44 Lamp 57 Lamp indicator 55 Lamp Setting 43 Lamp Timer (Life 48 Lamp unit 58 Language (on-screen display language 45 LAN terminal 25 L-CLICK button 35 Lens Cap 12 MAC Address 50 MAGNIFY buttons 34 MENU/HELP button 39, 51 MONITOR OUT terminal 23 MOUSE/Adjustment buttons...


