
PG-MB60X Operation Manual
Page 5
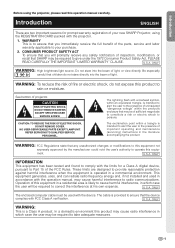
... cable is intended to alert the user to the presence of the FCC Rules. Be especially careful that the device complies with the operation manual, may be required to take adequate measures. -1 DO NOT REMOVE SCREWS EXCEPT SPECIFIED USER SERVICE SCREW. NO USER-SERVICEABLE PARTS EXCEPT LAMP UNIT. ment. This equipment generates, uses, and can radiate radio frequency energy and, if not installed and used with...
... cable is intended to alert the user to the presence of the FCC Rules. Be especially careful that the device complies with the operation manual, may be required to take adequate measures. -1 DO NOT REMOVE SCREWS EXCEPT SPECIFIED USER SERVICE SCREW. NO USER-SERVICEABLE PARTS EXCEPT LAMP UNIT. ment. This equipment generates, uses, and can radiate radio frequency energy and, if not installed and used with...

PG-MB60X Operation Manual
Page 6
... remote control. ALLOW 1 HOUR TO COOL BEFORE REPLACING THE LAMP. This SHARP projector uses a DMD panel. During normal operation, when putting the projector into standby mode always use the STANDBY button on the projector or on page 64. Ensure the cooling fan has stopped before disconnecting the power cord. LAMP REPLACEMENT WARNING : TURN OFF THE LAMP AND DISCONNECT POWER CORD BEFORE OPENING THIS COVER. REPLACE WITH SAME SHARP LAMP UNIT MODEL AN-MB60LP ONLY. As with any high technology electronic equipment such as large screen TVs, video...
... remote control. ALLOW 1 HOUR TO COOL BEFORE REPLACING THE LAMP. This SHARP projector uses a DMD panel. During normal operation, when putting the projector into standby mode always use the STANDBY button on the projector or on page 64. Ensure the cooling fan has stopped before disconnecting the power cord. LAMP REPLACEMENT WARNING : TURN OFF THE LAMP AND DISCONNECT POWER CORD BEFORE OPENING THIS COVER. REPLACE WITH SAME SHARP LAMP UNIT MODEL AN-MB60LP ONLY. As with any high technology electronic equipment such as large screen TVs, video...
PG-MB60X Operation Manual
Page 8
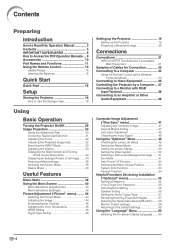
... 23 Using the Remote Control as the Wireless Computer Mouse 24 Connecting to Video Equipment 25 Controlling the Projector by a Computer ... 27 Connecting to a Monitor with RGB Input Terminal 28 Connecting to an Amplifier or Other Audio Equipment 28 Computer Image Adjustment ("Fine Sync" menu 47 Adjusting the Computer Image 47 Special Modes Setting 47 Auto Sync Adjustment 48 Checking the Input Signal 48 Using the "Options1" Menu 49 Checking the Lamp Life Status 49 Setting the Resize Mode 49 Setting On-screen Display 50 Setting the Video System...
... 23 Using the Remote Control as the Wireless Computer Mouse 24 Connecting to Video Equipment 25 Controlling the Projector by a Computer ... 27 Connecting to a Monitor with RGB Input Terminal 28 Connecting to an Amplifier or Other Audio Equipment 28 Computer Image Adjustment ("Fine Sync" menu 47 Adjusting the Computer Image 47 Special Modes Setting 47 Auto Sync Adjustment 48 Checking the Input Signal 48 Using the "Options1" Menu 49 Checking the Lamp Life Status 49 Setting the Resize Mode 49 Setting On-screen Display 50 Setting the Video System...

PG-MB60X Operation Manual
Page 11
... Lamp" on the screen washes out the colors, making viewing difficult. This does not indicate a malfunction (See pages 62 and 63.). Internal cleaning should be cleaned more often. tor Dealer or Service Center for long hours will automatically put the projector into standby mode to direct sunlight or bright light. ■ Position the screen so that this projector be installed in these environments, the vents and lens...
... Lamp" on the screen washes out the colors, making viewing difficult. This does not indicate a malfunction (See pages 62 and 63.). Internal cleaning should be cleaned more often. tor Dealer or Service Center for long hours will automatically put the projector into standby mode to direct sunlight or bright light. ■ Position the screen so that this projector be installed in these environments, the vents and lens...
PG-MB60X Operation Manual
Page 12
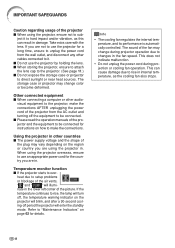
.... Using the projector in other audio- nate in the lower left corner of the picture. The sound of the fan may change during projection or cooling fan operation. Temperature monitor function ■ If the projector starts to "Maintenance Indicators" on the projector will illumi- Refer to over- IMPORTANT SAFEGUARDS Caution regarding usage of the projector ■ When using the projector in. ject it . ■ Do not use an appropriate power cord...
.... Using the projector in other audio- nate in the lower left corner of the picture. The sound of the fan may change during projection or cooling fan operation. Temperature monitor function ■ If the projector starts to "Maintenance Indicators" on the projector will illumi- Refer to over- IMPORTANT SAFEGUARDS Caution regarding usage of the projector ■ When using the projector in. ject it . ■ Do not use an appropriate power cord...
PG-MB60X Operation Manual
Page 15
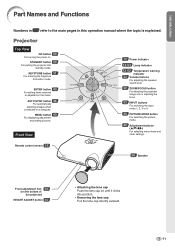
.... Introduction Part Names and Functions Numbers in refer to a computer. STANDBY button 29 For putting the projector into position. • Removing the lens cap Pull the lens cap directly outward. -11 KEYSTONE button 31 For entering the Keystone Correction mode. Front View 12 Power indicator 12·62 Lamp indicator 12·62 Temperature warning indicator 33 Volume buttons For adjusting the speaker sound level. 32 ZOOM/FOCUS button For adjusting the projected image size or adjusting the focus. 33 INPUT buttons For switching the input mode...
.... Introduction Part Names and Functions Numbers in refer to a computer. STANDBY button 29 For putting the projector into position. • Removing the lens cap Pull the lens cap directly outward. -11 KEYSTONE button 31 For entering the Keystone Correction mode. Front View 12 Power indicator 12·62 Lamp indicator 12·62 Temperature warning indicator 33 Volume buttons For adjusting the speaker sound level. 32 ZOOM/FOCUS button For adjusting the projected image size or adjusting the focus. 33 INPUT buttons For switching the input mode...
PG-MB60X Operation Manual
Page 18
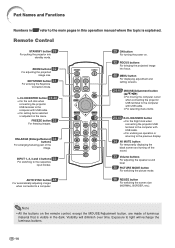
AUTO SYNC button 48 For automatically adjusting images when connected to a computer. 29 ON button For turning the power on. 32 FOCUS buttons For bringing the projected image into standby mode. Exposure to light will diminish over time. FREEZE button 35 For freezing images. ZOOM buttons 32 For adjusting the projected image size. Remote Control STANDBY button 29 For putting the projector into focus. 40 MENU button For displaying adjustment and setting screens. 24·40 MOUSE/Adjustment button For moving the computer cursor when connecting the projector USB terminal to the ...
AUTO SYNC button 48 For automatically adjusting images when connected to a computer. 29 ON button For turning the power on. 32 FOCUS buttons For bringing the projected image into standby mode. Exposure to light will diminish over time. FREEZE button 35 For freezing images. ZOOM buttons 32 For adjusting the projected image size. Remote Control STANDBY button 29 For putting the projector into focus. 40 MENU button For displaying adjustment and setting screens. 24·40 MOUSE/Adjustment button For moving the computer cursor when connecting the projector USB terminal to the ...
PG-MB60X Operation Manual
Page 20
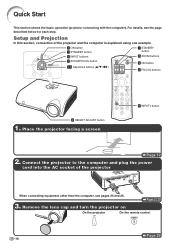
... button 7 STNADBY button 6 INPUT buttons 7 STANDBY button 5 ZOOM buttons 5 ZOOM/FOCUS button 5·6 Adjustment buttons ('/"/\/|) 3 ON button 5 FOCUS buttons 4 HEIGHT ADJUST button 1. Pages 23, 29 3. Setup and Projection In this section, connection of the projector When connecting equipment other than the computer, see the page described below for each step. For details, see pages 25 and 26. Place the projector facing a screen 6 INPUT1 button Page 19 2. Remove the lens cap and turn the projector on On the projector On the remote control Page...
... button 7 STNADBY button 6 INPUT buttons 7 STANDBY button 5 ZOOM buttons 5 ZOOM/FOCUS button 5·6 Adjustment buttons ('/"/\/|) 3 ON button 5 FOCUS buttons 4 HEIGHT ADJUST button 1. Pages 23, 29 3. Setup and Projection In this section, connection of the projector When connecting equipment other than the computer, see the page described below for each step. For details, see pages 25 and 26. Place the projector facing a screen 6 INPUT1 button Page 19 2. Remove the lens cap and turn the projector on On the projector On the remote control Page...
PG-MB60X Operation Manual
Page 23
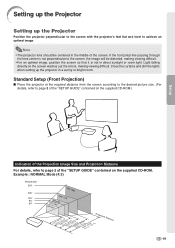
... image. Light falling directly on the supplied CD-ROM.) Setup Indication of the Projection Image Size and Projection Distance For details, refer to page 2 of the "SETUP GUIDE" contained on the screen washes out the colors, making viewing difficult. • For an optimal image, position the screen so that it is not in direct sunlight or room light. Note • The projector lens should be distorted, making viewing difficult. Standard Setup (Front Projection...
... image. Light falling directly on the supplied CD-ROM.) Setup Indication of the Projection Image Size and Projection Distance For details, refer to page 2 of the "SETUP GUIDE" contained on the screen washes out the colors, making viewing difficult. • For an optimal image, position the screen so that it is not in direct sunlight or room light. Note • The projector lens should be distorted, making viewing difficult. Standard Setup (Front Projection...
PG-MB60X Operation Manual
Page 27
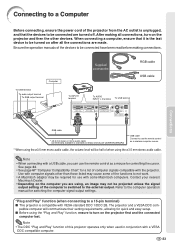
... the operation manuals of the devices to not work. • A Macintosh adaptor may be required for use the remote control as a mouse for quick and easy setup. ■ Before using the "Plug and Play" function, ensure to use the remote control as Sharp service part QCNWGA038WJPZ) USB cable Connect to turn on the projector and then the other than those listed may not be projected unless the signal output setting of the...
... the operation manuals of the devices to not work. • A Macintosh adaptor may be required for use the remote control as a mouse for quick and easy setup. ■ Before using the "Plug and Play" function, ensure to use the remote control as Sharp service part QCNWGA038WJPZ) USB cable Connect to turn on the projector and then the other than those listed may not be projected unless the signal output setting of the...
PG-MB60X Operation Manual
Page 33
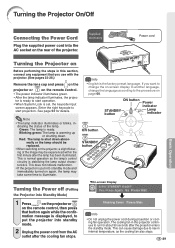
... lamp has been illuminated. Supplied accessory Power cord Turning the Projector on Before performing the steps in this section, connect any equipment that button again while the confir- Green: The lamp is shut down . Blinking green: The lamp is the factory preset language. This does not indicate malfunction. • If the projector is put the projector into Standby Mode) ▼On-screen Display 1 Press on the projector or on the projector, a slight flickering of the image...
... lamp has been illuminated. Supplied accessory Power cord Turning the Projector on Before performing the steps in this section, connect any equipment that button again while the confir- Green: The lamp is shut down . Blinking green: The lamp is the factory preset language. This does not indicate malfunction. • If the projector is put the projector into Standby Mode) ▼On-screen Display 1 Press on the projector or on the projector, a slight flickering of the image...
PG-MB60X Operation Manual
Page 34
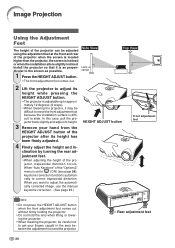
... HEIGHT ADJUST button of the projector when the screen is located higher than the projector, the screen is inclined or when the installation site is set to " " (ON) (see page 56), keystone correction functions automatically to slide. When you want to adjust the automatically corrected image, use the manual keystone correction. (See page 31.) HEIGHT ADJUST button Front adjustment foot Info • Do not press the HEIGHT ADJUST button when...
... HEIGHT ADJUST button of the projector when the screen is located higher than the projector, the screen is inclined or when the installation site is set to " " (ON) (see page 56), keystone correction functions automatically to slide. When you want to adjust the automatically corrected image, use the manual keystone correction. (See page 31.) HEIGHT ADJUST button Front adjustment foot Info • Do not press the HEIGHT ADJUST button when...
PG-MB60X Operation Manual
Page 48
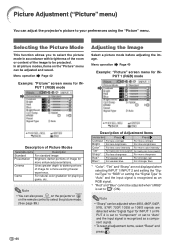
...; "Sharp" can also press on the projector or on the "Picture" menu can adjust the projector's picture to your preferences using the "Picture" menu. Menu operation Page 40 Example: "Picture" screen menu for INPUT 1 (RGB) mode Description of Picture Modes Selectable items Description Standard For standard image Presentation Brightens darker portions of image for INPUT 1 or INPUT 2 is set to "Component" or set to " " (ON). Game For natural color gradation for INPUT 1 (RGB) mode Adjusting the Image Select a picture mode before adjusting the image. Menu operation...
...; "Sharp" can also press on the projector or on the "Picture" menu can adjust the projector's picture to your preferences using the "Picture" menu. Menu operation Page 40 Example: "Picture" screen menu for INPUT 1 (RGB) mode Description of Picture Modes Selectable items Description Standard For standard image Presentation Brightens darker portions of image for INPUT 1 or INPUT 2 is set to "Component" or set to " " (ON). Game For natural color gradation for INPUT 1 (RGB) mode Adjusting the Image Select a picture mode before adjusting the image. Menu operation...

PG-MB60X Operation Manual
Page 54
... function is set to "Auto", you to turn the on-screen messages on Projector are displayed. • INPUT/VOLUME/AV MUTE/FREEZE/ AUTO SYNC/ENLARGE/ "An invalid button has been pressed." In that case, switch the video signal. NTSC4.43 When reproducing NTSC signals in INPUT 3 or INPUT 4 mode. • When "Video System" is active. Menu operation Page 42 Example: "Options1" screen menu for INPUT 3 (Video) mode Description of the source signal. -50 however, a clear picture from the connected audio-visual...
... function is set to "Auto", you to turn the on-screen messages on Projector are displayed. • INPUT/VOLUME/AV MUTE/FREEZE/ AUTO SYNC/ENLARGE/ "An invalid button has been pressed." In that case, switch the video signal. NTSC4.43 When reproducing NTSC signals in INPUT 3 or INPUT 4 mode. • When "Video System" is active. Menu operation Page 42 Example: "Options1" screen menu for INPUT 3 (Video) mode Description of the source signal. -50 however, a clear picture from the connected audio-visual...
PG-MB60X Operation Manual
Page 57
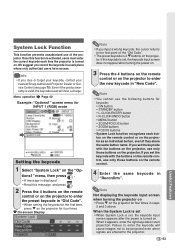
...; R-CLICK/UNDO button • MENU button • ZOOM/FOCUS button • ZOOM buttons • FOCUS buttons • System Lock function recognizes each time the projector is valid, the keycode reset will cause images not to be projected even when signals are entered to start projection. Note • You cannot use only those buttons on the projector. If you set , the keycode input screen does not appear when turning the power on. 3 Press the 4 buttons on the remote control or on...
...; R-CLICK/UNDO button • MENU button • ZOOM/FOCUS button • ZOOM buttons • FOCUS buttons • System Lock function recognizes each time the projector is valid, the keycode reset will cause images not to be projected even when signals are entered to start projection. Note • You cannot use only those buttons on the projector. If you set , the keycode input screen does not appear when turning the power on. 3 Press the 4 buttons on the remote control or on...
PG-MB60X Operation Manual
Page 70
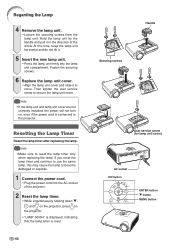
... projector. 2 Reset the lamp timer. • While simultaneously holding down ", and on the projector, press on , even if the power cord is reset. -66 Handle Securing screws User service screw (for lamp unit cover) AC socket ON button ENTER button " button MENU button If you reset the lamp timer and continue to use the same lamp, this time, keep the lamp unit horizontal and do not tilt it to become damaged or explode. 1 Connect the power cord. • Plug the power cord...
... projector. 2 Reset the lamp timer. • While simultaneously holding down ", and on the projector, press on , even if the power cord is reset. -66 Handle Securing screws User service screw (for lamp unit cover) AC socket ON button ENTER button " button MENU button If you reset the lamp timer and continue to use the same lamp, this time, keep the lamp unit horizontal and do not tilt it to become damaged or explode. 1 Connect the power cord. • Plug the power cord...
PG-MB60X Operation Manual
Page 72
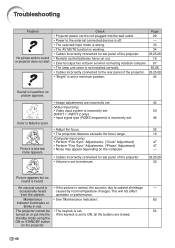
Color is blurred; noise appears. • Image adjustments are locked. An unusual sound is • If the picture is normal, the sound is due to minimum position. 44 Sound is heard but no sound or projector does not start. operation or performance. standby mode using the ON or STANDBY button on the computer. • Cables incorrectly connected to rear panel of the projector. 23,25-28 • "Bright" is set to minimum. 44...
Color is blurred; noise appears. • Image adjustments are locked. An unusual sound is • If the picture is normal, the sound is due to minimum position. 44 Sound is heard but no sound or projector does not start. operation or performance. standby mode using the ON or STANDBY button on the computer. • Cables incorrectly connected to rear panel of the projector. 23,25-28 • "Bright" is set to minimum. 44...

PG-MB60X Operation Manual
Page 73
... projection. Check • Change the input signal type setting. • Image adjustments are incorrectly set. • When temperature inside the projector increases, the cooling fan runs faster. • The lamp indicator is equipped with a microprocessor. Page 46 44 - 62 23,25-28 65 65 This projector is illuminating in again after the projector turns on. Its performance could be changed. Appendix -69 Picture is dark. The image sometimes flickers. Replace the lamp. • Cables...
... projection. Check • Change the input signal type setting. • Image adjustments are incorrectly set. • When temperature inside the projector increases, the cooling fan runs faster. • The lamp indicator is equipped with a microprocessor. Page 46 44 - 62 23,25-28 65 65 This projector is illuminating in again after the projector turns on. Its performance could be changed. Appendix -69 Picture is dark. The image sometimes flickers. Replace the lamp. • Cables...

PG-MB60X Operation Manual
Page 74
...sharp.co.jp http://www.sharp-th.com Sharp Electronics Incorporated of New Zealand (09) 634-2059, (09) 636-6972 http://www.sharpnz.co.nz Sharp-Roxy Sales (S) Pte. Ltd. 1300-135-022 http://www.sharp.net.au Sharp Corporation of Korea (82) 2-3660-2002 lcd@sharp-... Sharp Electronics (Europe) GMBH 01805-234675 http://www.sharp.de U.K. If this projector, first refer to the "Troubleshooting" section on pages 68 and 69. For SHARP Assistance If you encounter any problems during setup or operation of this operation manual does not answer your question, please contact the SHARP Service ...
...sharp.co.jp http://www.sharp-th.com Sharp Electronics Incorporated of New Zealand (09) 634-2059, (09) 636-6972 http://www.sharpnz.co.nz Sharp-Roxy Sales (S) Pte. Ltd. 1300-135-022 http://www.sharp.net.au Sharp Corporation of Korea (82) 2-3660-2002 lcd@sharp-... Sharp Electronics (Europe) GMBH 01805-234675 http://www.sharp.de U.K. If this projector, first refer to the "Troubleshooting" section on pages 68 and 69. For SHARP Assistance If you encounter any problems during setup or operation of this operation manual does not answer your question, please contact the SHARP Service ...

PG-MB60X Operation Manual
Page 75
... D-sub connector output (OUTPUT) signal RGB separate/sync on green type analog input: 0-0.7 Vp-p, positive, 75 Ω terminated HORIZONTAL SYNC. SIGNAL: TTL level (positive/negative) VERTICAL SYNC. Specifications Product type Multimedia Projector Model PG-MB60X Video system NTSC3.58/NTSC4.43/PAL/PAL-M/PAL-N/PAL-60/SECAM/ DTV480I/DTV480P/DTV540P/DTV576I/DTV576P/DTV720P/DTV1035I/DTV1080I Display method Single Chip Digital Micromirror DeviceTM (DMDTM) by Texas Instruments DMD panel Panel size: 0.7" No.
... D-sub connector output (OUTPUT) signal RGB separate/sync on green type analog input: 0-0.7 Vp-p, positive, 75 Ω terminated HORIZONTAL SYNC. SIGNAL: TTL level (positive/negative) VERTICAL SYNC. Specifications Product type Multimedia Projector Model PG-MB60X Video system NTSC3.58/NTSC4.43/PAL/PAL-M/PAL-N/PAL-60/SECAM/ DTV480I/DTV480P/DTV540P/DTV576I/DTV576P/DTV720P/DTV1035I/DTV1080I Display method Single Chip Digital Micromirror DeviceTM (DMDTM) by Texas Instruments DMD panel Panel size: 0.7" No.


