
PG-MB60X Operation Manual
Page 9
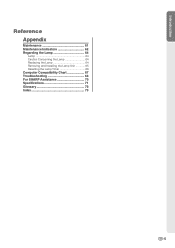
Introduction Reference Appendix Maintenance 61 Maintenance Indicators 62 Regarding the Lamp 64 Lamp 64 Caution Concerning the Lamp 64 Replacing the Lamp 64 Removing and Installing the Lamp Unit 65 Resetting the Lamp Timer 66 Computer Compatibility Chart 67 Troubleshooting 68 For SHARP Assistance 70 Specifications 71 Glossary 72 Index 73 -5
Introduction Reference Appendix Maintenance 61 Maintenance Indicators 62 Regarding the Lamp 64 Lamp 64 Caution Concerning the Lamp 64 Replacing the Lamp 64 Removing and Installing the Lamp Unit 65 Resetting the Lamp Timer 66 Computer Compatibility Chart 67 Troubleshooting 68 For SHARP Assistance 70 Specifications 71 Glossary 72 Index 73 -5
PG-MB60X Operation Manual
Page 43
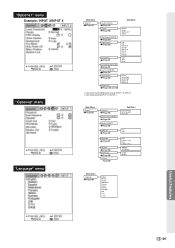
"Options1" menu Example: INPUT 3/INPUT 4 "Options2" menu "Language" menu Main Menu Options1 Page 49 Lamp Timer(Life) Page 49 Resize Page 49 OSD Display [ON/OFF] Page 50 Video System *2 Page 50 Background Page 51 Eco Mode [Eco/Standard] Page .../OFF] Page 56 Speaker [ON/OFF] Page 56 Audio Out Page 57 PRJ Mode Page 57 RS-232C Page 58 Monitor Out Page 58 All Reset Page 59 Sub Menu Old Password New Password Reconfirm FAO VAO Front Ceiling + Front Rear Ceiling + Rear 9600 bps 115200 bps Enable Disable Main Menu...
"Options1" menu Example: INPUT 3/INPUT 4 "Options2" menu "Language" menu Main Menu Options1 Page 49 Lamp Timer(Life) Page 49 Resize Page 49 OSD Display [ON/OFF] Page 50 Video System *2 Page 50 Background Page 51 Eco Mode [Eco/Standard] Page .../OFF] Page 56 Speaker [ON/OFF] Page 56 Audio Out Page 57 PRJ Mode Page 57 RS-232C Page 58 Monitor Out Page 58 All Reset Page 59 Sub Menu Old Password New Password Reconfirm FAO VAO Front Ceiling + Front Rear Ceiling + Rear 9600 bps 115200 bps Enable Disable Main Menu...
PG-MB60X Operation Manual
Page 70
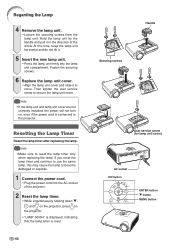
... user service screw to reset the lamp timer only when replacing the lamp. Info • Make sure to secure the lamp unit cover. Regarding the Lamp 4 Remove the lamp unit. • Loosen the securing screws from the lamp unit. At this may cause the lamp to the projector. Fasten... • "LAMP 0000H" is displayed, indicating that the lamp timer is connected to become damaged or explode. 1 Connect the power cord. • Plug the power cord into the lamp unit compartment. Resetting the Lamp Timer Reset the lamp timer after replacing the lamp. If you reset the lamp timer and continue...
... user service screw to reset the lamp timer only when replacing the lamp. Info • Make sure to secure the lamp unit cover. Regarding the Lamp 4 Remove the lamp unit. • Loosen the securing screws from the lamp unit. At this may cause the lamp to the projector. Fasten... • "LAMP 0000H" is displayed, indicating that the lamp timer is connected to become damaged or explode. 1 Connect the power cord. • Plug the power cord into the lamp unit compartment. Resetting the Lamp Timer Reset the lamp timer after replacing the lamp. If you reset the lamp timer and continue...

