
PG-MB60X Operation Manual
Page 2
Model No.: PG-MB60X Serial No.: Before recycling the packaging, please ensure that you have checked the contents of the carton thoroughly against the list of "Supplied accessories" on the bottom of your assistance in reporting the loss or theft of the projector and retain this information. IMPORTANT For your Projector, please record the Serial Number located on page 10.
Model No.: PG-MB60X Serial No.: Before recycling the packaging, please ensure that you have checked the contents of the carton thoroughly against the list of "Supplied accessories" on the bottom of your assistance in reporting the loss or theft of the projector and retain this information. IMPORTANT For your Projector, please record the Serial Number located on page 10.
PG-MB60X Operation Manual
Page 5
...for a Class A digital device, pursuant to Part 15 of sufficient magnitude to constitute a risk or electric shock to your new SHARP Projector, using the projector, please read this equip- ONLY WARNING: This is intended to alert the user to rain or moisture. CONSUMER PRODUCT SAFETY ACT ...To ensure that SHARP may be required to radio communications. DO NOT REMOVE SCREWS EXCEPT SPECIFIED USER SERVICE SCREW. NO USER-SERVICEABLE ...
...for a Class A digital device, pursuant to Part 15 of sufficient magnitude to constitute a risk or electric shock to your new SHARP Projector, using the projector, please read this equip- ONLY WARNING: This is intended to alert the user to rain or moisture. CONSUMER PRODUCT SAFETY ACT ...To ensure that SHARP may be required to radio communications. DO NOT REMOVE SCREWS EXCEPT SPECIFIED USER SERVICE SCREW. NO USER-SERVICEABLE ...

PG-MB60X Operation Manual
Page 6
...DU BOITIER ETANT EXTREMEMENT CHAUD, ATTENDRE 1 HEURE AVANT DE PROCEDER AU REMPLACEMENT DE LA LAMPE. NE REMPLACER QUE PAR UNE LAMPE SHARP DE MODÈLE AN-MB60LP. This SHARP projector uses a DMD panel. in the United States and/or other countries. • All other countries. • PC/AT... cooling fan has stopped before disconnecting the power cord. SEE OPERATION MANUAL. During normal operation, when putting the projector into standby mode always use the STANDBY button on the projector or on page 64. HIGH PRESSURE LAMP : RISK OF EXPLOSION. nies. • Some IC chips in ...
...DU BOITIER ETANT EXTREMEMENT CHAUD, ATTENDRE 1 HEURE AVANT DE PROCEDER AU REMPLACEMENT DE LA LAMPE. NE REMPLACER QUE PAR UNE LAMPE SHARP DE MODÈLE AN-MB60LP. This SHARP projector uses a DMD panel. in the United States and/or other countries. • All other countries. • PC/AT... cooling fan has stopped before disconnecting the power cord. SEE OPERATION MANUAL. During normal operation, when putting the projector into standby mode always use the STANDBY button on the projector or on page 64. HIGH PRESSURE LAMP : RISK OF EXPLOSION. nies. • Some IC chips in ...
PG-MB60X Operation Manual
Page 7
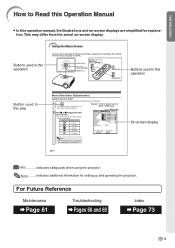
...menu is not available for selecting INPUT 3 or INPUT 4. -40 On-screen display Info Indicates safeguards when using the buttons on the projector. 1 Press . • The "Picture" menu screen for explanation. Note ........Indicates additional information for the selected menu screen is displayed... Operation Manual • In this step Menu Selections (Adjustments) Example: Adjusting "Bright" • This operation can be performed by using the projector. Example: "Picture" screen menu for INPUT 1 (RGB) mode Menu icons 2 Press | or \ to achieve two functions, adjustments and ...
...menu is not available for selecting INPUT 3 or INPUT 4. -40 On-screen display Info Indicates safeguards when using the buttons on the projector. 1 Press . • The "Picture" menu screen for explanation. Note ........Indicates additional information for the selected menu screen is displayed... Operation Manual • In this step Menu Selections (Adjustments) Example: Adjusting "Bright" • This operation can be performed by using the projector. Example: "Picture" screen menu for INPUT 1 (RGB) mode Menu icons 2 Press | or \ to achieve two functions, adjustments and ...
PG-MB60X Operation Manual
Page 8
... 44 Emphasizing the Contrast 45 Adjusting the Color Temperature 45 sRGB Setting 46 Signal Type Setting 46 Setting up the Projector 19 Setting up the Projector 19 Projecting a Reversed Image 20 Connections Connections 21 INPUT/OUTPUT Terminals and Connectable Main Equipment 21 Samples of Cables... 22 Connecting to a Computer 23 Using the Remote Control as the Wireless Computer Mouse 24 Connecting to Video Equipment 25 Controlling the Projector by a Computer ... 27 Connecting to a Monitor with RGB Input Terminal 28 Connecting to an Amplifier or Other Audio Equipment 28 Computer...
... 44 Emphasizing the Contrast 45 Adjusting the Color Temperature 45 sRGB Setting 46 Signal Type Setting 46 Setting up the Projector 19 Setting up the Projector 19 Projecting a Reversed Image 20 Connections Connections 21 INPUT/OUTPUT Terminals and Connectable Main Equipment 21 Samples of Cables... 22 Connecting to a Computer 23 Using the Remote Control as the Wireless Computer Mouse 24 Connecting to Video Equipment 25 Controlling the Projector by a Computer ... 27 Connecting to a Monitor with RGB Input Terminal 28 Connecting to an Amplifier or Other Audio Equipment 28 Computer...

PG-MB60X Operation Manual
Page 11
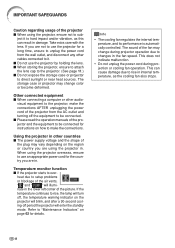
... screen washes out the colors, making viewing difficult. As long as not to maintain high image quality, SHARP recommends that this projector be installed in an area free from humidity, dust and cigarette smoke. Rest your projector. Introduction Ensure that you read the following safeguards when setting up the screen in a sunny or...
... screen washes out the colors, making viewing difficult. As long as not to maintain high image quality, SHARP recommends that this projector be installed in an area free from humidity, dust and cigarette smoke. Rest your projector. Introduction Ensure that you read the following safeguards when setting up the screen in a sunny or...
PG-MB60X Operation Manual
Page 12
... is automatically controlled. If you are not to use an appropriate power cord for details. Temperature monitor function ■ If the projector starts to setup problems or blockage of the plug may vary depending on page 62 for the country you are in . nate in...damage due to hard impact and/or vibration, as the cooling fan also stops. -8 IMPORTANT SAFEGUARDS Caution regarding usage of the projector ■ When using the projector in . Using the projector in other countries ■ The power supply voltage and the shape of the air vents, " " and " " will blink...
... is automatically controlled. If you are not to use an appropriate power cord for details. Temperature monitor function ■ If the projector starts to setup problems or blockage of the plug may vary depending on page 62 for the country you are in . nate in...damage due to hard impact and/or vibration, as the cooling fan also stops. -8 IMPORTANT SAFEGUARDS Caution regarding usage of the projector ■ When using the projector in . Using the projector in other countries ■ The power supply voltage and the shape of the air vents, " " and " " will blink...

PG-MB60X Operation Manual
Page 13
...setup guide 1) Double click the "SETUP" folder. 2) Double click the language (name of the folder) that you can work with the projector. Introduction How to Access the PDF Operation Manuals PDF operation manuals in several languages are included in the CD-ROM, so that you want... to view. 3) Double click the "MB60" pdf file to access the projector manuals. Screen Size and Projection Distance 2 Connecting Pin Assignments 3 RS-232C Specifications and Commands ..... 4 Dimensions 6 -9 Info • If the desired ...
...setup guide 1) Double click the "SETUP" folder. 2) Double click the language (name of the folder) that you can work with the projector. Introduction How to Access the PDF Operation Manuals PDF operation manuals in several languages are included in the CD-ROM, so that you want... to view. 3) Double click the "MB60" pdf file to access the projector manuals. Screen Size and Projection Distance 2 Connecting Pin Assignments 3 RS-232C Specifications and Commands ..... 4 Dimensions 6 -9 Info • If the desired ...
PG-MB60X Operation Manual
Page 14
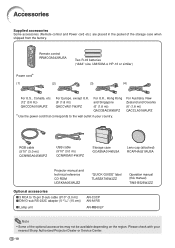
... QACCLA018WJPZ RGB cable (9'10" (3.0 m)) QCNWGA045WJPZ USB cable (9'10" (3.0 m)) QCNWGA014WJPZ Storage case GCASNA014WJSA Lens cap (attached) RCAPHA021WJSA Projector manual and technical reference CD-ROM UDSKAA053WJZZ "QUICK GUIDE" label TLABZA793WJZZ Optional accessories ■ 3 RCA to the wall outlet in ...on the region. Accessories Supplied accessories Some accessories (Remote control and Power cord etc.) are placed in your nearest Sharp Authorized Projector Dealer or Service Center. -10 Please check with your country. Remote control RRMCGA342WJSA Two R-03 batteries ("AAA" ...
... QACCLA018WJPZ RGB cable (9'10" (3.0 m)) QCNWGA045WJPZ USB cable (9'10" (3.0 m)) QCNWGA014WJPZ Storage case GCASNA014WJSA Lens cap (attached) RCAPHA021WJSA Projector manual and technical reference CD-ROM UDSKAA053WJZZ "QUICK GUIDE" label TLABZA793WJZZ Optional accessories ■ 3 RCA to the wall outlet in ...on the region. Accessories Supplied accessories Some accessories (Remote control and Power cord etc.) are placed in your nearest Sharp Authorized Projector Dealer or Service Center. -10 Please check with your country. Remote control RRMCGA342WJSA Two R-03 batteries ("AAA" ...
PG-MB60X Operation Manual
Page 15
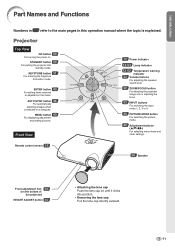
...or adjusted on until it clicks into standby mode. Remote control sensor 15 56 Speaker Front adjustment foot 30 (on the bottom of the projector) HEIGHT ADJUST button 30 • Attaching the lens cap Push the lens cap on the menu. Introduction Part Names and Functions Numbers ... For switching the picture mode. 40 Adjustment buttons ('/"/\/|) For selecting menu items and other settings. Projector Top View ON button 29 For turning the power on. STANDBY button 29 For putting the projector into position. • Removing the lens cap Pull the lens cap directly outward. -11 KEYSTONE...
...or adjusted on until it clicks into standby mode. Remote control sensor 15 56 Speaker Front adjustment foot 30 (on the bottom of the projector) HEIGHT ADJUST button 30 • Attaching the lens cap Push the lens cap on the menu. Introduction Part Names and Functions Numbers ... For switching the picture mode. 40 Adjustment buttons ('/"/\/|) For selecting menu items and other settings. Projector Top View ON button 29 For turning the power on. STANDBY button 29 For putting the projector into position. • Removing the lens cap Pull the lens cap directly outward. -11 KEYSTONE...
PG-MB60X Operation Manual
Page 16
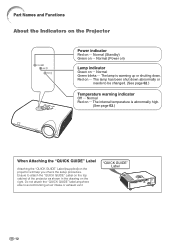
Normal (Power on) Lamp indicator Green on the projector will help you check the setup procedure. Do not attach the "QUICK GUIDE" label anywhere else to be changed. (See page 62.) Temperature warning indicator ..." Label Attaching the "QUICK GUIDE" Label (supplied) on ... Red on the right. Ensure to attach the "QUICK GUIDE" Label on the top cabinet of the projector as shown in the drawing on ... Normal Red on ... The lamp has been shut down . Normal (Standby) Green on ... Part Names and Functions About the...
Normal (Power on) Lamp indicator Green on the projector will help you check the setup procedure. Do not attach the "QUICK GUIDE" label anywhere else to be changed. (See page 62.) Temperature warning indicator ..." Label Attaching the "QUICK GUIDE" Label (supplied) on ... Red on the right. Ensure to attach the "QUICK GUIDE" Label on the top cabinet of the projector as shown in the drawing on ... Normal Red on ... The lamp has been shut down . Normal (Standby) Green on ... Part Names and Functions About the...
PG-MB60X Operation Manual
Page 17
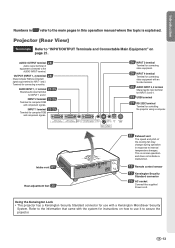
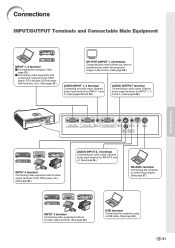
... (INPUT 1, 2) terminal 28 · Shared computer RGB and component signals output terminal for INPUT 1 and 2. · Terminal for controlling the projector using a computer. INPUT 1 terminal 23·25 Terminal for computer RGB and component signals. 26 INPUT 3 terminal Terminal for connecting video equipment. ...26 INPUT 4 terminal Terminal for connecting video equipment with the system for use it to secure the projector. -13 INPUT 2 terminal 23·25 Terminal for INPUT 1 and 2. Projector (Rear View) Terminals Refer to the AUDIO INPUT terminal. AUDIO INPUT 1, 2 terminal 23·25...
... (INPUT 1, 2) terminal 28 · Shared computer RGB and component signals output terminal for INPUT 1 and 2. · Terminal for controlling the projector using a computer. INPUT 1 terminal 23·25 Terminal for computer RGB and component signals. 26 INPUT 3 terminal Terminal for connecting video equipment. ...26 INPUT 4 terminal Terminal for connecting video equipment with the system for use it to secure the projector. -13 INPUT 2 terminal 23·25 Terminal for INPUT 1 and 2. Projector (Rear View) Terminals Refer to the AUDIO INPUT terminal. AUDIO INPUT 1, 2 terminal 23·25...
PG-MB60X Operation Manual
Page 18
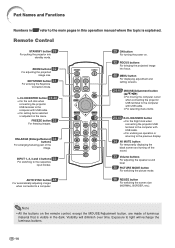
... of luminous material that is visible in this operation manual where the topic is explained. Remote Control STANDBY button 29 For putting the projector into focus. 40 MENU button For displaying adjustment and setting screens. 24·40 MOUSE/Adjustment button For moving the computer cursor when... with USB cable. • For selecting menu items. 24·40 R-CLICK/UNDO button • For the Right click when connecting the projector USB terminal to the computer with USB cable. • For setting items selected or adjusted on the remote control, except the MOUSE/Adjustment button...
... of luminous material that is visible in this operation manual where the topic is explained. Remote Control STANDBY button 29 For putting the projector into focus. 40 MENU button For displaying adjustment and setting screens. 24·40 MOUSE/Adjustment button For moving the computer cursor when... with USB cable. • For selecting menu items. 24·40 R-CLICK/UNDO button • For the Right click when connecting the projector USB terminal to the computer with USB cable. • For setting items selected or adjusted on the remote control, except the MOUSE/Adjustment button...
PG-MB60X Operation Manual
Page 19
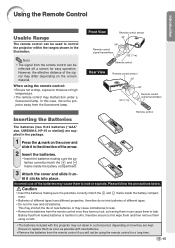
...control: • Ensure not to drop, expose to leak or explode. til it in a short period, depending on the screen material. In this projector may differ depending on how they have different properties, therefore do not mix batteries of the arrow. 2 Insert the batteries. • Insert the batteries... the fluorescent lamp. Ensure to first wipe them and then remove them as soon as leaving them in can cause them to control the projector within the ranges shown in the illustration. However, the effective distance of the signal may run out, as possible with new batteries. &#...
...control: • Ensure not to drop, expose to leak or explode. til it in a short period, depending on the screen material. In this projector may differ depending on how they have different properties, therefore do not mix batteries of the arrow. 2 Insert the batteries. • Insert the batteries... the fluorescent lamp. Ensure to first wipe them and then remove them as soon as leaving them in can cause them to control the projector within the ranges shown in the illustration. However, the effective distance of the signal may run out, as possible with new batteries. &#...
PG-MB60X Operation Manual
Page 20
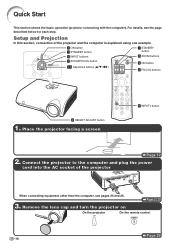
... the computer and plug the power cord into the AC socket of the projector and the computer is explained using one example. 3 ON button 7 STNADBY button 6 INPUT buttons 7 STANDBY button 5 ZOOM buttons 5 ZOOM/FOCUS button 5·6 Adjustment buttons ('/"/\/|) ... buttons 4 HEIGHT ADJUST button 1. Pages 23, 29 3. Remove the lens cap and turn the projector on On the projector On the remote control Page 29 -16 Setup and Projection In this section, connection of the projector When connecting equipment other than the computer, see the page described below for each step. For...
... the computer and plug the power cord into the AC socket of the projector and the computer is explained using one example. 3 ON button 7 STNADBY button 6 INPUT buttons 7 STANDBY button 5 ZOOM buttons 5 ZOOM/FOCUS button 5·6 Adjustment buttons ('/"/\/|) ... buttons 4 HEIGHT ADJUST button 1. Pages 23, 29 3. Remove the lens cap and turn the projector on On the projector On the remote control Page 29 -16 Setup and Projection In this section, connection of the projector When connecting equipment other than the computer, see the page described below for each step. For...
PG-MB60X Operation Manual
Page 21
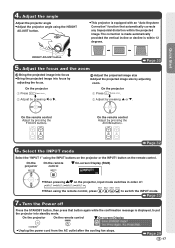
... Bring the projected image into standby mode. Select the INPUT mode Page 32 Select the "INPUT 1" using the remote control, press /// to put the projector into focus by adjusting the focus. 2 Adjust the projected image size • Adjust the projected image size by pressing the ZOOM buttons. 6. Quick Start ... the projected image. HEIGHT ADJUST button Page 30 5. On the remote control Adjust by pressing ' or ". Page 29 -17 On the projector On the remote control " On-screen Display • Unplug the power cord from the AC outlet after the cooling fan stops. On the...
... Bring the projected image into standby mode. Select the INPUT mode Page 32 Select the "INPUT 1" using the remote control, press /// to put the projector into focus by adjusting the focus. 2 Adjust the projected image size • Adjust the projected image size by pressing the ZOOM buttons. 6. Quick Start ... the projected image. HEIGHT ADJUST button Page 30 5. On the remote control Adjust by pressing ' or ". Page 29 -17 On the projector On the remote control " On-screen Display • Unplug the power cord from the AC outlet after the cooling fan stops. On the...

PG-MB60X Operation Manual
Page 22
...• This storage case is only for protection. • Place the projector into the stor- Info • Ensure the projector has cooled down sufficiently before placing it in the front pocket of the storage case. 2 Place the projector into the storage case with the lens facing the handle. • Ensure ...the projector is attached to the lens, and place it in the case. • Ensure the lens cap is held...
...• This storage case is only for protection. • Place the projector into the stor- Info • Ensure the projector has cooled down sufficiently before placing it in the front pocket of the storage case. 2 Place the projector into the storage case with the lens facing the handle. • Ensure ...the projector is attached to the lens, and place it in the case. • Ensure the lens cap is held...
PG-MB60X Operation Manual
Page 23
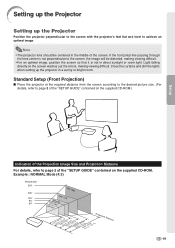
...optimal image, position the screen so that it is not perpendicular to achieve an optimal image. Standard Setup (Front Projection) ■ Place the projector at the required distance from the screen according to the desired picture size. (For details, refer to page 2 of the "SETUP GUIDE" contained... Size and Projection Distance For details, refer to page 2 of the screen. Light falling directly on the supplied CD-ROM. Setting up the Projector Setting up the projector in a sunny or bright room. Example : NORMAL Mode (4:3) Picture Size 300" 200" 100" 84" 60" 240"´180" 160"&#...
...optimal image, position the screen so that it is not perpendicular to achieve an optimal image. Standard Setup (Front Projection) ■ Place the projector at the required distance from the screen according to the desired picture size. (For details, refer to page 2 of the "SETUP GUIDE" contained... Size and Projection Distance For details, refer to page 2 of the screen. Light falling directly on the supplied CD-ROM. Setting up the Projector Setting up the projector in a sunny or bright room. Example : NORMAL Mode (4:3) Picture Size 300" 200" 100" 84" 60" 240"´180" 160"&#...
PG-MB60X Operation Manual
Page 24
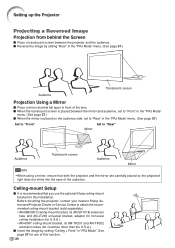
...are carefully placed so the projected light does not shine into the eyes of the audience. Before mounting the projector, contact your nearest Sharp Authorized Projector Dealer or Service Center to obtain the recommended ceiling-mount bracket (sold separately). • AN-MBCM10 ceiling-...57.) Translucent screen Audience Projection Using a Mirror ■ Place a mirror (normal flat type) in front of this installation. Setting up the Projector Projecting a Reversed Image Projection from behind the Screen ■ Place a translucent screen between the mirror and audience, set to "Rear" in ...
...are carefully placed so the projected light does not shine into the eyes of the audience. Before mounting the projector, contact your nearest Sharp Authorized Projector Dealer or Service Center to obtain the recommended ceiling-mount bracket (sold separately). • AN-MBCM10 ceiling-...57.) Translucent screen Audience Projection Using a Mirror ■ Place a mirror (normal flat type) in front of this installation. Setting up the Projector Projecting a Reversed Image Projection from behind the Screen ■ Place a translucent screen between the mirror and audience, set to "Rear" in ...
PG-MB60X Operation Manual
Page 25
... INPUT 3, 4 terminal Connecting an audio cable. (Shared audio input terminal for INPUT 3 and 4.) (See page 26.) RS-232C terminal Connecting the computer to control the projector. (See page 27.) INPUT 3 terminal Connecting video equipment without S-video output terminal. (See page 26.) USB terminal Connecting the computer using a USB cable. (See page...
... INPUT 3, 4 terminal Connecting an audio cable. (Shared audio input terminal for INPUT 3 and 4.) (See page 26.) RS-232C terminal Connecting the computer to control the projector. (See page 27.) INPUT 3 terminal Connecting video equipment without S-video output terminal. (See page 26.) USB terminal Connecting the computer using a USB cable. (See page...


