
Installation Instructions
Page 2
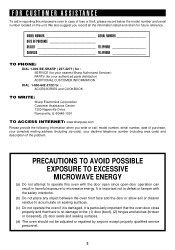
... to the: (1) door (bent), (2) hinges and latches (broken or loosened), (3) door seals and sealing surfaces. (d) The oven should not be adjusted or repaired by anyone except properly qualified service personnel. 2 MODEL NUMBER SERIAL NUMBER DATE OF PURCHASE DEALER TELEPHONE SERVICER TELEPHONE TO PHONE: DIAL 1-800-BE-SHARP ( 237-4277 ) for : SERVICE (for your nearest Sharp Authorized Servicer) PARTS (for your daytime telephone number (including area code) and description...
... to the: (1) door (bent), (2) hinges and latches (broken or loosened), (3) door seals and sealing surfaces. (d) The oven should not be adjusted or repaired by anyone except properly qualified service personnel. 2 MODEL NUMBER SERIAL NUMBER DATE OF PURCHASE DEALER TELEPHONE SERVICER TELEPHONE TO PHONE: DIAL 1-800-BE-SHARP ( 237-4277 ) for : SERVICE (for your nearest Sharp Authorized Servicer) PARTS (for your daytime telephone number (including area code) and description...
Installation Instructions
Page 3
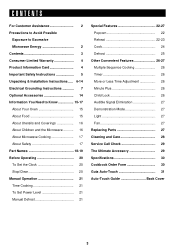
... Popcorn 22 Reheat 22-23 Cook 24 Defrost 25 Other Convenient Features 26-27 Multiple Sequence Cooking 26 Timer 26 More or Less Time Adjustment 26 Minute Plus 26 Child Lock 26 Audible Signal Elimination 27 Demonstration Mode 27 Light 27 Fan 27 Replacing Parts 27 Cleaning and Care 28 Service Call Check 29 The Ultimate Accessory 29 Specifications 30 Cookbook Order Form 30 Guia Auto-Touch 31 Auto-Touch Guide Back Cover...
... Popcorn 22 Reheat 22-23 Cook 24 Defrost 25 Other Convenient Features 26-27 Multiple Sequence Cooking 26 Timer 26 More or Less Time Adjustment 26 Minute Plus 26 Child Lock 26 Audible Signal Elimination 27 Demonstration Mode 27 Light 27 Fan 27 Replacing Parts 27 Cleaning and Care 28 Service Call Check 29 The Ultimate Accessory 29 Specifications 30 Cookbook Order Form 30 Guia Auto-Touch 31 Auto-Touch Guide Back Cover...
Installation Instructions
Page 4
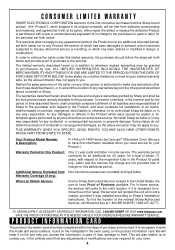
... damaged or defaced, which has been subjected to misuse, abnormal service or handling, or which were caused by repairs or attempted repairs performed by anyone other than an authorized servicer. Your Product Model Number & Description: R-1405 or R-1406 Home Use Carousel™ Microwave Oven. (Be sure to have Proof of Sharp. PRODUCT INFORMATION CARD The product information card should follow the steps...
... damaged or defaced, which has been subjected to misuse, abnormal service or handling, or which were caused by repairs or attempted repairs performed by anyone other than an authorized servicer. Your Product Model Number & Description: R-1405 or R-1406 Home Use Carousel™ Microwave Oven. (Be sure to have Proof of Sharp. PRODUCT INFORMATION CARD The product information card should follow the steps...

Installation Instructions
Page 5
... should ignite, keep oven door closed glass jars-may damage the louver and the grease filters. 20. Do not store or use the cavity for example, closed , turn the fan on page 7. 4. Do not overcook food. Remove wire twist-ties from heated surfaces. 15. Do not use this appliance outdoors. Clean ventilation openings and grease filters frequently-Grease should not be allowed to heat, cook or dry food. Corrosive cleaning agents, such...
... should ignite, keep oven door closed glass jars-may damage the louver and the grease filters. 20. Do not store or use the cavity for example, closed , turn the fan on page 7. 4. Do not overcook food. Remove wire twist-ties from heated surfaces. 15. Do not use this appliance outdoors. Clean ventilation openings and grease filters frequently-Grease should not be allowed to heat, cook or dry food. Corrosive cleaning agents, such...
Installation Instructions
Page 6
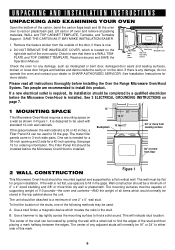
... mounted against and supported by a qualified electrician before installing the Over the Range Microwave Oven/Hood System. See page 15 for a 42-inch opening and 2 sets for ordering information. Wall construction should be completed by a flat vertical wall. Hinges Safety door latches Oven cavity Door seals and sealing surfaces Waveguide cover Check the oven for any damage, do not operate the oven and contact your dealer or SHARP AUTHORIZED SERVICER. One set is located...
... mounted against and supported by a qualified electrician before installing the Over the Range Microwave Oven/Hood System. See page 15 for a 42-inch opening and 2 sets for ordering information. Wall construction should be completed by a flat vertical wall. Hinges Safety door latches Oven cavity Door seals and sealing surfaces Waveguide cover Check the oven for any damage, do not operate the oven and contact your dealer or SHARP AUTHORIZED SERVICER. One set is located...
Installation Instructions
Page 7
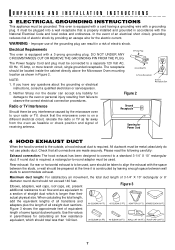
... UNDER ANY CIRCUMSTANCES CUT OR REMOVE THE GROUNDING PIN FROM THE PLUG. The Power Supply Cord and plug must be located inside the cabinet directly above the Microwave Oven mounting location as shown in a risk of electric shock. Neither Sharp nor the dealer can result in Figure 2. Rear exhaust: If a rear or horizontal exhaust is to be used . Maximum duct length: For satisfactory air movement, the total duct length of some...
... UNDER ANY CIRCUMSTANCES CUT OR REMOVE THE GROUNDING PIN FROM THE PLUG. The Power Supply Cord and plug must be located inside the cabinet directly above the Microwave Oven mounting location as shown in a risk of electric shock. Neither Sharp nor the dealer can result in Figure 2. Rear exhaust: If a rear or horizontal exhaust is to be used . Maximum duct length: For satisfactory air movement, the total duct length of some...
Installation Instructions
Page 8
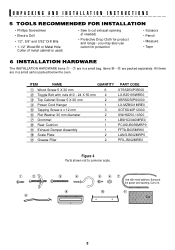
... 6 2 Toggle Bolt with nuts #10 - 24 X 50 mm 4 3 Top Cabinet Screw 5 X 60 mm 2 4 Power Cord Hanger 1 5 Tapping Screw 4 x 12 mm 3 6 Flat Washer 30 mm diameter 2 7 Grommet 1 8 Rear Cushion 1 9 Exhaust Damper Assembly 1 ! you may also use carton for product and range - Items 8 - " are packed separately. UNPACKING AND INSTALLATION INSTRUCTIONS 5 TOOLS RECOMMENDED FOR INSTALLATION • Phillips Screwdriver • Electric Drill • 1/2", 5/8" and 3/32" Drill Bits • 1-1/2" Wood...
... 6 2 Toggle Bolt with nuts #10 - 24 X 50 mm 4 3 Top Cabinet Screw 5 X 60 mm 2 4 Power Cord Hanger 1 5 Tapping Screw 4 x 12 mm 3 6 Flat Washer 30 mm diameter 2 7 Grommet 1 8 Rear Cushion 1 9 Exhaust Damper Assembly 1 ! you may also use carton for product and range - Items 8 - " are packed separately. UNPACKING AND INSTALLATION INSTRUCTIONS 5 TOOLS RECOMMENDED FOR INSTALLATION • Phillips Screwdriver • Electric Drill • 1/2", 5/8" and 3/32" Drill Bits • 1-1/2" Wood...
Installation Instructions
Page 10
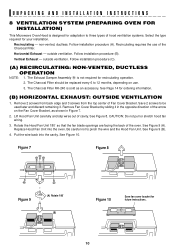
... - Vertical Exhaust - The Charcoal Filter RK-240 is not required for recirculating operation. 2. Horizontal Exhaust - The Exhaust Damper Assembly 9 is sold as shown in the opposite direction of the oven. non-vented, ductless. outside ventilation. See Figure 8. Put the wire back into the oven. UNPACKING AND INSTALLATION INSTRUCTIONS 8 VENTILATION SYSTEM (PREPARING OVEN FOR INSTALLATION) This Microwave Oven/Hood is designed for adaptation to three types of Fan Cover Bracket. Remove 2 screws from back edge and 3 screws from...
... - Vertical Exhaust - The Charcoal Filter RK-240 is not required for recirculating operation. 2. Horizontal Exhaust - The Exhaust Damper Assembly 9 is sold as shown in the opposite direction of the oven. non-vented, ductless. outside ventilation. See Figure 8. Put the wire back into the oven. UNPACKING AND INSTALLATION INSTRUCTIONS 8 VENTILATION SYSTEM (PREPARING OVEN FOR INSTALLATION) This Microwave Oven/Hood is designed for adaptation to three types of Fan Cover Bracket. Remove 2 screws from back edge and 3 screws from...
Installation Instructions
Page 11
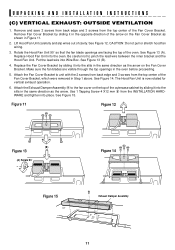
... the Hood Fan Unit 90˚ so that the fan blade openings are visible through the top openings in Figure 11. 2. Use 1 Tapping Screw 4 X12 mm 5 from the INSTALLATION HARDWARE and tighten into the slits in the same direction as the arrow on the Fan Cover Bracket as shown in the oven before proceeding. 5. UNPACKING AND INSTALLATION INSTRUCTIONS (C) VERTICAL EXHAUST: OUTSIDE VENTILATION 1. Lift Hood Fan Unit carefully and slip wires out...
... the Hood Fan Unit 90˚ so that the fan blade openings are visible through the top openings in Figure 11. 2. Use 1 Tapping Screw 4 X12 mm 5 from the INSTALLATION HARDWARE and tighten into the slits in the same direction as the arrow on the Fan Cover Bracket as shown in the oven before proceeding. 5. UNPACKING AND INSTALLATION INSTRUCTIONS (C) VERTICAL EXHAUST: OUTSIDE VENTILATION 1. Lift Hood Fan Unit carefully and slip wires out...

Installation Instructions
Page 14
.... The metal filler panels come in the power cord. 3. Charcoal Filter (RK-240). OPTIONAL ACCESSORIES Two optional accessories are available for a 42-inch opening. If dealer does not stock this oven. 1. One set is needed for a 36-inch opening . See Figure 24. 3. UNPACKING AND INSTALLATION INSTRUCTIONS MOUNTING OVEN TO THE WALL Two people are recommended to attach the Microwave Oven/Hood to the inside of the cabinet using the Power Cord Hanger 4. See...
.... The metal filler panels come in the power cord. 3. Charcoal Filter (RK-240). OPTIONAL ACCESSORIES Two optional accessories are available for a 42-inch opening. If dealer does not stock this oven. 1. One set is needed for a 36-inch opening . See Figure 24. 3. UNPACKING AND INSTALLATION INSTRUCTIONS MOUNTING OVEN TO THE WALL Two people are recommended to attach the Microwave Oven/Hood to the inside of the cabinet using the Power Cord Hanger 4. See...

Installation Instructions
Page 15
... the magnetron cycling on bottles after heating before heating and allow to the touch when cooking or reheating. Condensation is a normal part of moisture that condenses in the oven. The oven is for ordering the Ultimate Accessory, the SHARP CAROUSEL MICROWAVE COOKBOOK. NEVER use special POPCORN pad. When using the oven at power levels below 100%, you may not be used to absorb the microwave energy. Popcorn • Use specially bagged popcorn...
... the magnetron cycling on bottles after heating before heating and allow to the touch when cooking or reheating. Condensation is a normal part of moisture that condenses in the oven. The oven is for ordering the Ultimate Accessory, the SHARP CAROUSEL MICROWAVE COOKBOOK. NEVER use special POPCORN pad. When using the oven at power levels below 100%, you may not be used to absorb the microwave energy. Popcorn • Use specially bagged popcorn...
Installation Instructions
Page 16
...; heat-resistant glass (Pyrex®) • microwave-safe plastics becomes very hot should be used . Children should not be used . INFORMATION YOU NEED TO KNOW ABOUT UTENSILS AND COVERINGS It is not responsible for any surface of the oven. See page 26 for Child Lock feature. 16 Make sure the utensil does not touch the interior walls during cooking. At no time should stand on the food...
...; heat-resistant glass (Pyrex®) • microwave-safe plastics becomes very hot should be used . Children should not be used . INFORMATION YOU NEED TO KNOW ABOUT UTENSILS AND COVERINGS It is not responsible for any surface of the oven. See page 26 for Child Lock feature. 16 Make sure the utensil does not touch the interior walls during cooking. At no time should stand on the food...
Installation Instructions
Page 17
...; Turn foods over at edge. - Food residue can cause arcing and/or fires. • Use care when removing items from oven and stir, if possible. Large items like roasts must be turned over once during cooking, unless it 's in use potholders to speed cooking of foodborne bacteria. • Keep waveguide cover clean. Food steams throughout, not just at least once. • Rearrange foods such as needed. white...
...; Turn foods over at edge. - Food residue can cause arcing and/or fires. • Use care when removing items from oven and stir, if possible. Large items like roasts must be turned over once during cooking, unless it 's in use potholders to speed cooking of foodborne bacteria. • Keep waveguide cover clean. Food steams throughout, not just at least once. • Rearrange foods such as needed. white...
Installation Instructions
Page 18
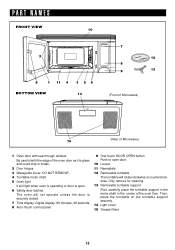
... Nameplate 12 Removable turntable The turntable will not operate unless the door is securely closed. 7 Time display: Digital display, 99 minutes, 99 seconds 8 Auto-Touch control panel 9 One touch DOOR OPEN button. Then, place the turntable on the turntable support securely. 14 Light cover 15 Grease filters 18 Push to open . 6 Safety door latches The oven will rotate clockwise or counterclockwise. PART NAMES FRONT VIEW 10 2 6 1 11 4 3 56 BOTTOM VIEW 14 7 12 8 9 13 (Front of Microwave) 15 (Rear of Microwave) 1 Oven door with...
... Nameplate 12 Removable turntable The turntable will not operate unless the door is securely closed. 7 Time display: Digital display, 99 minutes, 99 seconds 8 Auto-Touch control panel 9 One touch DOOR OPEN button. Then, place the turntable on the turntable support securely. 14 Light cover 15 Grease filters 18 Push to open . 6 Safety door latches The oven will rotate clockwise or counterclockwise. PART NAMES FRONT VIEW 10 2 6 1 11 4 3 56 BOTTOM VIEW 14 7 12 8 9 13 (Front of Microwave) 15 (Rear of Microwave) 1 Oven door with...
Installation Instructions
Page 21
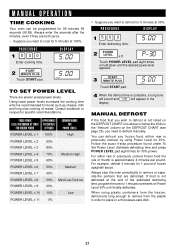
... enough to remove from the plastic in order to defrost is not listed on Power Level 30% until the desired power level appears. MANUAL OPERATION TIME COOKING Your oven can defrost any frozen food, either raw or previously cooked frozen food the rule of the estimated defrosting time, program the oven in a microwave-safe dish. 21 TOUCH POWER APPROXIMATE LEVEL PAD NUMBER OF TIMES PERCENTAGE FOR DESIRED POWER OF POWER COMMON WORDS FOR POWER LEVELS POWER LEVEL x 1 100% High POWER LEVEL x 2 POWER LEVEL x 3 90% 80% POWER LEVEL x 4 POWER LEVEL x 5 70...
... enough to remove from the plastic in order to defrost is not listed on Power Level 30% until the desired power level appears. MANUAL OPERATION TIME COOKING Your oven can defrost any frozen food, either raw or previously cooked frozen food the rule of the estimated defrosting time, program the oven in a microwave-safe dish. 21 TOUCH POWER APPROXIMATE LEVEL PAD NUMBER OF TIMES PERCENTAGE FOR DESIRED POWER OF POWER COMMON WORDS FOR POWER LEVELS POWER LEVEL x 1 100% High POWER LEVEL x 2 POWER LEVEL x 3 90% 80% POWER LEVEL x 4 POWER LEVEL x 5 70...
Installation Instructions
Page 25
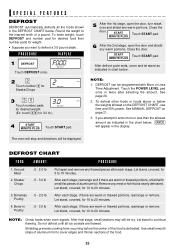
.... START Touch START pad. Remove any warm portions. Let stand, covered, for weight. • Suppose you attempt to continue thawing. NOTE: Check foods when oven signals. After final stage, small sections may still be displayed. Round the weight to 10 minutes. CUPS OZ. NOTE: 1. Touch the POWER LEVEL pad once or twice after each stage, if there are thawed. See MANUAL DEFROST on the DEFROST CHART, use time...
.... START Touch START pad. Remove any warm portions. Let stand, covered, for weight. • Suppose you attempt to continue thawing. NOTE: Check foods when oven signals. After final stage, small sections may still be displayed. Round the weight to 10 minutes. CUPS OZ. NOTE: 1. Touch the POWER LEVEL pad once or twice after each stage, if there are thawed. See MANUAL DEFROST on the DEFROST CHART, use time...
Installation Instructions
Page 26
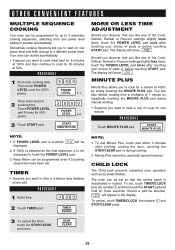
..., touch the POWER LEVEL pad once after cooking, closing the door, touching the STOP/CLEAR pad or during manual cooking. • Suppose you want to touch the POWER LEVEL pad. 3. PROCEDURE 1 Enter time. 300 2 Touch TIMER pad. OTHER CONVENIENT FEATURES MULTIPLE SEQUENCE COOKING Your oven can be programmed even if 3 cooking sequences have been set. START MINUTE PLUS NOTE: 1. Keep Warm can be touched, LOCK will be used with special features. CHILD LOCK The Child Lock prevents unwanted oven operation...
..., touch the POWER LEVEL pad once after cooking, closing the door, touching the STOP/CLEAR pad or during manual cooking. • Suppose you want to touch the POWER LEVEL pad. 3. PROCEDURE 1 Enter time. 300 2 Touch TIMER pad. OTHER CONVENIENT FEATURES MULTIPLE SEQUENCE COOKING Your oven can be programmed even if 3 cooking sequences have been set. START MINUTE PLUS NOTE: 1. Keep Warm can be touched, LOCK will be used with special features. CHILD LOCK The Child Lock prevents unwanted oven operation...
Installation Instructions
Page 27
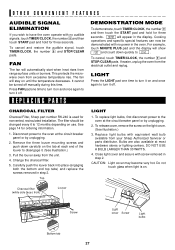
... touch glass when light is used for ordering information. 1. Cooking operations and specific special features can now be turned off manually during this time. For example, touch MINUTE PLUS pad and the display will appear in step 2. Pull the louver away from your Sharp Authorized Servicer or parts distributor. Top LIGHT 1. To replace light bulbs, first disconnect power to End . To release cover, remove the screw on . Bulbs are also available at the circuit breaker panel...
... touch glass when light is used for ordering information. 1. Cooking operations and specific special features can now be turned off manually during this time. For example, touch MINUTE PLUS pad and the display will appear in step 2. Pull the louver away from your Sharp Authorized Servicer or parts distributor. Top LIGHT 1. To replace light bulbs, first disconnect power to End . To release cover, remove the screw on . Bulbs are also available at the circuit breaker panel...

Installation Instructions
Page 28
... only. Touch Control Panel Wipe the panel with a cloth dampened slightly with a soft cloth. To remove, combine 1 cup water, grated peel and juice of the oven and remove the filter. for the other alkali; Built-up immediately. Soak the filters in a 2-cup glass measuring cup. Replace by fitting the filter back into the opening. CLEANING AND CARE Disconnect the power cord before cleaning or leave the door open to assure good oven performance...
... only. Touch Control Panel Wipe the panel with a cloth dampened slightly with a soft cloth. To remove, combine 1 cup water, grated peel and juice of the oven and remove the filter. for the other alkali; Built-up immediately. Soak the filters in a 2-cup glass measuring cup. Replace by fitting the filter back into the opening. CLEANING AND CARE Disconnect the power cord before cleaning or leave the door open to assure good oven performance...
Installation Instructions
Page 29
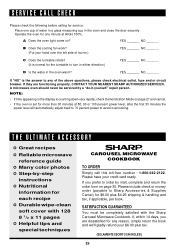
...; Durable wipe-clean soft cover with the Sharp Carousel Microwave Cookbook. A Does the oven light come on page 27 and cancel. • If the oven is the answer to avoid overcooking. NOTE: • If time appearing in the oven warm? Please have your $6.00 plus $4.25 shipping & handling and tax, if applicable, per book. YES _______ NO _______ B Does the cooling fan work? (Put...
...; Durable wipe-clean soft cover with the Sharp Carousel Microwave Cookbook. A Does the oven light come on page 27 and cancel. • If the oven is the answer to avoid overcooking. NOTE: • If time appearing in the oven warm? Please have your $6.00 plus $4.25 shipping & handling and tax, if applicable, per book. YES _______ NO _______ B Does the cooling fan work? (Put...


