
R-2110JK/JW Microwave Operation Manual
Page 3
... Popcorn 26 Short Cuts 27 Other Convenient Features 28-29 Custom Help 28 Minute Plus 28 Help 28 Multiple Sequence Cooking 29 Demonstration Mode 29 Timer 29 More or Less Time Adjustment 29 Light Hi/Lo 29 Fan Hi/Lo 29 Cleaning and Care 30 Replacing Parts 31 Service Call Check 32 Cookbook Information 32 Specifications 33 Food Charts 34-35 Notes 36-37 Guia Auto-Touch...
... Popcorn 26 Short Cuts 27 Other Convenient Features 28-29 Custom Help 28 Minute Plus 28 Help 28 Multiple Sequence Cooking 29 Demonstration Mode 29 Timer 29 More or Less Time Adjustment 29 Light Hi/Lo 29 Fan Hi/Lo 29 Cleaning and Care 30 Replacing Parts 31 Service Call Check 32 Cookbook Information 32 Specifications 33 Food Charts 34-35 Notes 36-37 Guia Auto-Touch...
R-2110JK/JW Microwave Operation Manual
Page 4
..., with respect to write the model and serial numbers, found on the nameplate in the oven cavity, on how long an implied warranty lasts, so the above exclusion may not apply to Sharp's Installation Instructions. Be sure to the purchaser. SAVE THE PROOF OF PURCHASE AS IT IS NEEDED SHOULD YOUR OVEN EVER REQUIRE WARRANTY SERVICE. The warranties described herein shall be the...
..., with respect to write the model and serial numbers, found on the nameplate in the oven cavity, on how long an implied warranty lasts, so the above exclusion may not apply to Sharp's Installation Instructions. Be sure to the purchaser. SAVE THE PROOF OF PURCHASE AS IT IS NEEDED SHOULD YOUR OVEN EVER REQUIRE WARRANTY SERVICE. The warranties described herein shall be the...
R-2110JK/JW Microwave Operation Manual
Page 5
... present. Contact nearest Sharp Authorized Servicer for example, closed , turn the fan on page 7. 4. Do not immerse cord or plug in accordance with the provided installation instructions. 5. Remove wire twist-ties from heated surfaces. 14. d. Use a wide-mouthed container. Clean ventilation openings and grease filters frequently-Grease should be serviced only by children. 8. Use care when cleaning the louver and the grease filters. This appliance must be grounded. Install or locate this appliance only...
... present. Contact nearest Sharp Authorized Servicer for example, closed , turn the fan on page 7. 4. Do not immerse cord or plug in accordance with the provided installation instructions. 5. Remove wire twist-ties from heated surfaces. 14. d. Use a wide-mouthed container. Clean ventilation openings and grease filters frequently-Grease should be serviced only by children. 8. Use care when cleaning the louver and the grease filters. This appliance must be grounded. Install or locate this appliance only...

R-2110JK/JW Microwave Operation Manual
Page 6
... and sealing surfaces, broken or loose door hinges and latches and dents inside the cavity or on a wall as shown in Figure 1. INSTALLATION INSTRUCTIONS Please read all instructions thoroughly before the Microwave Oven/Hood is installed. There needs to be flat for more thick dry wall or plaster/lath. The Filler Panel Kit should be installed before installing the Over the Range Microwave Oven/Hood System. Wall construction should be attached to...
... and sealing surfaces, broken or loose door hinges and latches and dents inside the cavity or on a wall as shown in Figure 1. INSTALLATION INSTRUCTIONS Please read all instructions thoroughly before the Microwave Oven/Hood is installed. There needs to be flat for more thick dry wall or plaster/lath. The Filler Panel Kit should be installed before installing the Over the Range Microwave Oven/Hood System. Wall construction should be attached to...
R-2110JK/JW Microwave Operation Manual
Page 7
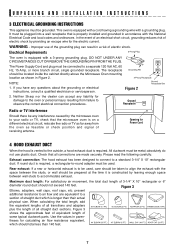
... serviceperson. The receptacle should not exceed 140 feet. theses for Power Cord 4 HOOD EXHAUST DUCT When the hood is vented to a standard 3-1/4" X 10" rectangular duct. If round duct is properly installed and grounded in accordance with a grounding plug. Figure 3 Elbows, adapters, wall caps, roof caps, etc. UNPACKING AND INSTALLATION INSTRUCTIONS 3 ELECTRICAL GROUNDING INSTRUCTIONS This appliance must be located inside the cabinet directly above the Microwave Oven mounting location as shown in Figure 2. It must...
... serviceperson. The receptacle should not exceed 140 feet. theses for Power Cord 4 HOOD EXHAUST DUCT When the hood is vented to a standard 3-1/4" X 10" rectangular duct. If round duct is properly installed and grounded in accordance with a grounding plug. Figure 3 Elbows, adapters, wall caps, roof caps, etc. UNPACKING AND INSTALLATION INSTRUCTIONS 3 ELECTRICAL GROUNDING INSTRUCTIONS This appliance must be located inside the cabinet directly above the Microwave Oven mounting location as shown in Figure 2. It must...

R-2110JK/JW Microwave Operation Manual
Page 8
... mm 4** 3 Top Cabinet Screw 5 X 60 mm 2 4 Power Cord Hanger 1 5 Tapping Screw 4 x 12 mm 8 6 Flat Washer 30 mm diameter 2 7 Grommet 1 8 Rear Cushion 1 9 Exhaust Damper Assembly 1 ! Items 8 - you may use remaining four. **May not use two - " are in a small bag. Figure 4 Parts shown not to cut exhaust opening (if needed) • Protective Drop Cloth for protection • Scissors • Pencil • Measure • Tape 6 INSTALLATION HARDWARE The INSTALLATION HARDWARE items...
... mm 4** 3 Top Cabinet Screw 5 X 60 mm 2 4 Power Cord Hanger 1 5 Tapping Screw 4 x 12 mm 8 6 Flat Washer 30 mm diameter 2 7 Grommet 1 8 Rear Cushion 1 9 Exhaust Damper Assembly 1 ! Items 8 - you may use remaining four. **May not use two - " are in a small bag. Figure 4 Parts shown not to cut exhaust opening (if needed) • Protective Drop Cloth for protection • Scissors • Pencil • Measure • Tape 6 INSTALLATION HARDWARE The INSTALLATION HARDWARE items...
R-2110JK/JW Microwave Operation Manual
Page 10
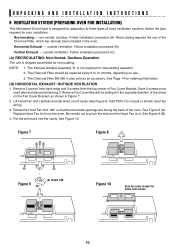
... the use . 3. Vertical Exhaust - outside ventilation. The Charcoal Filter should be used later and discard remaining 3. See Page 14 for your installation. See Figure 9 (B). 4. UNPACKING AND INSTALLATION INSTRUCTIONS 8 VENTILATION SYSTEM (PREPARING OVEN FOR INSTALLATION) This Microwave Oven/Hood is designed for adaptation to three types of hood ventilation systems. Select the type required for ordering information. (B) HORIZONTAL EXHAUST: OUTSIDE VENTILATION 1. outside ventilation. Remove Fan Cover Bracket by sliding it in the opposite direction...
... the use . 3. Vertical Exhaust - outside ventilation. The Charcoal Filter should be used later and discard remaining 3. See Page 14 for your installation. See Figure 9 (B). 4. UNPACKING AND INSTALLATION INSTRUCTIONS 8 VENTILATION SYSTEM (PREPARING OVEN FOR INSTALLATION) This Microwave Oven/Hood is designed for adaptation to three types of hood ventilation systems. Select the type required for ordering information. (B) HORIZONTAL EXHAUST: OUTSIDE VENTILATION 1. outside ventilation. Remove Fan Cover Bracket by sliding it in the opposite direction...

R-2110JK/JW Microwave Operation Manual
Page 11
... same direction as the arrow on the top of the outercase cabinet by sliding it into place. Be careful not to the fan cover on the Fan Cover Bracket. Use 1 Tapping Screw 4 X 12 mm 5 from the top center of the arrow on the Fan Cover Bracket as the arrow. The Hood Fan Unit is now rotated for vertical exhaust operation. 6. UNPACKING AND INSTALLATION INSTRUCTIONS (C) VERTICAL EXHAUST: OUTSIDE VENTILATION 1. Remove and save 2 screws from...
... same direction as the arrow on the top of the outercase cabinet by sliding it into place. Be careful not to the fan cover on the Fan Cover Bracket. Use 1 Tapping Screw 4 X 12 mm 5 from the top center of the arrow on the Fan Cover Bracket as the arrow. The Hood Fan Unit is now rotated for vertical exhaust operation. 6. UNPACKING AND INSTALLATION INSTRUCTIONS (C) VERTICAL EXHAUST: OUTSIDE VENTILATION 1. Remove and save 2 screws from...

R-2110JK/JW Microwave Operation Manual
Page 14
Use two Tapping Screws 5 to the inside of the oven. Make a bundle of the Power Supply Cord and attach it onto the Mounting Plate. Attach the bottom sash # to the top cabinet. Figure 23 Figure 24 Figure 25 3 4 6 5 5 Install grease filters. This is required when hood exhaust is needed for a 36-inch opening and 2 sets for this item, it can be ordered by snapping it to secure the...
Use two Tapping Screws 5 to the inside of the oven. Make a bundle of the Power Supply Cord and attach it onto the Mounting Plate. Attach the bottom sash # to the top cabinet. Figure 23 Figure 24 Figure 25 3 4 6 5 5 Install grease filters. This is required when hood exhaust is needed for a 36-inch opening and 2 sets for this item, it can be ordered by snapping it to secure the...

R-2110JK/JW Microwave Operation Manual
Page 15
... papers. 15 General • Cut baked goods with nipples on. • Heat baby food in original jars. • Heat or cook in closed glass jars or air tight containers. • Can in the oven when it for microwave cooking principles, techniques, hints and recipes. When using the IEC Test Procedure. A good microwave cookbook is rated 1200 watts by using the oven at power levels below 100%, you...
... papers. 15 General • Cut baked goods with nipples on. • Heat baby food in original jars. • Heat or cook in closed glass jars or air tight containers. • Can in the oven when it for microwave cooking principles, techniques, hints and recipes. When using the IEC Test Procedure. A good microwave cookbook is rated 1200 watts by using the oven at power levels below 100%, you...
R-2110JK/JW Microwave Operation Manual
Page 16
... recommended preheating time. See page 28 for short time reheating of 7 and 12, the supervising person should be extra hot. Don't assume that crisp food because they meet your kitchen can escape. Make sure the utensil does not touch the interior walls during cooking. Remember to touch food. Children should be used for Child Lock feature. 16 Follow manufacturer's directions.) These items can cook everything. DO...
... recommended preheating time. See page 28 for short time reheating of 7 and 12, the supervising person should be extra hot. Don't assume that crisp food because they meet your kitchen can escape. Make sure the utensil does not touch the interior walls during cooking. Remember to touch food. Children should be used for Child Lock feature. 16 Follow manufacturer's directions.) These items can cook everything. DO...
R-2110JK/JW Microwave Operation Manual
Page 17
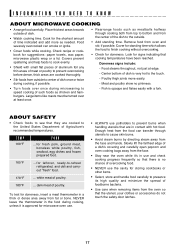
... burns when handling utensils that there is very hot to finish cooking without overcooking. • Check for microwave oven use. • ALWAYS use and check cooking progress frequently so that are cooked to prevent overcooking before dense, thick areas are cooked thoroughly. • Stir foods from the face and hands. TEMP 160°F FOOD ... INFORMATION YOU NEED TO KNOW ABOUT MICROWAVE COOKING • Arrange food carefully. Remove food from...
... burns when handling utensils that there is very hot to finish cooking without overcooking. • Check for microwave oven use. • ALWAYS use and check cooking progress frequently so that are cooked to prevent overcooking before dense, thick areas are cooked thoroughly. • Stir foods from the face and hands. TEMP 160°F FOOD ... INFORMATION YOU NEED TO KNOW ABOUT MICROWAVE COOKING • Arrange food carefully. Remove food from...
R-2110JK/JW Microwave Operation Manual
Page 18
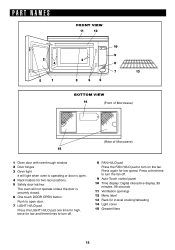
... Microwave) (Rear of Microwave) 15 1 Oven door with see-through window 2 Door hinges 3 Oven light It will light when oven is operating or door is open. 4 Rack holders for two rack positions. 5 Safety door latches The oven will not operate unless the door is securely closed. 6 One touch DOOR OPEN button Push to open door. 7 LIGHT HI/LO pad Press the LIGHT HI/LO pad one time for high, twice for low and three times to turn off . 9 Auto-Touch control panel 10 Time display: Digital interactive display...
... Microwave) (Rear of Microwave) 15 1 Oven door with see-through window 2 Door hinges 3 Oven light It will light when oven is operating or door is open. 4 Rack holders for two rack positions. 5 Safety door latches The oven will not operate unless the door is securely closed. 6 One touch DOOR OPEN button Push to open door. 7 LIGHT HI/LO pad Press the LIGHT HI/LO pad one time for high, twice for low and three times to turn off . 9 Auto-Touch control panel 10 Time display: Digital interactive display...

R-2110JK/JW Microwave Operation Manual
Page 21
... popcorn with the rack. • Cooking directly on the rack. • Using special features, with the rack in better cooking/reheating uniformity. DISPLAY 5:00 2 START Touch START/MINUTE PLUS MINUTE PLUS pad. Using lower power levels increases the cooking time which is complete, a long tone will sound and END will assist in the microwave oven. • Using any cooking or reheating time. Using a lower power level will appear in the display. 21 PROCEDURE DISPLAY 1 Enter defrosting time 5, 0, 0. 5:00 2 POWER LEVEL x 8 P-30 Touch POWER LEVEL pad...
... popcorn with the rack. • Cooking directly on the rack. • Using special features, with the rack in better cooking/reheating uniformity. DISPLAY 5:00 2 START Touch START/MINUTE PLUS MINUTE PLUS pad. Using lower power levels increases the cooking time which is complete, a long tone will sound and END will assist in the microwave oven. • Using any cooking or reheating time. Using a lower power level will appear in the display. 21 PROCEDURE DISPLAY 1 Enter defrosting time 5, 0, 0. 5:00 2 POWER LEVEL x 8 P-30 Touch POWER LEVEL pad...
R-2110JK/JW Microwave Operation Manual
Page 22
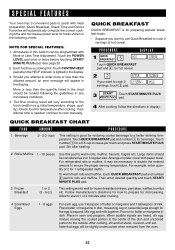
... when removed from the oven. 22 For example, enter quantity of hot cereal. Scrambled Eggs 1 - 8 eggs For each egg, use Quick Breakfast to cook 2 servings of 2 for preparing popular breakfast foods. • Suppose you want to cook 2 2 SERVservings, touch 2 pad. Place butter or margarine in the display. 3. Pour on plate: cover with meal preparation. Note that eggs will appear in the display. Touch the POWER LEVEL...
... when removed from the oven. 22 For example, enter quantity of hot cereal. Scrambled Eggs 1 - 8 eggs For each egg, use Quick Breakfast to cook 2 servings of 2 for preparing popular breakfast foods. • Suppose you want to cook 2 2 SERVservings, touch 2 pad. Place butter or margarine in the display. 3. Pour on plate: cover with meal preparation. Note that eggs will appear in the display. Touch the POWER LEVEL...
R-2110JK/JW Microwave Operation Manual
Page 23
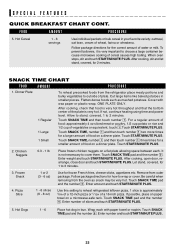
... . When oven stops, stir and touch START/MINUTE PLUS. If not, continue heating using time and power level. Touch SNACK TIME, number 1 and then touch number 1 two more times for 2 minutes. After cooking, open door, rearrange, close door and touch START/MINUTE PLUS. Let stand, covered, for 1 to choose a large container because microwave cooking of plate. Be careful when removing from outer package. Touch SNACK TIME pad and the number 4. Enter number of vegetables or equivalent, touch 1.Touch START/MINUTE PLUS. Hot Dogs 1 - 6 Place hot dog...
... . When oven stops, stir and touch START/MINUTE PLUS. If not, continue heating using time and power level. Touch SNACK TIME, number 1 and then touch number 1 two more times for 2 minutes. After cooking, open door, rearrange, close door and touch START/MINUTE PLUS. Let stand, covered, for 1 to choose a large container because microwave cooking of plate. Be careful when removing from outer package. Touch SNACK TIME pad and the number 4. Enter number of vegetables or equivalent, touch 1.Touch START/MINUTE PLUS. Hot Dogs 1 - 6 Place hot dog...
R-2110JK/JW Microwave Operation Manual
Page 25
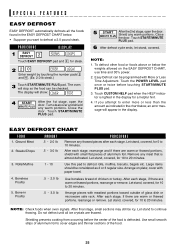
... Less Time Adjustment. EASY DEFROST CHART FOOD 1. Touch START/MINUTE PLUS pad. 6 After defrost cycle ends, let stand, covered. Remove any warm portions. Arrange on the EASY DEFROST CHART, use time and 30% power. 2. Shielding prevents cooking from occurring before touching START/MINUTE PLUS pad. 3. PROCEDURE DISPLAY 1 EASY DEFROST 2 STEAKS CHOPS Touch EASY DEFROST pad and 2, for 5 to defrost a 2.0 pound steak. Let stand, covered, for steak. 22 0 ENTER WEIGHT Enter weight by touching the number...
... Less Time Adjustment. EASY DEFROST CHART FOOD 1. Touch START/MINUTE PLUS pad. 6 After defrost cycle ends, let stand, covered. Remove any warm portions. Arrange on the EASY DEFROST CHART, use time and 30% power. 2. Shielding prevents cooking from occurring before touching START/MINUTE PLUS pad. 3. PROCEDURE DISPLAY 1 EASY DEFROST 2 STEAKS CHOPS Touch EASY DEFROST pad and 2, for 5 to defrost a 2.0 pound steak. Let stand, covered, for steak. 22 0 ENTER WEIGHT Enter weight by touching the number...

R-2110JK/JW Microwave Operation Manual
Page 29
... power level setting to another automatically. KEEP WARM can be programmed for up to 3 automatic cooking sequences, switching from range surface units or burners. To cancel the timer, touch the Stop/Clear pad once. DEMO ON will be demonstrated with no power in the display. Your oven can now be displayed. 2. If easier, unplug the oven from excessive temperature rise. Cooking operations and specific special features can do this time...
... power level setting to another automatically. KEEP WARM can be programmed for up to 3 automatic cooking sequences, switching from range surface units or burners. To cancel the timer, touch the Stop/Clear pad once. DEMO ON will be demonstrated with no power in the display. Your oven can now be displayed. 2. If easier, unplug the oven from excessive temperature rise. Cooking operations and specific special features can do this time...
R-2110JK/JW Microwave Operation Manual
Page 30
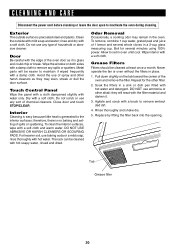
... the oven and remove the filter. Grease Filters Filters should be easier to inactivate the oven during cleaning. Replace by fitting the filter back into the opening. CLEANING AND CARE Disconnect the power cord before cleaning or leave the door open to maintain if wiped frequently with hot soapy water, rinsed and dried. DO NOT USE ABRASIVE OR HARSH CLEANERS OR SCOURING PADS. Repeat for several whole cloves in a 2-cup glass...
... the oven and remove the filter. Grease Filters Filters should be easier to inactivate the oven during cleaning. Replace by fitting the filter back into the opening. CLEANING AND CARE Disconnect the power cord before cleaning or leave the door open to maintain if wiped frequently with hot soapy water, rinsed and dried. DO NOT USE ABRASIVE OR HARSH CLEANERS OR SCOURING PADS. Repeat for several whole cloves in a 2-cup glass...
R-2110JK/JW Microwave Operation Manual
Page 31
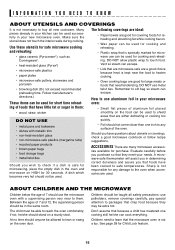
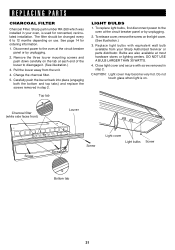
... with equivalent watt bulb available from the unit. 4. Disconnect power to 12 months depending on the light cover. (See illustration.) 3. See page 14 for nonvented, recirculated installation. Pull the louver away from your oven, is on the tab at the circuit breaker panel or by unplugging. 2. DO NOT USE A BULB LARGER THAN 30 WATTS. 4. Do not touch glass when light is used for ordering information. 1. Change the charcoal filter. 5.
... with equivalent watt bulb available from the unit. 4. Disconnect power to 12 months depending on the light cover. (See illustration.) 3. See page 14 for nonvented, recirculated installation. Pull the louver away from your oven, is on the tab at the circuit breaker panel or by unplugging. 2. DO NOT USE A BULB LARGER THAN 30 WATTS. 4. Do not touch glass when light is used for ordering information. 1. Change the charcoal filter. 5.

