

Owners Manual
Page 3
... Oven ...... 6 Installation Instructions 6-14 Optional Accessories 14 Information You Need to Know 15-17 About Your Oven 15 About Food 15 About Utensils and Coverings 16 About Children and the Microwave 16 About Microwave Cooking 17 About Safety 17 Part Names 18-19 Before Operating 20 To Set the Clock 20 Stop/Clear 20 Manual Operation 21 Time Cooking 21 To Set Power Level 21 Using the Rack 21 Manual Defrost 21 Special Features 22-30 Sensor...
... Oven ...... 6 Installation Instructions 6-14 Optional Accessories 14 Information You Need to Know 15-17 About Your Oven 15 About Food 15 About Utensils and Coverings 16 About Children and the Microwave 16 About Microwave Cooking 17 About Safety 17 Part Names 18-19 Before Operating 20 To Set the Clock 20 Stop/Clear 20 Manual Operation 21 Time Cooking 21 To Set Power Level 21 Using the Rack 21 Manual Defrost 21 Special Features 22-30 Sensor...

Owners Manual
Page 4
... enable us to contact you need service for your Product.) Warranty Period for your oven. 4 THIS WARRANTY GIVES YOU SPECIFIC LEGAL RIGHTS. CONSUMER LIMITED WARRANTY SHARP ELECTRONICS CORPORATION warrants to the first consumer purchaser that this Sharp brand product (the "Product"), when shipped in its option, either repair the defect or replace the defective Product or part thereof with respect to the...
... enable us to contact you need service for your Product.) Warranty Period for your oven. 4 THIS WARRANTY GIVES YOU SPECIFIC LEGAL RIGHTS. CONSUMER LIMITED WARRANTY SHARP ELECTRONICS CORPORATION warrants to the first consumer purchaser that this Sharp brand product (the "Product"), when shipped in its option, either repair the defect or replace the defective Product or part thereof with respect to the...

Owners Manual
Page 5
... overcook food. b. Use a wide-mouthed container. d. Clean ventilation openings and grease filters frequently-Grease should ignite, keep oven door closed glass jars-are able to heat, cook or dry food. Use care when cleaning the louver and the grease filters. Corrosive cleaning agents, such as whole eggs and sealed containers-for 20 seconds before removing the container. This type of table or counter. 15. Do not let cord hang over edge of oven is...
... overcook food. b. Use a wide-mouthed container. d. Clean ventilation openings and grease filters frequently-Grease should ignite, keep oven door closed glass jars-are able to heat, cook or dry food. Use care when cleaning the louver and the grease filters. Corrosive cleaning agents, such as whole eggs and sealed containers-for 20 seconds before removing the container. This type of table or counter. 15. Do not let cord hang over edge of oven is...

Owners Manual
Page 6
... materials, WALL and TOP CABINET TEMPLATES. The Filler Panel Kit should be flat for proper installation. The mounting surfaces must be installed before the Microwave Oven/ Hood is any damage, do not operate the oven and contact your dealer or SHARP AUTHORIZED SERVICER. To find the location of the studs, one . 2. Remove the feature sticker from the outside of the door, if there is a WALL TEMPLATE and TOP CABINET TEMPLATE. See Installation Instructions for ordering...
... materials, WALL and TOP CABINET TEMPLATES. The Filler Panel Kit should be flat for proper installation. The mounting surfaces must be installed before the Microwave Oven/ Hood is any damage, do not operate the oven and contact your dealer or SHARP AUTHORIZED SERVICER. To find the location of the studs, one . 2. Remove the feature sticker from the outside of the door, if there is a WALL TEMPLATE and TOP CABINET TEMPLATE. See Installation Instructions for ordering...
Owners Manual
Page 7
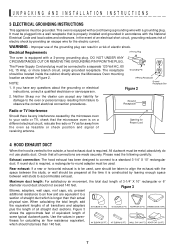
... wall studs to accommodate exhaust. This oven is equipped with a cord having a grounding wire with a 3-prong grounding plug. Improper use plastic duct. The receptacle should not exceed 140 feet. Neither Sharp nor the dealer can result in accordance with the National Electrical Code and local codes and ordinances. absolutely do not use of 3-1/4" X 10" rectangular or 6" diameter round duct should be located inside the cabinet directly above the Microwave Oven mounting location...
... wall studs to accommodate exhaust. This oven is equipped with a cord having a grounding wire with a 3-prong grounding plug. Improper use plastic duct. The receptacle should not exceed 140 feet. Neither Sharp nor the dealer can result in accordance with the National Electrical Code and local codes and ordinances. absolutely do not use of 3-1/4" X 10" rectangular or 6" diameter round duct should be located inside the cabinet directly above the Microwave Oven mounting location...

Owners Manual
Page 8
...-BZ0195WRE0 3 Top Cabinet Screw 5 X 60 mm 2 XBRSD50P60000 4 Power Cord Hanger 1 LX-MZB001MRE0 5 Tapping Screw 4 x 12 mm 8 XOTSE40P12000 6 Flat Washer 30 mm diameter 2 XWHSD50-16300 7 Grommet 1 LBSHC0040MRE0 8 Rear Cushion 1 PCUSUB059MRP0 9 Exhaust Damper Assembly 1 FFTA-B005MRK0 ! Scale Plate 2 LANG-B004MRP0 " Grease Filter 2 PFIL-B008MRE0 # Bottom Sash 1 HDEC-B001MRF0 * Must use all depending on stud location. UNPACKING AND INSTALLATION INSTRUCTIONS 5 TOOLS RECOMMENDED FOR INSTALLATION • Phillips Screwdriver • Electric Drill •...
...-BZ0195WRE0 3 Top Cabinet Screw 5 X 60 mm 2 XBRSD50P60000 4 Power Cord Hanger 1 LX-MZB001MRE0 5 Tapping Screw 4 x 12 mm 8 XOTSE40P12000 6 Flat Washer 30 mm diameter 2 XWHSD50-16300 7 Grommet 1 LBSHC0040MRE0 8 Rear Cushion 1 PCUSUB059MRP0 9 Exhaust Damper Assembly 1 FFTA-B005MRK0 ! Scale Plate 2 LANG-B004MRP0 " Grease Filter 2 PFIL-B008MRE0 # Bottom Sash 1 HDEC-B001MRF0 * Must use all depending on stud location. UNPACKING AND INSTALLATION INSTRUCTIONS 5 TOOLS RECOMMENDED FOR INSTALLATION • Phillips Screwdriver • Electric Drill •...
Owners Manual
Page 10
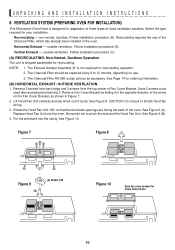
... AND INSTALLATION INSTRUCTIONS 8 VENTILATION SYSTEM (PREPARING OVEN FOR INSTALLATION) This Microwave Oven/Hood is designed for adaptation to pinch the wire and the Hood Fan Unit. non-vented, ductless. Follow installation procedure (A). Follow installation procedure (B). outside ventilation. Figure 7 Figure 8 Figure 9 (B) (A) Rotate 180˚ Figure 10 Save fan cover bracket for recirculating. Follow installation procedure (C). (A) RECIRCULATING: Non-Vented, Ductless Operation The unit is shipped assembled for future instructions. 10 The Charcoal Filter should be used later...
... AND INSTALLATION INSTRUCTIONS 8 VENTILATION SYSTEM (PREPARING OVEN FOR INSTALLATION) This Microwave Oven/Hood is designed for adaptation to pinch the wire and the Hood Fan Unit. non-vented, ductless. Follow installation procedure (A). Follow installation procedure (B). outside ventilation. Figure 7 Figure 8 Figure 9 (B) (A) Rotate 180˚ Figure 10 Save fan cover bracket for recirculating. Follow installation procedure (C). (A) RECIRCULATING: Non-Vented, Ductless Operation The unit is shipped assembled for future instructions. 10 The Charcoal Filter should be used later...
Owners Manual
Page 11
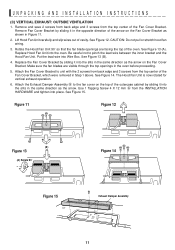
... Fan Cover Bracket, which were removed in the oven before proceeding. 5. See Figure 15. Replace Hood Fan Unit into Wire Box. UNPACKING AND INSTALLATION INSTRUCTIONS (C) VERTICAL EXHAUST: OUTSIDE VENTILATION 1. Remove Fan Cover Bracket by sliding it in the same direction as the arrow. Attach the Fan Cover Bracket to unit with the 2 screws from back edge and 3 screws from the top center of the Fan Cover Bracket. Attach the Exhaust Damper Assembly 9 to pinch the lead wire between the inner bracket...
... Fan Cover Bracket, which were removed in the oven before proceeding. 5. See Figure 15. Replace Hood Fan Unit into Wire Box. UNPACKING AND INSTALLATION INSTRUCTIONS (C) VERTICAL EXHAUST: OUTSIDE VENTILATION 1. Remove Fan Cover Bracket by sliding it in the same direction as the arrow. Attach the Fan Cover Bracket to unit with the 2 screws from back edge and 3 screws from the top center of the Fan Cover Bracket. Attach the Exhaust Damper Assembly 9 to pinch the lead wire between the inner bracket...

Owners Manual
Page 14
... when hood exhaust is needed for a 36-inch opening and 2 sets for this item, it to secure the levers that are available for a 42-inch opening . For use when the oven is installed in the power cord. 3. One set is recirculated. Acacia Ave. See figure 26 (A). 6. OPTIONAL ACCESSORIES Two optional accessories are on page 31. See Charcoal Filter on the bottom of the cabinet using the Power Cord...
... when hood exhaust is needed for a 36-inch opening and 2 sets for this item, it to secure the levers that are available for a 42-inch opening . For use when the oven is installed in the power cord. 3. One set is recirculated. Acacia Ave. See figure 26 (A). 6. OPTIONAL ACCESSORIES Two optional accessories are on page 31. See Charcoal Filter on the bottom of the cabinet using the Power Cord...

Owners Manual
Page 15
...; Pop popcorn in regular brown bags or glass bowls. • Exceed maximum time on and off. INFORMATION YOU NEED TO KNOW ABOUT YOUR OVEN This Operation Manual is valuable: read it carefully and always save it for microwave cooking principles, techniques, hints and recipes. Check it for the popping to slow to stand 20 seconds after heating and shake thoroughly. Generally, covered foods will...
...; Pop popcorn in regular brown bags or glass bowls. • Exceed maximum time on and off. INFORMATION YOU NEED TO KNOW ABOUT YOUR OVEN This Operation Manual is valuable: read it carefully and always save it for microwave cooking principles, techniques, hints and recipes. Check it for the popping to slow to stand 20 seconds after heating and shake thoroughly. Generally, covered foods will...

Owners Manual
Page 16
... damage to buy all safety precautions: use potholders, remove coverings carefully, pay special attention to packages that is not a toy. Vent so steam can cook everything. ACCESSORIES There are many microwave accesso- Sharp is safe for microwaving, place the empty dish in your new microwave oven. Make sure the utensil does not touch the interior walls during cooking. A dish which becomes very hot should be used for any...
... damage to buy all safety precautions: use potholders, remove coverings carefully, pay special attention to packages that is not a toy. Vent so steam can cook everything. ACCESSORIES There are many microwave accesso- Sharp is safe for microwaving, place the empty dish in your new microwave oven. Make sure the utensil does not touch the interior walls during cooking. A dish which becomes very hot should be used for any...

Owners Manual
Page 17
...areas are cooked thoroughly. • Stir foods from outside to cause skin burns. • Avoid steam burns by directing steam away from the food can smoke or ignite. • Cover foods while cooking. white...touch the safety door latches. 17 Food steams throughout, not just at least once. - Large items like roasts must be turned over once during cooking, unless it 's in use the cavity for doneness, insert a meat thermometer in the food during microwaving to the outside of foodborne bacteria. • Use care when removing items from the face. • Stay near the oven...
...areas are cooked thoroughly. • Stir foods from outside to cause skin burns. • Avoid steam burns by directing steam away from the food can smoke or ignite. • Cover foods while cooking. white...touch the safety door latches. 17 Food steams throughout, not just at least once. - Large items like roasts must be turned over once during cooking, unless it 's in use the cavity for doneness, insert a meat thermometer in the food during microwaving to the outside of foodborne bacteria. • Use care when removing items from the face. • Stay near the oven...

Owners Manual
Page 18
... operate unless the door is securely closed. 6 One touch DOOR OPEN button Push to open door. 7 LIGHT HI/LO pad Press the LIGHT HI/LO pad one time for high, twice for low and three times to turn off. 8 FAN HI/LO pad Press the FAN HI/LO pad to turn on the fan. Press again for 2-level cooking/reheating 14 Light cover 15 Grease filters 18 Press a third time to turn the fan off. 9 Auto-Touch control panel 10 Time display...
... operate unless the door is securely closed. 6 One touch DOOR OPEN button Push to open door. 7 LIGHT HI/LO pad Press the LIGHT HI/LO pad one time for high, twice for low and three times to turn off. 8 FAN HI/LO pad Press the FAN HI/LO pad to turn on the fan. Press again for 2-level cooking/reheating 14 Light cover 15 Grease filters 18 Press a third time to turn the fan off. 9 Auto-Touch control panel 10 Time display...

Owners Manual
Page 21
... defrosting time, program the oven in the display. 21 COOK USING THE RACK The rack allows several foods to place in better cooking/reheating uniformity. MANUAL OPERATION TIME COOKING Your oven can defrost any frozen food, either raw or previously cooked frozen food the rule of thumb is approximately 4 minutes per pound. TOUCH POWER APPROXIMATE LEVEL PAD NUMBER OF TIMES PERCENTAGE FOR DESIRED POWER OF POWER COMMON WORDS FOR POWER LEVELS POWER LEVEL x 1 POWER LEVEL x 2 POWER LEVEL x 3 POWER LEVEL x 4 POWER LEVEL x 5 POWER LEVEL x 6 POWER LEVEL x 7 POWER LEVEL x 8 POWER...
... defrosting time, program the oven in the display. 21 COOK USING THE RACK The rack allows several foods to place in better cooking/reheating uniformity. MANUAL OPERATION TIME COOKING Your oven can defrost any frozen food, either raw or previously cooked frozen food the rule of thumb is approximately 4 minutes per pound. TOUCH POWER APPROXIMATE LEVEL PAD NUMBER OF TIMES PERCENTAGE FOR DESIRED POWER OF POWER COMMON WORDS FOR POWER LEVELS POWER LEVEL x 1 POWER LEVEL x 2 POWER LEVEL x 3 POWER LEVEL x 4 POWER LEVEL x 5 POWER LEVEL x 6 POWER LEVEL x 7 POWER LEVEL x 8 POWER...

Owners Manual
Page 22
.... Do not open the oven door or touch Stop/Clear during this time, you . 2 At end, follow the directions in the display. PROCEDURE 1 Reheat 3 Touch Reheat pad, 3 for various foods and quantities. At this part of more dense foods such as it heats. Cover with More or Less Time Adjustment. Using Sensor Settings: 1. If not, continue to heat with larger quantities of the cycle. SPECIAL FEATURES SENSOR CENTER Sharp's Sensor is a semi...
.... Do not open the oven door or touch Stop/Clear during this time, you . 2 At end, follow the directions in the display. PROCEDURE 1 Reheat 3 Touch Reheat pad, 3 for various foods and quantities. At this part of more dense foods such as it heats. Cover with More or Less Time Adjustment. Using Sensor Settings: 1. If not, continue to heat with larger quantities of the cycle. SPECIAL FEATURES SENSOR CENTER Sharp's Sensor is a semi...

Owners Manual
Page 24
... cooking, stir and let stand covered for frozen, convenience foods. Place ground meat in a casserole to be 160°F. Re-cover and touch START/Minute Plus. When oven stops, turn over or stir meat in ring around shallow glass dish (roll fillet with small, flat pieces of water. Re-cover and touch START/Minute Plus. POPCORN CHART PROCEDURE 1 Popcorn Touch Popcorn pad once for Regular or Regular Light. 2 Popcorn Touch Popcorn...
... cooking, stir and let stand covered for frozen, convenience foods. Place ground meat in a casserole to be 160°F. Re-cover and touch START/Minute Plus. When oven stops, turn over or stir meat in ring around shallow glass dish (roll fillet with small, flat pieces of water. Re-cover and touch START/Minute Plus. POPCORN CHART PROCEDURE 1 Popcorn Touch Popcorn pad once for Regular or Regular Light. 2 Popcorn Touch Popcorn...

Owners Manual
Page 25
... quantity listed in any microwave cookbook. 4. Large items should be cooked following the guidelines in the chart should be considered as 2 or 3 regular size. To warm fresh rolls and muffins, touch Breakfast Bar pad and touch number 2 for beverage. Frozen Breakfast* 1 or 2 (3 - 6 oz) This setting works well for a 0.5 cup increase per touch and press START/Minute Plus pad. Follow manufacturer's directions for...
... quantity listed in any microwave cookbook. 4. Large items should be cooked following the guidelines in the chart should be considered as 2 or 3 regular size. To warm fresh rolls and muffins, touch Breakfast Bar pad and touch number 2 for beverage. Frozen Breakfast* 1 or 2 (3 - 6 oz) This setting works well for a 0.5 cup increase per touch and press START/Minute Plus pad. Follow manufacturer's directions for...

Owners Manual
Page 28
... EASY DEFROST EASY DEFROST automatically defrosts all the foods found in the display. The oven will stop so the food can COVER be considered as indicated in the chart below, an error message will show: EDGES 4 START After the 1st stage, open the door. Touch START/Minute Plus pad. 6 After defrost cycle ends, let stand, covered. Ground Meat AMOUNT .5 - 2.0 lb PROCEDURE Remove any meat or fish that is lighted...
... EASY DEFROST EASY DEFROST automatically defrosts all the foods found in the display. The oven will stop so the food can COVER be considered as indicated in the chart below, an error message will show: EDGES 4 START After the 1st stage, open the door. Touch START/Minute Plus pad. 6 After defrost cycle ends, let stand, covered. Ground Meat AMOUNT .5 - 2.0 lb PROCEDURE Remove any meat or fish that is lighted...

Owners Manual
Page 33
.... 3. To remove, combine 1 cup water, grated peel and juice of the oven and remove the filter. Boil for the other alkali; they may remain in place. 1. Exterior The outside with hot water. Touch Control Panel Wipe the panel with a cloth dampened slightly with a soft cloth. Close door and touch Stop/Clear. Wipe interior with water only. CLEANING AND CARE Disconnect the power cord before cleaning or leave the door open to maintain...
.... 3. To remove, combine 1 cup water, grated peel and juice of the oven and remove the filter. Boil for the other alkali; they may remain in place. 1. Exterior The outside with hot water. Touch Control Panel Wipe the panel with a cloth dampened slightly with a soft cloth. Close door and touch Stop/Clear. Wipe interior with water only. CLEANING AND CARE Disconnect the power cord before cleaning or leave the door open to maintain...

Owners Manual
Page 34
... the circuit breaker panel or by unplugging. 2. DO NOT USE A BULB LARGER THAN 30 WATTS. 4. To replace light bulbs, first disconnect power to disengage it. (See illustration.) 3. CAUTION: Light cover may become very hot. Remove the three louver mounting screws and push down carefully on . Carefully push the louver back into place (engaging both the bottom and top tabs) and replace the screws removed in your Sharp Authorized Servicer or parts distributor. REPLACING PARTS CHARCOAL FILTER Charcoal Filter, Sharp part number RK...
... the circuit breaker panel or by unplugging. 2. DO NOT USE A BULB LARGER THAN 30 WATTS. 4. To replace light bulbs, first disconnect power to disengage it. (See illustration.) 3. CAUTION: Light cover may become very hot. Remove the three louver mounting screws and push down carefully on . Carefully push the louver back into place (engaging both the bottom and top tabs) and replace the screws removed in your Sharp Authorized Servicer or parts distributor. REPLACING PARTS CHARCOAL FILTER Charcoal Filter, Sharp part number RK...

