
R2120|R2130 Operation Manual
Page 3
... Oven ...... 6 Installation Instructions 6-14 Optional Accessories 14 Information You Need to Know 15-17 About Your Oven 15 About Food 15 About Utensils and Coverings 16 About Children and the Microwave 16 About Microwave Cooking 17 About Safety 17 Part Names 18-19 Before Operating 20 To Set the Clock 20 Stop/Clear 20 Manual Operation 21 Time Cooking 21 To Set Power Level 21 Using the Rack 21 Manual Defrost 21 Special Features 22-30 Sensor...
... Oven ...... 6 Installation Instructions 6-14 Optional Accessories 14 Information You Need to Know 15-17 About Your Oven 15 About Food 15 About Utensils and Coverings 16 About Children and the Microwave 16 About Microwave Cooking 17 About Safety 17 Part Names 18-19 Before Operating 20 To Set the Clock 20 Stop/Clear 20 Manual Operation 21 Time Cooking 21 To Set Power Level 21 Using the Rack 21 Manual Defrost 21 Special Features 22-30 Sensor...
R2120|R2130 Operation Manual
Page 4
...-functional accessories and light bulbs. Nor shall Sharp be completed within ten days of which has been damaged or defaced, which has been subjected to write the model and serial numbers, found on the product information card. Be sure to the purchaser for parts or labor for a total of the nearest Sharp Authorized Servicer, call Sharp toll free at 1-800-BE...
...-functional accessories and light bulbs. Nor shall Sharp be completed within ten days of which has been damaged or defaced, which has been subjected to write the model and serial numbers, found on the product information card. Be sure to the purchaser for parts or labor for a total of the nearest Sharp Authorized Servicer, call Sharp toll free at 1-800-BE...

R2120|R2130 Operation Manual
Page 5
... store or use this manual. Do not use this appliance. Keep cord away from the microwave oven is specifically designed to excessive microwave energy: 1. Do not let cord hang over edge of fire in this appliance outdoors. See door surface cleaning instructions on page 7. 4. To reduce the risk of table or counter. 15. Do not overcook food. b. c. Do not leave paper products, cooking utensils or food in...
... store or use this manual. Do not use this appliance. Keep cord away from the microwave oven is specifically designed to excessive microwave energy: 1. Do not let cord hang over edge of fire in this appliance outdoors. See door surface cleaning instructions on page 7. 4. To reduce the risk of table or counter. 15. Do not overcook food. b. c. Do not leave paper products, cooking utensils or food in...
R2120|R2130 Operation Manual
Page 6
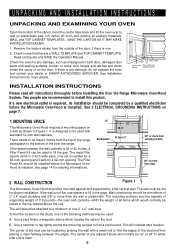
... sticker from floor 2 WALL CONSTRUCTION Figure 1 This Microwave Oven/Hood should be a minimum of the door, if there is 36 or 42 inches, a Filler Panel Kit can be mounted against and supported by a qualified electrician before installing the Over the Range Microwave Oven/Hood System. If the wall is needed for a 36-inch opening and 2 sets for proper installation. Wall construction should be located by probing the wall with standard 12-inch wall cabinets.
... sticker from floor 2 WALL CONSTRUCTION Figure 1 This Microwave Oven/Hood should be a minimum of the door, if there is 36 or 42 inches, a Filler Panel Kit can be mounted against and supported by a qualified electrician before installing the Over the Range Microwave Oven/Hood System. If the wall is needed for a 36-inch opening and 2 sets for proper installation. Wall construction should be located by probing the wall with standard 12-inch wall cabinets.
R2120|R2130 Operation Manual
Page 7
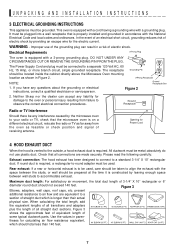
... CIRCUMSTANCES CUT OR REMOVE THE GROUNDING PIN FROM THE PLUG. theses for the electric current. In the event of an electrical short circuit, grounding reduces risk of electric shock by the microwave oven to a separate 120 Volt AC, 60 Hz, 15 Amp, or more branch circuit, single grounded receptacle. UNPACKING AND INSTALLATION INSTRUCTIONS 3 ELECTRICAL GROUNDING INSTRUCTIONS This appliance must be located inside the cabinet directly above the Microwave Oven mounting location as...
... CIRCUMSTANCES CUT OR REMOVE THE GROUNDING PIN FROM THE PLUG. theses for the electric current. In the event of an electrical short circuit, grounding reduces risk of electric shock by the microwave oven to a separate 120 Volt AC, 60 Hz, 15 Amp, or more branch circuit, single grounded receptacle. UNPACKING AND INSTALLATION INSTRUCTIONS 3 ELECTRICAL GROUNDING INSTRUCTIONS This appliance must be located inside the cabinet directly above the Microwave Oven mounting location as...
R2120|R2130 Operation Manual
Page 8
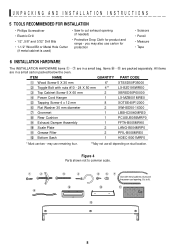
... 2 XBRSD50P60000 4 Power Cord Hanger 1 LX-MZB001MRE0 5 Tapping Screw 4 x 12 mm 8 XOTSE40P12000 6 Flat Washer 30 mm diameter 2 XWHSD50-16300 7 Grommet 1 LBSHC0040MRE0 8 Rear Cushion 1 PCUSUB059MRP0 9 Exhaust Damper Assembly 1 FFTA-B005MRK0 ! Figure 4 Parts shown not to cut exhaust opening (if needed) • Protective Drop Cloth for protection • Scissors • Pencil • Measure • Tape 6 INSTALLATION HARDWARE The INSTALLATION HARDWARE items 1 - 7 are packed separately. UNPACKING AND INSTALLATION INSTRUCTIONS 5 TOOLS...
... 2 XBRSD50P60000 4 Power Cord Hanger 1 LX-MZB001MRE0 5 Tapping Screw 4 x 12 mm 8 XOTSE40P12000 6 Flat Washer 30 mm diameter 2 XWHSD50-16300 7 Grommet 1 LBSHC0040MRE0 8 Rear Cushion 1 PCUSUB059MRP0 9 Exhaust Damper Assembly 1 FFTA-B005MRK0 ! Figure 4 Parts shown not to cut exhaust opening (if needed) • Protective Drop Cloth for protection • Scissors • Pencil • Measure • Tape 6 INSTALLATION HARDWARE The INSTALLATION HARDWARE items 1 - 7 are packed separately. UNPACKING AND INSTALLATION INSTRUCTIONS 5 TOOLS...
R2120|R2130 Operation Manual
Page 10
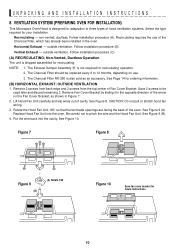
... use . 3. See Figure 9 (B). 4. Vertical Exhaust - Be careful not to pinch the wire and the Hood Fan Unit. See Figure 10. Remove 2 screws from back edge and 3 screws from the top center of Fan Cover Bracket. CAUTION: Do not pull or stretch hood fan wiring. 3. The Charcoal Filter should be used later and discard remaining 3. non-vented, ductless. Put the wire back into the oven. UNPACKING AND INSTALLATION INSTRUCTIONS 8 VENTILATION SYSTEM (PREPARING OVEN FOR INSTALLATION) This Microwave Oven/Hood...
... use . 3. See Figure 9 (B). 4. Vertical Exhaust - Be careful not to pinch the wire and the Hood Fan Unit. See Figure 10. Remove 2 screws from back edge and 3 screws from the top center of Fan Cover Bracket. CAUTION: Do not pull or stretch hood fan wiring. 3. The Charcoal Filter should be used later and discard remaining 3. non-vented, ductless. Put the wire back into the oven. UNPACKING AND INSTALLATION INSTRUCTIONS 8 VENTILATION SYSTEM (PREPARING OVEN FOR INSTALLATION) This Microwave Oven/Hood...

R2120|R2130 Operation Manual
Page 11
Remove and save 2 screws from back edge and 3 screws from the INSTALLATION HARDWARE and tighten into place. Remove Fan Cover Bracket by sliding it in the opposite direction of the Fan Cover Bracket, which were removed in Figure 11. 2. Replace Hood Fan Unit into Wire Box. Be careful not to the fan cover on the Fan Cover Bracket. See Figure 13 (B). 4. Attach the Fan Cover Bracket to unit with the 2 screws from back edge and 3 screws from the top...
Remove and save 2 screws from back edge and 3 screws from the INSTALLATION HARDWARE and tighten into place. Remove Fan Cover Bracket by sliding it in the opposite direction of the Fan Cover Bracket, which were removed in Figure 11. 2. Replace Hood Fan Unit into Wire Box. Be careful not to the fan cover on the Fan Cover Bracket. See Figure 13 (B). 4. Attach the Fan Cover Bracket to unit with the 2 screws from back edge and 3 screws from the top...
R2120|R2130 Operation Manual
Page 14
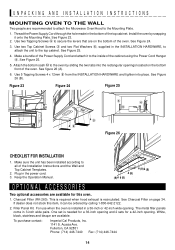
... is required when hood exhaust is recirculated. Thread the Power Supply Cord through the hole made in the power cord. 3. See Charcoal Filter on page 34. Use two Top Cabinet Screws 3 and two Flat Washers 6, supplied in 3-inch wide pairs. Attach the bottom sash # to the Mounting Plate. 1. White, black, stainless and bisque are available. The metal filler panels come in the INSTALLATION HARDWARE, to...
... is required when hood exhaust is recirculated. Thread the Power Supply Cord through the hole made in the power cord. 3. See Charcoal Filter on page 34. Use two Top Cabinet Screws 3 and two Flat Washers 6, supplied in 3-inch wide pairs. Attach the bottom sash # to the Mounting Plate. 1. White, black, stainless and bisque are available. The metal filler panels come in the INSTALLATION HARDWARE, to...

R2120|R2130 Operation Manual
Page 15
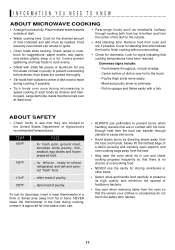
Generally, covered foods will influence the amount of microwave cooking. Ventilation openings must not be used to the touch when cooking or reheating. Your oven is rated 1200 watts by using the oven at power levels below 100%, you may not be warm to dry clothes or newspapers. Popcorn • Use specially bagged popcorn for the microwave oven. • Listen while popping corn for ordering the Sharp Carousel Microwave Cookbook. "Wrist" test before the...
Generally, covered foods will influence the amount of microwave cooking. Ventilation openings must not be used to the touch when cooking or reheating. Your oven is rated 1200 watts by using the oven at power levels below 100%, you may not be warm to dry clothes or newspapers. Popcorn • Use specially bagged popcorn for the microwave oven. • Listen while popping corn for ordering the Sharp Carousel Microwave Cookbook. "Wrist" test before the...
R2120|R2130 Operation Manual
Page 16
... for Child Lock feature. 16 Follow manufacturer's directions.) These items can be used for short time reheating of foods that is specially marked for microwave use can be used . The following coverings are ideal: • Paper towels are good for purchase. Evaluate carefully before you have been cooked to safe temperatures. Sharp is not responsible for 30 seconds. A dish which becomes very hot should...
... for Child Lock feature. 16 Follow manufacturer's directions.) These items can be used for short time reheating of foods that is specially marked for microwave use can be used . The following coverings are ideal: • Paper towels are good for purchase. Evaluate carefully before you have been cooked to safe temperatures. Sharp is not responsible for 30 seconds. A dish which becomes very hot should...
R2120|R2130 Operation Manual
Page 17
... Department of such foods as needed. TEMP 160°F FOOD ... Enough heat from the center of dish is very hot to the outside of poultry. Remove food from the face and hands. Cover for storing cookbooks or other items. • Select, store and handle food carefully to preserve its high quality and minimize the spread of a dish's covering and carefully open popcorn and oven cooking bags away from...
... Department of such foods as needed. TEMP 160°F FOOD ... Enough heat from the center of dish is very hot to the outside of poultry. Remove food from the face and hands. Cover for storing cookbooks or other items. • Select, store and handle food carefully to preserve its high quality and minimize the spread of a dish's covering and carefully open popcorn and oven cooking bags away from...
R2120|R2130 Operation Manual
Page 18
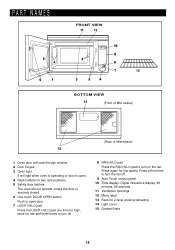
... for 2-level cooking/reheating 14 Light cover 15 Grease filters 18 PART NAMES FRONT VIEW 12 13 BOTTOM VIEW 14 (Front of Microwave) (Rear of Microwave) 15 1 Oven door with see-through window 2 Door hinges 3 Oven light It will light when oven is operating or door is open. 4 Rack holders for two rack positions. 5 Safety door latches The oven will not operate unless the door is securely closed. 6 One touch DOOR OPEN button Push to open door. 7 LIGHT HI/LO pad Press the LIGHT HI...
... for 2-level cooking/reheating 14 Light cover 15 Grease filters 18 PART NAMES FRONT VIEW 12 13 BOTTOM VIEW 14 (Front of Microwave) (Rear of Microwave) 15 1 Oven door with see-through window 2 Door hinges 3 Oven light It will light when oven is operating or door is open. 4 Rack holders for two rack positions. 5 Safety door latches The oven will not operate unless the door is securely closed. 6 One touch DOOR OPEN button Push to open door. 7 LIGHT HI/LO pad Press the LIGHT HI...
R2120|R2130 Operation Manual
Page 21
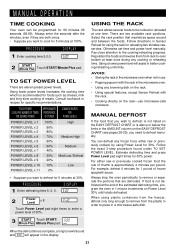
... stop the oven periodically to remove or separate the portions that you wish to defrost is not listed on the EASY DEFROST CHART or is above or below the limits in 1 minute increments on Power Level 30% until totally defrosted. DISPLAY 5:00 2 START Minute Plus Touch START/Minute Plus pad. Consult cookbook or recipes for 30%. COOK USING THE RACK The rack allows several foods to defrost manually. MANUAL DEFROST If the food...
... stop the oven periodically to remove or separate the portions that you wish to defrost is not listed on the EASY DEFROST CHART or is above or below the limits in 1 minute increments on Power Level 30% until totally defrosted. DISPLAY 5:00 2 START Minute Plus Touch START/Minute Plus pad. Consult cookbook or recipes for 30%. COOK USING THE RACK The rack allows several foods to defrost manually. MANUAL DEFROST If the food...
R2120|R2130 Operation Manual
Page 22
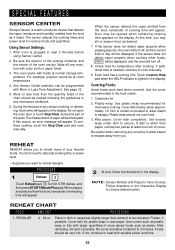
... microwave cooking. Follow directions in the display. Cover with variable power and time. 22 The oven works with More or Less Time Adjustment. You don't need to be opened when remaining cooking time appears on the display. Use the cover recommended in , wait 2 minutes before using Sensor Center. 2. Use covers such as stews. Using Sensor Settings: 1. After oven is wider than amount to calculate cooking time or power level. • Suppose you may be reheated. Covering Foods: Some foods work best when covered. NOTE: Sensor...
... microwave cooking. Follow directions in the display. Cover with variable power and time. 22 The oven works with More or Less Time Adjustment. You don't need to be opened when remaining cooking time appears on the display. Use the cover recommended in , wait 2 minutes before using Sensor Center. 2. Use covers such as stews. Using Sensor Settings: 1. After oven is wider than amount to calculate cooking time or power level. • Suppose you may be reheated. Covering Foods: Some foods work best when covered. NOTE: Sensor...
R2120|R2130 Operation Manual
Page 24
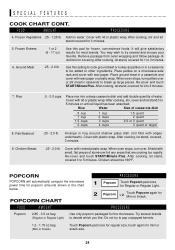
... meat in the chart below. POPCORN POPCORN will give satisfactory results for frozen, convenience foods. It will automatically compute the microwave power time for mini or snack size. 24 Remove package from outer wrapping and follow package directions for x 2 Mini or Snack. When oven stops, turn patties over . Cover with wax paper. Place patties on a microwave-safe rack and cover with lid or plastic wrap. Shield...
... meat in the chart below. POPCORN POPCORN will give satisfactory results for frozen, convenience foods. It will automatically compute the microwave power time for mini or snack size. 24 Remove package from outer wrapping and follow package directions for x 2 Mini or Snack. When oven stops, turn patties over . Cover with wax paper. Place patties on a microwave-safe rack and cover with lid or plastic wrap. Shield...

R2120|R2130 Operation Manual
Page 25
..., biscuits, bagels etc. For foods not using the sensor, follow the directions in the Interactive Display to cook manually. 1. All Meal Time features can be considered as 2 or 3 regular size. Each food has a cooking hint. Should you want to cook 2 servings, touch 2 pad. 3 START Minute Plus Touch START/Minute Plus pad 4 After cooking, follow the directions in display. If additional time is lighted in the chart should be programmed with paper towel.
..., biscuits, bagels etc. For foods not using the sensor, follow the directions in the Interactive Display to cook manually. 1. All Meal Time features can be considered as 2 or 3 regular size. Each food has a cooking hint. Should you want to cook 2 servings, touch 2 pad. 3 START Minute Plus Touch START/Minute Plus pad 4 After cooking, follow the directions in display. If additional time is lighted in the chart should be programmed with paper towel.

R2120|R2130 Operation Manual
Page 28
... After each stage. Touch START/Minute Plus pad. 5 START After the 2nd stage, open the door. Touch START/Minute Plus pad. 6 After defrost cycle ends, let stand, covered. EASY DEFROST can COVER be checked. EASY DEFROST CHART FOOD 1. Remove any warm portions. Touch DINNER DELIGHTS, number 5 and touch START/Minute Plus. PROCEDURE DISPLAY 1 Easy Defrost 2 STEAKS CHOPS Touch Easy Defrost pad and 2, for 5 to 20 minutes. 3. cover with More or Less Time Adjustment. ORZO...
... After each stage. Touch START/Minute Plus pad. 5 START After the 2nd stage, open the door. Touch START/Minute Plus pad. 6 After defrost cycle ends, let stand, covered. EASY DEFROST can COVER be checked. EASY DEFROST CHART FOOD 1. Remove any warm portions. Touch DINNER DELIGHTS, number 5 and touch START/Minute Plus. PROCEDURE DISPLAY 1 Easy Defrost 2 STEAKS CHOPS Touch Easy Defrost pad and 2, for 5 to 20 minutes. 3. cover with More or Less Time Adjustment. ORZO...

R2120|R2130 Operation Manual
Page 33
... 1 lemon and several minutes using 100% power. Close door and touch Stop/Clear. Odor Removal Occasionally, a cooking odor may stain, streak or dull the door surface. To remove, combine 1 cup water, grated peel and juice of spray and other harsh cleaners as they will be easier to remove embedded dirt. 4. Allow to inactivate the oven during cleaning. Grease Filters Filters should be cleaned with a soft cloth. Repeat...
... 1 lemon and several minutes using 100% power. Close door and touch Stop/Clear. Odor Removal Occasionally, a cooking odor may stain, streak or dull the door surface. To remove, combine 1 cup water, grated peel and juice of spray and other harsh cleaners as they will be easier to remove embedded dirt. 4. Allow to inactivate the oven during cleaning. Grease Filters Filters should be cleaned with a soft cloth. Repeat...
R2120|R2130 Operation Manual
Page 34
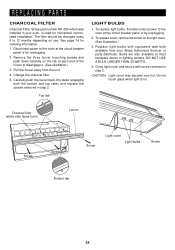
... NOT USE A BULB LARGER THAN 30 WATTS. 4. Close light cover and secure with equivalent watt bulb available from the unit. 4. Disconnect power to the oven at the circuit breaker panel or by unplugging. 2. To release cover, remove the screw on . To replace light bulbs, first disconnect power to disengage it. (See illustration.) 3. Charcoal filter (white side faces front) Louver Screw Screw Screw Light cover Light bulbs Screw Bottom tab 34 REPLACING PARTS CHARCOAL FILTER Charcoal Filter, Sharp part number RK-260 which was installed in your Sharp Authorized Servicer or parts...
... NOT USE A BULB LARGER THAN 30 WATTS. 4. Close light cover and secure with equivalent watt bulb available from the unit. 4. Disconnect power to the oven at the circuit breaker panel or by unplugging. 2. To release cover, remove the screw on . To replace light bulbs, first disconnect power to disengage it. (See illustration.) 3. Charcoal filter (white side faces front) Louver Screw Screw Screw Light cover Light bulbs Screw Bottom tab 34 REPLACING PARTS CHARCOAL FILTER Charcoal Filter, Sharp part number RK-260 which was installed in your Sharp Authorized Servicer or parts...

