

R-319F Operation Manual
Page 1
... 16-17 • Cleaning & Care 18 • Service Call Check 19 • THE ULTIMATE ACCESSORY 19 • COOKBOOK ORDER FORM 20 • Specifications 20 • Guia Auto-Touch Parte Interior de la Cubierta Trasera • Auto-Touch Guide Back Cover R E A D A L L I1N S T R U C T I O N S C A R E F U L L Y B E F O R E U S I C R O WAV E O V E N OPERATION MANUAL ® MODEL R-319F followed by letter indicating color W=white CONTENTS • Precautions to Avoid Possible Exposure to Excessive Microwave Energy Inside Front Cover • For...
... 16-17 • Cleaning & Care 18 • Service Call Check 19 • THE ULTIMATE ACCESSORY 19 • COOKBOOK ORDER FORM 20 • Specifications 20 • Guia Auto-Touch Parte Interior de la Cubierta Trasera • Auto-Touch Guide Back Cover R E A D A L L I1N S T R U C T I O N S C A R E F U L L Y B E F O R E U S I C R O WAV E O V E N OPERATION MANUAL ® MODEL R-319F followed by letter indicating color W=white CONTENTS • Precautions to Avoid Possible Exposure to Excessive Microwave Energy Inside Front Cover • For...

R-319F Operation Manual
Page 2
... : SERVICE (for your nearest Sharp Authorized Servicer) PARTS (for your daytime telephone number (including area code) and description of loss or theft, please record below the model number and serial number located on sealing surfaces. (c) Do not operate the oven if it is no damage to the: (1) door (bent), (2) hinges and latches (broken or loosened), (3) door seals and sealing surfaces. (d) The oven should not be adjusted or repaired...
... : SERVICE (for your nearest Sharp Authorized Servicer) PARTS (for your daytime telephone number (including area code) and description of loss or theft, please record below the model number and serial number located on sealing surfaces. (c) Do not operate the oven if it is no damage to the: (1) door (bent), (2) hinges and latches (broken or loosened), (3) door seals and sealing surfaces. (d) The oven should not be adjusted or repaired...

R-319F Operation Manual
Page 3
... Model Number & Description: R-319F Home Use Carousel Microwave Oven. (Be sure to you access the information in the Product which is authorized to make any warranties other misuse, abnormal service or handling, or which has been subjected to purchasers by law. The warranty period continues for an additional four (4) years, for a total of five (5) years, with respect to Obtain Service: From a Sharp Authorized Servicer located...
... Model Number & Description: R-319F Home Use Carousel Microwave Oven. (Be sure to you access the information in the Product which is authorized to make any warranties other misuse, abnormal service or handling, or which has been subjected to purchasers by law. The warranty period continues for an additional four (4) years, for a total of five (5) years, with respect to Obtain Service: From a Sharp Authorized Servicer located...
R-319F Operation Manual
Page 4
..., closed , turn oven off and disconnect the power cord or shut off power at least for industrial or laboratory use . 17. This appliance should be grounded. Remove wire twist-ties from heated surfaces. 14. Use this appliance only for examination, repair or adjustment. 10. See "GROUNDING INSTRUCTIONS" on page 18. 16. Do not overcook food. Do not leave paper products, cooking utensils or food in...
..., closed , turn oven off and disconnect the power cord or shut off power at least for industrial or laboratory use . 17. This appliance should be grounded. Remove wire twist-ties from heated surfaces. 14. Use this appliance only for examination, repair or adjustment. 10. See "GROUNDING INSTRUCTIONS" on page 18. 16. Do not overcook food. Do not leave paper products, cooking utensils or food in...
R-319F Operation Manual
Page 5
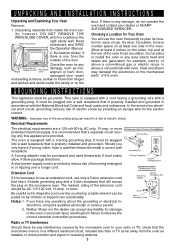
... from the outside of becoming entangled in accordance with the National Electrical Code and local codes and ordinances. however, DO NOT REMOVE THE WAVEGUIDE COVER, which is located on the microwave oven. GROUNDING INSTRUCTIONS This appliance must be plugged into a wall receptacle that is properly installed and grounded in or tripping over a longer cord. It must be plugged into a wall receptacle that the microwave oven is necessary...
... from the outside of becoming entangled in accordance with the National Electrical Code and local codes and ordinances. however, DO NOT REMOVE THE WAVEGUIDE COVER, which is located on the microwave oven. GROUNDING INSTRUCTIONS This appliance must be plugged into a wall receptacle that is properly installed and grounded in or tripping over a longer cord. It must be plugged into a wall receptacle that the microwave oven is necessary...

R-319F Operation Manual
Page 6
... after heating and shake thoroughly. Generally, covered foods will turn the turntable over so that a large dish could be warm to prevent "explosion". • Pierce skins of moisture that steam escapes. Your oven is valuable: read it carefully and always save it for microwave cooking principles, techniques, hints and recipes. ALWAYS have food in the oven. The oven is on popcorn package. ABOUT FOOD FOOD DO...
... after heating and shake thoroughly. Generally, covered foods will turn the turntable over so that a large dish could be warm to prevent "explosion". • Pierce skins of moisture that steam escapes. Your oven is valuable: read it carefully and always save it for microwave cooking principles, techniques, hints and recipes. ALWAYS have food in the oven. The oven is on popcorn package. ABOUT FOOD FOOD DO...

R-319F Operation Manual
Page 7
... microwave cooking and reheating: • glass ceramic (Pyroceram®), such as Corningware®. • heat-resistant glass (Pyrex®) The following coverings are ideal: • Paper towels are a good choice because heat is kept near to lean or swing on a sturdy stool. ries available for Child Lock feature. 5 Children need tenderizing. Use these utensils for microwave use the microwave oven with metallic trim • non-heat-resistant glass...
... microwave cooking and reheating: • glass ceramic (Pyroceram®), such as Corningware®. • heat-resistant glass (Pyrex®) The following coverings are ideal: • Paper towels are a good choice because heat is kept near to lean or swing on a sturdy stool. ries available for Child Lock feature. 5 Children need tenderizing. Use these utensils for microwave use the microwave oven with metallic trim • non-heat-resistant glass...
R-319F Operation Manual
Page 8
... waveguide cover clean. for leftover, ready-to the outside. • Add standing time. Remove food from the oven so that the utensil, your clothes or accessories do not touch the safety door latches. 6 Doneness signs include: - TEMP 160°F 165°F 170°F 180°F FOOD ... Enough heat from the face. • Stay near the oven while it is approved for microwave oven use. • ALWAYS use potholders...
... waveguide cover clean. for leftover, ready-to the outside. • Add standing time. Remove food from the oven so that the utensil, your clothes or accessories do not touch the safety door latches. 6 Doneness signs include: - TEMP 160°F 165°F 170°F 180°F FOOD ... Enough heat from the face. • Stay near the oven while it is approved for microwave oven use. • ALWAYS use potholders...

R-319F Operation Manual
Page 9
PART NAMES MICROWAVE OVEN PARTS 5 9 10 1 4 6 13 8 12 7 32 11 3 1 Door handle Pull to read a specific hint which may assist you. Only remove for cleaning. 9 Ventilation openings (Rear) 10 Oven light It will light when oven is operating or door is securely closed. 4 Door hinges 5 Door seals and sealing surfaces 6 Turntable motor shaft 7 Removable turntable support Carefully place the turntable support in the display will rotate clockwise or counterclockwise. Words in the center of the oven floor. 8 Removable turntable Place the turntable on...
PART NAMES MICROWAVE OVEN PARTS 5 9 10 1 4 6 13 8 12 7 32 11 3 1 Door handle Pull to read a specific hint which may assist you. Only remove for cleaning. 9 Ventilation openings (Rear) 10 Oven light It will light when oven is operating or door is securely closed. 4 Door hinges 5 Door seals and sealing surfaces 6 Turntable motor shaft 7 Removable turntable support Carefully place the turntable support in the display will rotate clockwise or counterclockwise. Words in the center of the oven floor. 8 Removable turntable Place the turntable on...

R-319F Operation Manual
Page 11
... P.M.). If this operation manual completely. • Before the oven can be interrupted, the display will appear in the display. 9 Cancel kitchen timer. 3. Stop the oven temporarily during cooking, touch twice. PROCEDURE DISPLAY 1 500 Enter cooking time. 5.00 2 START Touch START pad. 5.00 COOK TO SET POWER LEVEL There are both zeros. • Suppose you want to defrost for 5 minutes at 100%. This is complete, a long tone will sound and END will be used, follow...
... P.M.). If this operation manual completely. • Before the oven can be interrupted, the display will appear in the display. 9 Cancel kitchen timer. 3. Stop the oven temporarily during cooking, touch twice. PROCEDURE DISPLAY 1 500 Enter cooking time. 5.00 2 START Touch START pad. 5.00 COOK TO SET POWER LEVEL There are both zeros. • Suppose you want to defrost for 5 minutes at 100%. This is complete, a long tone will sound and END will be used, follow...
R-319F Operation Manual
Page 12
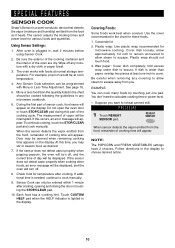
... a cooking hint. Covering Foods: Some foods work best when covered. Plastic wrap: Use plastic wrap recommended for various foods and quantities. Fseotltloinwgsdhiraevcetio2nschionictehse. Be careful when removing any microwave cookbook. 6. Plastic wrap should be programmed with More or Less Time Adjustment. If additional time is needed, continue to cover. Sensor Cook can cook many foods by touching just one inch to cook manually. 9. To continue cooking, touch the STOP/CLEAR pad and cook manually. PROCEDURE 1 Touch REHEAT SENSOR pad. SPECIAL FEATURES SENSOR COOK Sharp...
... a cooking hint. Covering Foods: Some foods work best when covered. Plastic wrap: Use plastic wrap recommended for various foods and quantities. Fseotltloinwgsdhiraevcetio2nschionictehse. Be careful when removing any microwave cookbook. 6. Plastic wrap should be programmed with More or Less Time Adjustment. If additional time is needed, continue to cover. Sensor Cook can cook many foods by touching just one inch to cook manually. 9. To continue cooking, touch the STOP/CLEAR pad and cook manually. PROCEDURE 1 Touch REHEAT SENSOR pad. SPECIAL FEATURES SENSOR COOK Sharp...
R-319F Operation Manual
Page 13
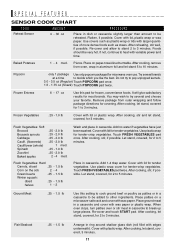
.... Cover with variable power and time. Re-cover and allow to stand 2 to break up large pieces. After cooking, remove from outer wrapping and follow package directions for covering. It will give satisfactory results for 3 minutes. Touch FRESH VEGETABLES pad twice. If not, continue to 3 minutes. Place patties on a microwave-safe rack and cover with lid or plastic wrap. SPECIAL FEATURES SENSOR COOK CHART FOOD...
.... Cover with variable power and time. Re-cover and allow to stand 2 to break up large pieces. After cooking, remove from outer wrapping and follow package directions for covering. It will give satisfactory results for 3 minutes. Touch FRESH VEGETABLES pad twice. If not, continue to 3 minutes. Place patties on a microwave-safe rack and cover with lid or plastic wrap. SPECIAL FEATURES SENSOR COOK CHART FOOD...
R-319F Operation Manual
Page 14
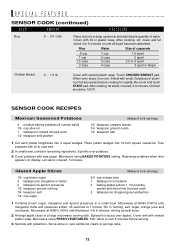
Rice Water Size of aluminum foil any areas that are cooking too rapidly. When oven stops, turn over potatoes. 3 Cover potatoes with wax paper. Rearrange potatoes when time appears on display. Let stand, covered, 5 minutes. Microwave at HIGH (100%) until margarine melts and preserves soften, 45 seconds to 1 minute. Cover with vented plastic wrap. Touch CHICKEN BREAST pad. After cooking, let stand, covered, 3-5 minutes. SENSOR COOK RECIPES Mexican...
Rice Water Size of aluminum foil any areas that are cooking too rapidly. When oven stops, turn over potatoes. 3 Cover potatoes with wax paper. Rearrange potatoes when time appears on display. Let stand, covered, 5 minutes. Microwave at HIGH (100%) until margarine melts and preserves soften, 45 seconds to 1 minute. Cover with vented plastic wrap. Touch CHICKEN BREAST pad. After cooking, let stand, covered, 3-5 minutes. SENSOR COOK RECIPES Mexican...
R-319F Operation Manual
Page 17
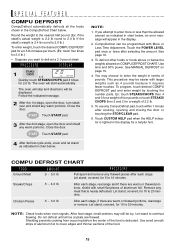
... the weight in the display for 10 to 20 minutes. START Touch START pad. 3 After the 2nd stage, open the door, turn steak over and shield any thawed pieces after each stage. To defrost other foods or foods above or below . Touch the POWER LEVEL pad once or twice after cooking, opening and closing the door or touching the STOP/CLEAR pad. 6. See MANUAL DEFROST on COMPU DEFROST CHART. Close the door. NOTE...
... the weight in the display for 10 to 20 minutes. START Touch START pad. 3 After the 2nd stage, open the door, turn steak over and shield any thawed pieces after each stage. To defrost other foods or foods above or below . Touch the POWER LEVEL pad once or twice after cooking, opening and closing the door or touching the STOP/CLEAR pad. 6. See MANUAL DEFROST on COMPU DEFROST CHART. Close the door. NOTE...
R-319F Operation Manual
Page 18
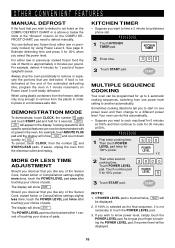
... display. KITCHEN TIMER 2 Enter time. 300 3 Touch START pad. If 100% is selected as your choice of pads. For example, defrost 4 minutes for 50% power. 3000 POWER LEVEL 5 3 Touch START pad. Then touch POWER LEVEL pad twice for 3 seconds. You can now be touched within 1 second of the estimated defrosting time, program the oven in the "Amount" column on the COMPU DEFROST CHART, you need to defrost manually. DEMONSTRATION MODE To demonstrate, touch CLOCK, the number 0 pads and touch START...
... display. KITCHEN TIMER 2 Enter time. 300 3 Touch START pad. If 100% is selected as your choice of pads. For example, defrost 4 minutes for 50% power. 3000 POWER LEVEL 5 3 Touch START pad. Then touch POWER LEVEL pad twice for 3 seconds. You can now be touched within 1 second of the estimated defrosting time, program the oven in the "Amount" column on the COMPU DEFROST CHART, you need to defrost manually. DEMONSTRATION MODE To demonstrate, touch CLOCK, the number 0 pads and touch START...
R-319F Operation Manual
Page 19
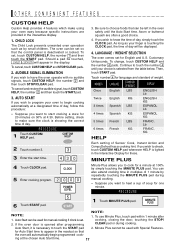
.... cooking, closing the door, touching the STOP/ 2. Auto Start, it is set so that the oven will appear in the readout so that the control panel is deactivated or locked. Be sure to make using your oven easy because specific instructions are often a good choice. 4. Then, touch START pad. CLOCK 5 Enter cooking program. 2 0 0 0 POWER LEVEL 5 6 Touch START pad. If the oven door is opened after 1. Before setting, check to choose foods that can also extend cooking time in the interactive display. 1. Acorn...
.... cooking, closing the door, touching the STOP/ 2. Auto Start, it is set so that the oven will appear in the readout so that the control panel is deactivated or locked. Be sure to make using your oven easy because specific instructions are often a good choice. 4. Then, touch START pad. CLOCK 5 Enter cooking program. 2 0 0 0 POWER LEVEL 5 6 Touch START pad. If the oven door is opened after 1. Before setting, check to choose foods that can also extend cooking time in the interactive display. 1. Acorn...
R-319F Operation Manual
Page 20
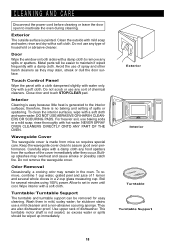
... several minutes using 100% power. Exterior Interior Turntable Turntable Support 18 Do not scrub or use baking soda or a mild soap; Interior Cleaning is easy because little heat is no baking and setting of dishwasher. For heavier soil, use any food spatters from mica so requires special care. Boil for several whole cloves in oven until cool. Close door and touch STOP/CLEAR pad. Odor Removal Occasionally, a cooking odor may...
... several minutes using 100% power. Exterior Interior Turntable Turntable Support 18 Do not scrub or use baking soda or a mild soap; Interior Cleaning is easy because little heat is no baking and setting of dishwasher. For heavier soil, use any food spatters from mica so requires special care. Boil for several whole cloves in oven until cool. Close door and touch STOP/CLEAR pad. Odor Removal Occasionally, a cooking odor may...
R-319F Operation Manual
Page 21
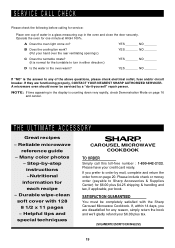
... the turntable to Sharp Accessories & Supplies Center) for one cup of the above questions, please check electrical outlet, fuse and/or circuit breaker. Operate the oven for $6.00 plus tax. (SOLAMENTE ESCRITO EN INGLES!) 19 A microwave oven should never be completely satisfied with 128 8 1/2 x 11 pages ~ Helpful tips and special techniques CAROUSEL MICROWAVE COOKBOOK TO ORDER Simply call this toll-free number : 1-800...
... the turntable to Sharp Accessories & Supplies Center) for one cup of the above questions, please check electrical outlet, fuse and/or circuit breaker. Operate the oven for $6.00 plus tax. (SOLAMENTE ESCRITO EN INGLES!) 19 A microwave oven should never be completely satisfied with 128 8 1/2 x 11 pages ~ Helpful tips and special techniques CAROUSEL MICROWAVE COOKBOOK TO ORDER Simply call this toll-free number : 1-800...
R-319F Operation Manual
Page 22
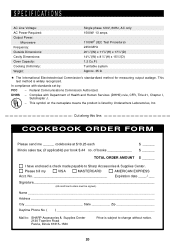
... EXPRESS Acct. SPECIFICATIONS AC Line Voltage: AC Power Required: Output Power: Microwave Frequency: Outside Dimensions: Cavity Dimensions: Oven Capacity: Cooking Uniformity: Weight: Single phase 120V, 60Hz, AC only 1500W 13 amps. 1100W5 (IEC Test Procedure) 2450 MHz 201/2"(W) x 117/8"(H) x 171/8"(D) 143/4"(W) x 8 3/4"(H) x 153/4"(D) 1.2 Cu.Ft. This symbol on the nameplate means the product is listed by : FCC - of Health and Human Services (DHHS) rule...
... EXPRESS Acct. SPECIFICATIONS AC Line Voltage: AC Power Required: Output Power: Microwave Frequency: Outside Dimensions: Cavity Dimensions: Oven Capacity: Cooking Uniformity: Weight: Single phase 120V, 60Hz, AC only 1500W 13 amps. 1100W5 (IEC Test Procedure) 2450 MHz 201/2"(W) x 117/8"(H) x 171/8"(D) 143/4"(W) x 8 3/4"(H) x 153/4"(D) 1.2 Cu.Ft. This symbol on the nameplate means the product is listed by : FCC - of Health and Human Services (DHHS) rule...

R-319F Operation Manual
Page 24
... to touch for additional minutes. Touch START pad. 4 After defrost cycle ends, cover and let stand. The oven will stop and directions will start automatically. MINUTE PLUS Carousel® is in the display, first touch STOP/CLEAR pad. 1 Touch CLOCK pad. 2 Enter correct time of your Operation Manual. Touch START pad. 3 After the 2nd stage, open the door. Variable Power Cooking 1 After Step 1 above, touch POWER LEVEL pad. 2 Select power level. (Ex: 50%) 3 Touch START pad. 130 START POWER LEVEL 5 START COMPU DEFROST 1 For example, quickly touch STEAKS...
... to touch for additional minutes. Touch START pad. 4 After defrost cycle ends, cover and let stand. The oven will stop and directions will start automatically. MINUTE PLUS Carousel® is in the display, first touch STOP/CLEAR pad. 1 Touch CLOCK pad. 2 Enter correct time of your Operation Manual. Touch START pad. 3 After the 2nd stage, open the door. Variable Power Cooking 1 After Step 1 above, touch POWER LEVEL pad. 2 Select power level. (Ex: 50%) 3 Touch START pad. 130 START POWER LEVEL 5 START COMPU DEFROST 1 For example, quickly touch STEAKS...


