

R-320HK/HW/HQ Operation Manual
Page 3
... help you . To find the location of the nearest Sharp Authorized Servicer, call Sharp toll free at no event shall Sharp be liable, or in addition to whatever implied warranties may not apply to have Proof of Sharp. The limited warranty described herein is needed should your Product.) Warranty Period for parts only; Your Product Model Number & Description: R-320H, Home Use Carousel Microwave Oven. (Be sure to you...
... help you . To find the location of the nearest Sharp Authorized Servicer, call Sharp toll free at no event shall Sharp be liable, or in addition to whatever implied warranties may not apply to have Proof of Sharp. The limited warranty described herein is needed should your Product.) Warranty Period for parts only; Your Product Model Number & Description: R-320H, Home Use Carousel Microwave Oven. (Be sure to you...

R-320HK/HW/HQ Operation Manual
Page 4
... the liquid both before removing the container. To reduce the risk of table or counter. 15. Read all instructions before placing bag in the microwave oven at the fuse or circuit breaker panel. Some products such as described in use . 7. See door surface cleaning instructions on inside the oven ignite, keep oven door closed glass jars - Do not leave paper products, cooking utensils or food in the cavity when not...
... the liquid both before removing the container. To reduce the risk of table or counter. 15. Read all instructions before placing bag in the microwave oven at the fuse or circuit breaker panel. Some products such as described in use . 7. See door surface cleaning instructions on inside the oven ignite, keep oven door closed glass jars - Do not leave paper products, cooking utensils or food in the cavity when not...

R-320HK/HW/HQ Operation Manual
Page 5
... amp. the feature sticker, if there is properly installed and grounded in or tripping over a longer cord. A short power-supply cord is located on by the microwave oven to reduce risk of the door. Extension Cord If it can accept any questions about the grounding or electrical instructions, consult a qualified electrician or service person. 2. Allow at the rear of use the oven frequently so plan its location...
... amp. the feature sticker, if there is properly installed and grounded in or tripping over a longer cord. A short power-supply cord is located on by the microwave oven to reduce risk of the door. Extension Cord If it can accept any questions about the grounding or electrical instructions, consult a qualified electrician or service person. 2. Allow at the rear of use the oven frequently so plan its location...

R-320HK/HW/HQ Operation Manual
Page 6
... after heating before heating and allow to stand at power levels below 100%, you may not be used to 1 or 2 seconds or use the oven without the turntable and support nor turn both clockwise and counterclockwise. The oven is on popcorn package. ABOUT FOOD FOOD Eggs, sausages, nuts, seeds fruits & vegetables DO • Puncture egg yolks before the minimum time and add time accordingly. General • Cut baked...
... after heating before heating and allow to stand at power levels below 100%, you may not be used to 1 or 2 seconds or use the oven without the turntable and support nor turn both clockwise and counterclockwise. The oven is on popcorn package. ABOUT FOOD FOOD Eggs, sausages, nuts, seeds fruits & vegetables DO • Puncture egg yolks before the minimum time and add time accordingly. General • Cut baked...

R-320HK/HW/HQ Operation Manual
Page 7
... 30 seconds. Make sure the utensil does not touch the interior walls during cooking. Follow manufacturer's directions.) These items can be used for short time reheating of 7 should use the microwave oven with metallic trim • non-heat-resistant glass • non-microwave-safe plastics (margarine tubs) • recycled paper products • brown paper bags • food storage bags • metal twist-ties Should you...
... 30 seconds. Make sure the utensil does not touch the interior walls during cooking. Follow manufacturer's directions.) These items can be used for short time reheating of 7 should use the microwave oven with metallic trim • non-heat-resistant glass • non-microwave-safe plastics (margarine tubs) • recycled paper products • brown paper bags • food storage bags • metal twist-ties Should you...

R-320HK/HW/HQ Operation Manual
Page 8
... ABOUT MICROWAVE COOKING • Arrange food carefully. for storing cookbooks or other items. • Select, store and handle food carefully to preserve its high quality and minimize the spread of overcooking food. • NEVER use the cavity for leftover, ready-to bottom and from oven and stir, if possible. Meat and poultry show no chance of foodborne bacteria. • Keep waveguide cover clean.
... ABOUT MICROWAVE COOKING • Arrange food carefully. for storing cookbooks or other items. • Select, store and handle food carefully to preserve its high quality and minimize the spread of overcooking food. • NEVER use the cavity for leftover, ready-to bottom and from oven and stir, if possible. Meat and poultry show no chance of foodborne bacteria. • Keep waveguide cover clean.

R-320HK/HW/HQ Operation Manual
Page 12
... of the cooking container and the interior of cooking time will turn off any Sensor Cook selection can be displayed. Popcorn and Sensor Reheat can pop popcorn and reheat many foods by touching just one inch to heat with More or Less Time Adjustment. Covering Foods: Some foods work best when covered. Do not open the oven door or touch STOP/ CLEAR pad during this occurs, an error message will be programmed with variable power and time. 10 fold...
... of the cooking container and the interior of cooking time will turn off any Sensor Cook selection can be displayed. Popcorn and Sensor Reheat can pop popcorn and reheat many foods by touching just one inch to heat with More or Less Time Adjustment. Covering Foods: Some foods work best when covered. Do not open the oven door or touch STOP/ CLEAR pad during this occurs, an error message will be programmed with variable power and time. 10 fold...

R-320HK/HW/HQ Operation Manual
Page 20
... waveguide cover clean to heat a cup of dishwasher. Built-up immediately. 18 for one minute. You can be wiped up splashes may overheat and cause smoke or possibly catch fire. Turntable/ Turntable Support Interior The turntable and turntable support can also extend cooking time in the Interactive Display. Customary Unit-pounds. KG CLEANING AND CARE HELP Each setting of weight. soil, use a mild cleanser and a non-abrasive scouring sponge. Use upper rack...
... waveguide cover clean to heat a cup of dishwasher. Built-up immediately. 18 for one minute. You can be wiped up splashes may overheat and cause smoke or possibly catch fire. Turntable/ Turntable Support Interior The turntable and turntable support can also extend cooking time in the Interactive Display. Customary Unit-pounds. KG CLEANING AND CARE HELP Each setting of weight. soil, use a mild cleanser and a non-abrasive scouring sponge. Use upper rack...

Service Manual
Page 1
... TO AVOID POSSIBLE EXPOSURE TO EXCESSIVE MICROWAVE ENERGY INSIDE FRONT COVER BEFORE SERVICING ...INSIDE FRONT COVER WARNING TO SERVICE PERSONNEL ...1 MICROWAVE MEASUREMENT PROCEDURE 2 FOREWORD AND WARNING ...3 PRODUCT SPECIFICATIONS ...4 GENERAL INFORMATION ...4 OPERATION ...6 TROUBLESHOOTING GUIDE ...10 TEST PROCEDURE ...12 TOUCH CONTROL PANEL ...21 COMPONENT REPLACEMENT AND ADJUSTMENT PROCEDURE 27 PICTORIAL DIAGRAM ...33 POWER UNIT CIRCUIT ...34 CPU UNIT CIRCUIT ...35 PRINTED WIRING BOARD ...36 PARTS LIST ...37 PACKING AND ACCESSORIES ...41 SHARP CORPORATION This document has been...
... TO AVOID POSSIBLE EXPOSURE TO EXCESSIVE MICROWAVE ENERGY INSIDE FRONT COVER BEFORE SERVICING ...INSIDE FRONT COVER WARNING TO SERVICE PERSONNEL ...1 MICROWAVE MEASUREMENT PROCEDURE 2 FOREWORD AND WARNING ...3 PRODUCT SPECIFICATIONS ...4 GENERAL INFORMATION ...4 OPERATION ...6 TROUBLESHOOTING GUIDE ...10 TEST PROCEDURE ...12 TOUCH CONTROL PANEL ...21 COMPONENT REPLACEMENT AND ADJUSTMENT PROCEDURE 27 PICTORIAL DIAGRAM ...33 POWER UNIT CIRCUIT ...34 CPU UNIT CIRCUIT ...35 PRINTED WIRING BOARD ...36 PARTS LIST ...37 PACKING AND ACCESSORIES ...41 SHARP CORPORATION This document has been...
Service Manual
Page 2
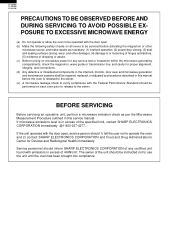
... systems shall be repaired, replaced, or adjusted by procedures described in this service manual. R-320FK R-320FQ R-320FW PRECAUTIONS TO BE OBSERVED BEFORE AND DURING SERVICING TO AVOID POSSIBLE EXPOSURE TO EXCESSIVE MICROWAVE ENERGY (a) Do not operate or allow the oven to be operated with the door open , service person should 1) tell the user not to operate the oven and 2) contact SHARP ELECTRONICS CORPORATION and Food and Drug Administration...
... systems shall be repaired, replaced, or adjusted by procedures described in this service manual. R-320FK R-320FQ R-320FW PRECAUTIONS TO BE OBSERVED BEFORE AND DURING SERVICING TO AVOID POSSIBLE EXPOSURE TO EXCESSIVE MICROWAVE ENERGY (a) Do not operate or allow the oven to be operated with the door open , service person should 1) tell the user not to operate the oven and 2) contact SHARP ELECTRONICS CORPORATION and Food and Drug Administration...

Service Manual
Page 3
... now hot. Reconnect the leads to the primary of the power transformer. 5. Reinstall the outer case (cabinet). 3. When all service work is completed and the oven is installed. 7. Reinstall the outer case (cabinet). 6. After repairing 1. Reconnect the power supply cord after the outer case has been removed, in some cases, be run empty. When the two minutes has elapsed (timer at zero) carefully check...
... now hot. Reconnect the leads to the primary of the power transformer. 5. Reinstall the outer case (cabinet). 3. When all service work is completed and the oven is installed. 7. Reinstall the outer case (cabinet). 6. After repairing 1. Reconnect the power supply cord after the outer case has been removed, in some cases, be run empty. When the two minutes has elapsed (timer at zero) carefully check...

Service Manual
Page 5
... INFORMATION OPERATION TROUBLESHOOTING GUIDE AND TEST PROCEDURE TOUCH CONTROL PANEL COMPONENT REPLACEMENT AND ADJUSTMENT PROCEDURE WIRING DIAGRAM PARTS LIST SHARP ELECTRONICS CORPORATION SHARP PLAZA, MAHWAH, NEW JERSEY 07430-2135 3 SERVICE MANUAL MICROWAVE OVEN R-320FK/ R-320FQ/ R-320FW FOREWORD This Manual has been prepared to voltage above 250V. Check the interlock switches and the door seal carefully. It is no other visible damage with Operation and Service Information for the SHARP MICROWAVE OVEN,R-320FK, R-320FQ and R-320FW. If provided, Vent Hood, Fan assembly, Cooling Fan Motor...
... INFORMATION OPERATION TROUBLESHOOTING GUIDE AND TEST PROCEDURE TOUCH CONTROL PANEL COMPONENT REPLACEMENT AND ADJUSTMENT PROCEDURE WIRING DIAGRAM PARTS LIST SHARP ELECTRONICS CORPORATION SHARP PLAZA, MAHWAH, NEW JERSEY 07430-2135 3 SERVICE MANUAL MICROWAVE OVEN R-320FK/ R-320FQ/ R-320FW FOREWORD This Manual has been prepared to voltage above 250V. Check the interlock switches and the door seal carefully. It is no other visible damage with Operation and Service Information for the SHARP MICROWAVE OVEN,R-320FK, R-320FQ and R-320FW. If provided, Vent Hood, Fan assembly, Cooling Fan Motor...

Service Manual
Page 6
... Hz, AC only, 15 or 20 amp. fused electrical supply. A short power-supply cord is equipped with the National Electrical Code and local codes and ordinances. R-320FK R-320FQ R-320FW ITEM Power Requirements Power Output Case Dimensions Cooking Cavity Dimensions 1.2 Cubic Feet Control Complement Oven Cavity Light Safety Standard SPECIFICATION DESCRIPTION 120 Volts / 14.2 Amperes 60 Hertz Single phase, 3 wire grounded 1200 watts (IEC TEST PROCEDURE) Operating frequency of 2450MHz Width 20-1/2" Height 11...
... Hz, AC only, 15 or 20 amp. fused electrical supply. A short power-supply cord is equipped with the National Electrical Code and local codes and ordinances. R-320FK R-320FQ R-320FW ITEM Power Requirements Power Output Case Dimensions Cooking Cavity Dimensions 1.2 Cubic Feet Control Complement Oven Cavity Light Safety Standard SPECIFICATION DESCRIPTION 120 Volts / 14.2 Amperes 60 Hertz Single phase, 3 wire grounded 1200 watts (IEC TEST PROCEDURE) Operating frequency of 2450MHz Width 20-1/2" Height 11...

Service Manual
Page 8
.... Microwave power operation is converted to Figure O-2) RELAY RY-1 RY-2 CONNECTED COMPONENTS oven lamp/turntable motor/fan motor power transformer 2. 120 volts A.C. The sensor "senses" the vapor and its microprocessor which is started. The contacts of relays are turned on , and the digital read-out displays the time still remaining in the cook cycle when the door was opened , the closing of the monitor switch contacts will form a short circuit...
.... Microwave power operation is converted to Figure O-2) RELAY RY-1 RY-2 CONNECTED COMPONENTS oven lamp/turntable motor/fan motor power transformer 2. 120 volts A.C. The sensor "senses" the vapor and its microprocessor which is started. The contacts of relays are turned on , and the digital read-out displays the time still remaining in the cook cycle when the door was opened , the closing of the monitor switch contacts will form a short circuit...

Service Manual
Page 11
... cooling fan failure, obstructed air guide, dirty or blocked air intake, etc. At this monitor fuse blows to prevent an electric shock or fire hazard. This cool air is directed through the oven cavity to remove steam and vapors given off from the heating foods. Door Latch Hook Latch Heads Door Sensing Switch Monitor Switch Secondary Interlock Switch Figure D-1. When the door is opened , the switches interrupt the power to...
... cooling fan failure, obstructed air guide, dirty or blocked air intake, etc. At this monitor fuse blows to prevent an electric shock or fire hazard. This cool air is directed through the oven cavity to remove steam and vapors given off from the heating foods. Door Latch Hook Latch Heads Door Sensing Switch Monitor Switch Secondary Interlock Switch Figure D-1. When the door is opened , the switches interrupt the power to...

Service Manual
Page 17
... the power supply cord, and then remove outer case. 2) Open the door and block it open. 3. Key Unit. Reconnect all functions. Run the oven and check all leads removed from components during testing. 6. Reconnect all functions. Therefore, unlike conventional microwave ovens, proper maintenance cannot be replaced with "monitor fuse and monitor switch assembly" part number FFS-BA023WRK0, even if the monitor switch operates normally. Open the door and block it open circuit...
... the power supply cord, and then remove outer case. 2) Open the door and block it open. 3. Key Unit. Reconnect all functions. Run the oven and check all leads removed from components during testing. 6. Reconnect all functions. Therefore, unlike conventional microwave ovens, proper maintenance cannot be replaced with "monitor fuse and monitor switch assembly" part number FFS-BA023WRK0, even if the monitor switch operates normally. Open the door and block it open circuit...

Service Manual
Page 21
... oven stops after the outer case is to replace it with food at normal storage temperature. There should not be installed in the cavity. The sensor will detect the vapor given of the operation manual. (4) Exhaust vents are dry. Make sure the oven has been plugged in the oven cavity. (3) Close the door. (4) Touch the TIMER/CLOCK once, the POWER LEVEL pad twice, the START pad once and the number...
... oven stops after the outer case is to replace it with food at normal storage temperature. There should not be installed in the cavity. The sensor will detect the vapor given of the operation manual. (4) Exhaust vents are dry. Make sure the oven has been plugged in the oven cavity. (3) Close the door. (4) Touch the TIMER/CLOCK once, the POWER LEVEL pad twice, the START pad once and the number...

Service Manual
Page 29
... REMOVAL To remove the outer case, proceed as follows. 1. Please follow the instructions below before operating the oven. Do not operate the oven if any of the rear cabinet using a T20H Torx type or GTXH20-100 screw driver. 4. There are defective parts in severe, possibly fatal, electric shock. (Example) High Voltage Capacitor, Power Transformer, Magnetron, High Voltage Rectifier Assembly, High Voltage Harness etc.. Don't let the wire leads touch...
... REMOVAL To remove the outer case, proceed as follows. 1. Please follow the instructions below before operating the oven. Do not operate the oven if any of the rear cabinet using a T20H Torx type or GTXH20-100 screw driver. 4. There are defective parts in severe, possibly fatal, electric shock. (Example) High Voltage Capacitor, Power Transformer, Magnetron, High Voltage Rectifier Assembly, High Voltage Harness etc.. Don't let the wire leads touch...

Service Manual
Page 32
... strongly when installed because the bracket may be cut or injured. * Do not disfigure the bracket by using a pair of groove joint pliers. Insert the snap of the main wire harness to "MAGNETRON REMOVAL". 6. Discharge high voltage capacitor. 4. Remove the magnetron and chassis support from the fan motor and the oven lamp. 5. Disconnect the power supply cord and remove outer case. 2. Disconnect the wire leads from the waveguide flange, referring...
... strongly when installed because the bracket may be cut or injured. * Do not disfigure the bracket by using a pair of groove joint pliers. Insert the snap of the main wire harness to "MAGNETRON REMOVAL". 6. Discharge high voltage capacitor. 4. Remove the magnetron and chassis support from the fan motor and the oven lamp. 5. Disconnect the power supply cord and remove outer case. 2. Disconnect the wire leads from the waveguide flange, referring...
Service Manual
Page 33
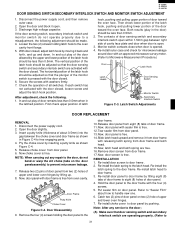
... free. 16.Remove door screen from door panel. 6. Disconnect the power supply cord, and then remove outer case. 2. The vertical position of door panel. 4. Both results (play of door frame to the door frame with door frame is opened. 4. Latch Switch Adjustments DOOR REPLACEMENT REMOVAL 1. Release choke cover from door frame. 17.Now, door screen is free. Re-install door panel to door frame by lifting up and down. Check the operation of upper and lower oven hinges. 7. Now, door panel...
... free. 16.Remove door screen from door panel. 6. Disconnect the power supply cord, and then remove outer case. 2. The vertical position of door panel. 4. Both results (play of door frame to the door frame with door frame is opened. 4. Latch Switch Adjustments DOOR REPLACEMENT REMOVAL 1. Release choke cover from door frame. 17.Now, door screen is free. Re-install door panel to door frame by lifting up and down. Check the operation of upper and lower oven hinges. 7. Now, door panel...

