

Operation Manual
Page 1
...; MICROWAVE OVEN OPERATION MANUAL MODELS R-402J /R-404J Followed by letter indicating color K=black, W=white CONTENTS • For Customer Assistance Inside Front Cover • Precautions to Avoid Possible Exposure to Excessive Microwave Energy Inside Front Cover • Consumer Limited Warranty 1 • Product Information Card 1 • Important Safety Instructions 2 • Unpacking and Installation Instructions ... 3 • Grounding Instructions 3 • Information You Need to Know 4-6 • Part Names 7-8 • Before Operating 9 • Manual Operation...
...; MICROWAVE OVEN OPERATION MANUAL MODELS R-402J /R-404J Followed by letter indicating color K=black, W=white CONTENTS • For Customer Assistance Inside Front Cover • Precautions to Avoid Possible Exposure to Excessive Microwave Energy Inside Front Cover • Consumer Limited Warranty 1 • Product Information Card 1 • Important Safety Instructions 2 • Unpacking and Installation Instructions ... 3 • Grounding Instructions 3 • Information You Need to Know 4-6 • Part Names 7-8 • Before Operating 9 • Manual Operation...

Operation Manual
Page 2
... the oven door close properly and that there is damaged. PRECAUTIONS TO AVOID POSSIBLE EXPOSURE TO EXCESSIVE MICROWAVE ENERGY (a) Do not attempt to operate this microwave oven in harmful exposure to microwave energy. MODEL NUMBER SERIAL NUMBER DATE OF PURCHASE DEALER TELEPHONE SERVICER TELEPHONE TO PHONE: DIAL 1-800-BE-SHARP ( 237-4277 ) for : SERVICE (for your nearest Sharp Authorized Servicer) PARTS (for your daytime telephone number (including area code...
... the oven door close properly and that there is damaged. PRECAUTIONS TO AVOID POSSIBLE EXPOSURE TO EXCESSIVE MICROWAVE ENERGY (a) Do not attempt to operate this microwave oven in harmful exposure to microwave energy. MODEL NUMBER SERIAL NUMBER DATE OF PURCHASE DEALER TELEPHONE SERVICER TELEPHONE TO PHONE: DIAL 1-800-BE-SHARP ( 237-4277 ) for : SERVICE (for your nearest Sharp Authorized Servicer) PARTS (for your daytime telephone number (including area code...

Operation Manual
Page 3
... www.sharp-usa.com. Your Product Model Number & Description: R-402J or R-404J Home Use Carousel Microwave Oven. (Be sure to have this information available when you . SAVE THE PROOF OF PURCHASE AS IT IS NEEDED SHOULD YOUR OVEN EVER REQUIRE WARRANTY SERVICE. In order to enforce the rights under this limited warranty, the purchaser should be free from Non-functional accessories, turntable and light bulb. Some...
... www.sharp-usa.com. Your Product Model Number & Description: R-402J or R-404J Home Use Carousel Microwave Oven. (Be sure to have this information available when you . SAVE THE PROOF OF PURCHASE AS IT IS NEEDED SHOULD YOUR OVEN EVER REQUIRE WARRANTY SERVICE. In order to enforce the rights under this limited warranty, the purchaser should be free from Non-functional accessories, turntable and light bulb. Some...

Operation Manual
Page 4
... a heating or cooking appliance. If the oven light fails, consult a SHARP AUTHORIZED SERVICER. IMPORTANT SAFETY INSTRUCTIONS When using electrical appliances basic safety precautions should be serviced only by children. 8. This appliance must be followed, including the following instructions: a. Do not use this appliance. As with any portion of table or counter. 15. Keep cord away from the microwave oven is specifically designed to be boiling. See door surface cleaning instructions on...
... a heating or cooking appliance. If the oven light fails, consult a SHARP AUTHORIZED SERVICER. IMPORTANT SAFETY INSTRUCTIONS When using electrical appliances basic safety precautions should be serviced only by children. 8. This appliance must be followed, including the following instructions: a. Do not use this appliance. As with any portion of table or counter. 15. Keep cord away from the microwave oven is specifically designed to be boiling. See door surface cleaning instructions on...

Operation Manual
Page 5
... a conventional wall oven. UNPACKING AND INSTALLATION INSTRUCTIONS Unpacking and Examining Your Oven Remove: 1. It must be provided. follow instructions for example, next to - - The kit includes ducts, finish trim strips and easy-to or above a conventional gas or electric range or above a heat source-using Sharp's black Built-In Kit RK-46K24 or white Built-In Kit RK-46W24. or more protected electrical supply. Read enclosures and SAVE the Operation Manual. 2. Built-in...
... a conventional wall oven. UNPACKING AND INSTALLATION INSTRUCTIONS Unpacking and Examining Your Oven Remove: 1. It must be provided. follow instructions for example, next to - - The kit includes ducts, finish trim strips and easy-to or above a conventional gas or electric range or above a heat source-using Sharp's black Built-In Kit RK-46K24 or white Built-In Kit RK-46W24. or more protected electrical supply. Read enclosures and SAVE the Operation Manual. 2. Built-in...

Operation Manual
Page 6
... using the oven at power levels below 100%, you may not be warm to the touch when cooking or reheating. It is normal for the popping to slow to absorb the microwave energy. Your oven is on to 1 or 2 seconds or use the oven without the turntable and support nor turn both clockwise and counterclockwise. General • Cut baked goods with nipples on. • Heat baby food...
... using the oven at power levels below 100%, you may not be warm to the touch when cooking or reheating. It is normal for the popping to slow to absorb the microwave energy. Your oven is on to 1 or 2 seconds or use the oven without the turntable and support nor turn both clockwise and counterclockwise. General • Cut baked goods with nipples on. • Heat baby food...

Operation Manual
Page 7
... for large meats or foods that need to learn that crisp food because they meet your new microwave oven. Many pieces already in your kitchen can be used successfully in determining correct doneness and assure you have been cooked to buy all safety precautions: use metal twist ties. Make sure the utensil does not touch the interior walls during cooking. Between the ages of...
... for large meats or foods that need to learn that crisp food because they meet your new microwave oven. Many pieces already in your kitchen can be used successfully in determining correct doneness and assure you have been cooked to buy all safety precautions: use metal twist ties. Make sure the utensil does not touch the interior walls during cooking. Between the ages of...

Operation Manual
Page 8
... foodborne bacteria. • Keep waveguide cover clean. Slowly lift the farthest edge of a dish's covering and carefully open popcorn and oven cooking bags away from the center of the dish to the outside to speed cooking of time indicated and add more as chicken and hamburgers. INFORMATION YOU NEED TO KNOW ABOUT MICROWAVE COOKING • Arrange food carefully. Food severely overcooked can transfer through cooking both from top to...
... foodborne bacteria. • Keep waveguide cover clean. Slowly lift the farthest edge of a dish's covering and carefully open popcorn and oven cooking bags away from the center of the dish to the outside to speed cooking of time indicated and add more as chicken and hamburgers. INFORMATION YOU NEED TO KNOW ABOUT MICROWAVE COOKING • Arrange food carefully. Food severely overcooked can transfer through cooking both from top to...

Operation Manual
Page 9
... operate unless the door is in the lower portion of the oven floor. 8 Removable turntable Place the turntable on the turntable support securely. PART NAMES MICROWAVE OVEN PARTS 1 One touch door open button Push to indicate what function is securely closed. 4 Door hinges 5 Door seals and sealing surfaces 6 Turntable motor shaft 7 Removable turntable support Carefully place the turntable support in the center of the display will rotate clockwise or counterclockwise. The turntable will light to open . 11 Waveguide cover: DO NOT REMOVE. 12 Auto-Touch control panel...
... operate unless the door is in the lower portion of the oven floor. 8 Removable turntable Place the turntable on the turntable support securely. PART NAMES MICROWAVE OVEN PARTS 1 One touch door open button Push to indicate what function is securely closed. 4 Door hinges 5 Door seals and sealing surfaces 6 Turntable motor shaft 7 Removable turntable support Carefully place the turntable support in the center of the display will rotate clockwise or counterclockwise. The turntable will light to open . 11 Waveguide cover: DO NOT REMOVE. 12 Auto-Touch control panel...

Operation Manual
Page 11
... the display. Set clock. Return the time of day. Simply touch STOP/CLEAR pad and reset the clock for the correct time of day to your new microwave oven make a mistake during cooking, the program will be erased. Cancel timer. 3. Plug in sequence. 12:30 3 TIMER CLOCK 12:30 Touch TIMER/CLOCK pad again. or P.M.). Touch the STOP/CLEAR pad and re-enter the time. • If the electrical power supply to the display. 5. Stop the oven...
... the display. Set clock. Return the time of day. Simply touch STOP/CLEAR pad and reset the clock for the correct time of day to your new microwave oven make a mistake during cooking, the program will be erased. Cancel timer. 3. Plug in sequence. 12:30 3 TIMER CLOCK 12:30 Touch TIMER/CLOCK pad again. or P.M.). Touch the STOP/CLEAR pad and re-enter the time. • If the electrical power supply to the display. 5. Stop the oven...

Operation Manual
Page 12
MANUAL OPERATION TO SET POWER LEVEL There are defrosted. Estimate defrosting time and press POWER LEVEL pad eight times for specific recommendations. Always stop the oven periodically to defrost manually. Consult cookbook or recipes for 30% power. For either raw or previously cooked, by using plastic containers from the freezer, defrost only long enough to remove from the plastic in order to place in the display. 10 Using lower power levels increases the cooking time which is recommended...
MANUAL OPERATION TO SET POWER LEVEL There are defrosted. Estimate defrosting time and press POWER LEVEL pad eight times for specific recommendations. Always stop the oven periodically to defrost manually. Consult cookbook or recipes for 30% power. For either raw or previously cooked, by using plastic containers from the freezer, defrost only long enough to remove from the plastic in order to place in the display. 10 Using lower power levels increases the cooking time which is recommended...

Operation Manual
Page 13
... correct cooking time for most brands of foods covered with plastic wrap tend to be slightly higher than the quantity listed in the chart should be programmed with wax paper or vented plastic wrap. PROCEDURE DISPLAY 1 COOK Touch COOK once. Temperatures of microwave popcorn. More or less food than those covered with wax paper. The final cooking result will vary according to cook manually. 11 If additional time is needed...
... correct cooking time for most brands of foods covered with plastic wrap tend to be slightly higher than the quantity listed in the chart should be programmed with wax paper or vented plastic wrap. PROCEDURE DISPLAY 1 COOK Touch COOK once. Temperatures of microwave popcorn. More or less food than those covered with wax paper. The final cooking result will vary according to cook manually. 11 If additional time is needed...
Operation Manual
Page 14
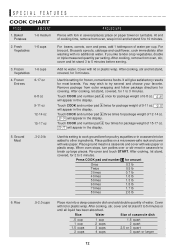
... Size of 6-8 oz. 6-8 will appear in the display. Fresh 1-6 cups Vegetables 3. For beans, carrots, corn and peas, add 1 tablespoon of 9-11 oz. 9-11 will appear in the display. Touch COOK and number pad 4 twice for package weight of water. Ground Meat .3-2.0 lb Use this setting for package weight of cooking time, remove from oven, stir, cover and let stand 3 to other ingredients. Place patties on turntable...
... Size of 6-8 oz. 6-8 will appear in the display. Fresh 1-6 cups Vegetables 3. For beans, carrots, corn and peas, add 1 tablespoon of 9-11 oz. 9-11 will appear in the display. Touch COOK and number pad 4 twice for package weight of water. Ground Meat .3-2.0 lb Use this setting for package weight of cooking time, remove from oven, stir, cover and let stand 3 to other ingredients. Place patties on turntable...
Operation Manual
Page 15
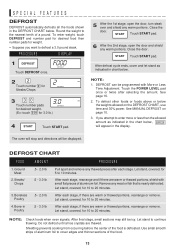
... stop and directions will appear in the DEFROST CHART below . SPECIAL FEATURES DEFROST DEFROST automatically defrosts all ice crystals are warm or thawed portions, rearrange or remove. START Touch START pad. 6 After the 2nd stage, open the door, turn steak over and shield any meat or fish that is defrosted. DEFROST CHART FOOD AMOUNT PROCEDURE 1. After each stage. Use small smooth strips of the food. 13 START Touch START pad. After defrost...
... stop and directions will appear in the DEFROST CHART below . SPECIAL FEATURES DEFROST DEFROST automatically defrosts all ice crystals are warm or thawed portions, rearrange or remove. START Touch START pad. 6 After the 2nd stage, open the door, turn steak over and shield any meat or fish that is defrosted. DEFROST CHART FOOD AMOUNT PROCEDURE 1. After each stage. Use small smooth strips of the food. 13 START Touch START pad. After defrost...

Operation Manual
Page 16
... soup. SMALL will appear in the display. FOOD 2 2 Select desired REHEAT 2 setting. (Ex: touch number pad 2 to outside of the plate is very hot. Place on plate; SPECIAL FEATURES REHEAT REHEAT automatically computes the correct heating time and microwave power level for foods shown in the chart below the quantity allowed on the REHEAT CHART, use Less option (see page 16). Cover with sauce or other dense...
... soup. SMALL will appear in the display. FOOD 2 2 Select desired REHEAT 2 setting. (Ex: touch number pad 2 to outside of the plate is very hot. Place on plate; SPECIAL FEATURES REHEAT REHEAT automatically computes the correct heating time and microwave power level for foods shown in the chart below the quantity allowed on the REHEAT CHART, use Less option (see page 16). Cover with sauce or other dense...
Operation Manual
Page 18
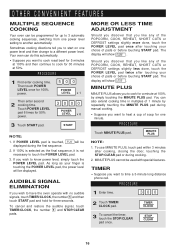
... simply touching the MINUTE PLUS pad. Then touch POWER LEVEL once for 50% power. 3000 POWER LEVEL x 6 3 Touch START pad. START NOTE: 1. The display will be used with no audible signals, touch TIMER/CLOCK, the number 5 and then touch START pad and hold for three seconds. STOP CLEAR 16 Touch POWER LEVEL pad 6 times for 100% power. 500 POWER LEVEL x 1 Then enter second 2 cooking time. MINUTE PLUS NOTE: 1. PROCEDURE 1 First enter cooking time. If you wish to have the oven operate with...
... simply touching the MINUTE PLUS pad. Then touch POWER LEVEL once for 50% power. 3000 POWER LEVEL x 6 3 Touch START pad. START NOTE: 1. The display will be used with no audible signals, touch TIMER/CLOCK, the number 5 and then touch START pad and hold for three seconds. STOP CLEAR 16 Touch POWER LEVEL pad 6 times for 100% power. 500 POWER LEVEL x 1 Then enter second 2 cooking time. MINUTE PLUS NOTE: 1. PROCEDURE 1 First enter cooking time. If you wish to have the oven operate with...

Operation Manual
Page 19
... be set , touch TIMER/CLOCK pad, the number 1 and then touch the START pad and hold for three seconds. DEMO will show 1:00 and count down quickly to turn off automatically when you start cooking and after the light has operated for 9 hours. To cancel, touch TIMER/CLOCK, the number 0 and STOP/CLEAR pads. To set so that the control panel is deactivated or locked. OTHER CONVENIENT FEATURES CHILD LOCK The Child Lock prevents unwanted oven operation such as...
... be set , touch TIMER/CLOCK pad, the number 1 and then touch the START pad and hold for three seconds. DEMO will show 1:00 and count down quickly to turn off automatically when you start cooking and after the light has operated for 9 hours. To cancel, touch TIMER/CLOCK, the number 0 and STOP/CLEAR pads. To set so that the control panel is deactivated or locked. OTHER CONVENIENT FEATURES CHILD LOCK The Child Lock prevents unwanted oven operation such as...

Operation Manual
Page 20
.... The turntable motor shaft is made from the surface of spills or spattering. Avoid the use of household or abrasive cleaner. NEVER SPRAY OVEN CLEANERS DIRECTLY ONTO ANY PART OF THE OVEN. If the control panel becomes soiled, open the oven door before cleaning or leave the door open to set in a 2-cup glass measuring cup. Close door and touch STOP/CLEAR. Interior Cleaning is easy because little heat is painted. Waveguide Cover The waveguide cover is not...
.... The turntable motor shaft is made from the surface of spills or spattering. Avoid the use of household or abrasive cleaner. NEVER SPRAY OVEN CLEANERS DIRECTLY ONTO ANY PART OF THE OVEN. If the control panel becomes soiled, open the oven door before cleaning or leave the door open to set in a 2-cup glass measuring cup. Close door and touch STOP/CLEAR. Interior Cleaning is easy because little heat is painted. Waveguide Cover The waveguide cover is not...

Operation Manual
Page 21
... a "do-it-yourself" repair person. Operate the oven for each recipe ✪ Durable wipe-clean soft cover with the Sharp Carousel Microwave Cookbook. YES _______ NO _______ B Does the cooling fan work? (Put your credit card ready. SATISFACTION GUARANTEED You must be serviced by -step instructions ✪ Nutritional information for one cup of the above questions, please check electrical outlet, fuse and/or circuit breaker.
... a "do-it-yourself" repair person. Operate the oven for each recipe ✪ Durable wipe-clean soft cover with the Sharp Carousel Microwave Cookbook. YES _______ NO _______ B Does the cooling fan work? (Put your credit card ready. SATISFACTION GUARANTEED You must be serviced by -step instructions ✪ Nutritional information for one cup of the above questions, please check electrical outlet, fuse and/or circuit breaker.

Operation Manual
Page 24
... 1 Touch DEFROST pad. 2 Select desired Defrost setting. (Ex: touch 2 to touch for regular size (3.5 oz). Ground Meat .5 - 2.0 lb 2. Steaks/Chops .5 - 3.0 lb 3. Bone-in the display, first touch STOP/CLEAR. 1 Touch TIMER/CLOCK pad. 2 Enter correct time of Sharp Corporation. Chocolate SOFTEN 1. Syrup 2. Dessert Topping 2 tbsp, 1/2 cup 1 cup chips, 1 square 1 pint, 1/2 gallon 3 oz., 8 oz. 1/4 cup, 1/2 cup 1/4 cup, 1/2 cup Carousel® is in Poultry .5 - 3.0 lb SHORT CUTS CHART FOOD AMOUNT...
... 1 Touch DEFROST pad. 2 Select desired Defrost setting. (Ex: touch 2 to touch for regular size (3.5 oz). Ground Meat .5 - 2.0 lb 2. Steaks/Chops .5 - 3.0 lb 3. Bone-in the display, first touch STOP/CLEAR. 1 Touch TIMER/CLOCK pad. 2 Enter correct time of Sharp Corporation. Chocolate SOFTEN 1. Syrup 2. Dessert Topping 2 tbsp, 1/2 cup 1 cup chips, 1 square 1 pint, 1/2 gallon 3 oz., 8 oz. 1/4 cup, 1/2 cup 1/4 cup, 1/2 cup Carousel® is in Poultry .5 - 3.0 lb SHORT CUTS CHART FOOD AMOUNT...

