
R428J|R520J Operation Manual
Page 1
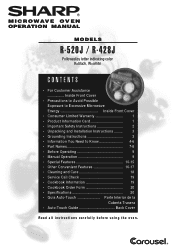
...; Information You Need to Know 4-6 • Part Names 7-8 • Before Operating 9 • Manual Operation 9 • Special Features 10-15 • Other Convenient Features 16-17 • Cleaning and Care 18 • Service Call Check 19 • Cookbook Information 19 • Cookbook Order Form 20 • Specifications 20 • Guia Auto-Touch Parte Interior de la Cuberta Trasera • Auto-Touch Guide Back Cover Read all instructions carefully before using the oven.
...; Information You Need to Know 4-6 • Part Names 7-8 • Before Operating 9 • Manual Operation 9 • Special Features 10-15 • Other Convenient Features 16-17 • Cleaning and Care 18 • Service Call Check 19 • Cookbook Information 19 • Cookbook Order Form 20 • Specifications 20 • Guia Auto-Touch Parte Interior de la Cuberta Trasera • Auto-Touch Guide Back Cover Read all instructions carefully before using the oven.
R428J|R520J Operation Manual
Page 2
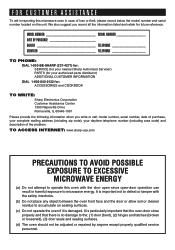
... latches (broken or loosened), (3) door seals and sealing surfaces. (d) The oven should not be adjusted or repaired by anyone except properly qualified service personnel. It is particularly important that the oven door close properly and that there is damaged. MODEL NUMBER SERIAL NUMBER DATE OF PURCHASE DEALER TELEPHONE SERVICER TELEPHONE TO PHONE: DIAL 1-800-BE-SHARP (237-4277) for: SERVICE (for your nearest Sharp Authorized Servicer) PARTS...
... latches (broken or loosened), (3) door seals and sealing surfaces. (d) The oven should not be adjusted or repaired by anyone except properly qualified service personnel. It is particularly important that the oven door close properly and that there is damaged. MODEL NUMBER SERIAL NUMBER DATE OF PURCHASE DEALER TELEPHONE SERVICER TELEPHONE TO PHONE: DIAL 1-800-BE-SHARP (237-4277) for: SERVICE (for your nearest Sharp Authorized Servicer) PARTS...
R428J|R520J Operation Manual
Page 3
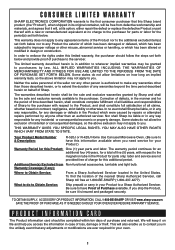
... Servicer, call Sharp toll free at no event shall Sharp be sure it is authorized to make any warranties other misuse, abnormal service or handling, or which were caused by repairs or attempted repairs performed by law. Be sure to Obtain Service: From a Sharp Authorized Servicer located In the United States. SAVE THE PROOF OF PURCHASE AS IT IS NEEDED SHOULD YOUR OVEN EVER REQUIRE WARRANTY SERVICE...
... Servicer, call Sharp toll free at no event shall Sharp be sure it is authorized to make any warranties other misuse, abnormal service or handling, or which were caused by repairs or attempted repairs performed by law. Be sure to Obtain Service: From a Sharp Authorized Servicer located In the United States. SAVE THE PROOF OF PURCHASE AS IT IS NEEDED SHOULD YOUR OVEN EVER REQUIRE WARRANTY SERVICE...
R428J|R520J Operation Manual
Page 4
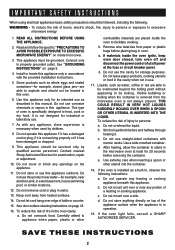
... a heating or cooking appliance. Use a wide-mouthed container. d. If the oven light fails, consult a SHARP AUTHORIZED SERVICER. See "GROUNDING INSTRUCTIONS" on page 18. 16. This type of the appliance surface when the appliance is in the microwave oven at the fuse or circuit breaker panel. Do not overcook food. d. Liquids, such as whole eggs and sealed containers-for example, closed , turn oven off and disconnect the power cord...
... a heating or cooking appliance. Use a wide-mouthed container. d. If the oven light fails, consult a SHARP AUTHORIZED SERVICER. See "GROUNDING INSTRUCTIONS" on page 18. 16. This type of the appliance surface when the appliance is in the microwave oven at the fuse or circuit breaker panel. Do not overcook food. d. Liquids, such as whole eggs and sealed containers-for example, closed , turn oven off and disconnect the power cord...
R428J|R520J Operation Manual
Page 5
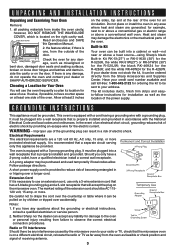
... or electric range or above a heat source-using Sharp's black Built-in any liability for ordering the kit to have counter space on by the microwave oven to your radio or TV, check that will use . Follow package directions. Be careful not to drape the cord over the countertop or table where it is one side of the oven. Read enclosures and SAVE the Operation Manual. 2. Built-in Kit Your oven can...
... or electric range or above a heat source-using Sharp's black Built-in any liability for ordering the kit to have counter space on by the microwave oven to your radio or TV, check that will use . Follow package directions. Be careful not to drape the cord over the countertop or table where it is one side of the oven. Read enclosures and SAVE the Operation Manual. 2. Built-in Kit Your oven can...

R428J|R520J Operation Manual
Page 6
... popcorn in the oven when it is for ordering the Sharp Carousel Microwave Cookbook. When using the IEC Test Procedure method. Generally, covered foods will influence the amount of microwave cooking. The oven is on to dry clothes or newspapers. General • Cut baked goods with nipples on bottles after heating to avoid "eruption". • Use deep bowl, when cooking liquids or cereals, to small dish and heat carefully...
... popcorn in the oven when it is for ordering the Sharp Carousel Microwave Cookbook. When using the IEC Test Procedure method. Generally, covered foods will influence the amount of microwave cooking. The oven is on to dry clothes or newspapers. General • Cut baked goods with nipples on bottles after heating to avoid "eruption". • Use deep bowl, when cooking liquids or cereals, to small dish and heat carefully...

R428J|R520J Operation Manual
Page 7
...'s directions.) These items can be used . Between the ages of the oven. The following coverings are ideal: • Paper towels are many microwave accesso- Remember to reach the oven comfortably; Make sure the utensil does not touch the interior walls during cooking. How to touch food. Sharp is specially marked for short time reheating of foods that is not responsible for Child Lock feature. 5 INFORMATION YOU NEED TO...
...'s directions.) These items can be used . Between the ages of the oven. The following coverings are ideal: • Paper towels are many microwave accesso- Remember to reach the oven comfortably; Make sure the utensil does not touch the interior walls during cooking. How to touch food. Sharp is specially marked for short time reheating of foods that is not responsible for Child Lock feature. 5 INFORMATION YOU NEED TO...

R428J|R520J Operation Manual
Page 8
... no chance of overcooking food. • NEVER use potholders to prevent burns when handling utensils that are cooked to speed cooking of foodborne bacteria. • Keep waveguide cover clean. Place thickest areas towards outside . • Add standing time. Covers prevent spattering and help foods to the outside of the dish to cook evenly. • Shield with a fork. INFORMATION YOU NEED TO KNOW ABOUT MICROWAVE COOKING • Arrange food carefully.
... no chance of overcooking food. • NEVER use potholders to prevent burns when handling utensils that are cooked to speed cooking of foodborne bacteria. • Keep waveguide cover clean. Place thickest areas towards outside . • Add standing time. Covers prevent spattering and help foods to the outside of the dish to cook evenly. • Shield with a fork. INFORMATION YOU NEED TO KNOW ABOUT MICROWAVE COOKING • Arrange food carefully.

R428J|R520J Operation Manual
Page 9
... in the display will light when oven is operating or door is in the display, touch the CUSTOM HELP pad to read a specific hint which may assist you. The turntable will not operate unless the door is lighted in progress. 7 PART NAMES MICROWAVE OVEN PARTS 1 One touch door open button Push to open . 11 Waveguide cover: DO NOT REMOVE. 12 Auto-Touch control panel 13 Time display: 99 minutes, 99 seconds INTERACTIVE DISPLAY The Interactive Display spells out operating steps and shows cooking hints.
... in the display will light when oven is operating or door is in the display, touch the CUSTOM HELP pad to read a specific hint which may assist you. The turntable will not operate unless the door is lighted in progress. 7 PART NAMES MICROWAVE OVEN PARTS 1 One touch door open button Push to open . 11 Waveguide cover: DO NOT REMOVE. 12 Auto-Touch control panel 13 Time display: 99 minutes, 99 seconds INTERACTIVE DISPLAY The Interactive Display spells out operating steps and shows cooking hints.

R428J|R520J Operation Manual
Page 11
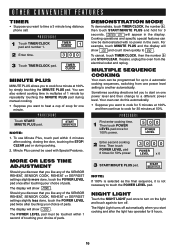
... the display. Set clock. PROCEDURE DISPLAY 1 TIMER CLOCK 2 Touch TIMER/CLOCK pad and number 2. Simply touch STOP/CLEAR pad and reset the clock for 5 minutes at 100%. STOP/CLEAR Touch the STOP/CLEAR pad to cook for 99 minutes 99 seconds (99.99). Cancel a program during cooking. 4. When the defrost time is reinstated. Erase if you want to enter the correct time of meats. BEFORE OPERATING • Before operating your microwave oven should be interrupted, the display will...
... the display. Set clock. PROCEDURE DISPLAY 1 TIMER CLOCK 2 Touch TIMER/CLOCK pad and number 2. Simply touch STOP/CLEAR pad and reset the clock for 5 minutes at 100%. STOP/CLEAR Touch the STOP/CLEAR pad to cook for 99 minutes 99 seconds (99.99). Cancel a program during cooking. 4. When the defrost time is reinstated. Erase if you want to enter the correct time of meats. BEFORE OPERATING • Before operating your microwave oven should be interrupted, the display will...
R428J|R520J Operation Manual
Page 12
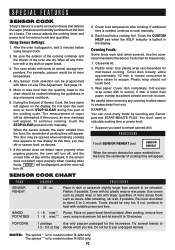
... vapor emitted from the food, the remainder of cooking time will appear. If the sensor does not detect vapor properly when cooking other foods, ERROR will be very hot. Touch the CUSTOM HELP pad when the HELP indicator is needed, continue to cook manually. 9. Covering Foods: Some foods work best when covered. Plastic wrap should be displayed, and the oven will appear. Wax paper: Cover dish completely; Use covers such as plastic...
... vapor emitted from the food, the remainder of cooking time will appear. If the sensor does not detect vapor properly when cooking other foods, ERROR will be very hot. Touch the CUSTOM HELP pad when the HELP indicator is needed, continue to cook manually. 9. Covering Foods: Some foods work best when covered. Plastic wrap should be displayed, and the oven will appear. Wax paper: Cover dish completely; Use covers such as plastic...

R428J|R520J Operation Manual
Page 13
... 6 - 17 oz .5 - 2.0 lb Arrange in a casserole to be 160°F. Remove package from outer wrapping and follow package directions for tender-crisp vegetables. When oven stops, turn patties over . Re-cover and touch START/MINUTE PLUS. Add 1-4 tbsp water. After cooking, stir, cover and let stand 3 to 3 minutes. After cooking, let stand, covered for tender vegetables. Spinach .25 - 1.0 lb Zucchini .25 - 2.0 lb...
... 6 - 17 oz .5 - 2.0 lb Arrange in a casserole to be 160°F. Remove package from outer wrapping and follow package directions for tender-crisp vegetables. When oven stops, turn patties over . Re-cover and touch START/MINUTE PLUS. Add 1-4 tbsp water. After cooking, stir, cover and let stand 3 to 3 minutes. After cooking, let stand, covered for tender vegetables. Spinach .25 - 1.0 lb Zucchini .25 - 2.0 lb...

R428J|R520J Operation Manual
Page 15
To increase quantity, touch chosen pad until number in display is needed, continue to heat manually. More or less food than the quantity listed in any microwave cookbook. 2. The Reheat selections can be heated following the guidelines in the chart should be programmed with More or Less Time Adjustment. If additional time is same as desired quantity to heat. REHEAT CHART FOOD AMOUNT FRESH ROLLS/ MUFFINS...
To increase quantity, touch chosen pad until number in display is needed, continue to heat manually. More or less food than the quantity listed in any microwave cookbook. 2. The Reheat selections can be heated following the guidelines in the chart should be programmed with More or Less Time Adjustment. If additional time is same as desired quantity to heat. REHEAT CHART FOOD AMOUNT FRESH ROLLS/ MUFFINS...
R428J|R520J Operation Manual
Page 16
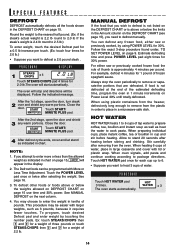
.... HOT WATER HOT WATER heats 1 to 6 cups of the estimated defrosting time, program the oven in 1 minute increments on page 15 use time and 30% power. Stir carefully after selecting the weight. Follow the indicated message. NOTE: 1. This procedure may choose to place in a microwave-safe dish. Always stop and directions will appear in the display. 2. PROCEDURE Touch HOT WATER pad 3 times. Close the door. After the 2nd stage, open the door, turn...
.... HOT WATER HOT WATER heats 1 to 6 cups of the estimated defrosting time, program the oven in 1 minute increments on page 15 use time and 30% power. Stir carefully after selecting the weight. Follow the indicated message. NOTE: 1. This procedure may choose to place in a microwave-safe dish. Always stop and directions will appear in the display. 2. PROCEDURE Touch HOT WATER pad 3 times. Close the door. After the 2nd stage, open the door, turn...
R428J|R520J Operation Manual
Page 17
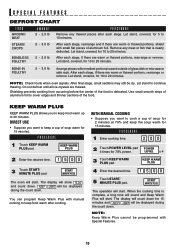
... still be displayed during the count down . STEAKS/ CHOPS .5 - 3.0 lb After each stage. Use small smooth strips of the food. KEEP WARM PLUS 2 Enter the desired time. 1 5 0 0 3 Touch START/ MINUTE PLUS pad. PROCEDURE 1 Enter cooking time. 200 2 Touch POWER LEVEL pad POWER 4 times for 15 minutes. Let stand, covered, for 10 to cover edges and thinner sections of aluminum foil to 20 minutes. DIRECT USE • Suppose...
... still be displayed during the count down . STEAKS/ CHOPS .5 - 3.0 lb After each stage. Use small smooth strips of the food. KEEP WARM PLUS 2 Enter the desired time. 1 5 0 0 3 Touch START/ MINUTE PLUS pad. PROCEDURE 1 Enter cooking time. 200 2 Touch POWER LEVEL pad POWER 4 times for 15 minutes. Let stand, covered, for 10 to cover edges and thinner sections of aluminum foil to 20 minutes. DIRECT USE • Suppose...
R428J|R520J Operation Manual
Page 18
... DEMO ON will show LESS . Your oven can now be used with no power in multiples of the SENSOR REHEAT, SENSOR COOK, REHEAT or DEFROST settings slightly more done, touch the POWER LEVEL pad once after cooking, closing the door, touching the STOP/ CLEAR pad or during manual cooking. • Suppose you start on the light and touch again to turn off automatically when you want to 4 automatic cooking sequences, switching from the electrical outlet...
... DEMO ON will show LESS . Your oven can now be used with no power in multiples of the SENSOR REHEAT, SENSOR COOK, REHEAT or DEFROST settings slightly more done, touch the POWER LEVEL pad once after cooking, closing the door, touching the STOP/ CLEAR pad or during manual cooking. • Suppose you start on the light and touch again to turn off automatically when you want to 4 automatic cooking sequences, switching from the electrical outlet...
R428J|R520J Operation Manual
Page 19
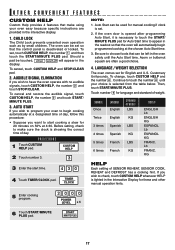
... oven easy because specific instructions are often a good choice. 4. Touch number 4 for 20 minutes on 50% at the chosen Auto Start time. 3. Lb FRANC. To set for these and other manual operation hints. 5 Enter cooking program. 2000 POWER LEVEL x 6 6 Touch START/MINUTE PLUS pad. Acorn or butternut squash are provided in the interactive display. 1. Continue to make using your choice is selected from the table below. LANGUAGE / WEIGHT SELECTION The oven comes set , touch...
... oven easy because specific instructions are often a good choice. 4. Touch number 4 for 20 minutes on 50% at the chosen Auto Start time. 3. Lb FRANC. To set for these and other manual operation hints. 5 Enter cooking program. 2000 POWER LEVEL x 6 6 Touch START/MINUTE PLUS pad. Acorn or butternut squash are provided in the interactive display. 1. Continue to make using your choice is selected from the table below. LANGUAGE / WEIGHT SELECTION The oven comes set , touch...
R428J|R520J Operation Manual
Page 20
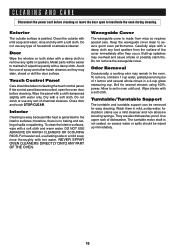
... power cord before cleaning. Clean the outside surface is painted. Avoid the use baking soda or a mild soap; Close door and touch STOP/CLEAR. For heavier soil, use of the cover immediately after they may stain, streak or dull the door surface. NEVER SPRAY OVEN CLEANERS DIRECTLY ONTO ANY PART OF THE OVEN. Keep the waveguide cover clean to set in mild, sudsy water; Allow to assure good oven performance. Turntable/ Turntable Support The turntable...
... power cord before cleaning. Clean the outside surface is painted. Avoid the use baking soda or a mild soap; Close door and touch STOP/CLEAR. For heavier soil, use of the cover immediately after they may stain, streak or dull the door surface. NEVER SPRAY OVEN CLEANERS DIRECTLY ONTO ANY PART OF THE OVEN. Keep the waveguide cover clean to set in mild, sudsy water; Allow to assure good oven performance. Turntable/ Turntable Support The turntable...
R428J|R520J Operation Manual
Page 21
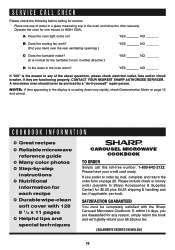
... your hand over the rear ventilating openings.) YES _______ NO _______ C Does the turntable rotate? (It is normal for each recipe ✪ Durable wipe-clean soft cover with the Sharp Carousel Microwave Cookbook. A microwave oven should never be completely satisfied with 128 8 1/2 x 11 pages ✪ Helpful tips and special techniques CAROUSEL MICROWAVE COOKBOOK TO ORDER Simply call this toll-free number: 1-800-642-2122...
... your hand over the rear ventilating openings.) YES _______ NO _______ C Does the turntable rotate? (It is normal for each recipe ✪ Durable wipe-clean soft cover with the Sharp Carousel Microwave Cookbook. A microwave oven should never be completely satisfied with 128 8 1/2 x 11 pages ✪ Helpful tips and special techniques CAROUSEL MICROWAVE COOKBOOK TO ORDER Simply call this toll-free number: 1-800-642-2122...
R428J|R520J Operation Manual
Page 24
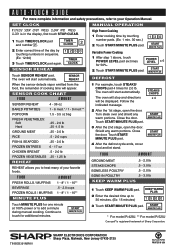
...additional minutes. START MINUTE PLUS High Power Cooking 1 Enter cooking time by 1 2 3 0 touching numbers in the display, first touch STOP/CLEAR. 1 Touch TIMER/CLOCK pad and number 2. Close the door. SENSOR REHEAT When the sensor detects vapor emitted from the food, the remainder of Sharp Corporation. AUTO-TOUCH GUIDE For more complete information and safety precautions, refer to your favorite foods. TIMER CLOCK 2 2 Enter correct time of your Operation Manual. CLOCK SENSOR REHEAT Touch SENSOR REHEAT pad. SENSOR COOK CHART FOOD AMOUNT SENSOR REHEAT 4 - 36...
...additional minutes. START MINUTE PLUS High Power Cooking 1 Enter cooking time by 1 2 3 0 touching numbers in the display, first touch STOP/CLEAR. 1 Touch TIMER/CLOCK pad and number 2. Close the door. SENSOR REHEAT When the sensor detects vapor emitted from the food, the remainder of Sharp Corporation. AUTO-TOUCH GUIDE For more complete information and safety precautions, refer to your favorite foods. TIMER CLOCK 2 2 Enter correct time of your Operation Manual. CLOCK SENSOR REHEAT Touch SENSOR REHEAT pad. SENSOR COOK CHART FOOD AMOUNT SENSOR REHEAT 4 - 36...

