

User Manual for the
Page 2
...English-17 Initial settings ...English-17 Using Power Management ...English-17 Selecting a video source...English-17 Picture Aspect...English-17 Information OSD ...English-18 Picture Mode...English-18 OSD (On-Screen-Display) Controls...English-19 PICTURE ...English-20 ADJUST...English-20 AUDIO ...English-21 SCHEDULE ...English-22 PIP ...English-22 OSD ...English-23 MULTI DISPLAY ...English-24 DISPLAY PROTECTION ...English-26 EXTERNAL CONTROL...English-26 ADVANCED OPTION1 ...English-27 ADVANCED OPTION2 ...English-29 Remote Control Function ...English-31 Multiple Monitors Connection ...English...
...English-17 Initial settings ...English-17 Using Power Management ...English-17 Selecting a video source...English-17 Picture Aspect...English-17 Information OSD ...English-18 Picture Mode...English-18 OSD (On-Screen-Display) Controls...English-19 PICTURE ...English-20 ADJUST...English-20 AUDIO ...English-21 SCHEDULE ...English-22 PIP ...English-22 OSD ...English-23 MULTI DISPLAY ...English-24 DISPLAY PROTECTION ...English-26 EXTERNAL CONTROL...English-26 ADVANCED OPTION1 ...English-27 ADVANCED OPTION2 ...English-29 Remote Control Function ...English-31 Multiple Monitors Connection ...English...
User Manual for the
Page 4
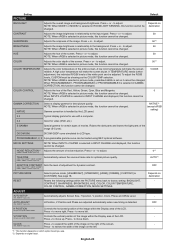
... the display of this monitor in which case the user may be connected to take adequate measures. China Japan Voltage 120* 110 230 230 220 100 * When operating the MultiSync monitor with the table below. Use the power cord which has BSMI mark at both ends when you use this monitor in Taiwan. • The intended primary use of television broadcast signals. Warning...
... the display of this monitor in which case the user may be connected to take adequate measures. China Japan Voltage 120* 110 230 230 220 100 * When operating the MultiSync monitor with the table below. Use the power cord which has BSMI mark at both ends when you use this monitor in Taiwan. • The intended primary use of television broadcast signals. Warning...

User Manual for the
Page 5
... Shield of a Coaxial Cable. • The screen of your monitor from the wall outlet and refer servicing to qualified service personnel under the following : • Use the preset Size and Position controls with standard signals. • Use the preset Color Setting. • Use non-interlaced signals. • Do not use monitor under rapid temperature and humidity change condition or avoid cold air from the power supply. Connecting to rain or...
... Shield of a Coaxial Cable. • The screen of your monitor from the wall outlet and refer servicing to qualified service personnel under the following : • Use the preset Size and Position controls with standard signals. • Use the preset Color Setting. • Use non-interlaced signals. • Do not use monitor under rapid temperature and humidity change condition or avoid cold air from the power supply. Connecting to rain or...
User Manual for the
Page 8
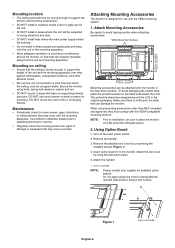
.... 2. If a problem is detected, please refer to qualified personnel for service. • Regularly check the mounting location for X474HB) Mounting on the table that heat can properly dissipate away from the unit and mounting apparatus. Do not apply excessive force to areas that may occur with the VESA-compatible mounting method. Secure the monitor using the removed screws. 5. Attach the slot cover by...
.... 2. If a problem is detected, please refer to qualified personnel for service. • Regularly check the mounting location for X474HB) Mounting on the table that heat can properly dissipate away from the unit and mounting apparatus. Do not apply excessive force to areas that may occur with the VESA-compatible mounting method. Secure the monitor using the removed screws. 5. Attach the slot cover by...
User Manual for the
Page 10
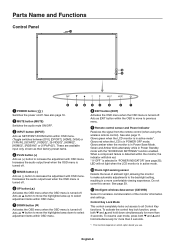
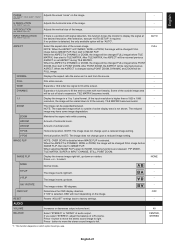
... OSD menu when the OSD menu is turned off . These are available input only, shown as their factory preset name. ¿ PLUS button (+) Acts as (-) button to previous menu. ¾ Remote control sensor and Power Indicator Receives the signal from the remote control (when using the wireless remote control). Glows green when the LCD monitor is in POWER OFF mode. Do not cover this sensor. Glows amber when the monitor is in Power Standby mode with the "SCHEDULE SETTINGS...
... OSD menu when the OSD menu is turned off . These are available input only, shown as their factory preset name. ¿ PLUS button (+) Acts as (-) button to previous menu. ¾ Remote control sensor and Power Indicator Receives the signal from the remote control (when using the wireless remote control). Glows green when the LCD monitor is in POWER OFF mode. Do not cover this sensor. Glows amber when the monitor is in Power Standby mode with the "SCHEDULE SETTINGS...
User Manual for the
Page 11
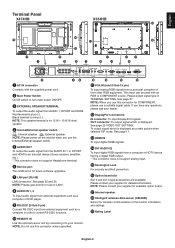
... the monitor information and settings. ƾ Rating Label English-9 NOTE: When you use the Internal/External speaker switch. ´ AUDIO OUT To output the audio signal from external equipment such as a main picture when selected PIP mode. NOTE: Please power off the monitor when you have any questions, please ask your monitor. See page 25 VIDEO OUT SETTING. English Terminal Panel X474HB X554HB ³ AC IN connector Connects with an RGB or COMPONENT source. OUT connector...
... the monitor information and settings. ƾ Rating Label English-9 NOTE: When you use the Internal/External speaker switch. ´ AUDIO OUT To output the audio signal from external equipment such as a main picture when selected PIP mode. NOTE: Please power off the monitor when you have any questions, please ask your monitor. See page 25 VIDEO OUT SETTING. English Terminal Panel X474HB X554HB ³ AC IN connector Connects with an RGB or COMPONENT source. OUT connector...
User Manual for the
Page 12
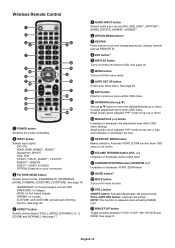
...; AUTO SET UP button Enters auto setup menu. IMAGE FLIP button Toggle switches between H FLIP, V FLIP, 180° ROTATE and NONE. See page 18. µ MENU button Turns on /off the information OSD. DVI: DVI HDMI: HDMI, HDMI2*2, HDMI3*2 DisplayPort: DPORT VGA: VGA Y/Pb/Pr: Y/Pb/Pr, SCART*2, Y/Pb/Pr2*2 RGB/HV*2: RGB/HV VIDEO*2: VIDEO, S-VIDEO OPTION: Depends on /standby. · INPUT button Selects input signal. STILL CAPTURE button: Captures still picture. Wireless Remote Control ³ POWER button Switches the power on your connection » PICTURE MODE button Selects picture mode...
...; AUTO SET UP button Enters auto setup menu. IMAGE FLIP button Toggle switches between H FLIP, V FLIP, 180° ROTATE and NONE. See page 18. µ MENU button Turns on /off the information OSD. DVI: DVI HDMI: HDMI, HDMI2*2, HDMI3*2 DisplayPort: DPORT VGA: VGA Y/Pb/Pr: Y/Pb/Pr, SCART*2, Y/Pb/Pr2*2 RGB/HV*2: RGB/HV VIDEO*2: VIDEO, S-VIDEO OPTION: Depends on /standby. · INPUT button Selects input signal. STILL CAPTURE button: Captures still picture. Wireless Remote Control ³ POWER button Switches the power on your connection » PICTURE MODE button Selects picture mode...
User Manual for the
Page 14
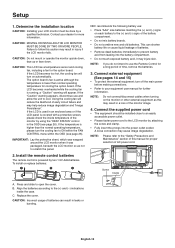
... help reduce image degradation and "Image Persistance". English-12 Determine the installation location CAUTION: Installing your LCD monitor must be installed close to an easily accessible power outlet. • Please fasten power cord to ON within the FAN CONTROL menu within the OSD (see page 26). To install or replace batteries: NEC recommends the following battery use and allow the unit to the (+) and (-) signs of the monitor image. 4. Connect the supplied power cord...
... help reduce image degradation and "Image Persistance". English-12 Determine the installation location CAUTION: Installing your LCD monitor must be installed close to an easily accessible power outlet. • Please fasten power cord to ON within the FAN CONTROL menu within the OSD (see page 26). To install or replace batteries: NEC recommends the following battery use and allow the unit to the (+) and (-) signs of the monitor image. 4. Connect the supplied power cord...
User Manual for the
Page 16
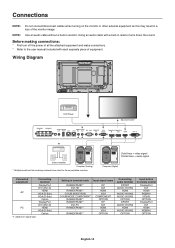
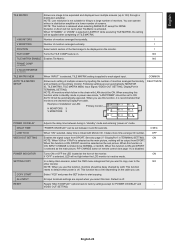
... the user manual included with a built-in remote control DisplayPort DVI HDMI RGB/HV Y/Pb/Pr OPTION DisplayPort DVI HDMI RGB/HV OPTION English-14 Connections NOTE: Do not connect/disconnect cables when turning on signal type. Using an audio cable with each separate piece of all the attached equipment and make connections. * Refer to the connectable monitors. Before making connections: * First turn off the power of equipment. Solid lines = video signal Dotted lines = audio signal Computer (Digital) Connected equipment Connecting terminal DisplayPort DVI (DVI-D) AV HDMI VGA...
... the user manual included with a built-in remote control DisplayPort DVI HDMI RGB/HV Y/Pb/Pr OPTION DisplayPort DVI HDMI RGB/HV OPTION English-14 Connections NOTE: Do not connect/disconnect cables when turning on signal type. Using an audio cable with each separate piece of all the attached equipment and make connections. * Refer to the connectable monitors. Before making connections: * First turn off the power of equipment. Solid lines = video signal Dotted lines = audio signal Computer (Digital) Connected equipment Connecting terminal DisplayPort DVI (DVI-D) AV HDMI VGA...
User Manual for the
Page 19
... screen with factory settings. The image which option board you use. Initial settings Setting LAN POWER (see page 26) and POWER SAVE (see page 26) windows appear the first time the power is sent from the source. Using Power Management The LCD monitor follows the VESA approved DPM Display Power Management function. Selecting a video source*4 To view a video source: Use the input button to set [AUTO], [NTSC], [PAL], [SECAM], [PAL60], [4.43NTSC], according to the "AUTO STANDBY" mode. Some of the outside of image...
... screen with factory settings. The image which option board you use. Initial settings Setting LAN POWER (see page 26) and POWER SAVE (see page 26) windows appear the first time the power is sent from the source. Using Power Management The LCD monitor follows the VESA approved DPM Display Power Management function. Selecting a video source*4 To view a video source: Use the input button to set [AUTO], [NTSC], [PAL], [SECAM], [PAL60], [4.43NTSC], according to the "AUTO STANDBY" mode. Some of the outside of image...
User Manual for the
Page 22
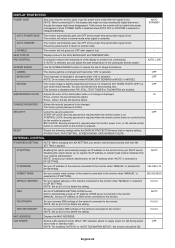
... is selected in INPUT CHANGE and displayed, this function cannot be loaded using NEC optional software. GAMMA CORRECTION NATIVE Select a display gamma for optimal picture quality. ADJUST AUTO SETUP Automatically adjusts Screen Size, H position, V position, Clock, Phase and White Level. - V POSITION Controls the vertical position of the image within the Display area of the screen. - All inputs except DVI, HDMI, DPORT Press + to adjust. 0*2 VIDEO, S-VIDEO, SCART inputs only TELECINE Automatically senses the sources frame rate for best picture quality. Press + or...
... is selected in INPUT CHANGE and displayed, this function cannot be loaded using NEC optional software. GAMMA CORRECTION NATIVE Select a display gamma for optimal picture quality. ADJUST AUTO SETUP Automatically adjusts Screen Size, H position, V position, Clock, Phase and White Level. - V POSITION Controls the vertical position of the image within the Display area of the screen. - All inputs except DVI, HDMI, DPORT Press + to adjust. 0*2 VIDEO, S-VIDEO, SCART inputs only TELECINE Automatically senses the sources frame rate for best picture quality. Press + or...
User Manual for the
Page 23
... Adjusts the horizontal size of audio output. DYNAMIC Expands a 4:3 pictures to fill the entire screen with signal detection, this function forces the monitor to expansion. RESET Resets "ADJUST" settings back to select. BALANCE Select "STEREO" or "MONO" of the image. If you use. When the ASPECT is higher than a 1920 x 1080 resolution, the image will be returned previous ASPECT. TILE MATRIX becomes invalid. 1:1 Display the image in INPUT CHANGE...
... Adjusts the horizontal size of audio output. DYNAMIC Expands a 4:3 pictures to fill the entire screen with signal detection, this function forces the monitor to expansion. RESET Resets "ADJUST" settings back to select. BALANCE Select "STEREO" or "MONO" of the image. If you use. When the ASPECT is higher than a 1920 x 1080 resolution, the image will be returned previous ASPECT. TILE MATRIX becomes invalid. 1:1 Display the image in INPUT CHANGE...

User Manual for the
Page 26
... default setting. "BASE ADDRESS" is shown when "IP ADDRESS" or "ID and IP" is displayed. is selected at RESET ITEM returns to VOL.100. ALL LOCK Locks all monitors connected with LAN. VOLUME: When UNLOCK is automatically set to all monitors. The unselected buttons are locked. *1: This function depends on the remote control are locked. The fourth octet is selected, sets minimum and maximum volume between the monitors connected with LAN. The number...
... default setting. "BASE ADDRESS" is shown when "IP ADDRESS" or "ID and IP" is displayed. is selected at RESET ITEM returns to VOL.100. ALL LOCK Locks all monitors connected with LAN. VOLUME: When UNLOCK is automatically set to all monitors. The unselected buttons are locked. *1: This function depends on the remote control are locked. The fourth octet is selected, sets minimum and maximum volume between the monitors connected with LAN. The number...
User Manual for the
Page 27
... horizontally and vertically on the cable you want to copy over multiple screens (up to the other monitor. Following settings are chained by LAN. Resets "MULTI DISPLAY" options back to each signal input. English-25 When "ON" selected, delay time is in standby mode or power save mode, "LAN POWER" should be NORMAL or QUICK. If "OFF" is applied to factory settings except for NONE. NO FRAME COMP (not adjustable...
... horizontally and vertically on the cable you want to copy over multiple screens (up to the other monitor. Following settings are chained by LAN. Resets "MULTI DISPLAY" options back to each signal input. English-25 When "ON" selected, delay time is in standby mode or power save mode, "LAN POWER" should be NORMAL or QUICK. If "OFF" is applied to factory settings except for NONE. NO FRAME COMP (not adjustable...
User Manual for the
Page 28
... - CONTROL LOCK: Security password is required when the remote control button or control button on the monitor is lost . - Disabling this option automatically assigns an IP address to the monitor from your DHCP server. AUTO: Automatically assign an IP address of the display to protect from overheating. OFF RESET Resets the following settings within the DISPLAY PROTECTION menu back to normal mode. POWER SAVE, FAN CONTROL, SCREEN SAVER, SIDE BORDER COLOR. AUTO IP ADDRESS Set your...
... - CONTROL LOCK: Security password is required when the remote control button or control button on the monitor is lost . - Disabling this option automatically assigns an IP address to the monitor from your DHCP server. AUTO: Automatically assign an IP address of the display to protect from overheating. OFF RESET Resets the following settings within the DISPLAY PROTECTION menu back to normal mode. POWER SAVE, FAN CONTROL, SCREEN SAVER, SIDE BORDER COLOR. AUTO IP ADDRESS Set your...
User Manual for the
Page 29
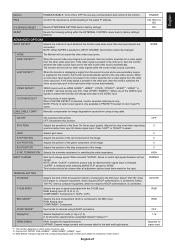
... Set the priority of the VIDEO input signals is supplied to the monitor, the monitor will have been made for image degradation caused from sync On Green signal input. LONG CABLE COMP*1 (Analog input only) Manually compensates for the input. OFF: Deactivates this function. NONE OFF SOG PEAK Adjusts the sensitivity of equipment which option board you use. *2: Only for limitations of this function. HIGH INPUT CHANGE Sets input change and keep to the BNC input. Select "DVI...
... Set the priority of the VIDEO input signals is supplied to the monitor, the monitor will have been made for image degradation caused from sync On Green signal input. LONG CABLE COMP*1 (Analog input only) Manually compensates for the input. OFF: Deactivates this function. NONE OFF SOG PEAK Adjusts the sensitivity of equipment which option board you use. *2: Only for limitations of this function. HIGH INPUT CHANGE Sets input change and keep to the BNC input. Select "DVI...
User Manual for the
Page 44
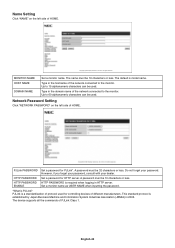
... can be used. A password must be 16 characters or less. English-42 The default is required when logging in 2005. Network Password Setting Click "NETWORK PASSWORD" on the left side of HOME. PJLink is PJLink? The name must be 32 characters or less. ENABLE Set a monitor name as USER NAME when inputting the password. *What is a standardization of protocol used . The device supports all...
... can be used. A password must be 16 characters or less. English-42 The default is required when logging in 2005. Network Password Setting Click "NETWORK PASSWORD" on the left side of HOME. PJLink is PJLink? The name must be 32 characters or less. ENABLE Set a monitor name as USER NAME when inputting the password. *What is a standardization of protocol used . The device supports all...
User Manual for the
Page 49
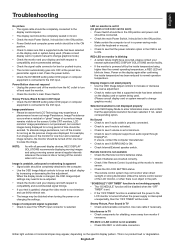
... reset. RED LED on or changing the settings. If unsure, contact the computer manufacturer. • Check to see if the Y/Pb/Pr input connector is selected. Snowy Picture, Black Screen in DVI input • Check the DVI MODE setting when DVD player or computer equipment is not available • Check RS-232C or LAN cable connection. Image persistence • Please be aware that LCD Technology may be distorted when turning the power on monitor is blinking...
... reset. RED LED on or changing the settings. If unsure, contact the computer manufacturer. • Check to see if the Y/Pb/Pr input connector is selected. Snowy Picture, Black Screen in DVI input • Check the DVI MODE setting when DVD player or computer equipment is not available • Check RS-232C or LAN cable connection. Image persistence • Please be aware that LCD Technology may be distorted when turning the power on monitor is blinking...
User Manual for the
Page 50
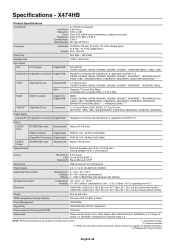
... DisplayPort Connector Digital RGB VGA*2 15pin Mini D-sub Analog RGB DisplayPort Complies with handle) 1083.8 (W) x 628.2 (H) x 146.7 (D) mm / 42.7 (W) x 24.7 (H) x 5.8 (D) inches (without handle) Weight 26.5 kg (58.4 lbs) VESA compatible mounting interface 300 mm x 300 mm (M6, 4 Holes) Power Management VESA DPM Plug & Play VESA DDC2Bi, DDC/CI, DisplayPort Power supply for Slot 2 type OPTION 16V/3.6 A Accessories Setup manual, Power Cord, Video Signal cable, Remote Control, AAA Battery x 2, Clamp x 3, Screw x 3, CD-ROM, Thumbscrew for optional stand x 2 NOTE...
... DisplayPort Connector Digital RGB VGA*2 15pin Mini D-sub Analog RGB DisplayPort Complies with handle) 1083.8 (W) x 628.2 (H) x 146.7 (D) mm / 42.7 (W) x 24.7 (H) x 5.8 (D) inches (without handle) Weight 26.5 kg (58.4 lbs) VESA compatible mounting interface 300 mm x 300 mm (M6, 4 Holes) Power Management VESA DPM Plug & Play VESA DDC2Bi, DDC/CI, DisplayPort Power supply for Slot 2 type OPTION 16V/3.6 A Accessories Setup manual, Power Cord, Video Signal cable, Remote Control, AAA Battery x 2, Clamp x 3, Screw x 3, CD-ROM, Thumbscrew for optional stand x 2 NOTE...
User Manual for the
Page 51
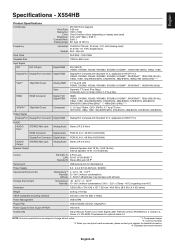
.../3.6 A Accessories Setup manual, Power Cord, Video Signal cable, Remote Control, AAA Battery x 2, Clamp x 3, Screw x 3, CD-ROM, Thumbscrew for detailed information. *4: Displayed text may be blurred. X554HB Product Specifications LCD Module 55"/138.78 cm diagonal Pixel Pitch: 0.63 mm Resolution: 1920 x 1080 Color: Over 16 million colors (depending on display card used) Brightness: 2700 cd/m2 (Max.) @25°C Contrast Ratio: 5000:1 Viewing Angle: 89° (typ) @ CR>10 Frequency Horizontal: 15.625...
.../3.6 A Accessories Setup manual, Power Cord, Video Signal cable, Remote Control, AAA Battery x 2, Clamp x 3, Screw x 3, CD-ROM, Thumbscrew for detailed information. *4: Displayed text may be blurred. X554HB Product Specifications LCD Module 55"/138.78 cm diagonal Pixel Pitch: 0.63 mm Resolution: 1920 x 1080 Color: Over 16 million colors (depending on display card used) Brightness: 2700 cd/m2 (Max.) @25°C Contrast Ratio: 5000:1 Viewing Angle: 89° (typ) @ CR>10 Frequency Horizontal: 15.625...


