

XG-MB67X Operation Manual
Page 17
... on page 21. Refer to the information that came with the system for connecting video equipment with a Kensington MicroSaver Security System. Rear View Terminals Refer to "INPUT Terminals and Connectable Main Equipment" on how to secure the projector. 13 Intake vent 52 24 AUDIO... the Kensington Lock • This projector has a Kensington Security Standard connector for connecting video equipment. 52 Exhaust vent 46 Speaker Rear adjustment 31 foot Kensington Security 27 AC socket Standard connector Connect the supplied Power cord. Introduction Numbers in Z refer to the...
... on page 21. Refer to the information that came with the system for connecting video equipment with a Kensington MicroSaver Security System. Rear View Terminals Refer to "INPUT Terminals and Connectable Main Equipment" on how to secure the projector. 13 Intake vent 52 24 AUDIO... the Kensington Lock • This projector has a Kensington Security Standard connector for connecting video equipment. 52 Exhaust vent 46 Speaker Rear adjustment 31 foot Kensington Security 27 AC socket Standard connector Connect the supplied Power cord. Introduction Numbers in Z refer to the...

XG-MB67X Operation Manual
Page 23
... mounted, front projection I Ceiling mounted, front projection Setup Menu item © "Front" I Table mounted, rear projection (with a translucent screen) Menu item © "Ceiling + Front" I Ceiling mounted, rear projection (with a translucent screen) Menu item © "Rear" Menu item © "Ceiling + Rear" Indication of the 4 projection modes shown in "SCR-ADJ" menu. Projection (PRJ) Mode The...
... mounted, front projection I Ceiling mounted, front projection Setup Menu item © "Front" I Table mounted, rear projection (with a translucent screen) Menu item © "Ceiling + Front" I Ceiling mounted, rear projection (with a translucent screen) Menu item © "Rear" Menu item © "Ceiling + Rear" Indication of the 4 projection modes shown in "SCR-ADJ" menu. Projection (PRJ) Mode The...

XG-MB67X Operation Manual
Page 25
... on the monitor. (See page 25.) AUDIO (INPUT 3, 4) terminal Connecting an audio cable (Shared audio input terminal for INPUT 3 and 4). (See pages 24 and 25.) Rear View Connections INPUT 3 terminal Connecting video equipment with an audio cable (commercially available) (Shared audio output terminal for INPUT 1, 2, 3 and 4). Connections INPUT Terminals and Connectable...
... on the monitor. (See page 25.) AUDIO (INPUT 3, 4) terminal Connecting an audio cable (Shared audio input terminal for INPUT 3 and 4). (See pages 24 and 25.) Rear View Connections INPUT 3 terminal Connecting video equipment with an audio cable (commercially available) (Shared audio output terminal for INPUT 1, 2, 3 and 4). Connections INPUT Terminals and Connectable...

XG-MB67X Operation Manual
Page 31
... LAN terminal using a LAN cable Hub or Computer TX/RX LED (yellow) Illuminates when transmitting/receiving data. Then plug into the AC socket on the rear of the projector.
... LAN terminal using a LAN cable Hub or Computer TX/RX LED (yellow) Illuminates when transmitting/receiving data. Then plug into the AC socket on the rear of the projector.
XG-MB67X Operation Manual
Page 35
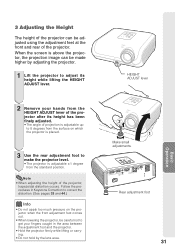
... Keystone Correction to make the projector level. • The projector is adjustable ±1 degree from the surface on which the projector is placed. 3 Use the rear adjustment foot to correct the distortion. (See pages 33 and 44.) Info • Do not apply too much pressure on the projector when the front... adjustment foot comes out. • When lowering the projector, be adjusted using the adjustment feet at the front and rear of the projector, trapezoidal distortion occurs. Note • When adjusting the height of the projector...
... Keystone Correction to make the projector level. • The projector is adjustable ±1 degree from the surface on which the projector is placed. 3 Use the rear adjustment foot to correct the distortion. (See pages 33 and 44.) Info • Do not apply too much pressure on the projector when the front... adjustment foot comes out. • When lowering the projector, be adjusted using the adjustment feet at the front and rear of the projector, trapezoidal distortion occurs. Note • When adjusting the height of the projector...

XG-MB67X Operation Manual
Page 41
... [On/Off] Page 45 PRJ Mode Page 45 Language Page 45 Sub menu Normal Border Stretch Logo Blue None Front Ceiling + Front Rear Ceiling + Rear English Deutsch Español Nederlands Français Italiano Svenska Português Useful Features 37 ADJ Page 44 SEL./ADJ. ENTER END INPUT... signals are input (including when forcibly changed to adjust "Tone", but you can be set in the projector. Help Picture Mode Contrast Bright Color Tint Sharp CLR Temp Bright Boost Progressive Lamp Setting Reset SEL./ADJ. 0 0 0 0 0 8500K 1 Standard 3D Progressive Bright ENTER END Main menu Picture Page...
... [On/Off] Page 45 PRJ Mode Page 45 Language Page 45 Sub menu Normal Border Stretch Logo Blue None Front Ceiling + Front Rear Ceiling + Rear English Deutsch Español Nederlands Français Italiano Svenska Português Useful Features 37 ADJ Page 44 SEL./ADJ. ENTER END INPUT... signals are input (including when forcibly changed to adjust "Tone", but you can be set in the projector. Help Picture Mode Contrast Bright Color Tint Sharp CLR Temp Bright Boost Progressive Lamp Setting Reset SEL./ADJ. 0 0 0 0 0 8500K 1 Standard 3D Progressive Bright ENTER END Main menu Picture Page...
XG-MB67X Operation Manual
Page 49
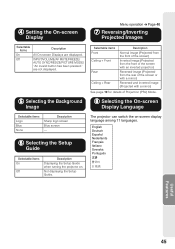
...VOLUME/AV MUTE/FREEZE/ AUTO SYNC/RESIZE/PICTURE MODE/ "An invalid button has been pressed." Selectable items Front Ceiling + Front Rear Ceiling + Rear Description Normal image (Projected from the front of the screen) Inverted image (Projected from the front of the screen with an inverted... of Projection (PRJ) Mode. 5 Selecting the Background Image 8 Selecting the On-screen Display Language Selectable items Logo Blue None Description Sharp logo screen Blue screen - 6 Selecting the Setup Guide Selectable items On Off Description Displaying the Setup Guide when turning the projector on...
...VOLUME/AV MUTE/FREEZE/ AUTO SYNC/RESIZE/PICTURE MODE/ "An invalid button has been pressed." Selectable items Front Ceiling + Front Rear Ceiling + Rear Description Normal image (Projected from the front of the screen) Inverted image (Projected from the front of the screen with an inverted... of Projection (PRJ) Mode. 5 Selecting the Background Image 8 Selecting the On-screen Display Language Selectable items Logo Blue None Description Sharp logo screen Blue screen - 6 Selecting the Setup Guide Selectable items On Off Description Displaying the Setup Guide when turning the projector on...
XG-MB67X Operation Manual
Page 68
ADJ 44 Screen Size and Projection Distance 20 Setup Guide 30, 45 Sharp 43 Speaker 46 STANDBY button 29 STANDBY/ON button 28, 29 STRETCH 34, 35 Supplied accessories 11 System Lock 47 System Sound 46 TCP/IP ... Picture Adjustment 42 Picture Mode 36, 42 PICTURE MODE button 36 Power cord 27 PRJ - ADJ 46 PRJ Mode 19, 45 Progressive 43 R-6 batteries 15 Rear adjustment foot 31 Red 43 Remote control 14 Remote control sensor 15 Replacing the lamp 55, 56 Resize 34, 44 RESIZE button 34 RETURN button...
ADJ 44 Screen Size and Projection Distance 20 Setup Guide 30, 45 Sharp 43 Speaker 46 STANDBY button 29 STANDBY/ON button 28, 29 STRETCH 34, 35 Supplied accessories 11 System Lock 47 System Sound 46 TCP/IP ... Picture Adjustment 42 Picture Mode 36, 42 PICTURE MODE button 36 Power cord 27 PRJ - ADJ 46 PRJ Mode 19, 45 Progressive 43 R-6 batteries 15 Rear adjustment foot 31 Red 43 Remote control 14 Remote control sensor 15 Replacing the lamp 55, 56 Resize 34, 44 RESIZE button 34 RETURN button...