

XG-MB67X Operation Manual
Page 1
MULTIMEDIA PROJECTOR MODEL XG-MB67X OPERATION MANUAL Introduction Quick Start Setup Connections Basic Operation Useful Features Appendix
MULTIMEDIA PROJECTOR MODEL XG-MB67X OPERATION MANUAL Introduction Quick Start Setup Connections Basic Operation Useful Features Appendix
XG-MB67X Operation Manual
Page 5
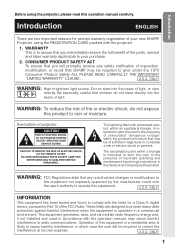
... enclosure that may be of sufficient magnitude to constitute a risk or electric shock to persons. U.S.A. U.S.A. Be especially careful that SHARP may cause harmful interference to the presence of important operating and maintenance (servicing) instructions in accordance with arrowhead symbol, within an ... in a commercial environment. See bottom of projector. ONLY INFORMATION This equipment has been tested and found to operate this operation manual carefully. WARNING: To reduce the risk of fire or electric shock, do not stare directly into the beam of light, ...
... enclosure that may be of sufficient magnitude to constitute a risk or electric shock to persons. U.S.A. U.S.A. Be especially careful that SHARP may cause harmful interference to the presence of important operating and maintenance (servicing) instructions in accordance with arrowhead symbol, within an ... in a commercial environment. See bottom of projector. ONLY INFORMATION This equipment has been tested and found to operate this operation manual carefully. WARNING: To reduce the risk of fire or electric shock, do not stare directly into the beam of light, ...

XG-MB67X Operation Manual
Page 7
...HELP button Adjustment buttons (P/R/O/Q) MENU/HELP button ENTER button RETURN button • Press l RETURN to return to Read this Operation Manual • In this step On-screen display 40 Info ........Indicates safeguards for the selected input mode is displayed. Note .........Indicates ...; The "Picture" menu screen for using the projector. ENTER END Buttons used in this operation Button used in this operation manual, the illustration and the screen display are simplified for explanation, and may differ slightly from the actual display. For Future Reference...
...HELP button Adjustment buttons (P/R/O/Q) MENU/HELP button ENTER button RETURN button • Press l RETURN to return to Read this Operation Manual • In this step On-screen display 40 Info ........Indicates safeguards for the selected input mode is displayed. Note .........Indicates ...; The "Picture" menu screen for using the projector. ENTER END Buttons used in this operation Button used in this operation manual, the illustration and the screen display are simplified for explanation, and may differ slightly from the actual display. For Future Reference...
XG-MB67X Operation Manual
Page 8
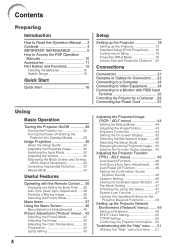
Contents Preparing Introduction How to Read this Operation Manual .... 3 Contents 4 IMPORTANT SAFEGUARDS 6 How to a Monitor with RGB Input Terminal 25 Controlling the Projector by a Computer .. 26 Connecting the Power Cord 27 Using Basic ..... 20 Connections Connections 21 Samples of Cables for Connection ..... 22 Connecting to a Computer 23 Connecting to Video Equipment ......... 24 Connecting to Access the PDF Operation Manuals 10 Accessories 11 Part Names and Functions 12 Inserting the Batteries 15 Usable Range 15 Quick Start Quick Start 16 Setup Setting up the Projector...
Contents Preparing Introduction How to Read this Operation Manual .... 3 Contents 4 IMPORTANT SAFEGUARDS 6 How to a Monitor with RGB Input Terminal 25 Controlling the Projector by a Computer .. 26 Connecting the Power Cord 27 Using Basic ..... 20 Connections Connections 21 Samples of Cables for Connection ..... 22 Connecting to a Computer 23 Connecting to Video Equipment ......... 24 Connecting to Access the PDF Operation Manuals 10 Accessories 11 Part Names and Functions 12 Inserting the Batteries 15 Usable Range 15 Quick Start Quick Start 16 Setup Setting up the Projector...
XG-MB67X Operation Manual
Page 13
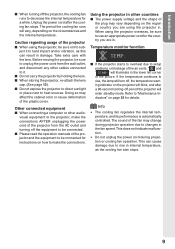
... connected to it to decrease the internal temperature for details. visual equipment to rise in the fan speed. Temperature monitor function I Please read the operation manuals of the plastic cover. This does not indicate malfunction. • Do not unplug the power cord during projector operation due to changes in internal temperature...
... connected to it to decrease the internal temperature for details. visual equipment to rise in the fan speed. Temperature monitor function I Please read the operation manuals of the plastic cover. This does not indicate malfunction. • Do not unplug the power cord during projector operation due to changes in internal temperature...
XG-MB67X Operation Manual
Page 14
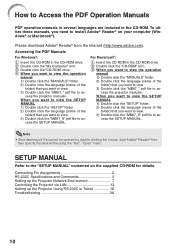
...CD-ROM drive. 2 Double click the "My Computer" icon. 3 Double click the "CD-ROM" drive. 4 When you want to view the operation manual 1) Double click the "MANUALS" folder. 2) Double click the language (name of the folder) that you want to view. 3) Double click the "MB67_S" pdf file to ac- ... "File", "Open" menu. Please download Adobe® Reader® from the Internet (http://www.adobe.com). cess the SETUP MANUAL. How to Access the PDF Operation Manuals PDF operation manuals in several languages are included in the CD-ROM drive. 2 Double click the "CD-ROM" icon. 3 When you want to...
...CD-ROM drive. 2 Double click the "My Computer" icon. 3 Double click the "CD-ROM" drive. 4 When you want to view the operation manual 1) Double click the "MANUALS" folder. 2) Double click the language (name of the folder) that you want to view. 3) Double click the "MB67_S" pdf file to ac- ... "File", "Open" menu. Please download Adobe® Reader® from the Internet (http://www.adobe.com). cess the SETUP MANUAL. How to Access the PDF Operation Manuals PDF operation manuals in several languages are included in the CD-ROM drive. 2 Double click the "CD-ROM" icon. 3 When you want to...
XG-MB67X Operation Manual
Page 15
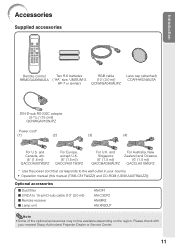
and Canada, etc. (6' (1.8 m)) QACCDA007WJPZ For Europe, except U.K. (6' (1.8 m)) QACCVA011WJPZ For U.K. Please check with your country. • Operation manual (this manual (TINS-C517WJZZ) and CD-ROM (UDSKAA078WJZZ)) Optional accessories I Dust filter I 3 RCA to 15-pin D-sub cable (10n (3.0 m)) I Remote receiver I Lamp unit AN...(3) (4) For U.S. and Singapore (6' (1.8 m)) QACCBA036WJPZ For Australia, New Zealand and Oceania (6' (1.8 m)) QACCLA018WJPZ * Use the power cord that corresponds to the wall outlet in your nearest Sharp Authorized Projector Dealer or Service Center. 11
and Canada, etc. (6' (1.8 m)) QACCDA007WJPZ For Europe, except U.K. (6' (1.8 m)) QACCVA011WJPZ For U.K. Please check with your country. • Operation manual (this manual (TINS-C517WJZZ) and CD-ROM (UDSKAA078WJZZ)) Optional accessories I Dust filter I 3 RCA to 15-pin D-sub cable (10n (3.0 m)) I Remote receiver I Lamp unit AN...(3) (4) For U.S. and Singapore (6' (1.8 m)) QACCBA036WJPZ For Australia, New Zealand and Oceania (6' (1.8 m)) QACCLA018WJPZ * Use the power cord that corresponds to the wall outlet in your nearest Sharp Authorized Projector Dealer or Service Center. 11

XG-MB67X Operation Manual
Page 16
... Zoom ring For enlarging/ reducing the picture. 15 Remote control sensor Push both sides of the lens cap to the main pages in this operation manual where the topic is explained.
... Zoom ring For enlarging/ reducing the picture. 15 Remote control sensor Push both sides of the lens cap to the main pages in this operation manual where the topic is explained.

XG-MB67X Operation Manual
Page 17
Introduction Numbers in this operation manual where the topic is explained. OUTPUT (INPUT 1, 2) 25 terminal (Shared computer RGB and component signals output terminal for INPUT 1 and 2) Terminal for connecting a monitor. 24 ...
Introduction Numbers in this operation manual where the topic is explained. OUTPUT (INPUT 1, 2) 25 terminal (Shared computer RGB and component signals output terminal for INPUT 1 and 2) Terminal for connecting a monitor. 24 ...
XG-MB67X Operation Manual
Page 18
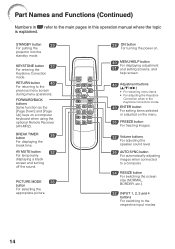
... 51 and setting screens, and help screen. 40 Adjustment buttons (P/R/O/Q) • For selecting menu items. • For adjusting the Keystone Correction when in this operation manual where the topic is explained. Part Names and Functions (Continued) Numbers in Z refer to the main pages in the Keystone Correction mode. 40 ENTER button...
... 51 and setting screens, and help screen. 40 Adjustment buttons (P/R/O/Q) • For selecting menu items. • For adjusting the Keystone Correction when in this operation manual where the topic is explained. Part Names and Functions (Continued) Numbers in Z refer to the main pages in the Keystone Correction mode. 40 ENTER button...
XG-MB67X Operation Manual
Page 26
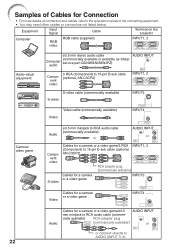
...video RGB cable (supplied) INPUT1, 2 Audio-visual equipment ø3.5 mm stereo audio cable AUDIO INPUT Computer audio (commercially available or available as Sharp service part QCNWGA038WJPZ) Component video 3 RCA (Component) to 15-pin D-sub cable (optional, AN-C3CP2) INPUT1, 2 S-video cable (... camera or a video game INPUT4 Audio Cables for Connection • For more details of connection and cables, refer to the operation manual of Cables for a camera or a video game/ø3.5 mm minijack to RCA audio cable (commercially available) RCA adaptor plug (commercially ...
...video RGB cable (supplied) INPUT1, 2 Audio-visual equipment ø3.5 mm stereo audio cable AUDIO INPUT Computer audio (commercially available or available as Sharp service part QCNWGA038WJPZ) Component video 3 RCA (Component) to 15-pin D-sub cable (optional, AN-C3CP2) INPUT1, 2 S-video cable (... camera or a video game INPUT4 Audio Cables for Connection • For more details of connection and cables, refer to the operation manual of Cables for a camera or a video game/ø3.5 mm minijack to RCA audio cable (commercially available) RCA adaptor plug (commercially ...
XG-MB67X Operation Manual
Page 27
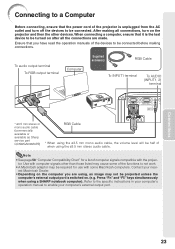
... those listed may cause some Macintosh computers. Use with computer signals other devices. After making connections. Contact your computer's operation manual to not work. • A Macintosh adaptor may not be connected before making all the connections are using the ø...connected. Connections 23 When connecting a computer, ensure that you are made. Press "Fn" and "F5" keys simultaneously when using a SHARP notebook computer). Note • See page 58 "Computer Compatibility Chart" for use with the projector. Connecting to a Computer Before connecting,...
... those listed may cause some Macintosh computers. Use with computer signals other devices. After making connections. Contact your computer's operation manual to not work. • A Macintosh adaptor may not be connected before making all the connections are using the ø...connected. Connections 23 When connecting a computer, ensure that you are made. Press "Fn" and "F5" keys simultaneously when using a SHARP notebook computer). Note • See page 58 "Computer Compatibility Chart" for use with the projector. Connecting to a Computer Before connecting,...
XG-MB67X Operation Manual
Page 30
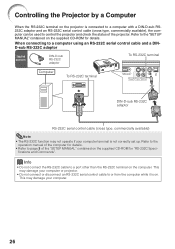
This may damage your computer terminal is on. Refer to the operation manual of the computer for details. • Refer to a port other than the RS-232C terminal on the computer. Info • Do not connect the RS-... or projector. • Do not connect or disconnect an RS-232C serial control cable to control the projector and check the status of the "SETUP MANUAL" contained on the supplied CD-ROM for details. When connecting to the "SETUP...
This may damage your computer terminal is on. Refer to the operation manual of the computer for details. • Refer to a port other than the RS-232C terminal on the computer. Info • Do not connect the RS-... or projector. • Do not connect or disconnect an RS-232C serial control cable to control the projector and check the status of the "SETUP MANUAL" contained on the supplied CD-ROM for details. When connecting to the "SETUP...
XG-MB67X Operation Manual
Page 40
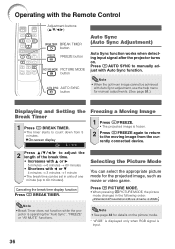
... P or Q 5 minutes s 6 minutes s 60 minutes • Shortens with Auto Sync adjustment, use the help menu for manual adjustments. (See page 51.) Displaying and Setting the Break Timer 1 Press k BREAK TIMER. • The timer starts to manually adjust with the Remote Control Adjustment buttons (P/R/O/Q) BREAK TIMER button FREEZE button PICTURE MODE button AUTO...
... P or Q 5 minutes s 6 minutes s 60 minutes • Shortens with Auto Sync adjustment, use the help menu for manual adjustments. (See page 51.) Displaying and Setting the Break Timer 1 Press k BREAK TIMER. • The timer starts to manually adjust with the Remote Control Adjustment buttons (P/R/O/Q) BREAK TIMER button FREEZE button PICTURE MODE button AUTO...
XG-MB67X Operation Manual
Page 48
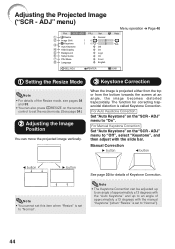
...35. • You can also press HRESIZE on the "SCR - For Auto Keystone Correction Set "Auto Keystone" on the remote control to "Normal"). 44 Manual Correction Q button O button O button Q button Note • You cannot set this item when "Resize" is set to an angle of approximately ±... an angle of Keystone Correction. Normal Off On Logo On Front English SEL./ADJ. The function for details of approximately ±13 degrees with the manual "Keystone" (when "Resize" is set to set the resize mode. (See page 34.) 2 Adjusting the Image Position You can be adjusted up...
...35. • You can also press HRESIZE on the "SCR - For Auto Keystone Correction Set "Auto Keystone" on the remote control to "Normal"). 44 Manual Correction Q button O button O button Q button Note • You cannot set this item when "Resize" is set to an angle of approximately ±... an angle of Keystone Correction. Normal Off On Logo On Front English SEL./ADJ. The function for details of approximately ±13 degrees with the manual "Keystone" (when "Resize" is set to set the resize mode. (See page 34.) 2 Adjusting the Image Position You can be adjusted up...

XG-MB67X Operation Manual
Page 50
... Sync (Auto Sync Adjustment) Selectable items On Off Description Auto Sync adjustment will automatically enter standby mode. will be achieved with Auto Sync adjustment, use manual adjustments. (See page 51.) 3 Auto Power Off Function Selectable items On Off Description When no input signal is detected for and switches to the input...
... Sync (Auto Sync Adjustment) Selectable items On Off Description Auto Sync adjustment will automatically enter standby mode. will be achieved with Auto Sync adjustment, use manual adjustments. (See page 51.) 3 Auto Power Off Function Selectable items On Off Description When no input signal is detected for and switches to the input...

XG-MB67X Operation Manual
Page 54
...to "000. 000. 000. 000". Note • Confirm the existing network's segment (IP address group) to change the projector name, see "SETUP MANUAL" contained in the supplied CD-ROM. 50 If "192.168.150.002" is displayed. appears. Factory default setting: 000. 000. 000. 000 *... IP address of the projector is not used in use, set the TCP/IP manually. (See the item 3.) 3 TCP/IP Setting Set the TCP/IP manually. Sets the TCP/IP manually. If the DHCP server is displayed. (Factory preset : XG-MB67X) 4 Enter "Subnet Mask" using P, R, Q and O, then press hENTER. 5 Enter "Gateway" using ...
...to "000. 000. 000. 000". Note • Confirm the existing network's segment (IP address group) to change the projector name, see "SETUP MANUAL" contained in the supplied CD-ROM. 50 If "192.168.150.002" is displayed. appears. Factory default setting: 000. 000. 000. 000 *... IP address of the projector is not used in use, set the TCP/IP manually. (See the item 3.) 3 TCP/IP Setting Set the TCP/IP manually. Sets the TCP/IP manually. If the DHCP server is displayed. (Factory preset : XG-MB67X) 4 Enter "Subnet Mask" using P, R, Q and O, then press hENTER. 5 Enter "Gateway" using ...

XG-MB67X Operation Manual
Page 63
... affect operation the cabinet. The projector cannot be projected unless the signal output setting of "Color" and "Tint" in red. Refer to the computer's operation manual for how to cabinet shrinkage - No picture and no • "Speaker" is wrong. • Cables incorrectly connected to the external output. Maintenance indicator on or...
... affect operation the cabinet. The projector cannot be projected unless the signal output setting of "Color" and "Tint" in red. Refer to the computer's operation manual for how to cabinet shrinkage - No picture and no • "Speaker" is wrong. • Cables incorrectly connected to the external output. Maintenance indicator on or...
XG-MB67X Operation Manual
Page 65
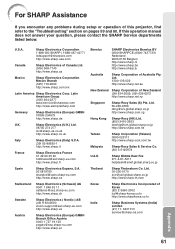
... If you encounter any problems during setup or operation of this operation manual does not answer your question, please contact the SHARP Service departments listed below. Ltd. 02-236-0170 [email protected].sharp.co.jp http://www.sharp-th.com Korea Sharp Electronics Incorporated of New Zealand (09) 634-2059, (09) 636-6972 http...
... If you encounter any problems during setup or operation of this operation manual does not answer your question, please contact the SHARP Service departments listed below. Ltd. 02-236-0170 [email protected].sharp.co.jp http://www.sharp-th.com Korea Sharp Electronics Incorporated of New Zealand (09) 634-2059, (09) 636-6972 http...
XG-MB67X Operation Manual
Page 66
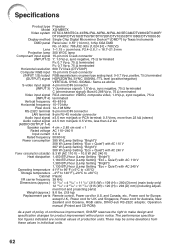
...176;F to 140°F (-20°C to make design and specification changes for U.S. The performance specification figures indicated are nominal values of continuous improvement, SHARP reserves the right to +60°C) Cabinet Plastic I/R carrier frequency 38 kHz Dimensions (approx.) 12 13/32" × 4 19/64" ×..., New Zealand and Oceania, RGB cable, DIN-D-sub RS-232C adaptor, Operation manual (Printed and CD-ROM) As a part of policy of production units. Specifications Product type Projector Model XG-MB67X Video system NTSC3.58/NTSC4.43/PAL/PAL-M/PAL-N/PAL-60/SECAM/DTV480I/DTV480P/...
...176;F to 140°F (-20°C to make design and specification changes for U.S. The performance specification figures indicated are nominal values of continuous improvement, SHARP reserves the right to +60°C) Cabinet Plastic I/R carrier frequency 38 kHz Dimensions (approx.) 12 13/32" × 4 19/64" ×..., New Zealand and Oceania, RGB cable, DIN-D-sub RS-232C adaptor, Operation manual (Printed and CD-ROM) As a part of policy of production units. Specifications Product type Projector Model XG-MB67X Video system NTSC3.58/NTSC4.43/PAL/PAL-M/PAL-N/PAL-60/SECAM/DTV480I/DTV480P/...


