

XG-MB67X Operation Manual
Page 1
MULTIMEDIA PROJECTOR MODEL XG-MB67X OPERATION MANUAL Introduction Quick Start Setup Connections Basic Operation Useful Features Appendix
MULTIMEDIA PROJECTOR MODEL XG-MB67X OPERATION MANUAL Introduction Quick Start Setup Connections Basic Operation Useful Features Appendix
XG-MB67X Operation Manual
Page 2
... record the Model and Serial Number located on the bottom of the projector and retain this information. • Before recycling the packaging, please ensure that you have checked the contents of the carton thoroughly against the list of "...
... record the Model and Serial Number located on the bottom of the projector and retain this information. • Before recycling the packaging, please ensure that you have checked the contents of the carton thoroughly against the list of "...
XG-MB67X Operation Manual
Page 5
...authority to cause harmful interference, in accordance with the projector. 1. DO NOT REMOVE SCREWS EXCEPT SPECIFIED USER SERVICE SCREW. NO USER-SERVICEABLE PARTS EXCEPT LAMP UNIT. WARNING: FCC Regulations state that SHARP may be required to give under the 1972 Consumer ...READ CAREFULLY THE IMPORTANT "LIMITED WARRANTY" CLAUSE. Operation of the parts, service and labor warranty applicable to your new SHARP Projector, using the projector, please read this product to rain or moisture. Be especially careful that may cause harmful interference to radio communications. ...
...authority to cause harmful interference, in accordance with the projector. 1. DO NOT REMOVE SCREWS EXCEPT SPECIFIED USER SERVICE SCREW. NO USER-SERVICEABLE PARTS EXCEPT LAMP UNIT. WARNING: FCC Regulations state that SHARP may be required to give under the 1972 Consumer ...READ CAREFULLY THE IMPORTANT "LIMITED WARRANTY" CLAUSE. Operation of the parts, service and labor warranty applicable to your new SHARP Projector, using the projector, please read this product to rain or moisture. Be especially careful that may cause harmful interference to radio communications. ...

XG-MB67X Operation Manual
Page 6
... standby mode. FAILURE TO OBSERVE THIS WILL RESULT IN PREMATURE LAMP FAILURE. PRODUCT DISPOSAL This projector utilizes tin-lead solder, and a pressurized lamp containing a small amount of the unit. 2 This SHARP projector uses a DMD panel. Caution Concerning Lamp Replacement See "Replacing the Lamp" on the remote control. For disposal or recycling information, please...
... standby mode. FAILURE TO OBSERVE THIS WILL RESULT IN PREMATURE LAMP FAILURE. PRODUCT DISPOSAL This projector utilizes tin-lead solder, and a pressurized lamp containing a small amount of the unit. 2 This SHARP projector uses a DMD panel. Caution Concerning Lamp Replacement See "Replacing the Lamp" on the remote control. For disposal or recycling information, please...

XG-MB67X Operation Manual
Page 7
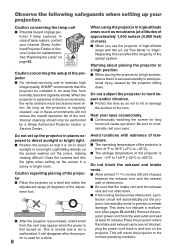
...How to Read this Operation Manual • In this step On-screen display 40 Info ........Indicates safeguards for using the buttons on the projector. 1 Press BMENU. • The "Picture" menu screen for the selected input mode is displayed. For Future Reference Maintenance P. 52...in this operation Button used in this operation manual, the illustration and the screen display are simplified for setting up and operating the projector. Using the Menu Screen ENTER button Adjustment buttons (P/R/O/Q) MENU/HELP button Adjustment buttons (P/R/O/Q) MENU/HELP button ENTER button RETURN button ...
...How to Read this Operation Manual • In this step On-screen display 40 Info ........Indicates safeguards for using the buttons on the projector. 1 Press BMENU. • The "Picture" menu screen for the selected input mode is displayed. For Future Reference Maintenance P. 52...in this operation Button used in this operation manual, the illustration and the screen display are simplified for setting up and operating the projector. Using the Menu Screen ENTER button Adjustment buttons (P/R/O/Q) MENU/HELP button Adjustment buttons (P/R/O/Q) MENU/HELP button ENTER button RETURN button ...
XG-MB67X Operation Manual
Page 8
...... 47 Fan Mode Setting 47 Checking the Lamp Life Status 47 System Lock Function 47 Locking the Operation Buttons on the Projector (Keylock Function 48 Setting up the Projector 18 Standard Setup (Front Projection) ....... 18 Ceiling-mount Setup 18 Projection (PRJ) Mode 19 Screen Size and Projection Distance ... and Functions 12 Inserting the Batteries 15 Usable Range 15 Quick Start Quick Start 16 Setup Setting up the Projector 18 Setting up the Projector Network Environment ("Network" menu) ........ 49 Setting a Password 49 DHCP Client Setting 50 TCP/IP Setting 50 Confirming the...
...... 47 Fan Mode Setting 47 Checking the Lamp Life Status 47 System Lock Function 47 Locking the Operation Buttons on the Projector (Keylock Function 48 Setting up the Projector 18 Standard Setup (Front Projection) ....... 18 Ceiling-mount Setup 18 Projection (PRJ) Mode 19 Screen Size and Projection Distance ... and Functions 12 Inserting the Batteries 15 Usable Range 15 Quick Start Quick Start 16 Setup Setting up the Projector 18 Setting up the Projector Network Environment ("Network" menu) ........ 49 Setting a Password 49 DHCP Client Setting 50 TCP/IP Setting 50 Confirming the...
XG-MB67X Operation Manual
Page 12
..." on the screen washes out the colors, making viewing difficult. Close the curtains and dim the lights when setting up your nearest Sharp Authorized Projector Dealer or Service Center for long hours will not reduce the overall operation life of the unit. This is normal and is from ... the wall outlet and wait at least 10 minutes. Do not subject the projector to avoid personal injury caused by a Sharp Authorized Projector Dealer or Service Center. Light falling directly on page 55. I When placing the projector in a high position, ensure that the intake vent and the exhaust vent...
..." on the screen washes out the colors, making viewing difficult. Close the curtains and dim the lights when setting up your nearest Sharp Authorized Projector Dealer or Service Center for long hours will not reduce the overall operation life of the unit. This is normal and is from ... the wall outlet and wait at least 10 minutes. Do not subject the projector to avoid personal injury caused by a Sharp Authorized Projector Dealer or Service Center. Light falling directly on page 55. I When placing the projector in a high position, ensure that the intake vent and the exhaust vent...
XG-MB67X Operation Manual
Page 13
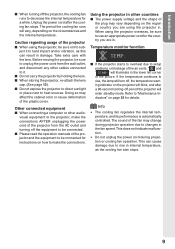
...dicators" on how to rise in internal temperature, as this can result in damage. Unplug the power cord after a 90-second cooling-off the projector, the cooling fan runs to unplug the power cord from the AC outlet and turning off , the temperature warn- Other connected equipment I Do ... place next to changes in . This does not indicate malfunction. • Do not unplug the power cord during projector operation due to heat sources. Before moving the projector, be sure not to be connected. The period the cooling fan runs will blink, and after the cooling fan stops...
...dicators" on how to rise in internal temperature, as this can result in damage. Unplug the power cord after a 90-second cooling-off the projector, the cooling fan runs to unplug the power cord from the AC outlet and turning off , the temperature warn- Other connected equipment I Do ... place next to changes in . This does not indicate malfunction. • Do not unplug the power cord during projector operation due to heat sources. Before moving the projector, be sure not to be connected. The period the cooling fan runs will blink, and after the cooling fan stops...
XG-MB67X Operation Manual
Page 14
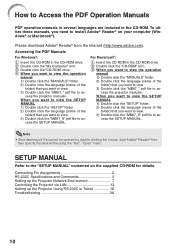
...2) Double click the language (name of the folder) that you want to view. 3) Double click the "MB67_S" pdf file to ac- cess the projector manuals. When you want to view the SETUP MANUAL 1) Double click the "SETUP" folder. 2) Double click the language (name of the folder) that... "MB67_S" pdf file to ac- Connecting Pin Assignments 2 RS-232C Specifications and Commands 3 Setting up the Projector Network Environment 7 Controlling the Projector via LAN 13 Setting up the Projector Using RS-232C or Telnet 18 Troubleshooting 28 10 Please download Adobe® Reader® from the Internet (http...
...2) Double click the language (name of the folder) that you want to view. 3) Double click the "MB67_S" pdf file to ac- cess the projector manuals. When you want to view the SETUP MANUAL 1) Double click the "SETUP" folder. 2) Double click the language (name of the folder) that... "MB67_S" pdf file to ac- Connecting Pin Assignments 2 RS-232C Specifications and Commands 3 Setting up the Projector Network Environment 7 Controlling the Projector via LAN 13 Setting up the Projector Using RS-232C or Telnet 18 Troubleshooting 28 10 Please download Adobe® Reader® from the Internet (http...
XG-MB67X Operation Manual
Page 15
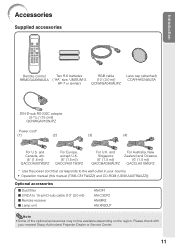
and Singapore (6' (1.8 m)) QACCBA036WJPZ For Australia, New Zealand and Oceania (6' (1.8 m)) QACCLA018WJPZ * Use the power cord that corresponds to the wall outlet in your nearest Sharp Authorized Projector Dealer or Service Center. 11 Please check with your country. • Operation manual (this manual (TINS-C517WJZZ) and CD-ROM (UDSKAA078WJZZ)) Optional accessories I Dust filter I 3 ...
and Singapore (6' (1.8 m)) QACCBA036WJPZ For Australia, New Zealand and Oceania (6' (1.8 m)) QACCLA018WJPZ * Use the power cord that corresponds to the wall outlet in your nearest Sharp Authorized Projector Dealer or Service Center. 11 Please check with your country. • Operation manual (this manual (TINS-C517WJZZ) and CD-ROM (UDSKAA078WJZZ)) Optional accessories I Dust filter I 3 ...

XG-MB67X Operation Manual
Page 16
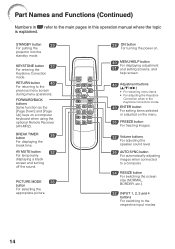
Front View Focus ring 30 For adjusting the focus. Part Names and Functions Numbers in this operation manual where the topic is explained. Projector Top View Power indicator 29, 53 STANDBY/ 28, 29 ON button For turning the power on the menu. ENTER button 40 For setting items ...selected or adjusted on and putting the projector into standby mode. KEYSTONE 33 button For entering the Keystone Correction mode. HEIGHT 31 ADJUST lever 12 28, 53 Lamp indicator 53 Temperature warning indicator...
Front View Focus ring 30 For adjusting the focus. Part Names and Functions Numbers in this operation manual where the topic is explained. Projector Top View Power indicator 29, 53 STANDBY/ 28, 29 ON button For turning the power on the menu. ENTER button 40 For setting items ...selected or adjusted on and putting the projector into standby mode. KEYSTONE 33 button For entering the Keystone Correction mode. HEIGHT 31 ADJUST lever 12 28, 53 Lamp indicator 53 Temperature warning indicator...

XG-MB67X Operation Manual
Page 17
...INPUT 1 and 23 INPUT 2 terminals Terminals for 24 computer RGB 25 and component signals. 26 RS-232C terminal Terminal for controlling the projector using a computer. 27 LAN terminal Terminal for connecting video equipment. 52 Exhaust vent 46 Speaker Rear adjustment 31 foot Kensington Security 27... cord. Intake vent 52 24 AUDIO (INPUT 25 3, 4) terminal (Shared for INPUT 3 and 4) 25 INPUT 4 terminal Terminal for controlling the projector using a computer via network. Refer to the information that came with the system for instructions on page 21. OUTPUT (INPUT 1, 2) 25 terminal ...
...INPUT 1 and 23 INPUT 2 terminals Terminals for 24 computer RGB 25 and component signals. 26 RS-232C terminal Terminal for controlling the projector using a computer. 27 LAN terminal Terminal for connecting video equipment. 52 Exhaust vent 46 Speaker Rear adjustment 31 foot Kensington Security 27... cord. Intake vent 52 24 AUDIO (INPUT 25 3, 4) terminal (Shared for INPUT 3 and 4) 25 INPUT 4 terminal Terminal for controlling the projector using a computer via network. Refer to the information that came with the system for instructions on page 21. OUTPUT (INPUT 1, 2) 25 terminal ...
XG-MB67X Operation Manual
Page 18
... where the topic is explained. AV MUTE button 32 For temporarily displaying a black screen and turning off the sound. STANDBY button 29 For putting the projector into the standby mode. BREAK TIMER button 36 For displaying the break time.
... where the topic is explained. AV MUTE button 32 For temporarily displaying a black screen and turning off the sound. STANDBY button 29 For putting the projector into the standby mode. BREAK TIMER button 36 For displaying the break time.
XG-MB67X Operation Manual
Page 19
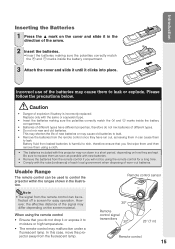
... transmitters 30° 23n (7 m) Remote control 15 flected off a screen for a long time. • Comply with this case, move the projector away from the remote control if you first wipe them and then remove them to leak. However, the effective distance of the signal may malfunction... new batteries. • Remove the batteries from the fluorescent lamp. Battery fluid from the remote control can be used to control the projector within the ranges shown in the illustration. Note • The signal from leaked batteries is incorrectly replaced. Be sure to replace them as...
... transmitters 30° 23n (7 m) Remote control 15 flected off a screen for a long time. • Comply with this case, move the projector away from the remote control if you first wipe them and then remove them to leak. However, the effective distance of the signal may malfunction... new batteries. • Remove the batteries from the fluorescent lamp. Battery fluid from the remote control can be used to control the projector within the ranges shown in the illustration. Note • The signal from leaked batteries is incorrectly replaced. Be sure to replace them as...
XG-MB67X Operation Manual
Page 20
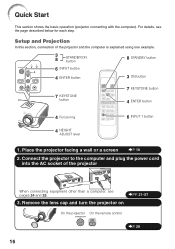
... connecting equipment other than a computer, see the page described below for each step. Connect the projector to the computer and plug the power cord into the AC socket of the projector and the computer is explained using one example. 3 8 STANDBY/ON button 8 STANDBY button 6 INPUT button 4 ENTER ...lever 6 INPUT 1 button 1. For details, see pages 24 and 25. _PP. 21-27 3. Remove the lens cap and turn the projector on On the projector On the remote control _P. 28 16 Place the projector facing a wall or a screen _P. 18 2. Quick Start This section shows the basic operation...
... connecting equipment other than a computer, see the page described below for each step. Connect the projector to the computer and plug the power cord into the AC socket of the projector and the computer is explained using one example. 3 8 STANDBY/ON button 8 STANDBY button 6 INPUT button 4 ENTER ...lever 6 INPUT 1 button 1. For details, see pages 24 and 25. _PP. 21-27 3. Remove the lens cap and turn the projector on On the projector On the remote control _P. 28 16 Place the projector facing a wall or a screen _P. 18 2. Quick Start This section shows the basic operation...
XG-MB67X Operation Manual
Page 21
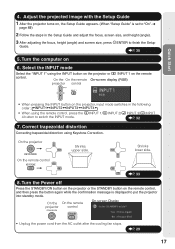
... Correcting trapezoidal distortion using the remote control, press the CINPUT 1/CINPUT 2/DINPUT 3/EINPUT 4 button to finish the Setup Guide. _P. 30 5. On the projector Shrinks upper side. n page 45) 2 Follow the steps in the following order: INPUT1 INPUT2 INPUT3 INPUT4 • When using Keystone Correction. Adjust the...height (angle) and screen size, press TENTER to switch the INPUT mode. _P. 32 7. Shrinks lower side. On the On the remote projector control On-screen Display • Unplug the power cord from the AC outlet after the cooling fan stops. _P. 29 17
... Correcting trapezoidal distortion using the remote control, press the CINPUT 1/CINPUT 2/DINPUT 3/EINPUT 4 button to finish the Setup Guide. _P. 30 5. On the projector Shrinks upper side. n page 45) 2 Follow the steps in the following order: INPUT1 INPUT2 INPUT3 INPUT4 • When using Keystone Correction. Adjust the...height (angle) and screen size, press TENTER to switch the INPUT mode. _P. 32 7. Shrinks lower side. On the On the remote projector control On-screen Display • Unplug the power cord from the AC outlet after the cooling fan stops. _P. 29 17

XG-MB67X Operation Manual
Page 22
... L Note • Refer to the desired picture size. (See page 20.) Example of this installation. Before mounting the projector, contact your nearest Sharp Authorized Projector Dealer or Service Center to the screen with the projector's feet flat and level. Doing so will eliminate the need for additional information concerning "Screen Size and Projection Distance...
... L Note • Refer to the desired picture size. (See page 20.) Example of this installation. Before mounting the projector, contact your nearest Sharp Authorized Projector Dealer or Service Center to the screen with the projector's feet flat and level. Doing so will eliminate the need for additional information concerning "Screen Size and Projection Distance...

XG-MB67X Operation Manual
Page 23
... a translucent screen) Menu item © "Rear" Menu item © "Ceiling + Rear" Indication of the 4 projection modes shown in "SCR-ADJ" menu. Projection (PRJ) Mode The projector can set the PRJ mode in the diagram below. Select the mode most appropriate for the projection setting in use. (You can use any of...
... a translucent screen) Menu item © "Rear" Menu item © "Ceiling + Rear" Indication of the 4 projection modes shown in "SCR-ADJ" menu. Projection (PRJ) Mode The projector can set the PRJ mode in the diagram below. Select the mode most appropriate for the projection setting in use. (You can use any of...

XG-MB67X Operation Manual
Page 24
... the lens center to the bottom of the image (cm/in) S: Adjustable range of error in the values in ) See page 44. Setting up the Projector (Continued) Screen Size and Projection Distance NORMAL Mode (4:3) Picture (Screen) size Diag. [χ] Width Height Projection distance [L] Distance from the lens center Minimum [L1] Maximum...
... the lens center to the bottom of the image (cm/in) S: Adjustable range of error in the values in ) See page 44. Setting up the Projector (Continued) Screen Size and Projection Distance NORMAL Mode (4:3) Picture (Screen) size Diag. [χ] Width Height Projection distance [L] Distance from the lens center Minimum [L1] Maximum...

XG-MB67X Operation Manual
Page 25
... View Connections INPUT 3 terminal Connecting video equipment with S-video output terminal (VCR, DVD player, etc.). (See page 24.) AUDIO OUTPUT terminal Connecting to control the projector. (See page 26.) LAN terminal (10 BASE-T/100 BASE-TX) Connecting the computer or the hub using a LAN cable. (See page 27.) INPUT 4 terminal Connecting...
... View Connections INPUT 3 terminal Connecting video equipment with S-video output terminal (VCR, DVD player, etc.). (See page 24.) AUDIO OUTPUT terminal Connecting to control the projector. (See page 26.) LAN terminal (10 BASE-T/100 BASE-TX) Connecting the computer or the hub using a LAN cable. (See page 27.) INPUT 4 terminal Connecting...


