

XG-MB67X Operation Manual
Page 6
... if you are certain acceptable tolerances that the device complies with the device. Caution Concerning Lamp Replacement See "Replacing the Lamp" on the remote control. This unit has some inactive pixels within acceptable tolerances which case the user may be used with FCC Class A verification. In a domestic... adequate measures. The enclosed computer cable must conform to. FAILURE TO OBSERVE THIS WILL RESULT IN PREMATURE LAMP FAILURE. This SHARP projector uses a DMD panel. This will not affect the picture quality or the life expectancy of mercury. The cable is a Class A...
... if you are certain acceptable tolerances that the device complies with the device. Caution Concerning Lamp Replacement See "Replacing the Lamp" on the remote control. This unit has some inactive pixels within acceptable tolerances which case the user may be used with FCC Class A verification. In a domestic... adequate measures. The enclosed computer cable must conform to. FAILURE TO OBSERVE THIS WILL RESULT IN PREMATURE LAMP FAILURE. This SHARP projector uses a DMD panel. This will not affect the picture quality or the life expectancy of mercury. The cable is a Class A...
XG-MB67X Operation Manual
Page 8
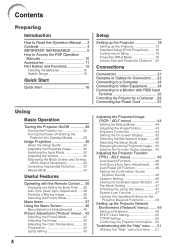
... Connection ..... 22 Connecting to a Computer 23 Connecting to Video Equipment ......... 24 Connecting to a Monitor with RGB Input Terminal 25 Controlling the Projector by a Computer .. 26 Connecting the Power Cord 27 Using Basic Operation Turning the Projector On/Off 28 Turning the ..." menu) ........ 49 Setting a Password 49 DHCP Client Setting 50 TCP/IP Setting 50 Confirming the Projector Information ... 50 Troubleshooting with the Remote Control .... 36 Displaying and Setting the Break Timer .... 36 Auto Sync (Auto Sync Adjustment) ..... 36 Freezing a Moving Image 36 Selecting the ...
... Connection ..... 22 Connecting to a Computer 23 Connecting to Video Equipment ......... 24 Connecting to a Monitor with RGB Input Terminal 25 Controlling the Projector by a Computer .. 26 Connecting the Power Cord 27 Using Basic Operation Turning the Projector On/Off 28 Turning the ..." menu) ........ 49 Setting a Password 49 DHCP Client Setting 50 TCP/IP Setting 50 Confirming the Projector Information ... 50 Troubleshooting with the Remote Control .... 36 Displaying and Setting the Break Timer .... 36 Auto Sync (Auto Sync Adjustment) ..... 36 Freezing a Moving Image 36 Selecting the ...
XG-MB67X Operation Manual
Page 15
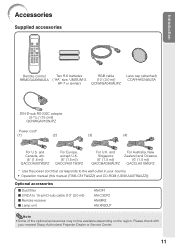
... Zealand and Oceania (6' (1.8 m)) QACCLA018WJPZ * Use the power cord that corresponds to 15-pin D-sub cable (10n (3.0 m)) I Remote receiver I Lamp unit AN-DF1 AN-C3CP2 AN-MR2 AN-XR20LP Note • Some of the optional accessories may not be available ... and CD-ROM (UDSKAA078WJZZ)) Optional accessories I Dust filter I 3 RCA to the wall outlet in your nearest Sharp Authorized Projector Dealer or Service Center. 11 Introduction Accessories Supplied accessories Remote control Two R-6 batteries RGB cable RRMCGA398WJSA ("AA" size, UM/SUM-3, (10' (3.0 m)) HP-7 or similar) ...
... Zealand and Oceania (6' (1.8 m)) QACCLA018WJPZ * Use the power cord that corresponds to 15-pin D-sub cable (10n (3.0 m)) I Remote receiver I Lamp unit AN-DF1 AN-C3CP2 AN-MR2 AN-XR20LP Note • Some of the optional accessories may not be available ... and CD-ROM (UDSKAA078WJZZ)) Optional accessories I Dust filter I 3 RCA to the wall outlet in your nearest Sharp Authorized Projector Dealer or Service Center. 11 Introduction Accessories Supplied accessories Remote control Two R-6 batteries RGB cable RRMCGA398WJSA ("AA" size, UM/SUM-3, (10' (3.0 m)) HP-7 or similar) ...

XG-MB67X Operation Manual
Page 16
... and setting screens, and help screen. 40 Adjustment buttons (P/R/O/Q) For selecting menu items. 52 Intake vent 30 Zoom ring For enlarging/ reducing the picture. 15 Remote control sensor Push both sides of the lens cap to the main pages in Z refer to attach or remove. Projector Top View Power indicator 29, 53...
... and setting screens, and help screen. 40 Adjustment buttons (P/R/O/Q) For selecting menu items. 52 Intake vent 30 Zoom ring For enlarging/ reducing the picture. 15 Remote control sensor Push both sides of the lens cap to the main pages in Z refer to attach or remove. Projector Top View Power indicator 29, 53...
XG-MB67X Operation Manual
Page 19
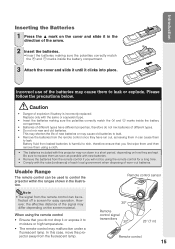
... run out, as possible with this case, move the projector away from the remote control if you will not be using the remote control for easy operation. Please follow the precautions below. Remote control sensor 30° Remote control signal transmitters 30° 23n (7 m) Remote control 15 Be sure to replace them as soon as leaving them in the illustration...
... run out, as possible with this case, move the projector away from the remote control if you will not be using the remote control for easy operation. Please follow the precautions below. Remote control sensor 30° Remote control signal transmitters 30° 23n (7 m) Remote control 15 Be sure to replace them as soon as leaving them in the illustration...
XG-MB67X Operation Manual
Page 20
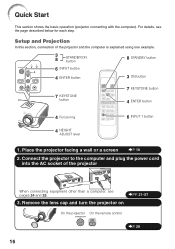
... other than a computer, see the page described below for each step. Remove the lens cap and turn the projector on On the projector On the remote control _P. 28 16 Connect the projector to the computer and plug the power cord into the AC socket of the projector and the computer is...
... other than a computer, see the page described below for each step. Remove the lens cap and turn the projector on On the projector On the remote control _P. 28 16 Connect the projector to the computer and plug the power cord into the AC socket of the projector and the computer is...
XG-MB67X Operation Manual
Page 21
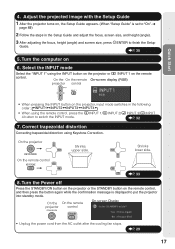
...from the AC outlet after the cooling fan stops. _P. 29 17 On the remote control _P. 33 8. Correct trapezoidal distortion Correcting trapezoidal distortion using the INPUT button on the projector or C INPUT 1 on the remote control. Turn the Power off Press the STANDBY/ON button on the projector or the ... screen size, press TENTER to "On". n page 45) 2 Follow the steps in the following order: INPUT1 INPUT2 INPUT3 INPUT4 • When using the remote control, press the CINPUT 1/CINPUT 2/DINPUT 3/EINPUT 4 button to put the projector into standby mode. Quick Start 4. On the On the...
...from the AC outlet after the cooling fan stops. _P. 29 17 On the remote control _P. 33 8. Correct trapezoidal distortion Correcting trapezoidal distortion using the INPUT button on the projector or C INPUT 1 on the remote control. Turn the Power off Press the STANDBY/ON button on the projector or the ... screen size, press TENTER to "On". n page 45) 2 Follow the steps in the following order: INPUT1 INPUT2 INPUT3 INPUT4 • When using the remote control, press the CINPUT 1/CINPUT 2/DINPUT 3/EINPUT 4 button to put the projector into standby mode. Quick Start 4. On the On the...

XG-MB67X Operation Manual
Page 32
... status of the image may take some time to 27.) Remove the lens cap and press S STANDBY/ON on the projector or fON on the remote control. • When System Lock is set . To cancel the keycode setting, input the keycode that the connections to external equipment and power outlet should be... on the projector, a slight flickering of the lamp. It should be replaced. • When switching on again, the lamp may be regarded as the lamp's control circuitry is on page 45.
... status of the image may take some time to 27.) Remove the lens cap and press S STANDBY/ON on the projector or fON on the remote control. • When System Lock is set . To cancel the keycode setting, input the keycode that the connections to external equipment and power outlet should be... on the projector, a slight flickering of the lamp. It should be replaced. • When switching on again, the lamp may be regarded as the lamp's control circuitry is on page 45.

XG-MB67X Operation Manual
Page 33
... green while cooling. • The power indicator changes to put the projector into Standby Mode) 1 Press SSTANDBY/ON on the projector or eSTANDBY on the remote control, then press that button again while the confirmation message is displayed, to red when the projector finishes cooling. Basic Operation 29 Turning the Power off...
... green while cooling. • The power indicator changes to put the projector into Standby Mode) 1 Press SSTANDBY/ON on the projector or eSTANDBY on the remote control, then press that button again while the confirmation message is displayed, to red when the projector finishes cooling. Basic Operation 29 Turning the Power off...

XG-MB67X Operation Manual
Page 36
... Volume buttons INPUT buttons Note • Pressing K/-O will lower the volume. • Pressing L/Q+ will turn the projected image back on the remote control to external equipment, the volume level of the external equipment changes in the following order: INPUT1 INPUT2 INPUT3 INPUT4 . • When "Auto ... "On", INPUT (P/ R) on the projector functions as the Auto Search buttons. (See page 46.) Adjusting the Volume Press K/L on the remote control or -O/Q+ on the projector to "Off". (See page 46.) On-screen Display Displaying the Black Screen and Turning off the sound. Image Projection...
... Volume buttons INPUT buttons Note • Pressing K/-O will lower the volume. • Pressing L/Q+ will turn the projected image back on the remote control to external equipment, the volume level of the external equipment changes in the following order: INPUT1 INPUT2 INPUT3 INPUT4 . • When "Auto ... "On", INPUT (P/ R) on the projector functions as the Auto Search buttons. (See page 46.) Adjusting the Volume Press K/L on the remote control or -O/Q+ on the projector to "Off". (See page 46.) On-screen Display Displaying the Black Screen and Turning off the sound. Image Projection...
XG-MB67X Operation Manual
Page 40
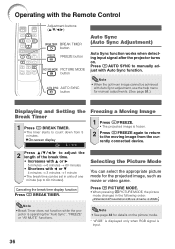
... menu for manual adjustments. (See page 51.) Displaying and Setting the Break Timer 1 Press k BREAK TIMER. • The timer starts to manually adjust with the Remote Control Adjustment buttons (P/R/O/Q) BREAK TIMER button FREEZE button PICTURE MODE button AUTO SYNC button Auto Sync (Auto Sync Adjustment) Auto Sync function works when detecting input...
... menu for manual adjustments. (See page 51.) Displaying and Setting the Break Timer 1 Press k BREAK TIMER. • The timer starts to manually adjust with the Remote Control Adjustment buttons (P/R/O/Q) BREAK TIMER button FREEZE button PICTURE MODE button AUTO SYNC button Auto Sync (Auto Sync Adjustment) Auto Sync function works when detecting input...

XG-MB67X Operation Manual
Page 41
... the items that can adjust the picture tone with this adjustment when inputting PAL or SECAM signals. Help Picture Mode Contrast Bright Color Tint Sharp CLR Temp Bright Boost Progressive Lamp Setting Reset SEL./ADJ. 0 0 0 0 0 8500K 1 Standard 3D Progressive Bright ENTER END Main ...). ADJ Page 44 SEL./ADJ. ENTER END • You can adjust the menu items with icons ( , , and ) using the respective buttons on the remote control. *1 Items when inputting RGB signal through INPUT 1 or INPUT 2. *2 Items when inputting component signal through INPUT 1 or INPUT 2, or when selecting INPUT 3...
... the items that can adjust the picture tone with this adjustment when inputting PAL or SECAM signals. Help Picture Mode Contrast Bright Color Tint Sharp CLR Temp Bright Boost Progressive Lamp Setting Reset SEL./ADJ. 0 0 0 0 0 8500K 1 Standard 3D Progressive Bright ENTER END Main ...). ADJ Page 44 SEL./ADJ. ENTER END • You can adjust the menu items with icons ( , , and ) using the respective buttons on the remote control. *1 Items when inputting RGB signal through INPUT 1 or INPUT 2. *2 Items when inputting component signal through INPUT 1 or INPUT 2, or when selecting INPUT 3...

XG-MB67X Operation Manual
Page 46
...Electrotechnical Commission). Info • When "sRGB" is selected. Standard Bright Help SEL./ADJ. Game Gives sharpness to the projected image. Any changes you make are displayed in memory. You cannot set or adjust...Sharp CLR Temp Bright Boost Progressive Lamp Setting Reset SEL./ADJ. 0 0 0 0 0 8500K 1 Standard 3D Progressive Bright ENTER END 1 Selecting the Picture Mode Selectable items Description Standard For standard image Presentation Brightens portions of color reproduction regulated by the IEC, the images are retained in a natural tint based on the remote control...
...Electrotechnical Commission). Info • When "sRGB" is selected. Standard Bright Help SEL./ADJ. Game Gives sharpness to the projected image. Any changes you make are displayed in memory. You cannot set or adjust...Sharp CLR Temp Bright Boost Progressive Lamp Setting Reset SEL./ADJ. 0 0 0 0 0 8500K 1 Standard 3D Progressive Bright ENTER END 1 Selecting the Picture Mode Selectable items Description Standard For standard image Presentation Brightens portions of color reproduction regulated by the IEC, the images are retained in a natural tint based on the remote control...
XG-MB67X Operation Manual
Page 48
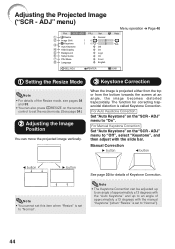
... 1 Setting the Resize Mode Note • For details of the Resize mode, see pages 34 and 35. • You can also press HRESIZE on the remote control to "On". ADJ" menu to set the resize mode. (See page 34.) 2 Adjusting the Image Position You can be adjusted up to an angle of...
... 1 Setting the Resize Mode Note • For details of the Resize mode, see pages 34 and 35. • You can also press HRESIZE on the remote control to "On". ADJ" menu to set the resize mode. (See page 34.) 2 Adjusting the Image Position You can be adjusted up to an angle of...

XG-MB67X Operation Manual
Page 50
... two or more than 15 minutes, the projector will occur when the projector is turned on the remote control to select an input mode other than the input mode selected by pressing F AUTO SYNC on the remote control. • The Auto Sync adjustment may take some time to complete, depending on the image of...
... two or more than 15 minutes, the projector will occur when the projector is turned on the remote control to select an input mode other than the input mode selected by pressing F AUTO SYNC on the remote control. • The Auto Sync adjustment may take some time to complete, depending on the image of...

XG-MB67X Operation Manual
Page 51
...Approx. 150 hours Approx. 100 hours Note • It is slow. We suggest you lose or forget your keycode, contact your nearest Sharp Authorized Projector Dealer or Service Center (see page 61). Select this function is activated, users must enter the correct keycode each time the ...condition. 1 Select "System Lock", then press hENTER or Q. • The screen for entering the keycode appears. 2 Press the 4 buttons on the remote control or on the projector for four times. P R 115200bps Transmission speed is turned on the projector. When "Fan Mode" is valid, the keycode reset...
...Approx. 150 hours Approx. 100 hours Note • It is slow. We suggest you lose or forget your keycode, contact your nearest Sharp Authorized Projector Dealer or Service Center (see page 61). Select this function is activated, users must enter the correct keycode each time the ...condition. 1 Select "System Lock", then press hENTER or Q. • The screen for entering the keycode appears. 2 Press the 4 buttons on the remote control or on the projector for four times. P R 115200bps Transmission speed is turned on the projector. When "Fan Mode" is valid, the keycode reset...

XG-MB67X Operation Manual
Page 52
... (Keylock Function) Use this function to lock the operation buttons on the projector in setting your keycode, the keycode cannot be canceled with the remote control buttons. • You cannot use the following buttons for keycode: • S STANDBY/ON • f ON • e STANDBY &#...8226; h ENTER • l RETURN • B MENU/HELP • System lock function recognizes each button on the remote control or on the projector for keycode System Lock ---- If you have already set , the keycode input screen appears after the power is : displaying the...
... (Keylock Function) Use this function to lock the operation buttons on the projector in setting your keycode, the keycode cannot be canceled with the remote control buttons. • You cannot use the following buttons for keycode: • S STANDBY/ON • f ON • e STANDBY &#...8226; h ENTER • l RETURN • B MENU/HELP • System lock function recognizes each button on the remote control or on the projector for keycode System Lock ---- If you have already set , the keycode input screen appears after the power is : displaying the...
XG-MB67X Operation Manual
Page 53
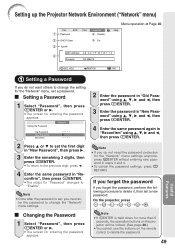
...5 seconds, the operation buttons on the projector will be locked. (See page 48.) • You cannot use the buttons on the remote control to change the "Network" menu settings. Setting the Password Network Old Password New Password Reconfirm 2 Press P or R to the previous ... 40 Pict. SCR PRJ Password Network Disable Help DHCP Client On TCP/IP MAC Address 0 8 : 0 0 : 1 F : B 1 : B 7 : 7 4 Projector XG-MB67X SEL./ADJ. a Changing the Password 1 Select "Password", then press hENTER or Q. • The screen for entering the password appears. 2 Enter the password in "Old Password...
...5 seconds, the operation buttons on the projector will be locked. (See page 48.) • You cannot use the buttons on the remote control to change the "Network" menu settings. Setting the Password Network Old Password New Password Reconfirm 2 Press P or R to the previous ... 40 Pict. SCR PRJ Password Network Disable Help DHCP Client On TCP/IP MAC Address 0 8 : 0 0 : 1 F : B 1 : B 7 : 7 4 Projector XG-MB67X SEL./ADJ. a Changing the Password 1 Select "Password", then press hENTER or Q. • The screen for entering the password appears. 2 Enter the password in "Old Password...
XG-MB67X Operation Manual
Page 56
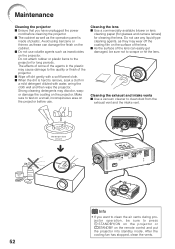
... on the projector before cleaning the projector. Cleaning the exhaust and intake vents I As the surface of the lens can damage the finish on the remote control and put the projector into standby mode. I Do not use volatile agents such as these can easily get damaged, be sure to clean dust from...
... on the projector before cleaning the projector. Cleaning the exhaust and intake vents I As the surface of the lens can damage the finish on the remote control and put the projector into standby mode. I Do not use volatile agents such as these can easily get damaged, be sure to clean dust from...
XG-MB67X Operation Manual
Page 60
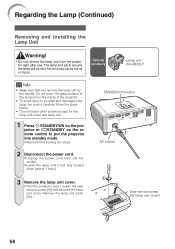
.../ON button AC socket 1 2 User service screw (for the lamp unit cover and lamp unit. 1 Press SSTANDBY/ON on the projector or eSTANDBY on the remote control to the lamp, be very hot and may cause burns or injury. The lamp and parts around the lamp will be sure to carefully follow...
.../ON button AC socket 1 2 User service screw (for the lamp unit cover and lamp unit. 1 Press SSTANDBY/ON on the projector or eSTANDBY on the remote control to the lamp, be very hot and may cause burns or injury. The lamp and parts around the lamp will be sure to carefully follow...


