
Operation Manual
Page 2
..." CLAUSE. U.S.A. NO USER-SERVICEABLE PARTS EXCEPT LAMP UNIT. Model No.: XG-NV5XB Serial No.: There are designed to provide reasonable protection against the list of "Supplied Accessories" on the bottom of your new SHARP LCD Projector, using the LCD projector, please read this product to rain or moisture. The exclamation point within the product's enclosure that SHARP may be used in the literature accompanying the product. U.S.A. OPERATION MANUAL ENGLISH IMPORTANT...
..." CLAUSE. U.S.A. NO USER-SERVICEABLE PARTS EXCEPT LAMP UNIT. Model No.: XG-NV5XB Serial No.: There are designed to provide reasonable protection against the list of "Supplied Accessories" on the bottom of your new SHARP LCD Projector, using the LCD projector, please read this product to rain or moisture. The exclamation point within the product's enclosure that SHARP may be used in the literature accompanying the product. U.S.A. OPERATION MANUAL ENGLISH IMPORTANT...
Operation Manual
Page 3
...Power 18 Turn on the Lamp Power 18 Adjusting Focus 18 Adjusting Zoom 18 Selecting and Checking the Input Mode ...... 19 Adjusting the Volume 19 Turning off the Power 19 Using the GUI (Graphical User Interface) Menu Screens 20 Using IrCOM for Wireless Presentations ......... 22 Selecting the On-screen Display Language ... 23 Selecting the Video Input System Mode (VIDEO mode only 23 Picture Adjustments 24 Audio Adjustments 25 Computer Image Adjustments 26 Auto Sync Adjustment 27 Auto Sync Display Function 27 Saving and Selecting Adjustment Settings ... 28 Mode Adjustment 28 Useful...
...Power 18 Turn on the Lamp Power 18 Adjusting Focus 18 Adjusting Zoom 18 Selecting and Checking the Input Mode ...... 19 Adjusting the Volume 19 Turning off the Power 19 Using the GUI (Graphical User Interface) Menu Screens 20 Using IrCOM for Wireless Presentations ......... 22 Selecting the On-screen Display Language ... 23 Selecting the Video Input System Mode (VIDEO mode only 23 Picture Adjustments 24 Audio Adjustments 25 Computer Image Adjustments 26 Auto Sync Adjustment 27 Auto Sync Display Function 27 Saving and Selecting Adjustment Settings ... 28 Mode Adjustment 28 Useful...
Operation Manual
Page 5
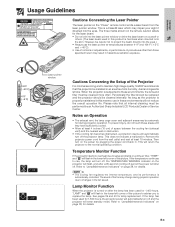
... the lamp has been used for 1,500 hours, the projector power will automatically turn off and the projector will automatically turn off, the TEMPERATURE WARNING indicator on the power by an Authorized Sharp Industrial LCD Products Dealer or Service Center. This will shut off period the power will return the projector to maintain high image quality, SHARP recommends that all internal cleaning must be cleaned internally. If the temperature continues to setup problems or a dirty air filter, "TEMP." The...
... the lamp has been used for 1,500 hours, the projector power will automatically turn off and the projector will automatically turn off, the TEMPERATURE WARNING indicator on the power by an Authorized Sharp Industrial LCD Products Dealer or Service Center. This will shut off period the power will return the projector to maintain high image quality, SHARP recommends that all internal cleaning must be cleaned internally. If the temperature continues to setup problems or a dirty air filter, "TEMP." The...
Operation Manual
Page 6
... Green and Composite Sync signals for perfectly synced computer images. 9. Or, send us an e-mail at an angle while maintaining image quality and brightness. 7. Our World Wide Web address is projected at [email protected] . XGA RESOLUTION FOR HIGH RESOLUTION PRESENTATIONS With XGA (1,024 ן768) resolution, this projector, first refer to set up . AUTO SYNC TECHNOLOGY FOR AUTOMATIC IMAGE PERFECTION Automatically makes any problems during setup or operation of high...
... Green and Composite Sync signals for perfectly synced computer images. 9. Or, send us an e-mail at an angle while maintaining image quality and brightness. 7. Our World Wide Web address is projected at [email protected] . XGA RESOLUTION FOR HIGH RESOLUTION PRESENTATIONS With XGA (1,024 ן768) resolution, this projector, first refer to set up . AUTO SYNC TECHNOLOGY FOR AUTOMATIC IMAGE PERFECTION Automatically makes any problems during setup or operation of high...

Operation Manual
Page 7
... Sharp Advanced Presentation Software manual. 7 Double click on the pdf file. • If the desired pdf file cannot be opened by double clicking the mouse, please start Acrobat Reader first, then specify the desired file using Acrobat Reader for important information on the "saps" pdf file to access the projector manuals. If you have not installed Acrobat Reader yet, you want to view...
... Sharp Advanced Presentation Software manual. 7 Double click on the pdf file. • If the desired pdf file cannot be opened by double clicking the mouse, please start Acrobat Reader first, then specify the desired file using Acrobat Reader for important information on the "saps" pdf file to access the projector manuals. If you have not installed Acrobat Reader yet, you want to view...

Operation Manual
Page 12
... screen. position for details. 2 Wireless mouse operation 1. LIGHT LCD PROJECTOR MOUSE ADJ. Using the laser pointer Slide the MOUSE/ADJUSTMENT switch to the MOUSE position, and then press LASER POINTER ( ) to projector adjustments. • If the MAIN POWER switch on the "Power" remote control is left on for details on setting up . The computer should always be used for wireless mouse operation. 5 Using the mouse buttons for more time. Green light refers to mouse operations, and red light...
... screen. position for details. 2 Wireless mouse operation 1. LIGHT LCD PROJECTOR MOUSE ADJ. Using the laser pointer Slide the MOUSE/ADJUSTMENT switch to the MOUSE position, and then press LASER POINTER ( ) to projector adjustments. • If the MAIN POWER switch on the "Power" remote control is left on for details on setting up . The computer should always be used for wireless mouse operation. 5 Using the mouse buttons for more time. Green light refers to mouse operations, and red light...
Operation Manual
Page 13
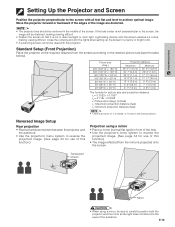
... level to achieve optimal image. If the lens center is not perpendicular to the screen, the image will be distorted, making viewing difficult. Standard Setup (Front Projection) Place the projector at the required distance from the mirror is projected onto the screen. E-12 Close the curtains and dim the lights when setting up the screen in the middle of this projector. Picture size (diag.) 300Љ (240...
... level to achieve optimal image. If the lens center is not perpendicular to the screen, the image will be distorted, making viewing difficult. Standard Setup (Front Projection) Place the projector at the required distance from the mirror is projected onto the screen. E-12 Close the curtains and dim the lights when setting up the screen in the middle of this projector. Picture size (diag.) 300Љ (240...
Operation Manual
Page 15
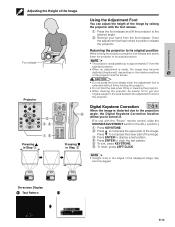
... upper part of the Image Foot release Projector Pressing ∂ in Step 2 ON Using the Adjustment Foot You can adjust the height of the projector and the screen. LIGHT Pressing ƒ in Step 2 2 ON VOL MUTE OFF BLACK SCREEN LASER TOOLS MENU R/C OFF 6 3, 4 R-CLICK ENTER 1, 5 INPUT IrCOM FREEZE AUTO SYNC KEYSTONE ENLARGE MOUSE ADJ. Digital Keystone Correction MOUSE ADJ. position.) 1 Press KEYSTONE. 2 Press ∂ to the desired angle. 2 Remove...
... upper part of the Image Foot release Projector Pressing ∂ in Step 2 ON Using the Adjustment Foot You can adjust the height of the projector and the screen. LIGHT Pressing ƒ in Step 2 2 ON VOL MUTE OFF BLACK SCREEN LASER TOOLS MENU R/C OFF 6 3, 4 R-CLICK ENTER 1, 5 INPUT IrCOM FREEZE AUTO SYNC KEYSTONE ENLARGE MOUSE ADJ. Digital Keystone Correction MOUSE ADJ. position.) 1 Press KEYSTONE. 2 Press ∂ to the desired angle. 2 Remove...
Operation Manual
Page 19
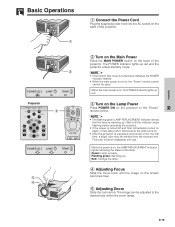
... power is on, the POWER indicator lights up red. 3 Turn on the Lamp Power Press POWER ON on the projector or the "Power" remote control. • The flashing green LAMP REPLACEMENT indicator shows that the lamp is on, the LAMP REPLACEMENT indicator lights indicating the status of the projector. When the power is warming up . The image can be used. This odor will soon disappear with use. Red: Change the lamp. 4 Adjusting Focus Slide the focus knob until the indicator stops flashing before operating the projector. • If the power is turned...
... power is on, the POWER indicator lights up red. 3 Turn on the Lamp Power Press POWER ON on the projector or the "Power" remote control. • The flashing green LAMP REPLACEMENT indicator shows that the lamp is on, the LAMP REPLACEMENT indicator lights indicating the status of the projector. When the power is warming up . The image can be used. This odor will soon disappear with use. Red: Change the lamp. 4 Adjusting Focus Slide the focus knob until the indicator stops flashing before operating the projector. • If the power is turned...
Operation Manual
Page 20
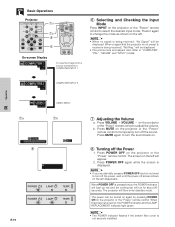
... desired input mode. When POWER OFF is displayed. • If you accidentally pressed POWER OFF and do not want to turn the sound back on , the POWER indicator and the LAMP REPLACEMENT indicator light green. • The POWER indicator flashes if the bottom filter cover is being received, "Not Reg." When the power is being received, "No Signal" will be turned on again by pressing POWER ON on the projector or the "Power" remote control to adjust the...
... desired input mode. When POWER OFF is displayed. • If you accidentally pressed POWER OFF and do not want to turn the sound back on , the POWER indicator and the LAMP REPLACEMENT indicator light green. • The POWER indicator flashes if the bottom filter cover is being received, "Not Reg." When the power is being received, "No Signal" will be turned on again by pressing POWER ON on the projector or the "Power" remote control to adjust the...
Operation Manual
Page 23
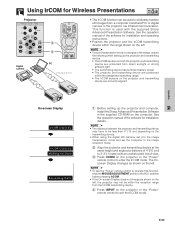
... transmitting device are correctly aligned. E-22 See the operation manual of view. 3 Press IrCOM on the projector or the "Power" remote control to enter the IrCOM mode. Projector Digital camera 15˚ ON VOL MUTE OFF BLACK SCREEN LASER TOOLS MENU 3 4 PC R-CLICK ENTER INPUT IrCOM FREEZE AUTO SYNC KEYSTONE ENLARGE MOUSE ADJ. On-screen Display f f 1 Before setting up the projector and transmitting device. • The IrCOM sensors on both...
... transmitting device are correctly aligned. E-22 See the operation manual of view. 3 Press IrCOM on the projector or the "Power" remote control to enter the IrCOM mode. Projector Digital camera 15˚ ON VOL MUTE OFF BLACK SCREEN LASER TOOLS MENU 3 4 PC R-CLICK ENTER INPUT IrCOM FREEZE AUTO SYNC KEYSTONE ENLARGE MOUSE ADJ. On-screen Display f f 1 Before setting up the projector and transmitting device. • The IrCOM sensors on both...
Operation Manual
Page 25
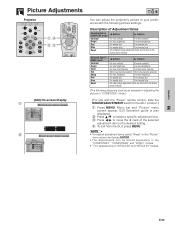
Picture Adjustments Projector 1, 4 2, 3 ON VOL MUTE OFF BLACK SCREEN LASER TOOLS MENU R-CLICK ENTER INPUT IrCOM FREEZE AUTO SYNC (GUI) On-screen Display 1 2 MOUSE ADJ. GUI Operation guide is also displayed. 2 Press ∂/ƒ to select a specific adjustment item. 3 Press ß/© to move the mark of Adjustment Items Selected item in COMPUTER mode Contrast Bright Red Blue Reset ß button © button For less contrast For more contrast For less brightness For...
Picture Adjustments Projector 1, 4 2, 3 ON VOL MUTE OFF BLACK SCREEN LASER TOOLS MENU R-CLICK ENTER INPUT IrCOM FREEZE AUTO SYNC (GUI) On-screen Display 1 2 MOUSE ADJ. GUI Operation guide is also displayed. 2 Press ∂/ƒ to select a specific adjustment item. 3 Press ß/© to move the mark of Adjustment Items Selected item in COMPUTER mode Contrast Bright Red Blue Reset ß button © button For less contrast For more contrast For less brightness For...
Operation Manual
Page 28
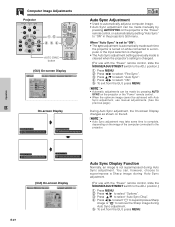
... Image Adjustments Projector 1, 5 2, 3, 4 ON VOL MUTE OFF BLACK SCREEN LASER TOOLS MENU AUTO SYNC button R-CLICK ENTER INPUT IrCOM FREEZE AUTO SYNC KEYSTONE ENLARGE (GUI) On-screen Display On-screen Display g f s (GUI) On-screen Display E-27 MOUSE ADJ. When "Auto Sync" is set to "ON": • The sync adjustment is automatically made each time the projector is turned on while connected to a computer or the input selection is changed . (For use with the "Power" remote control, slide the MOUSE/ADJUSTMENT switch to superimpose a Sharp image during Auto Sync adjustment...
... Image Adjustments Projector 1, 5 2, 3, 4 ON VOL MUTE OFF BLACK SCREEN LASER TOOLS MENU AUTO SYNC button R-CLICK ENTER INPUT IrCOM FREEZE AUTO SYNC KEYSTONE ENLARGE (GUI) On-screen Display On-screen Display g f s (GUI) On-screen Display E-27 MOUSE ADJ. When "Auto Sync" is set to "ON": • The sync adjustment is automatically made each time the projector is turned on while connected to a computer or the input selection is changed . (For use with the "Power" remote control, slide the MOUSE/ADJUSTMENT switch to superimpose a Sharp image during Auto Sync adjustment...
Operation Manual
Page 36
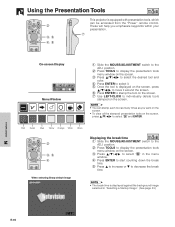
... BLACK SCREEN LASER TOOLS MENU R-CLICK ENTER INPUT IrCOM FREEZE AUTO SYNC 2 3, 5 4, 6 R/C OFF ON This projector is displayed against the background image selected in "Selecting a Startup Image". (See page 33.) Useful Features E-35 Using the Presentation Tools MOUSE ADJ. Red Green Blue Yellow Orange White Black ON VOL MUTE OFF BLACK SCREEN LASER TOOLS MENU R-CLICK ENTER INPUT IrCOM FREEZE AUTO SYNC 2 3, 5 4 When selecting Sharp default image Displaying the break time MOUSE ADJ. 1 Slide the MOUSE/ADJUSTMENT switch to...
... BLACK SCREEN LASER TOOLS MENU R-CLICK ENTER INPUT IrCOM FREEZE AUTO SYNC 2 3, 5 4, 6 R/C OFF ON This projector is displayed against the background image selected in "Selecting a Startup Image". (See page 33.) Useful Features E-35 Using the Presentation Tools MOUSE ADJ. Red Green Blue Yellow Orange White Black ON VOL MUTE OFF BLACK SCREEN LASER TOOLS MENU R-CLICK ENTER INPUT IrCOM FREEZE AUTO SYNC 2 3, 5 4 When selecting Sharp default image Displaying the break time MOUSE ADJ. 1 Slide the MOUSE/ADJUSTMENT switch to...

Operation Manual
Page 39
... projector to change the lamp. • If a problem occurs, either the TEMPERATURE WARNING indicator or the LAMP REPLACEMENT indicator will light up red, and the power will turn off and the projector will flash in yellow in red when POWER ON is pressed. • The bottom filter cover is abnormally high. Maintenance & Troubleshooting • The lamp usage time can vary significantly, the projector lamp may have the lamp replaced at your nearest Authorized Sharp Industrial LCD Products Dealer or Service Center. • Replace...
... projector to change the lamp. • If a problem occurs, either the TEMPERATURE WARNING indicator or the LAMP REPLACEMENT indicator will light up red, and the power will turn off and the projector will flash in yellow in red when POWER ON is pressed. • The bottom filter cover is abnormally high. Maintenance & Troubleshooting • The lamp usage time can vary significantly, the projector lamp may have the lamp replaced at your nearest Authorized Sharp Industrial LCD Products Dealer or Service Center. • Replace...

Operation Manual
Page 40
... to allow the surface of the picture and color quality. See page 37 for repair. After the cooling fan stops, turn off the main power. or Ł OFF 2 3 Disconnect the power cord. Slide the lamp cage cover out. Unplug the power cord from the lamp cage. Turn over the projector and unfasten the user service screw that the lamp be replaced after 1,400 cumulative hours of use or when you notice a significant...
... to allow the surface of the picture and color quality. See page 37 for repair. After the cooling fan stops, turn off the main power. or Ł OFF 2 3 Disconnect the power cord. Slide the lamp cage cover out. Unplug the power cord from the lamp cage. Turn over the projector and unfasten the user service screw that the lamp be replaced after 1,400 cumulative hours of use or when you notice a significant...

Operation Manual
Page 41
... reset. Ł • Reset the lamp timer only after replacing the lamp. Troubleshooting Problem No picture and no picture appears. Sound is turned on the MAIN POWER switch. Picture appears but no sound. Replacing the Projection Lamp Resetting the lamp timer 1 Connect the power cord. 2 Reset the lamp timer. This will not affect operation or performance. • Refer to "Lamp/Maintenance Indicators" on page 38. • Distance and angle between the projector and transmitting device are not correct. (See page 24.) • Adjust the focus...
... reset. Ł • Reset the lamp timer only after replacing the lamp. Troubleshooting Problem No picture and no picture appears. Sound is turned on the MAIN POWER switch. Picture appears but no sound. Replacing the Projection Lamp Resetting the lamp timer 1 Connect the power cord. 2 Reset the lamp timer. This will not affect operation or performance. • Refer to "Lamp/Maintenance Indicators" on page 38. • Distance and angle between the projector and transmitting device are not correct. (See page 24.) • Adjust the focus...
Operation Manual
Page 43
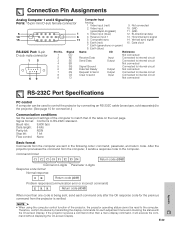
... code for connection.) Communication conditions Set the serial port settings of the projector, the projector operating status cannot be used to control the projector by connecting an RS-232C cable (cross type, sold separately) to the projector. (See page 15 for the previous command from the computer are sent in the following order: command, parameter, and return code. Video input (blue) 12. Bi-directional data 10 6 4. Horizontal sync signal 15 11 5. After the projector processes the command...
... code for connection.) Communication conditions Set the serial port settings of the projector, the projector operating status cannot be used to control the projector by connecting an RS-232C cable (cross type, sold separately) to the projector. (See page 15 for the previous command from the computer are sent in the following order: command, parameter, and return code. Video input (blue) 12. Bi-directional data 10 6 4. Horizontal sync signal 15 11 5. After the projector processes the command...

Operation Manual
Page 46
... Mouse control cable for Mac (6 45⁄64Љ, 17 cm), Remote mouse receiver, Extra air filter, Lens cap (attached), Carrying bag, CDROM, LCD projector operation manual, LCD projector quick reference, Sharp Advanced Presentation Software operation manual, Sharp Advanced Presentation Software quick reference, IrDA driver installation instruction sheet Replacement parts Lamp unit (Lamp/cage module) (BQC-XGNV5XB/1) "Power" remote control (RRMCG1470CESA), Simple presentation remote control (RRMCG1480CESA), AA size batteries, AAA size batteries, Power cord (CACCU5013DE01), Computer cable (QCNW...
... Mouse control cable for Mac (6 45⁄64Љ, 17 cm), Remote mouse receiver, Extra air filter, Lens cap (attached), Carrying bag, CDROM, LCD projector operation manual, LCD projector quick reference, Sharp Advanced Presentation Software operation manual, Sharp Advanced Presentation Software quick reference, IrDA driver installation instruction sheet Replacement parts Lamp unit (Lamp/cage module) (BQC-XGNV5XB/1) "Power" remote control (RRMCG1470CESA), Simple presentation remote control (RRMCG1480CESA), AA size batteries, AAA size batteries, Power cord (CACCU5013DE01), Computer cable (QCNW...
Operation Manual
Page 53
... cable for Mac 15 Mouse control serial cable 15 MUTE button 19 O Opening image 33 P PDF 6 Phase 26 Picture adjustment 24 POWER buttons 18 Power cord 18 POWER indicator 18 Presentation tools 35 R Rear projection 12 Remote control 11 Remote control sensor 10 Remote mouse receiver 10 RIGHT-CLICK button 11 RS-232C port 17 S Speaker 8 Startup image 33 Status confirmation 36 S-VIDEO INPUT terminal 17 Sync 27 Sync on green 42 T TEMPERATURE WARNING indicator 38 TOOLS button 35 V VIDEO INPUT terminal 17 VOLUME buttons 19 W Wireless mouse control 10 X XGA resolution 5 Z Zoom...
... cable for Mac 15 Mouse control serial cable 15 MUTE button 19 O Opening image 33 P PDF 6 Phase 26 Picture adjustment 24 POWER buttons 18 Power cord 18 POWER indicator 18 Presentation tools 35 R Rear projection 12 Remote control 11 Remote control sensor 10 Remote mouse receiver 10 RIGHT-CLICK button 11 RS-232C port 17 S Speaker 8 Startup image 33 Status confirmation 36 S-VIDEO INPUT terminal 17 Sync 27 Sync on green 42 T TEMPERATURE WARNING indicator 38 TOOLS button 35 V VIDEO INPUT terminal 17 VOLUME buttons 19 W Wireless mouse control 10 X XGA resolution 5 Z Zoom...


