
Operation Manual
Page 3
... Presentation Tools 35 Checking the Adjustment Status 36 Automatic Power Shutoff Function 36 Maintenance & Troubleshooting Air Filter Maintenance 37 Lamp/Maintenance Indicators 38 Replacing the Projection Lamp 39 Using the Kensington Lock 40 Troubleshooting 40 Appendix Transporting the Projector 41 Connection Pin Assignments 42 RS-232C Port ...Useful Features Maintenance & Troubleshooting Appendix E-2 Important Information Setup & Connections Operation Contents Important Information Important Safeguards 3 Usage Guidelines 4 Outstanding Features 5 For SHARP Assistance (U.S.A.
... Presentation Tools 35 Checking the Adjustment Status 36 Automatic Power Shutoff Function 36 Maintenance & Troubleshooting Air Filter Maintenance 37 Lamp/Maintenance Indicators 38 Replacing the Projection Lamp 39 Using the Kensington Lock 40 Troubleshooting 40 Appendix Transporting the Projector 41 Connection Pin Assignments 42 RS-232C Port ...Useful Features Maintenance & Troubleshooting Appendix E-2 Important Information Setup & Connections Operation Contents Important Information Important Safeguards 3 Usage Guidelines 4 Outstanding Features 5 For SHARP Assistance (U.S.A.
Operation Manual
Page 5
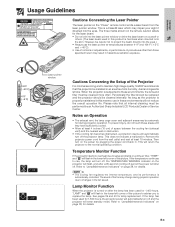
... turn off , the TEMPERATURE WARNING indicator on the power by an Authorized Sharp Industrial LCD Products Dealer or Service Center. Lamp Monitor Function When the projector is automatically controlled. Refer to replace the lamp. Temperature Monitor Function If the projector starts to overheat due to rise,... be careful not to project the beam directly into the eyes. Then turn on the projector will flash, and after the lamp has been used for lamp replacement. If the temperature continues to setup problems or a dirty air filter, "TEMP." ONLY REMOTE CONTROL MODEL NO. : G1462CESA...
... turn off , the TEMPERATURE WARNING indicator on the power by an Authorized Sharp Industrial LCD Products Dealer or Service Center. Lamp Monitor Function When the projector is automatically controlled. Refer to replace the lamp. Temperature Monitor Function If the projector starts to overheat due to rise,... be careful not to project the beam directly into the eyes. Then turn on the projector will flash, and after the lamp has been used for lamp replacement. If the temperature continues to setup problems or a dirty air filter, "TEMP." ONLY REMOTE CONTROL MODEL NO. : G1462CESA...
Operation Manual
Page 9
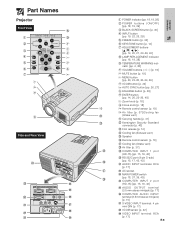
... SCREEN button [p. 30] 4 INPUT button [pp. 19, 22, 26, 29] 5 FREEZE button [p. 33] 6 KEYSTONE button [p. 14] 7 ADJUSTMENT buttons pp. 14, 20, 21, 23-36, 40] 8 LAMP REPLACEMENT indicator [pp. 18, 19, 38] 9 TEMPERATURE WARNING indicator [pp. 4, 38] 0 VOLUME buttons p. 19] q MUTE button [p. 19] w MENU button [pp. 20, 23-28, 30-34, 36...
... SCREEN button [p. 30] 4 INPUT button [pp. 19, 22, 26, 29] 5 FREEZE button [p. 33] 6 KEYSTONE button [p. 14] 7 ADJUSTMENT buttons pp. 14, 20, 21, 23-36, 40] 8 LAMP REPLACEMENT indicator [pp. 18, 19, 38] 9 TEMPERATURE WARNING indicator [pp. 4, 38] 0 VOLUME buttons p. 19] q MUTE button [p. 19] w MENU button [pp. 20, 23-28, 30-34, 36...
Operation Manual
Page 19
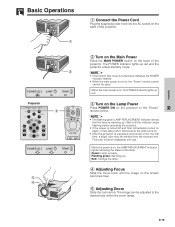
...; After the projector is unpacked and turned on the projector or the "Power" remote control. • The flashing green LAMP REPLACEMENT indicator shows that the lamp is ready. Red: Change the lamp. 4 Adjusting Focus Slide the focus knob until the indicator stops flashing before operating the projector. • If the power ...CLICK ENTER INPUT IrCOM FREEZE AUTO SYNC 2 Turn on the Main Power Press the MAIN POWER switch on the back of the lamp. Wait until the image on , the LAMP REPLACEMENT indicator lights indicating the status of the projector. Flashing green: Warming up .
...; After the projector is unpacked and turned on the projector or the "Power" remote control. • The flashing green LAMP REPLACEMENT indicator shows that the lamp is ready. Red: Change the lamp. 4 Adjusting Focus Slide the focus knob until the indicator stops flashing before operating the projector. • If the power ...CLICK ENTER INPUT IrCOM FREEZE AUTO SYNC 2 Turn on the Main Power Press the MAIN POWER switch on the back of the lamp. Wait until the image on , the LAMP REPLACEMENT indicator lights indicating the status of the projector. Flashing green: Warming up .
Operation Manual
Page 20
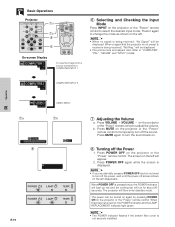
... be displayed. When a signal that the projector is not securely installed. will then enter standby mode. Press POWER OFF on , the POWER indicator and the LAMP REPLACEMENT indicator light green. • The POWER indicator flashes if the bottom filter cover is not preset to select the desired input mode. Press it again...
... be displayed. When a signal that the projector is not securely installed. will then enter standby mode. Press POWER OFF on , the POWER indicator and the LAMP REPLACEMENT indicator light green. • The POWER indicator flashes if the bottom filter cover is not preset to select the desired input mode. Press it again...

Operation Manual
Page 33
...E-32 Description of usage. Custom image must be displayed. your company logo) as the background image. Please see the Sharp Advanced Presentation Software's operation manual for lamp replacement. • In VIDEO mode, the resolution and frequency settings will be displayed. 3 Press ∂/ƒ to select... the background image you to select the image displayed when no signal is recommended that the lamp be replaced after 1,400 hours of Background Images Selected item Sharp Custom Blue None Background image SHARP default image User customized image (i.e.
...E-32 Description of usage. Custom image must be displayed. your company logo) as the background image. Please see the Sharp Advanced Presentation Software's operation manual for lamp replacement. • In VIDEO mode, the resolution and frequency settings will be displayed. 3 Press ∂/ƒ to select... the background image you to select the image displayed when no signal is recommended that the lamp be replaced after 1,400 hours of Background Images Selected item Sharp Custom Blue None Background image SHARP default image User customized image (i.e.

Operation Manual
Page 39
... of use or when you notice a significant deterioration of the picture and color quality. Maintenance & Troubleshooting • The lamp usage time can vary significantly, the projector lamp may have the lamp replaced at your nearest Authorized Sharp Industrial LCD Products Dealer or Service Center for over 1,400 hours. After turning off and then turned on...
... of use or when you notice a significant deterioration of the picture and color quality. Maintenance & Troubleshooting • The lamp usage time can vary significantly, the projector lamp may have the lamp replaced at your nearest Authorized Sharp Industrial LCD Products Dealer or Service Center for over 1,400 hours. After turning off and then turned on...

Operation Manual
Page 40
... or Service Center, please call toll-free: 1-800-BE-SHARP (1-800-237-4277). CUSTOMERS: The lamp included with this projector under warranty, including lamp replacement, must be obtained through an Authorized Sharp Industrial LCD Products Dealer or Service Center. Press POWER OFF. If the new lamp does not light after operation of the projector. • To...
... or Service Center, please call toll-free: 1-800-BE-SHARP (1-800-237-4277). CUSTOMERS: The lamp included with this projector under warranty, including lamp replacement, must be obtained through an Authorized Sharp Industrial LCD Products Dealer or Service Center. Press POWER OFF. If the new lamp does not light after operation of the projector. • To...

Operation Manual
Page 41
Refer to the information that the lamp timer is reset. Ł • Reset the lamp timer only after replacing the lamp. Picture appears but no sound is not plugged into the AC socket of the projector. E-40 Maintenance & Troubleshooting Picture is occasionally heard from ...19.) • If the picture is normal, the sound is too long or too short to secure the projector. Replacing the Projection Lamp Resetting the lamp timer 1 Connect the power cord. 2 Reset the lamp timer. While pressing ƒ, © and ENTER on the projector, turn on how to use with the system...
Refer to the information that the lamp timer is reset. Ł • Reset the lamp timer only after replacing the lamp. Picture appears but no sound is not plugged into the AC socket of the projector. E-40 Maintenance & Troubleshooting Picture is occasionally heard from ...19.) • If the picture is normal, the sound is too long or too short to secure the projector. Replacing the Projection Lamp Resetting the lamp timer 1 Connect the power cord. 2 Reset the lamp timer. While pressing ƒ, © and ENTER on the projector, turn on how to use with the system...

Operation Manual
Page 46
Specifications Product type LCD Projector Model XG-NV5XB Video system PAL/SECAM/NTSC 3.58/NTSC 4.43 Display method LCD panel ן3, RGB optical shutter method LCD panel ...Lens cap (attached), Carrying bag, CDROM, LCD projector operation manual, LCD projector quick reference, Sharp Advanced Presentation Software operation manual, Sharp Advanced Presentation Software quick reference, IrDA driver installation instruction sheet Replacement parts Lamp unit (Lamp/cage module) (BQC-XGNV5XB/1) "Power" remote control (RRMCG1470CESA), Simple presentation remote control (RRMCG1480CESA),...
Specifications Product type LCD Projector Model XG-NV5XB Video system PAL/SECAM/NTSC 3.58/NTSC 4.43 Display method LCD panel ן3, RGB optical shutter method LCD panel ...Lens cap (attached), Carrying bag, CDROM, LCD projector operation manual, LCD projector quick reference, Sharp Advanced Presentation Software operation manual, Sharp Advanced Presentation Software quick reference, IrDA driver installation instruction sheet Replacement parts Lamp unit (Lamp/cage module) (BQC-XGNV5XB/1) "Power" remote control (RRMCG1470CESA), Simple presentation remote control (RRMCG1480CESA),...
Operation Manual
Page 53
... INPUT button 19 Input signal confirmation 19 Intelligent compression 5 I/P conversion 31 IrCOM 22 IrDA 47 IrTran-P 47 K Kensington Security Standard connector 40 KEYSTONE button 14 L LAMP REPLACEMENT indicator 38 Language selection 23 LASER POINTER button 11 LEFT-CLICK button 11 Lens cap 41 M Macintosh adaptor 16 MAIN POWER switch 18 MENU button...
... INPUT button 19 Input signal confirmation 19 Intelligent compression 5 I/P conversion 31 IrCOM 22 IrDA 47 IrTran-P 47 K Kensington Security Standard connector 40 KEYSTONE button 14 L LAMP REPLACEMENT indicator 38 Language selection 23 LASER POINTER button 11 LEFT-CLICK button 11 Lens cap 41 M Macintosh adaptor 16 MAIN POWER switch 18 MENU button...


