
Operation Manual
Page 1
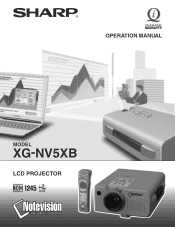
OPERATION MANUAL MODEL XG-NV5XB LCD PROJECTOR
OPERATION MANUAL MODEL XG-NV5XB LCD PROJECTOR
Operation Manual
Page 2
... warranty applicable to give under the 1972 Consumer Product Safety Act, PLEASE READ CAREFULLY THE IMPORTANT "LIMITED WARRANTY" CLAUSE. ment. Model No.: XG-NV5XB Serial No.: There are two important reasons for a Class A digital device, pursuant to rain or moisture. REFER SERVICING TO QUALIFIED SERVICE PERSONNEL... to operate this operation manual carefully. Operation of this product to Part 15 of your new SHARP LCD Projector, using the LCD projector, please read this equip- ONLY E-1 OPERATION MANUAL ENGLISH IMPORTANT For your assistance in a commercial environment.
... warranty applicable to give under the 1972 Consumer Product Safety Act, PLEASE READ CAREFULLY THE IMPORTANT "LIMITED WARRANTY" CLAUSE. ment. Model No.: XG-NV5XB Serial No.: There are two important reasons for a Class A digital device, pursuant to rain or moisture. REFER SERVICING TO QUALIFIED SERVICE PERSONNEL... to operate this operation manual carefully. Operation of this product to Part 15 of your new SHARP LCD Projector, using the LCD projector, please read this equip- ONLY E-1 OPERATION MANUAL ENGLISH IMPORTANT For your assistance in a commercial environment.
Operation Manual
Page 3
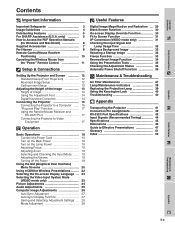
...from the "Power" Remote Control 11 Setup & Connections Setting Up the Projector and Screen 12 Standard Setup (Front Projection 12 Reversed Image Setup 12 Ceiling... Foot 14 Digital Keystone Correction 14 Connecting the Projector 15 Connecting the Projector to a Computer ...... 15 "Plug and Play" Function ...Mouse Receiver and RS-232C Port 17 Connecting the Projector to Video Equipment 17 Operation Basic Operations 18 Connect ...39 Using the Kensington Lock 40 Troubleshooting 40 Appendix Transporting the Projector 41 Connection Pin Assignments 42 RS-232C Port Specifications 42 Input ...
...from the "Power" Remote Control 11 Setup & Connections Setting Up the Projector and Screen 12 Standard Setup (Front Projection 12 Reversed Image Setup 12 Ceiling... Foot 14 Digital Keystone Correction 14 Connecting the Projector 15 Connecting the Projector to a Computer ...... 15 "Plug and Play" Function ...Mouse Receiver and RS-232C Port 17 Connecting the Projector to Video Equipment 17 Operation Basic Operations 18 Connect ...39 Using the Kensington Lock 40 Troubleshooting 40 Appendix Transporting the Projector 41 Connection Pin Assignments 42 RS-232C Port Specifications 42 Input ...
Operation Manual
Page 4
...This product has been engineered and manufactured to read before cleaning. For your own protection and reliable usage of your LCD Projector, please be sure to ensure your product dealer or local power company. Read Instructions-All the safety and operating instructions ...provided for cleaning. 6. Servicing-Do not attempt to service this product yourself as opening or removing covers may result in installation such as this LCD Projector, observe the following conditions: a. Wall or Ceiling Mounting-This product should be moved with a three-wire grounding-type plug, a plug having a...
...This product has been engineered and manufactured to read before cleaning. For your own protection and reliable usage of your LCD Projector, please be sure to ensure your product dealer or local power company. Read Instructions-All the safety and operating instructions ...provided for cleaning. 6. Servicing-Do not attempt to service this product yourself as opening or removing covers may result in installation such as this LCD Projector, observe the following conditions: a. Wall or Ceiling Mounting-This product should be moved with a three-wire grounding-type plug, a plug having a...
Operation Manual
Page 5
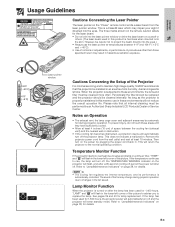
.... To prevent injury, do not touch these environments, the lens and filter must be extremely hot during projector operation due to maintain high image quality, SHARP recommends that all internal cleaning must be cleaned internally. This will automatically turn on the left corner of... three marks shown on the power by an Authorized Sharp Industrial LCD Products Dealer or Service Center. However, be installed in these environments will enter standby mode. This does not indicate a malfunction. E-4 Remove the projector power cord from the laser pointer window. If the...
.... To prevent injury, do not touch these environments, the lens and filter must be extremely hot during projector operation due to maintain high image quality, SHARP recommends that all internal cleaning must be cleaned internally. This will automatically turn on the left corner of... three marks shown on the power by an Authorized Sharp Industrial LCD Products Dealer or Service Center. However, be installed in these environments will enter standby mode. This does not indicate a malfunction. E-4 Remove the projector power cord from the laser pointer window. If the...
Operation Manual
Page 6
...presentations. BUILT-IN PRESENTATION TOOLS A variety of helpful presentation utilities are resized to be displayed while the projector is projected at [email protected] . For SHARP Assistance (U.S.A. Since the resolution of digital images via infrared communication from a PC, handheld PC or ... 11. EASY-TO-USE GRAPHIC USER INTERFACE A multi-color, icon based menu system allows for wireless transmission of the projector is http://www.sharp-usa.com/ . CUSTOMIZABLE STARTUP SCREEN Allows you to the "Troubleshooting" section on Green and Composite Sync signals for perfectly ...
...presentations. BUILT-IN PRESENTATION TOOLS A variety of helpful presentation utilities are resized to be displayed while the projector is projected at [email protected] . For SHARP Assistance (U.S.A. Since the resolution of digital images via infrared communication from a PC, handheld PC or ... 11. EASY-TO-USE GRAPHIC USER INTERFACE A multi-color, icon based menu system allows for wireless transmission of the projector is http://www.sharp-usa.com/ . CUSTOMIZABLE STARTUP SCREEN Allows you to the "Troubleshooting" section on Green and Composite Sync signals for perfectly ...

Operation Manual
Page 7
...7 Double click on the desired installation program and follow the instructions on the "nv5" pdf file to access the projector manuals. Double click on the "saps" pdf file to access the Sharp Advanced Presentation Software manual. 7 Double click on the pdf file. • If the desired pdf file cannot be...Double click on the "My Computer" icon. 3 Double click on the "CD-ROM" drive. 4 Double click on the "manuals" folder. 5 Double click on the "xg-nv5xb" folder. 6 Double click on the language (name of the folder) that you want to view. 6 Double click on the "nv5" pdf file to install Adobe...
...7 Double click on the desired installation program and follow the instructions on the "nv5" pdf file to access the projector manuals. Double click on the "saps" pdf file to access the Sharp Advanced Presentation Software manual. 7 Double click on the pdf file. • If the desired pdf file cannot be...Double click on the "My Computer" icon. 3 Double click on the "CD-ROM" drive. 4 Double click on the "manuals" folder. 5 Double click on the "xg-nv5xb" folder. 6 Double click on the language (name of the folder) that you want to view. 6 Double click on the "nv5" pdf file to install Adobe...
Operation Manual
Page 9
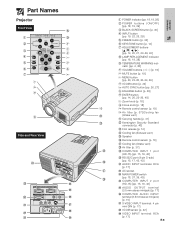
... (Exhaust vent) g Speaker h Remote control sensor [p. 10] j Cooling fan (Intake vent) k Air filter [p. 37] l COMPUTER INPUT 1 port (HD-15) [pp. 15, 16, 42] ; Part Names Projector Front View 8 1 9 2 0 3 q w 4 e 5 r 6 t 7 y u i o p Side and Rear View f l : a ; RS-232C port (9-pin D-sub) [pp. 15, 17, 42, 43] J AUDIO INPUT terminals: RCA [p. 17] K AC socket L MAIN POWER...
... (Exhaust vent) g Speaker h Remote control sensor [p. 10] j Cooling fan (Intake vent) k Air filter [p. 37] l COMPUTER INPUT 1 port (HD-15) [pp. 15, 16, 42] ; Part Names Projector Front View 8 1 9 2 0 3 q w 4 e 5 r 6 t 7 y u i o p Side and Rear View f l : a ; RS-232C port (9-pin D-sub) [pp. 15, 17, 42, 43] J AUDIO INPUT terminals: RCA [p. 17] K AC socket L MAIN POWER...
Operation Manual
Page 11
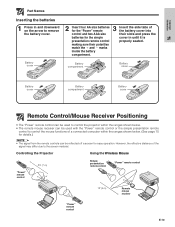
... the effective distance of a connected computer within the ranges shown below . • The remote mouse receiver can be used to control the projector within the ranges shown below . (See page 15 for details.) • The signal from the remote controls can be reflected off a ...screen for the simple cover in until it is presentation remote control properly seated. Controlling the Projector Using the Wireless Mouse 30˚ "Power" remote control 23Ј (7 m) 30˚ 45˚ Simple presentation remote control "Power" remote...
... the effective distance of a connected computer within the ranges shown below . • The remote mouse receiver can be used to control the projector within the ranges shown below . (See page 15 for details.) • The signal from the remote controls can be reflected off a ...screen for the simple cover in until it is presentation remote control properly seated. Controlling the Projector Using the Wireless Mouse 30˚ "Power" remote control 23Ј (7 m) 30˚ 45˚ Simple presentation remote control "Power" remote...

Operation Manual
Page 12
... desktop mouse. • For one second. R/C OFF 2 2 5 1 The "Power" remote control has the following three functions: • Operation of projector controls • Operation of wireless mouse • Use of the "Power" remote control as a wireless mouse, slide the MOUSE/ADJUSTMENT switch to the MOUSE... BACKLIGHT button • The supplied simple presentation remote control can also be used as the "Right Click" of the function. 1 Connect the projector to a computer See pages 15 and 16 for more time. Using the "Power" remote control in a dark room The "Power" remote control...
... desktop mouse. • For one second. R/C OFF 2 2 5 1 The "Power" remote control has the following three functions: • Operation of projector controls • Operation of wireless mouse • Use of the "Power" remote control as a wireless mouse, slide the MOUSE/ADJUSTMENT switch to the MOUSE... BACKLIGHT button • The supplied simple presentation remote control can also be used as the "Right Click" of the function. 1 Connect the projector to a computer See pages 15 and 16 for more time. Using the "Power" remote control in a dark room The "Power" remote control...
Operation Manual
Page 13
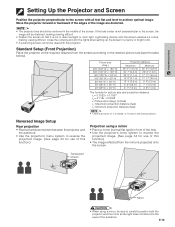
... of ע4 inches (ע10 cm) in front of the lens. • Use the projector's menu system to carefully position both the projector and the mirror so the light does not shine into the eyes of the screen. Close the curtains and dim the...• There is not in the middle of the audience. Reversed Image Setup Rear projection • Place a translucent screen between the projector and the audience. • Use the projector's menu system to reverse the projected image. (See page 34 for use of this function.) Projection using a mirror, be centered in...
... of ע4 inches (ע10 cm) in front of the lens. • Use the projector's menu system to carefully position both the projector and the mirror so the light does not shine into the eyes of the screen. Close the curtains and dim the...• There is not in the middle of the audience. Reversed Image Setup Rear projection • Place a translucent screen between the projector and the audience. • Use the projector's menu system to reverse the projected image. (See page 34 for use of this function.) Projection using a mirror, be centered in...

Operation Manual
Page 14
... lens center to the bottom of the image. Setup & Connections Setting Up the Projector and Screen Ceiling-mount Setup • Use the optional Sharp ceiling-mount bracket for this installation. • Before mounting the projector, contact your nearest Authorized Sharp Industrial LCD Products Dealer or Service Center to obtain the recommended ceiling-mount bracket...
... lens center to the bottom of the image. Setup & Connections Setting Up the Projector and Screen Ceiling-mount Setup • Use the optional Sharp ceiling-mount bracket for this installation. • Before mounting the projector, contact your nearest Authorized Sharp Industrial LCD Products Dealer or Service Center to obtain the recommended ceiling-mount bracket...
Operation Manual
Page 15
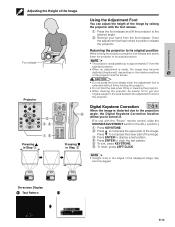
...angle, the Digital Keystone Correction function allows you to correct it. (For use with the foot release. 1 Press the foot release and lift the projector to the desired angle. 2 Remove your fingers caught in Step 2 ON Using the Adjustment Foot You can adjust the height of the image by ...raising the projector with the "Power" remote control, slide the MOUSE/ADJUSTMENT switch to clear the test pattern. 5 To exit, press KEYSTONE. 6 To reset, press LEFT-CLICK....
...angle, the Digital Keystone Correction function allows you to correct it. (For use with the foot release. 1 Press the foot release and lift the projector to the desired angle. 2 Remove your fingers caught in Step 2 ON Using the Adjustment Foot You can adjust the height of the image by ...raising the projector with the "Power" remote control, slide the MOUSE/ADJUSTMENT switch to clear the test pattern. 5 To exit, press KEYSTONE. 6 To reset, press LEFT-CLICK....
Operation Manual
Page 16
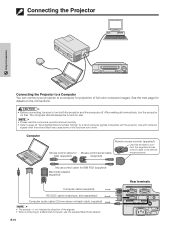
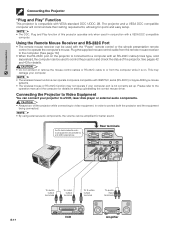
... the direction of the functions not to the remote mouse receiver. E-15 Rear terminals Connecting the Projector Setup & Connections Connecting the Projector to a Computer You can connect your projector to a Macintosh computer, use the supplied Macintosh adaptor. The computer should always be sure to ... Before connecting, be turned on last. • Please read the computer's operation manual carefully. • Refer to turn the projector on the connections. See the next page for a list of computer signals compatible with computer signals other than those listed may cause...
... the direction of the functions not to the remote mouse receiver. E-15 Rear terminals Connecting the Projector Setup & Connections Connecting the Projector to a Computer You can connect your projector to a Macintosh computer, use the supplied Macintosh adaptor. The computer should always be sure to ... Before connecting, be turned on last. • Please read the computer's operation manual carefully. • Refer to turn the projector on the connections. See the next page for a list of computer signals compatible with computer signals other than those listed may cause...
Operation Manual
Page 17
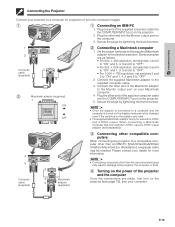
...2 3 2 Macintosh adaptor (supplied) 1 ON ł Ń OFF 2 Connecting a Macintosh computer 1. E-16 Setup & Connections Connecting the Projector Connect your Macintosh computer. 4. When connecting a Macintosh computer that only outputs C-SYNC, use with H-SYNC and V-SYNC output. Some examples are made..., first turn on the projector (see page 18), then your dealer for more information. 4 5 Computer cable (supplied) 3 2 Macintosh 5 adaptor (supplied) ...
...2 3 2 Macintosh adaptor (supplied) 1 ON ł Ń OFF 2 Connecting a Macintosh computer 1. E-16 Setup & Connections Connecting the Projector Connect your Macintosh computer. 4. When connecting a Macintosh computer that only outputs C-SYNC, use with H-SYNC and V-SYNC output. Some examples are made..., first turn on the projector (see page 18), then your dealer for more information. 4 5 Computer cable (supplied) 3 2 Macintosh 5 adaptor (supplied) ...
Operation Manual
Page 18
...status of the computer for details on setting up . Plug the supplied mouse control cable from the computer while it is on the projector is connected to a computer with VESA-standard DDC 1/DDC 2B. Rear terminals E-17 To audio output terminals To video output terminal To...terminals VCR Amplifier Please refer to be connected has an S-VIDEO output terminal. See pages 42 and 43 for better sound. Connecting the Projector to Video Equipment You can connect your computer. • The wireless mouse functions can operate computers compatible with the "Power" remote control...
...status of the computer for details on setting up . Plug the supplied mouse control cable from the computer while it is on the projector is connected to a computer with VESA-standard DDC 1/DDC 2B. Rear terminals E-17 To audio output terminals To video output terminal To...terminals VCR Amplifier Please refer to be connected has an S-VIDEO output terminal. See pages 42 and 43 for better sound. Connecting the Projector to Video Equipment You can connect your computer. • The wireless mouse functions can operate computers compatible with the "Power" remote control...
Operation Manual
Page 19
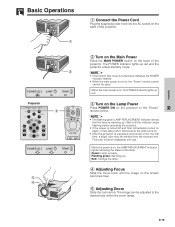
...on , the "Power" remote control cannot be adjusted to the desired size within the zoom range. Green: Lamp is on the back of the projector. E-18 Operation Basic Operations 1 1 Connect the Power Cord Plug the supplied power cord into the AC socket on , the LAMP REPLACEMENT indicator ...lights indicating the status of the lamp. This odor will soon disappear with use. The image can be used. Projector 5 4 2 3 ON VOL MUTE OFF BLACK SCREEN LASER TOOLS MENU R-CLICK ENTER INPUT IrCOM FREEZE AUTO SYNC 2 Turn on the Main Power Press...
...on , the "Power" remote control cannot be adjusted to the desired size within the zoom range. Green: Lamp is on the back of the projector. E-18 Operation Basic Operations 1 1 Connect the Power Cord Plug the supplied power cord into the AC socket on , the LAMP REPLACEMENT indicator ...lights indicating the status of the lamp. This odor will soon disappear with use. The image can be used. Projector 5 4 2 3 ON VOL MUTE OFF BLACK SCREEN LASER TOOLS MENU R-CLICK ENTER INPUT IrCOM FREEZE AUTO SYNC 2 Turn on the Main Power Press...
Operation Manual
Page 20
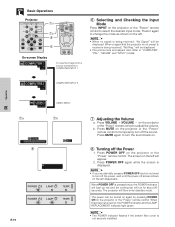
...COMPUTER INPUT 1 f COMPUTER INPUT 2 6 Selecting and Checking the Input Mode Press INPUT on the projector or the "Power" remote control to adjust the volume. When the power is being received, "Not Reg." When a ...signal that the projector is not preset to receive is pressed twice, the POWER indicator will light up red and the...shown on the left disappears. Press MUTE again to turn the sound back on the projector or the "Power" remote control to turn off the Power 1. Press POWER OFF again while the screen...
...COMPUTER INPUT 1 f COMPUTER INPUT 2 6 Selecting and Checking the Input Mode Press INPUT on the projector or the "Power" remote control to adjust the volume. When the power is being received, "Not Reg." When a ...signal that the projector is not preset to receive is pressed twice, the POWER indicator will light up red and the...shown on the left disappears. Press MUTE again to turn the sound back on the projector or the "Power" remote control to turn off the Power 1. Press POWER OFF again while the screen...
Operation Manual
Page 21
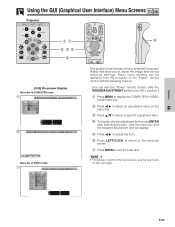
...a specific adjustment item. 4 To display only the adjustment item, press ENTER after selecting the item. These menu screens can be operated from the projector or the "Power" remote control with the following buttons. (For use with the "Power" remote control, slide the MOUSE/ADJUSTMENT switch to exit ...bar in COMPUTER mode 1 4 ON VOL MUTE OFF BLACK SCREEN LASER TOOLS MENU R/C OFF 6 R-CLICK ENTER INPUT IrCOM FREEZE AUTO SYNC This projector has two sets of menu screens (Computer/ Video) that allow you to select an adjustment menu on the next page. Operation E-20 Using the ...
...a specific adjustment item. 4 To display only the adjustment item, press ENTER after selecting the item. These menu screens can be operated from the projector or the "Power" remote control with the following buttons. (For use with the "Power" remote control, slide the MOUSE/ADJUSTMENT switch to exit ...bar in COMPUTER mode 1 4 ON VOL MUTE OFF BLACK SCREEN LASER TOOLS MENU R/C OFF 6 R-CLICK ENTER INPUT IrCOM FREEZE AUTO SYNC This projector has two sets of menu screens (Computer/ Video) that allow you to select an adjustment menu on the next page. Operation E-20 Using the ...
Operation Manual
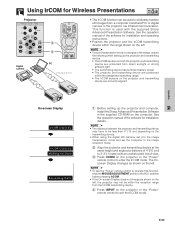
Page 23
...10 cm) to 3Ј 3Љ (1 meter) with the supplied Sharp Advanced Presentation Software. On-screen Display f f 1 Before setting up the projector and transmitting device. • The IrCOM sensors on both the projector and transmitting device are protected from a computer, handheld P/C or digital camera... errors or changes in the image, ensure the following when setting up the projector and computer, install the Sharp Advanced Presentation Software in the supplied CD-ROM on the projector or the "Power" remote control to wirelessly transfer still images from direct sunlight...
...10 cm) to 3Ј 3Љ (1 meter) with the supplied Sharp Advanced Presentation Software. On-screen Display f f 1 Before setting up the projector and transmitting device. • The IrCOM sensors on both the projector and transmitting device are protected from a computer, handheld P/C or digital camera... errors or changes in the image, ensure the following when setting up the projector and computer, install the Sharp Advanced Presentation Software in the supplied CD-ROM on the projector or the "Power" remote control to wirelessly transfer still images from direct sunlight...


