
Operation Manual
Page 2
... assistance in the literature accompanying the product. NO USER-SERVICEABLE PARTS EXCEPT LAMP UNIT. ONLY INFORMATION This equipment has been tested and found to correct ...of sufficient magnitude to constitute a risk or electric shock to your new SHARP LCD Projector, using the LCD projector, please read this equip- U.S.A. U.S.A. U.S.A. WARNING: To reduce the risk... or moisture. WARNING: FCC Regulations state that SHARP may be required to operate this operation manual carefully. Model No.: XG-NV5XB Serial No.: There are two important reasons for...
... assistance in the literature accompanying the product. NO USER-SERVICEABLE PARTS EXCEPT LAMP UNIT. ONLY INFORMATION This equipment has been tested and found to correct ...of sufficient magnitude to constitute a risk or electric shock to your new SHARP LCD Projector, using the LCD projector, please read this equip- U.S.A. U.S.A. U.S.A. WARNING: To reduce the risk... or moisture. WARNING: FCC Regulations state that SHARP may be required to operate this operation manual carefully. Model No.: XG-NV5XB Serial No.: There are two important reasons for...
Operation Manual
Page 3
... SHARP Assistance (U.S.A. only 5 How to Access the PDF Operation Manuals (for Windows and Macintosh 6 Supplied Accessories 7 Part Names 8 Remote Control/Mouse Receiver Positioning 10 Operating the Wireless Mouse from the "Power" Remote Control 11 Setup & Connections Setting Up the Projector and... Shutoff Function 36 Maintenance & Troubleshooting Air Filter Maintenance 37 Lamp/Maintenance Indicators 38 Replacing the Projection Lamp 39 Using the Kensington Lock 40 Troubleshooting 40 Appendix Transporting the Projector 41 Connection Pin Assignments 42 RS-232C Port Specifications 42 ...
... SHARP Assistance (U.S.A. only 5 How to Access the PDF Operation Manuals (for Windows and Macintosh 6 Supplied Accessories 7 Part Names 8 Remote Control/Mouse Receiver Positioning 10 Operating the Wireless Mouse from the "Power" Remote Control 11 Setup & Connections Setting Up the Projector and... Shutoff Function 36 Maintenance & Troubleshooting Air Filter Maintenance 37 Lamp/Maintenance Indicators 38 Replacing the Projection Lamp 39 Using the Kensington Lock 40 Troubleshooting 40 Appendix Transporting the Projector 41 Connection Pin Assignments 42 RS-232C Port Specifications 42 ...
Operation Manual
Page 5
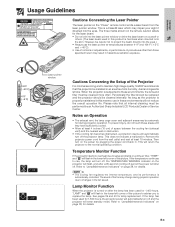
...on after a 90-second cooling-off the projector lamp. Then turn off . This will shut off and the projector will flash in the lower-left corner of the picture to advise you to maintain high image quality, SHARP recommends that all internal cleaning must be installed... filter should be replaced and the projector should be extremely hot during projector operation due to the normal operating condition. Temperature Monitor Function If the projector starts to overheat due to "Lamp/Maintenance Indicators" on the power by an Authorized Sharp Industrial LCD Products Dealer or Service...
...on after a 90-second cooling-off the projector lamp. Then turn off . This will shut off and the projector will flash in the lower-left corner of the picture to advise you to maintain high image quality, SHARP recommends that all internal cleaning must be installed... filter should be replaced and the projector should be extremely hot during projector operation due to the normal operating condition. Temperature Monitor Function If the projector starts to overheat due to "Lamp/Maintenance Indicators" on the power by an Authorized Sharp Industrial LCD Products Dealer or Service...
Operation Manual
Page 9
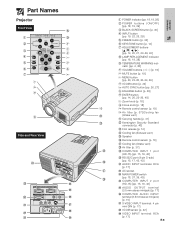
... 30] 4 INPUT button [pp. 19, 22, 26, 29] 5 FREEZE button [p. 33] 6 KEYSTONE button [p. 14] 7 ADJUSTMENT buttons pp. 14, 20, 21, 23-36, 40] 8 LAMP REPLACEMENT indicator [pp. 18, 19, 38] 9 TEMPERATURE WARNING indicator [pp. 4, 38] 0 VOLUME buttons p. 19] q MUTE button [p. 19] w MENU button [pp. 20, 23-28, 30-... stereo minijack) [p. 15] d S-VIDEO INPUT terminal: 4 pin mini DIN [p. 17] f IrCOM sensor [p. 22] g VIDEO INPUT terminal: RCA [p. 17] E-8 Important Information Part Names Projector Front View 8 1 9 2 0 3 q w 4 e 5 r 6 t 7 y u i o p Side and Rear View f l : a ;
... 30] 4 INPUT button [pp. 19, 22, 26, 29] 5 FREEZE button [p. 33] 6 KEYSTONE button [p. 14] 7 ADJUSTMENT buttons pp. 14, 20, 21, 23-36, 40] 8 LAMP REPLACEMENT indicator [pp. 18, 19, 38] 9 TEMPERATURE WARNING indicator [pp. 4, 38] 0 VOLUME buttons p. 19] q MUTE button [p. 19] w MENU button [pp. 20, 23-28, 30-... stereo minijack) [p. 15] d S-VIDEO INPUT terminal: 4 pin mini DIN [p. 17] f IrCOM sensor [p. 22] g VIDEO INPUT terminal: RCA [p. 17] E-8 Important Information Part Names Projector Front View 8 1 9 2 0 3 q w 4 e 5 r 6 t 7 y u i o p Side and Rear View f l : a ;
Operation Manual
Page 19
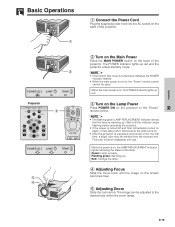
... range. Flashing green: Warming up . E-18 Red: Change the lamp. 4 Adjusting Focus Slide the focus knob until the indicator stops flashing before the lamp turns on , the POWER indicator lights up red and the projector enters standby mode. • If the bottom filter cover is not... exhaust vent. Wait until the image on , the LAMP REPLACEMENT indicator lights indicating the status of the lamp. Operation Basic Operations 1 1 Connect the Power Cord Plug the supplied power cord into the AC socket on the back of the projector. Projector 5 4 2 3 ON VOL MUTE OFF BLACK SCREEN...
... range. Flashing green: Warming up . E-18 Red: Change the lamp. 4 Adjusting Focus Slide the focus knob until the indicator stops flashing before the lamp turns on , the POWER indicator lights up red and the projector enters standby mode. • If the bottom filter cover is not... exhaust vent. Wait until the image on , the LAMP REPLACEMENT indicator lights indicating the status of the lamp. Operation Basic Operations 1 1 Connect the Power Cord Plug the supplied power cord into the AC socket on the back of the projector. Projector 5 4 2 3 ON VOL MUTE OFF BLACK SCREEN...
Operation Manual
Page 20
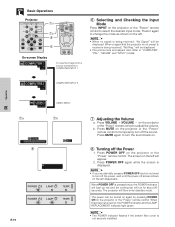
...To view the image from a source connected to: s COMPUTER INPUT 1 f COMPUTER INPUT 2 6 Selecting and Checking the Input Mode Press INPUT on the projector or the "Power" remote control to change the mode as shown on the left. • When no signal is being received, "Not Reg." will... left will be turned on again by pressing POWER ON on , the POWER indicator and the LAMP REPLACEMENT indicator light green. • The POWER indicator flashes if the bottom filter cover is turned on the projector or the "Power" remote control. f VIDEO INPUT Operation 7a 7b 8 E-19 7 Adjusting ...
...To view the image from a source connected to: s COMPUTER INPUT 1 f COMPUTER INPUT 2 6 Selecting and Checking the Input Mode Press INPUT on the projector or the "Power" remote control to change the mode as shown on the left. • When no signal is being received, "Not Reg." will... left will be turned on again by pressing POWER ON on , the POWER indicator and the LAMP REPLACEMENT indicator light green. • The POWER indicator flashes if the bottom filter cover is turned on the projector or the "Power" remote control. f VIDEO INPUT Operation 7a 7b 8 E-19 7 Adjusting ...

Operation Manual
Page 33
...8226; It is being sent to the ADJ. Useful Features Setting a Background Image MOUSE ADJ. Please see the Sharp Advanced Presentation Software's operation manual for lamp replacement. • In VIDEO mode, the resolution and frequency settings will be displayed. 3 Press ∂/ƒ ... must be displayed. company logo) Blue screen Black screen (For use with the "Power" remote control, slide the MOUSE/ADJUSTMENT switch to the projector. position.) 1 Press MENU. 2 Press ß/© to select "Options". 3 Press ∂/ƒ to select "Background", and then press...
...8226; It is being sent to the ADJ. Useful Features Setting a Background Image MOUSE ADJ. Please see the Sharp Advanced Presentation Software's operation manual for lamp replacement. • In VIDEO mode, the resolution and frequency settings will be displayed. 3 Press ∂/ƒ ... must be displayed. company logo) Blue screen Black screen (For use with the "Power" remote control, slide the MOUSE/ADJUSTMENT switch to the projector. position.) 1 Press MENU. 2 Press ß/© to select "Options". 3 Press ∂/ƒ to select "Background", and then press...

Operation Manual
Page 39
... off . It is open. Maintenance & Troubleshooting • The lamp usage time can be checked with proper ventilation. • Clean the filter. (See page 37.) • Take the projector to your nearest Authorized Sharp Industrial LCD Products Dealer or Service Center for 1,500 hours. E-38... the On-screen Display (see page 32). • As the usage environment can vary significantly, the projector lamp may have the lamp replaced at your nearest Authorized Sharp Industrial LCD Products Dealer or Service Center for approximately 1,500 cumulative hours, depending on . The power will...
... off . It is open. Maintenance & Troubleshooting • The lamp usage time can be checked with proper ventilation. • Clean the filter. (See page 37.) • Take the projector to your nearest Authorized Sharp Industrial LCD Products Dealer or Service Center for 1,500 hours. E-38... the On-screen Display (see page 32). • As the usage environment can vary significantly, the projector lamp may have the lamp replaced at your nearest Authorized Sharp Industrial LCD Products Dealer or Service Center for approximately 1,500 cumulative hours, depending on . The power will...

Operation Manual
Page 40
... projector. Press the lamp cage firmly into the lamp cage compartment. Slide the lamp cage cover in . Replacing the Projection Lamp It is recommended that secures the lamp cage cover. CUSTOMERS: The lamp included with this projector under warranty, including lamp replacement, must be obtained through an Authorized Sharp... Before or after operation of the picture and color quality. Turn over the projector and unfasten the user service screw that the lamp be sure to the nearest Authorized Sharp Industrial LCD Products Dealer or Service Center for cleaning the air filters. 1 Turn...
... projector. Press the lamp cage firmly into the lamp cage compartment. Slide the lamp cage cover in . Replacing the Projection Lamp It is recommended that secures the lamp cage cover. CUSTOMERS: The lamp included with this projector under warranty, including lamp replacement, must be obtained through an Authorized Sharp... Before or after operation of the picture and color quality. Turn over the projector and unfasten the user service screw that the lamp be sure to the nearest Authorized Sharp Industrial LCD Products Dealer or Service Center for cleaning the air filters. 1 Turn...

Operation Manual
Page 41
...to the section "Troubleshooting" in the operation manual of the projector. Color is reset. Ł • Reset the lamp timer only after replacing the lamp. This will not affect operation or performance. • Refer to "Lamp/Maintenance Indicators" on , creating a black image. (See ...page 18.) • Projection distance is due to secure the projector. Data cannot be received via IrCOM. Replacing the Projection Lamp Resetting the lamp timer 1 Connect the power cord. 2 Reset the lamp timer. "LAMP 0000H" is displayed, indicating that came with a Kensington MicroSaver ...
...to the section "Troubleshooting" in the operation manual of the projector. Color is reset. Ł • Reset the lamp timer only after replacing the lamp. This will not affect operation or performance. • Refer to "Lamp/Maintenance Indicators" on , creating a black image. (See ...page 18.) • Projection distance is due to secure the projector. Data cannot be received via IrCOM. Replacing the Projection Lamp Resetting the lamp timer 1 Connect the power cord. 2 Reset the lamp timer. "LAMP 0000H" is displayed, indicating that came with a Kensington MicroSaver ...

Operation Manual
Page 46
...Lens cap (attached), Carrying bag, CDROM, LCD projector operation manual, LCD projector quick reference, Sharp Advanced Presentation Software operation manual, Sharp Advanced Presentation Software quick reference, IrDA driver installation instruction sheet Replacement parts Lamp unit (Lamp/cage module) (BQC-XGNV5XB/1) "Power" remote ...Specifications are certain acceptable tolerances that the equipment must conform to change without notice. Specifications Product type LCD Projector Model XG-NV5XB Video system PAL/SECAM/NTSC 3.58/NTSC 4.43 Display method LCD panel ן3, RGB...
...Lens cap (attached), Carrying bag, CDROM, LCD projector operation manual, LCD projector quick reference, Sharp Advanced Presentation Software operation manual, Sharp Advanced Presentation Software quick reference, IrDA driver installation instruction sheet Replacement parts Lamp unit (Lamp/cage module) (BQC-XGNV5XB/1) "Power" remote ...Specifications are certain acceptable tolerances that the equipment must conform to change without notice. Specifications Product type LCD Projector Model XG-NV5XB Video system PAL/SECAM/NTSC 3.58/NTSC 4.43 Display method LCD panel ן3, RGB...


