
Operation Manual
Page 3
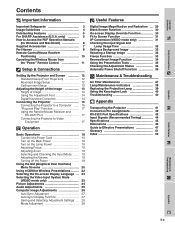
... Adjustment Foot 14 Digital Keystone Correction 14 Connecting the Projector 15 Connecting the Projector to a Computer ...... 15 "Plug and Play" Function 17 Using the Remote Mouse Receiver and RS-232C Port 17 Connecting the Projector to Video Equipment 17 Operation Basic Operations 18 Connect the Power Cord 18 Turn on... Glossary 51 Index 52 Useful Features Maintenance & Troubleshooting Appendix E-2 Important Information Setup & Connections Operation Contents Important Information Important Safeguards 3 Usage Guidelines 4 Outstanding Features 5 For SHARP Assistance (U.S.A.
... Adjustment Foot 14 Digital Keystone Correction 14 Connecting the Projector 15 Connecting the Projector to a Computer ...... 15 "Plug and Play" Function 17 Using the Remote Mouse Receiver and RS-232C Port 17 Connecting the Projector to Video Equipment 17 Operation Basic Operations 18 Connect the Power Cord 18 Turn on... Glossary 51 Index 52 Useful Features Maintenance & Troubleshooting Appendix E-2 Important Information Setup & Connections Operation Contents Important Information Important Safeguards 3 Usage Guidelines 4 Outstanding Features 5 For SHARP Assistance (U.S.A.
Operation Manual
Page 5
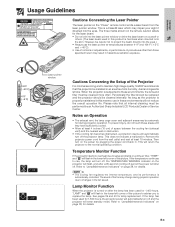
... in . Notes on Operation • The exhaust vent, the lamp cage cover and adjacent areas may change during projector operation. E-4 ONLY REMOTE CONTROL MODEL NO. : G1462CESA DC6V (1.5VX4PCS.) MADE IN JAPAN FABRIQUÉ AU JAPON AVOID EXPOSURE-LASER RADIATION IS EMITTED FROM THIS APERTURE..... This will shut off the projector lamp. Cautions Concerning the Laser Pointer The laser pointer on the power by an Authorized Sharp Industrial LCD Products Dealer or Service Center. When the projector is subjected to replace the lamp. Temperature Monitor Function If the ...
... in . Notes on Operation • The exhaust vent, the lamp cage cover and adjacent areas may change during projector operation. E-4 ONLY REMOTE CONTROL MODEL NO. : G1462CESA DC6V (1.5VX4PCS.) MADE IN JAPAN FABRIQUÉ AU JAPON AVOID EXPOSURE-LASER RADIATION IS EMITTED FROM THIS APERTURE..... This will shut off the projector lamp. Cautions Concerning the Laser Pointer The laser pointer on the power by an Authorized Sharp Industrial LCD Products Dealer or Service Center. When the projector is subjected to replace the lamp. Temperature Monitor Function If the ...
Operation Manual
Page 9
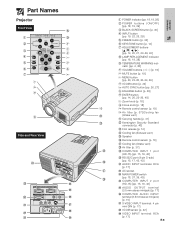
... button [p. 22] r AUTO SYNC button [pp. 26, 27] t ENLARGE button [p. 29] y ENTER button [pp. 14, 20, 23-36, 40] u Zoom knob [p. 18] i Focus knob [p. 18] o Remote control sensor [p. 10] p Air filter [p. 37]/Cooling fan (Intake vent) a Carrying handle [p. 41] s Kensington Security Standard connector [p. 40] d Foot release [p. 14] f Cooling fan (Exhaust vent...
... button [p. 22] r AUTO SYNC button [pp. 26, 27] t ENLARGE button [p. 29] y ENTER button [pp. 14, 20, 23-36, 40] u Zoom knob [p. 18] i Focus knob [p. 18] o Remote control sensor [p. 10] p Air filter [p. 37]/Cooling fan (Intake vent) a Carrying handle [p. 41] s Kensington Security Standard connector [p. 40] d Foot release [p. 14] f Cooling fan (Exhaust vent...
Operation Manual
Page 11
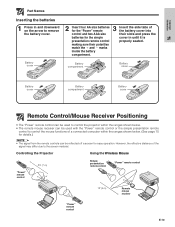
...within the ranges shown below. • The remote mouse receiver can be reflected off a screen for details.) • The signal from the remote controls can be used with the "Power" remote control or the simple presentation remote control to control the mouse functions of the ...8235; מmarks inside the battery compartment. Controlling the Projector Using the Wireless Mouse 30˚ "Power" remote control 23Ј (7 m) 30˚ 45˚ Simple presentation remote control "Power" remote control 30˚ 30˚ 30˚ 120˚ 45˚ 30˚ 13Ј...
...within the ranges shown below. • The remote mouse receiver can be reflected off a screen for details.) • The signal from the remote controls can be used with the "Power" remote control or the simple presentation remote control to control the mouse functions of the ...8235; מmarks inside the battery compartment. Controlling the Projector Using the Wireless Mouse 30˚ "Power" remote control 23Ј (7 m) 30˚ 45˚ Simple presentation remote control "Power" remote control 30˚ 30˚ 30˚ 120˚ 45˚ 30˚ 13Ј...

Operation Manual
Page 12
...more than one more than 10 minutes without operation, the power will automatically turn the power back on, press any button on the "Power" remote control to the MOUSE position. • To use of a standard desktop mouse. • For one-button mouse systems, use . position ... Operation of projector controls • Operation of wireless mouse • Use of MOUSE/ADJUSTMENT switch MOUSE ADJ. When the button is pressed, the remote buttons light up. Using the laser pointer Slide the MOUSE/ADJUSTMENT switch to the MOUSE position, and then press LASER POINTER ( ) to the...
...more than one more than 10 minutes without operation, the power will automatically turn the power back on, press any button on the "Power" remote control to the MOUSE position. • To use of a standard desktop mouse. • For one-button mouse systems, use . position ... Operation of projector controls • Operation of wireless mouse • Use of MOUSE/ADJUSTMENT switch MOUSE ADJ. When the button is pressed, the remote buttons light up. Using the laser pointer Slide the MOUSE/ADJUSTMENT switch to the MOUSE position, and then press LASER POINTER ( ) to the...
Operation Manual
Page 15
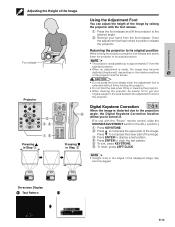
... foot has locked in Step 2 ON Using the Adjustment Foot You can adjust the height of the image by raising the projector with the "Power" remote control, slide the MOUSE/ADJUSTMENT switch to clear the test pattern. 5 To exit, press KEYSTONE. 6 To reset, press LEFT-CLICK. • Straight lines or the...
... foot has locked in Step 2 ON Using the Adjustment Foot You can adjust the height of the image by raising the projector with the "Power" remote control, slide the MOUSE/ADJUSTMENT switch to clear the test pattern. 5 To exit, press KEYSTONE. 6 To reset, press LEFT-CLICK. • Straight lines or the...
Operation Manual
Page 16
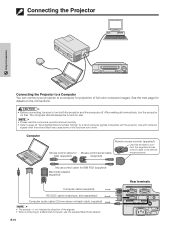
... manual carefully. • Refer to a computer for projection of full color computer images. Computer Mouse control cable for Mac (supplied) Mouse control serial cable (supplied) Remote mouse receiver (supplied) Use this terminal to connect the supplied mouse control cable to turn the projector on the connections. Connecting the Projector Setup & Connections... those listed may cause some of the functions not to a Macintosh computer, use the supplied Macintosh adaptor. The computer should always be sure to the remote mouse receiver.
... manual carefully. • Refer to a computer for projection of full color computer images. Computer Mouse control cable for Mac (supplied) Mouse control serial cable (supplied) Remote mouse receiver (supplied) Use this terminal to connect the supplied mouse control cable to turn the projector on the connections. Connecting the Projector Setup & Connections... those listed may cause some of the functions not to a Macintosh computer, use the supplied Macintosh adaptor. The computer should always be sure to the remote mouse receiver.
Operation Manual
Page 18
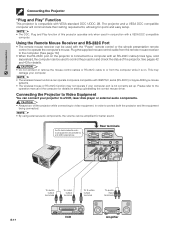
..."Plug and Play" Function This projector is compatible with the "Power" remote control or the simple presentation remote control to operate the computer's mouse. Using the Remote Mouse Receiver and RS-232C Port • The remote mouse receiver can operate computers compatible with a VESA DDC compatible computer. Please... on setting up . CAUTION • Do not connect or remove the mouse control cables or RS-232C cable to or from the remote mouse receiver to a VCR, laser disk player or external audio components. Connecting the Projector to protect both the projector and the equipment ...
..."Plug and Play" Function This projector is compatible with the "Power" remote control or the simple presentation remote control to operate the computer's mouse. Using the Remote Mouse Receiver and RS-232C Port • The remote mouse receiver can operate computers compatible with a VESA DDC compatible computer. Please... on setting up . CAUTION • Do not connect or remove the mouse control cables or RS-232C cable to or from the remote mouse receiver to a VCR, laser disk player or external audio components. Connecting the Projector to protect both the projector and the equipment ...
Operation Manual
Page 19
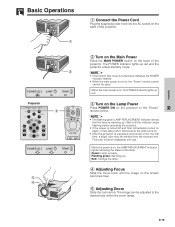
... lights up . Green: Lamp is warming up red. 3 Turn on the Lamp Power Press POWER ON on the projector or the "Power" remote control. • The flashing green LAMP REPLACEMENT indicator shows that the lamp is ready. Wait until the image on , the LAMP REPLACEMENT indicator lights... odor may take a short while before operating the projector. • If the power is turned off and then immediately turned on , the "Power" remote control cannot be used. E-18 This odor will soon disappear with use. Flashing green: Warming up red and the projector enters standby mode. • ...
... lights up . Green: Lamp is warming up red. 3 Turn on the Lamp Power Press POWER ON on the projector or the "Power" remote control. • The flashing green LAMP REPLACEMENT indicator shows that the lamp is ready. Wait until the image on , the LAMP REPLACEMENT indicator lights... odor may take a short while before operating the projector. • If the power is turned off and then immediately turned on , the "Power" remote control cannot be used. E-18 This odor will soon disappear with use. Flashing green: Warming up red and the projector enters standby mode. • ...
Operation Manual
Page 20
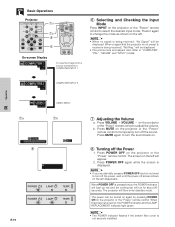
...signal is being received, "Not Reg." The power can be turned on again by pressing POWER ON on the projector or the "Power" remote control to adjust the volume. Basic Operations Projector 7a 7b 8 ON VOL MUTE OFF BLACK SCREEN LASER TOOLS MENU 6 On-screen Display ...from a source connected to: s COMPUTER INPUT 1 f COMPUTER INPUT 2 6 Selecting and Checking the Input Mode Press INPUT on the projector or the "Power" remote control. b. Press MUTE again to turn off the Power 1. When POWER OFF is not securely installed. f VIDEO INPUT Operation 7a 7b 8 E-19 7 ...
...signal is being received, "Not Reg." The power can be turned on again by pressing POWER ON on the projector or the "Power" remote control to adjust the volume. Basic Operations Projector 7a 7b 8 ON VOL MUTE OFF BLACK SCREEN LASER TOOLS MENU 6 On-screen Display ...from a source connected to: s COMPUTER INPUT 1 f COMPUTER INPUT 2 6 Selecting and Checking the Input Mode Press INPUT on the projector or the "Power" remote control. b. Press MUTE again to turn off the Power 1. When POWER OFF is not securely installed. f VIDEO INPUT Operation 7a 7b 8 E-19 7 ...
Operation Manual
Page 21
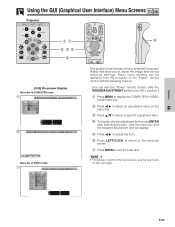
... item. 6 Press LEFT-CLICK to return to the previous screen. 7 Press MENU to exit from the projector or the "Power" remote control with the following buttons. (For use with the "Power" remote control, slide the MOUSE/ADJUSTMENT switch to the ADJ. Operation E-20 position.) 1 Press MENU to display the COMPUTER or VIDEO...
... item. 6 Press LEFT-CLICK to return to the previous screen. 7 Press MENU to exit from the projector or the "Power" remote control with the following buttons. (For use with the "Power" remote control, slide the MOUSE/ADJUSTMENT switch to the ADJ. Operation E-20 position.) 1 Press MENU to display the COMPUTER or VIDEO...
Operation Manual
Page 23
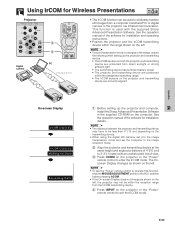
...function is used to wirelessly transfer still images from the IrCOM transmitting device. 4 Press INPUT on the projector or the "Power" remote control to exit the IrCOM mode. See the operation manual of the software for installation and operating instructions. • Position the ...8226; To avoid transmission errors or changes in the image, ensure the following when setting up the projector and computer, install the Sharp Advanced Presentation Software in the supplied CD-ROM on the computer. Operation Using IrCOM for installation details. • The distance between ...
...function is used to wirelessly transfer still images from the IrCOM transmitting device. 4 Press INPUT on the projector or the "Power" remote control to exit the IrCOM mode. See the operation manual of the software for installation and operating instructions. • Position the ...8226; To avoid transmission errors or changes in the image, ensure the following when setting up the projector and computer, install the Sharp Advanced Presentation Software in the supplied CD-ROM on the computer. Operation Using IrCOM for installation details. • The distance between ...
Operation Manual
Page 24
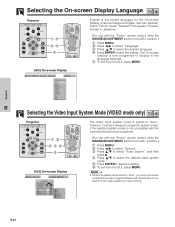
...(GUI) On-screen Display The video input system mode is not compatible with the connected audiovisual equipment. (For use with the "Power" remote control, slide the MOUSE/ADJUSTMENT switch to signal differences. Should this occur, switch to the video system you may not receive a clear ... can be changed to English, German, Spanish, Dutch, French, Italian, Swedish, Portuguese, Chinese, Korean or Japanese. (For use with the "Power" remote control, slide the MOUSE/ADJUSTMENT switch to "Auto", you are viewing. The On-screen Display is now programed to display in the language selected. 5 ...
...(GUI) On-screen Display The video input system mode is not compatible with the connected audiovisual equipment. (For use with the "Power" remote control, slide the MOUSE/ADJUSTMENT switch to signal differences. Should this occur, switch to the video system you may not receive a clear ... can be changed to English, German, Spanish, Dutch, French, Italian, Swedish, Portuguese, Chinese, Korean or Japanese. (For use with the "Power" remote control, slide the MOUSE/ADJUSTMENT switch to "Auto", you are viewing. The On-screen Display is now programed to display in the language selected. 5 ...
Operation Manual
Page 25
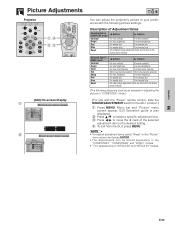
...The adjustments can adjust the projector's picture to your preferences with the "Power" remote control, slide the MOUSE/ADJUSTMENT switch to the ADJ. Operation E-24 Selected item in VIDEO mode Contrast Bright Color Tint Sharp Red Blue Reset ß button © button For less contrast For more ...brightness For more brightness For less color intensity For more color intensity Skin tones become purplish Skin tones become greenish For less sharpness For more brightness For weaker red For stronger red For weaker blue For stronger blue All computer image adjustment items are ...
...The adjustments can adjust the projector's picture to your preferences with the "Power" remote control, slide the MOUSE/ADJUSTMENT switch to the ADJ. Operation E-24 Selected item in VIDEO mode Contrast Bright Color Tint Sharp Red Blue Reset ß button © button For less contrast For more ...brightness For more brightness For less color intensity For more color intensity Skin tones become purplish Skin tones become greenish For less sharpness For more brightness For weaker red For stronger red For weaker blue For stronger blue All computer image adjustment items are ...
Operation Manual
Page 26
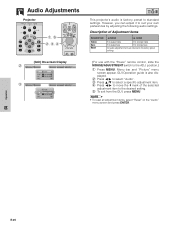
... For stronger treble For weaker bass For stronger bass All audio adjustment items are returned to the factory preset settings. (For use with the "Power" remote control, slide the MOUSE/ADJUSTMENT switch to the desired setting. 5 To exit from the GUI, press MENU. • To reset all adjustment items, select "Reset...
... For stronger treble For weaker bass For stronger bass All audio adjustment items are returned to the factory preset settings. (For use with the "Power" remote control, slide the MOUSE/ADJUSTMENT switch to the desired setting. 5 To exit from the GUI, press MENU. • To reset all adjustment items, select "Reset...
Operation Manual
Page 27
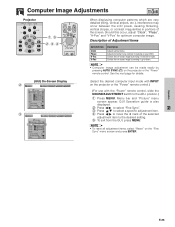
... details. (Select the desired computer input mode with INPUT on the projector or the "Power" remote control.) (For use with the "Power" remote control, slide the MOUSE/ADJUSTMENT switch to tracking on the projector or the "Power" remote control. GUI Operation guide is also displayed. 2 Press ß/© to select "Fine Sync". 3 Press...
... details. (Select the desired computer input mode with INPUT on the projector or the "Power" remote control.) (For use with the "Power" remote control, slide the MOUSE/ADJUSTMENT switch to tracking on the projector or the "Power" remote control. GUI Operation guide is also displayed. 2 Press ß/© to select "Fine Sync". 3 Press...
Operation Manual
Page 28
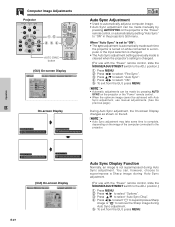
... ß/© to select "ON". 5 To exit from the GUI, press MENU. • Automatic adjustments can be achieved with the "Power" remote control, slide the MOUSE/ADJUSTMENT switch to superimpose a Sharp image during Auto Sync adjustment. 5 To exit from the GUI, press MENU. Auto Sync Display Function Normally, an image is changed...
... ß/© to select "ON". 5 To exit from the GUI, press MENU. • Automatic adjustments can be achieved with the "Power" remote control, slide the MOUSE/ADJUSTMENT switch to superimpose a Sharp image during Auto Sync adjustment. 5 To exit from the GUI, press MENU. Auto Sync Display Function Normally, an image is changed...

Operation Manual
Page 29
...is detected and the correct resolution mode (Text or Graphics) is automatically selected. Selecting a saved setting (For use with the "Power" remote control, slide the MOUSE/ADJUSTMENT switch to the projector. Saving and Selecting Adjustment Settings This projector allows you connect the computer to the ADJ...; ן400 lines or 1,152 dots ן864 lines, 60 Hz) or "OFF" for use with the "Power" remote control, slide the MOUSE/ADJUSTMENT switch to display image in the text and graphic modes. Computer Image Adjustments 2 Projector 1, 6 ON VOL MUTE OFF ...
...is detected and the correct resolution mode (Text or Graphics) is automatically selected. Selecting a saved setting (For use with the "Power" remote control, slide the MOUSE/ADJUSTMENT switch to the projector. Saving and Selecting Adjustment Settings This projector allows you connect the computer to the ADJ...; ן400 lines or 1,152 dots ן864 lines, 60 Hz) or "OFF" for use with the "Power" remote control, slide the MOUSE/ADJUSTMENT switch to display image in the text and graphic modes. Computer Image Adjustments 2 Projector 1, 6 ON VOL MUTE OFF ...
Operation Manual
Page 30
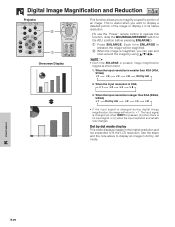
... the note above to display an image in dot by dot mode display This mode displays images in its native resolution. (To use the "Power" remote control to operate this function, slide the MOUSE/ADJUSTMENT switch to ן1. This is pressed, the image will return to the ADJ. Useful...
... the note above to display an image in dot by dot mode display This mode displays images in its native resolution. (To use the "Power" remote control to operate this function, slide the MOUSE/ADJUSTMENT switch to ן1. This is pressed, the image will return to the ADJ. Useful...
Operation Manual
Page 31
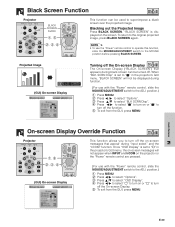
... to select " " to turn off the On-screen Display The On-screen Display ("BLACK SCREEN") that appear during function. (For use with the "Power" remote control, slide the MOUSE/ADJUSTMENT switch to the ADJ. "BLACK SCREEN" is set to " " in the projector's GUI menu, the on the projector or ...slide the MOUSE/ADJUSTMENT switch to the ADJ. To return to the original projected image, press BLACK SCREEN again. • To use the "Power" remote control to operate this function, slide the MOUSE/ADJUSTMENT switch to turn off the On-screen Display. 5 To exit from the GUI, press MENU. ...
... to select " " to turn off the On-screen Display The On-screen Display ("BLACK SCREEN") that appear during function. (For use with the "Power" remote control, slide the MOUSE/ADJUSTMENT switch to the ADJ. "BLACK SCREEN" is set to " " in the projector's GUI menu, the on the projector or ...slide the MOUSE/ADJUSTMENT switch to the ADJ. To return to the original projected image, press BLACK SCREEN again. • To use the "Power" remote control to operate this function, slide the MOUSE/ADJUSTMENT switch to turn off the On-screen Display. 5 To exit from the GUI, press MENU. ...


