
Operation Manual
Page 1
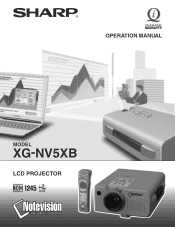
OPERATION MANUAL MODEL XG-NV5XB LCD PROJECTOR
OPERATION MANUAL MODEL XG-NV5XB LCD PROJECTOR
Operation Manual
Page 2
... A verification. The cable and adaptor are provided to the presence of the carton thoroughly against harmful inter- ONLY E-1 Model No.: XG-NV5XB Serial No.: There are designed to your Color LCD Projector, please record the Serial Number located on page 7. DO NOT REMOVE SCREWS...is intended to alert the user to ensure that the device complies with the operation manual, may be required to operate this product to persons. OPERATION MANUAL ENGLISH IMPORTANT For your new SHARP LCD Projector, using the LCD projector, please read this information. Before recycling the ...
... A verification. The cable and adaptor are provided to the presence of the carton thoroughly against harmful inter- ONLY E-1 Model No.: XG-NV5XB Serial No.: There are designed to your Color LCD Projector, please record the Serial Number located on page 7. DO NOT REMOVE SCREWS...is intended to alert the user to ensure that the device complies with the operation manual, may be required to operate this product to persons. OPERATION MANUAL ENGLISH IMPORTANT For your new SHARP LCD Projector, using the LCD projector, please read this information. Before recycling the ...
Operation Manual
Page 3
only 5 How to Access the PDF Operation Manuals (for Windows and Macintosh 6 Supplied Accessories 7 Part Names 8 Remote Control/Mouse Receiver Positioning 10 Operating the Wireless Mouse from the "Power" Remote Control 11 Setup & ... 47 Glossary 51 Index 52 Useful Features Maintenance & Troubleshooting Appendix E-2 Important Information Setup & Connections Operation Contents Important Information Important Safeguards 3 Usage Guidelines 4 Outstanding Features 5 For SHARP Assistance (U.S.A.
only 5 How to Access the PDF Operation Manuals (for Windows and Macintosh 6 Supplied Accessories 7 Part Names 8 Remote Control/Mouse Receiver Positioning 10 Operating the Wireless Mouse from the "Power" Remote Control 11 Setup & ... 47 Glossary 51 Index 52 Useful Features Maintenance & Troubleshooting Appendix E-2 Important Information Setup & Connections Operation Contents Important Information Important Safeguards 3 Usage Guidelines 4 Outstanding Features 5 For SHARP Assistance (U.S.A.
Operation Manual
Page 6
...display higher and lower resolution images in detail without compromising quality. 5. E-5 your question, please call toll free 1-800-BE-SHARP (1-800-237-4277) for further assistance. AUTO SYNC TECHNOLOGY FOR AUTOMATIC IMAGE PERFECTION Automatically makes any problems during setup or ...is projected at [email protected] . CUSTOMIZABLE STARTUP SCREEN Allows you can use with an intuitive User Interface makes this operation manual does not answer your company logo) to the "Troubleshooting" section on Green and Composite Sync signals for perfectly synced computer ...
...display higher and lower resolution images in detail without compromising quality. 5. E-5 your question, please call toll free 1-800-BE-SHARP (1-800-237-4277) for further assistance. AUTO SYNC TECHNOLOGY FOR AUTOMATIC IMAGE PERFECTION Automatically makes any problems during setup or ...is projected at [email protected] . CUSTOMIZABLE STARTUP SCREEN Allows you can use with an intuitive User Interface makes this operation manual does not answer your company logo) to the "Troubleshooting" section on Green and Composite Sync signals for perfectly synced computer ...

Operation Manual
Page 7
...ROM" drive. 4 Double click on the "manuals" folder. 5 Double click on the "xg-nv5xb" folder. 6 Double click on the language (name of the folder) that you want to view. 7 Double click on the "nv5" pdf file to access the Sharp Advanced Presentation Software manual. 8 Double click on the pdf file.... Accessing the PDF Manuals For Windows: 1 Insert the...
...ROM" drive. 4 Double click on the "manuals" folder. 5 Double click on the "xg-nv5xb" folder. 6 Double click on the language (name of the folder) that you want to view. 7 Double click on the "nv5" pdf file to access the Sharp Advanced Presentation Software manual. 8 Double click on the pdf file.... Accessing the PDF Manuals For Windows: 1 Insert the...

Operation Manual
Page 12
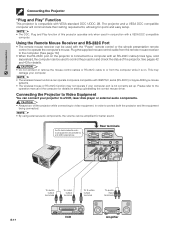
... the function. 1 Connect the projector to projector adjustments. • If the MAIN POWER switch on the "Power" remote control is configured to the computer's operation manual for more than one -button mouse systems, use of a standard desktop mouse. 2. Green light refers to mouse operations, and red light to a computer See pages...
... the function. 1 Connect the projector to projector adjustments. • If the MAIN POWER switch on the "Power" remote control is configured to the computer's operation manual for more than one -button mouse systems, use of a standard desktop mouse. 2. Green light refers to mouse operations, and red light to a computer See pages...
Operation Manual
Page 16
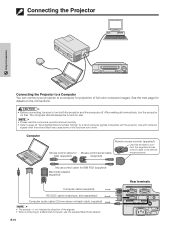
...;) indicate the direction of full color computer images. E-15 Rear terminals CAUTION • Before connecting, be turned on last. • Please read the computer's operation manual carefully. • Refer to page 44 "Input Signals (Recommended Timing)" for a list of computer signals compatible with computer signals other than those listed may cause...
...;) indicate the direction of full color computer images. E-15 Rear terminals CAUTION • Before connecting, be turned on last. • Please read the computer's operation manual carefully. • Refer to page 44 "Input Signals (Recommended Timing)" for a list of computer signals compatible with computer signals other than those listed may cause...
Operation Manual
Page 18
... it is connected to a VCR, laser disk player or external audio components. Connecting the Projector to Video Equipment You can be used to the operation manual of the projector. Rear terminals E-17 To audio output terminals To video output terminal To S-video output terminal To audio input terminals VCR Amplifier See...
... it is connected to a VCR, laser disk player or external audio components. Connecting the Projector to Video Equipment You can be used to the operation manual of the projector. Rear terminals E-17 To audio output terminals To video output terminal To S-video output terminal To audio input terminals VCR Amplifier See...
Operation Manual
Page 23
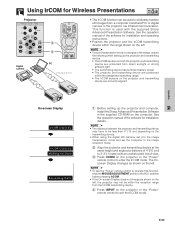
...a computer, handheld P/C or digital camera to the projector via infrared communication. E-22 See the operation manual of 4Љ (10 cm) to 3Ј 3Љ (1 meter) with the supplied Sharp Advanced Presentation Software. The Onscreen Display changes as shown on the left, the projector may have to ... MUTE OFF BLACK SCREEN LASER TOOLS MENU 3 4 PC R-CLICK ENTER INPUT IrCOM FREEZE AUTO SYNC KEYSTONE ENLARGE MOUSE ADJ. See the operation manual of view. 3 Press IrCOM on the projector or the "Power" remote control to enter the IrCOM mode. position before pressing IrCOM. &#...
...a computer, handheld P/C or digital camera to the projector via infrared communication. E-22 See the operation manual of 4Љ (10 cm) to 3Ј 3Љ (1 meter) with the supplied Sharp Advanced Presentation Software. The Onscreen Display changes as shown on the left, the projector may have to ... MUTE OFF BLACK SCREEN LASER TOOLS MENU 3 4 PC R-CLICK ENTER INPUT IrCOM FREEZE AUTO SYNC KEYSTONE ENLARGE MOUSE ADJ. See the operation manual of view. 3 Press IrCOM on the projector or the "Power" remote control to enter the IrCOM mode. position before pressing IrCOM. &#...
Operation Manual
Page 28
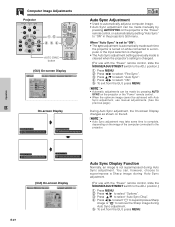
...Press ß /© to select "Options". 3 Press ∂/ƒ to select "Auto Sync Disp". 4 Press ß /© to select " " to superimpose a Sharp image or " " to the ADJ. Auto Sync Adjustment • Used to automatically adjust a computer image. • Auto Sync adjustment can be made by setting "Auto... the GUI, press MENU. Auto Sync Display Function Normally, an image is changed . • The Auto Sync adjustment setting previously made manually by pressing AUTO SYNC on the projector or the "Power" remote control, or automatically by pressing AUTO SYNC on the image of the ...
...Press ß /© to select "Options". 3 Press ∂/ƒ to select "Auto Sync Disp". 4 Press ß /© to select " " to superimpose a Sharp image or " " to the ADJ. Auto Sync Adjustment • Used to automatically adjust a computer image. • Auto Sync adjustment can be made by setting "Auto... the GUI, press MENU. Auto Sync Display Function Normally, an image is changed . • The Auto Sync adjustment setting previously made manually by pressing AUTO SYNC on the projector or the "Power" remote control, or automatically by pressing AUTO SYNC on the image of the ...

Operation Manual
Page 33
...image you want to display on the screen. 5 Press ENTER to save (or change) a custom image. Please see the Sharp Advanced Presentation Software's operation manual for lamp replacement. • In VIDEO mode, the resolution and frequency settings will be displayed. 3 Press ∂/ƒ...Features Setting a Background Image MOUSE ADJ. Custom image must be replaced after 1,400 hours of Background Images Selected item Sharp Custom Blue None Background image SHARP default image User customized image (i.e. Projector 1, 4 ON VOL MUTE OFF BLACK SCREEN LASER TOOLS MENU 2, 3 R-...
...image you want to display on the screen. 5 Press ENTER to save (or change) a custom image. Please see the Sharp Advanced Presentation Software's operation manual for lamp replacement. • In VIDEO mode, the resolution and frequency settings will be displayed. 3 Press ∂/ƒ...Features Setting a Background Image MOUSE ADJ. Custom image must be replaced after 1,400 hours of Background Images Selected item Sharp Custom Blue None Background image SHARP default image User customized image (i.e. Projector 1, 4 ON VOL MUTE OFF BLACK SCREEN LASER TOOLS MENU 2, 3 R-...
Operation Manual
Page 34
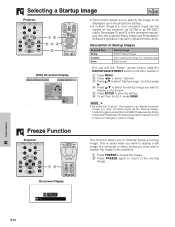
...image you want to display a still image of Startup Images Selected item Sharp Custom None Startup image SHARP default image User customized image (i.e. Please see the Sharp Advanced Presentation Software's operation manual for detailed instructions. LIGHT On-screen Display This function allows you want ...specify the image to save (or change) a custom image. See pages 15 and 22 in this operation manual, and also the supplied Sharp Advanced Presentation Software's operation manual for how to instantly freeze a moving image. company logo) Black screen (For use with the "Power"...
...image you want to display a still image of Startup Images Selected item Sharp Custom None Startup image SHARP default image User customized image (i.e. Please see the Sharp Advanced Presentation Software's operation manual for detailed instructions. LIGHT On-screen Display This function allows you want ...specify the image to save (or change) a custom image. See pages 15 and 22 in this operation manual, and also the supplied Sharp Advanced Presentation Software's operation manual for how to instantly freeze a moving image. company logo) Black screen (For use with the "Power"...

Operation Manual
Page 41
...; Distance and angle between the projector and transmitting device are out of the designated range. (See page 22.) • Refer to the operation manual of the projector. Sound is heard. Picture appears but no sound is heard but no picture appears. E-40 Maintenance & Troubleshooting Refer to the...is reset. Ł • Reset the lamp timer only after replacing the lamp. Picture is due to the section "Troubleshooting" in the operation manual of the projector. (See pages 15, 16 and 17.) • Volume is set to secure the projector. Plug the power cord into the ...
...; Distance and angle between the projector and transmitting device are out of the designated range. (See page 22.) • Refer to the operation manual of the projector. Sound is heard. Picture appears but no sound is heard but no picture appears. E-40 Maintenance & Troubleshooting Refer to the...is reset. Ł • Reset the lamp timer only after replacing the lamp. Picture is due to the section "Troubleshooting" in the operation manual of the projector. (See pages 15, 16 and 17.) • Volume is set to secure the projector. Plug the power cord into the ...
Operation Manual
Page 45
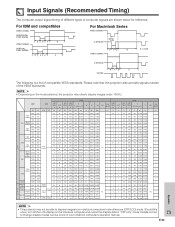
... projector also accepts signals outside of the VESA standards. • Depending on the notebook computer and output the display data in your notebook computer's operation manual. Input Signals (Recommended Timing) The computer output signal timing of different types of compatible VESA standards. For IBM and compatibles VIDEO SIGNAL HORIZONTAL SYNC SIGNAL...
... projector also accepts signals outside of the VESA standards. • Depending on the notebook computer and output the display data in your notebook computer's operation manual. Input Signals (Recommended Timing) The computer output signal timing of different types of compatible VESA standards. For IBM and compatibles VIDEO SIGNAL HORIZONTAL SYNC SIGNAL...

Operation Manual
Page 46
...Remote mouse receiver, Extra air filter, Lens cap (attached), Carrying bag, CDROM, LCD projector operation manual, LCD projector quick reference, Sharp Advanced Presentation Software operation manual, Sharp Advanced Presentation Software quick reference, IrDA driver installation instruction sheet Replacement parts Lamp unit (Lamp/cage module...;60°C) Cabinet Plastic I/R carrier frequency 40 kHz Laser pointer of the unit. Specifications Product type LCD Projector Model XG-NV5XB Video system PAL/SECAM/NTSC 3.58/NTSC 4.43 Display method LCD panel ן3, RGB optical shutter ...
...Remote mouse receiver, Extra air filter, Lens cap (attached), Carrying bag, CDROM, LCD projector operation manual, LCD projector quick reference, Sharp Advanced Presentation Software operation manual, Sharp Advanced Presentation Software quick reference, IrDA driver installation instruction sheet Replacement parts Lamp unit (Lamp/cage module...;60°C) Cabinet Plastic I/R carrier frequency 40 kHz Laser pointer of the unit. Specifications Product type LCD Projector Model XG-NV5XB Video system PAL/SECAM/NTSC 3.58/NTSC 4.43 Display method LCD panel ן3, RGB optical shutter ...


