

XG-NV5XU Operation Manual
Page 2
... ensure that you have checked the contents of the projector and retain this operation manual carefully. Model No.: XG-NV5XU Serial No.: There are two important reasons for a Class A digital device, pursuant to provide reasonable protection against the list of "Supplied Accessories" on the bottom of the carton thoroughly against harmful inter- ment. DO NOT REMOVE SCREWS EXCEPT SPECIFIED USER SERVICE SCREW. ference when the...
... ensure that you have checked the contents of the projector and retain this operation manual carefully. Model No.: XG-NV5XU Serial No.: There are two important reasons for a Class A digital device, pursuant to provide reasonable protection against the list of "Supplied Accessories" on the bottom of the carton thoroughly against harmful inter- ment. DO NOT REMOVE SCREWS EXCEPT SPECIFIED USER SERVICE SCREW. ference when the...

XG-NV5XU Operation Manual
Page 3
.../Invert Image Function 34 Using the Presentation Tools 35 Checking the Adjustment Status 36 Automatic Power Shutoff Function 36 Maintenance & Troubleshooting Air Filter Maintenance 37 Lamp/Maintenance Indicators 38 Replacing the Projection Lamp 39 Using the Kensington Lock 40 Troubleshooting 40 Appendix Transporting the Projector 41 Connection Pin Assignments 42 RS-232C Port Specifications 42 Input Signals (Recommended Timing 44 Specifications 45 Dimensions 46 Guide to Access the PDF Operation Manuals (for Windows and Macintosh 6 Supplied Accessories 7 For SHARP Assistance...
.../Invert Image Function 34 Using the Presentation Tools 35 Checking the Adjustment Status 36 Automatic Power Shutoff Function 36 Maintenance & Troubleshooting Air Filter Maintenance 37 Lamp/Maintenance Indicators 38 Replacing the Projection Lamp 39 Using the Kensington Lock 40 Troubleshooting 40 Appendix Transporting the Projector 41 Connection Pin Assignments 42 RS-232C Port Specifications 42 Input Signals (Recommended Timing 44 Specifications 45 Dimensions 46 Guide to Access the PDF Operation Manuals (for Windows and Macintosh 6 Supplied Accessories 7 For SHARP Assistance...

XG-NV5XU Operation Manual
Page 5
... installed in the fan speed. If the temperature continues to maintain high image quality, SHARP recommends that all internal cleaning must be performed by plugging the power cord back in hazardous radiation exposure. 104˚F (ם40˚C) 41˚F (ם5˚C) Cautions Concerning the Setup of the picture. Refer to setup problems or a dirty air filter, "TEMP." Temperature Monitor Function If the projector starts...
... installed in the fan speed. If the temperature continues to maintain high image quality, SHARP recommends that all internal cleaning must be performed by plugging the power cord back in hazardous radiation exposure. 104˚F (ם40˚C) 41˚F (ם5˚C) Cautions Concerning the Setup of the picture. Refer to setup problems or a dirty air filter, "TEMP." Temperature Monitor Function If the projector starts...

XG-NV5XU Operation Manual
Page 8
... operation manual does not answer your question, please call toll free 1-800-BE-SHARP (1-800-237-4277) for Mac QCNW-5113CEZZ QCNW-5114CEZZ Remote mouse receiver RUNTK0648CEZZ Extra air filter PFILD0076CEZZ Lens cap GCOVH1307CESA Quick Reference to the "Troubleshooting" section on page 40. Supplied Accessories Important Information "Power" remote control RRMCG1470CESA Four AA size batteries UBATU0025GEZZ Simple presentation remote control RRMCG1480CESA Two AAA size batteries UBATU0026GEZZ Power cord CACCU5013CE01 Computer cable...
... operation manual does not answer your question, please call toll free 1-800-BE-SHARP (1-800-237-4277) for Mac QCNW-5113CEZZ QCNW-5114CEZZ Remote mouse receiver RUNTK0648CEZZ Extra air filter PFILD0076CEZZ Lens cap GCOVH1307CESA Quick Reference to the "Troubleshooting" section on page 40. Supplied Accessories Important Information "Power" remote control RRMCG1470CESA Four AA size batteries UBATU0025GEZZ Simple presentation remote control RRMCG1480CESA Two AAA size batteries UBATU0026GEZZ Power cord CACCU5013CE01 Computer cable...
XG-NV5XU Operation Manual
Page 12
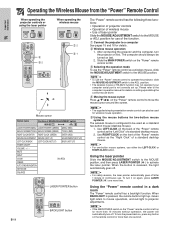
... INPUT IrCOM FREEZE AUTO SYNC KEYSTONE ENLARGE MOUSE ADJ. Use RIGHT-CLICK on again, press LASER POINTER ( ) one more time. To turn it on the front of the "Power" remote control as the "Left Click" of a standard desktop mouse. • For one second. Use LEFT-CLICK on the remote control for more than one -button mouse systems, use of laser pointer Slide the MOUSE/ADJUSTMENT switch to projector adjustments...
... INPUT IrCOM FREEZE AUTO SYNC KEYSTONE ENLARGE MOUSE ADJ. Use RIGHT-CLICK on again, press LASER POINTER ( ) one more time. To turn it on the front of the "Power" remote control as the "Left Click" of a standard desktop mouse. • For one second. Use LEFT-CLICK on the remote control for more than one -button mouse systems, use of laser pointer Slide the MOUSE/ADJUSTMENT switch to projector adjustments...

XG-NV5XU Operation Manual
Page 13
...;3.28 x: Picture size (diag.) (inches) y1 : Maximum projection distance (feet) y : Minimum projection distance (feet) 2 • There is an error of this function.) Projection using a mirror, be used with this projector. Move the projector forward or backward if the edges of the image are distorted. • The projector lens should be centered in the formula above. Close the curtains and dim the lights when setting up the screen in...
...;3.28 x: Picture size (diag.) (inches) y1 : Maximum projection distance (feet) y : Minimum projection distance (feet) 2 • There is an error of this function.) Projection using a mirror, be used with this projector. Move the projector forward or backward if the edges of the image are distorted. • The projector lens should be centered in the formula above. Close the curtains and dim the lights when setting up the screen in...
XG-NV5XU Operation Manual
Page 14
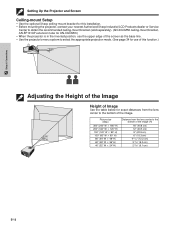
Picture size (diag.) Distance from the lens center to the bottom of the image. Setup & Connections Setting Up the Projector and Screen Ceiling-mount Setup • Use the optional Sharp ceiling-mount bracket for this installation. • Before mounting the projector, contact your nearest Authorized Sharp Industrial LCD Products dealer or Service Center to obtain the recommended ceiling-mount bracket (sold separately). (AN-XGCM50 ceiling-mount bracket, AN-EP101AP extension tube for AN-XGCM50.) • When the projector is...
Picture size (diag.) Distance from the lens center to the bottom of the image. Setup & Connections Setting Up the Projector and Screen Ceiling-mount Setup • Use the optional Sharp ceiling-mount bracket for this installation. • Before mounting the projector, contact your nearest Authorized Sharp Industrial LCD Products dealer or Service Center to obtain the recommended ceiling-mount bracket (sold separately). (AN-XGCM50 ceiling-mount bracket, AN-EP101AP extension tube for AN-XGCM50.) • When the projector is...
XG-NV5XU Operation Manual
Page 15
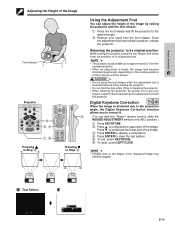
... KEYSTONE. 6 To reset, press LEFT-CLICK. • Straight lines or the edges of the displayed image may become jagged. 3 Test Pattern 4 g E-14 Setup & Connections Adjusting the Height of the Image Foot release Projector Pressing ∂ in Step 2 ON Using the Adjustment Foot You can adjust the height of the image by raising the projector with the "Power" remote control, slide the MOUSE/ADJUSTMENT switch to compress the upper part of...
... KEYSTONE. 6 To reset, press LEFT-CLICK. • Straight lines or the edges of the displayed image may become jagged. 3 Test Pattern 4 g E-14 Setup & Connections Adjusting the Height of the Image Foot release Projector Pressing ∂ in Step 2 ON Using the Adjustment Foot You can adjust the height of the image by raising the projector with the "Power" remote control, slide the MOUSE/ADJUSTMENT switch to compress the upper part of...

XG-NV5XU Operation Manual
Page 19
... with use. Green: Lamp is warming up red. 3 Turn on the Lamp Power Press POWER ON on the projector or the "Power" remote control. • The flashing green LAMP REPLACEMENT indicator shows that the lamp is ready. E-18 When the main power is on the screen becomes clear. 5 Adjusting Zoom Slide the zoom knob. Wait until the image on , the POWER indicator lights up . Flashing green: Warming up red and the projector enters standby mode. • If the bottom filter cover is not securely installed, the POWER indicator flashes...
... with use. Green: Lamp is warming up red. 3 Turn on the Lamp Power Press POWER ON on the projector or the "Power" remote control. • The flashing green LAMP REPLACEMENT indicator shows that the lamp is ready. E-18 When the main power is on the screen becomes clear. 5 Adjusting Zoom Slide the zoom knob. Wait until the image on , the POWER indicator lights up . Flashing green: Warming up red and the projector enters standby mode. • If the bottom filter cover is not securely installed, the POWER indicator flashes...

XG-NV5XU Operation Manual
Page 20
... POWER indicator and the LAMP REPLACEMENT indicator light green. • The POWER indicator flashes if the bottom filter cover is turned on the left will run for about 90 seconds. When the power is not securely installed. Press POWER OFF again while the screen is being received, "No Signal" will be displayed. The projector will be turned on again by pressing POWER ON on the projector or the "Power" remote control to temporarily turn off the sound. Basic Operations Projector...
... POWER indicator and the LAMP REPLACEMENT indicator light green. • The POWER indicator flashes if the bottom filter cover is turned on the left will run for about 90 seconds. When the power is not securely installed. Press POWER OFF again while the screen is being received, "No Signal" will be displayed. The projector will be turned on again by pressing POWER ON on the projector or the "Power" remote control to temporarily turn off the sound. Basic Operations Projector...
XG-NV5XU Operation Manual
Page 23
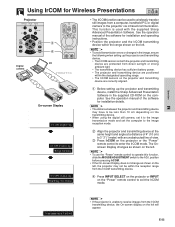
... receive images from a computer, handheld P/C or digital camera to 3Ј 3Љ (1 meter) with the supplied Sharp Advanced Presentation Software. position before pressing IrCOM. • If the On-screen Display does not change as shown on the left. • To use the "Power" remote control to operate this function, slide the MOUSE/ADJUSTMENT switch to enter the IrCOM mode. E-22 See the operation manual of view. 3 Press IrCOM on the projector...
... receive images from a computer, handheld P/C or digital camera to 3Ј 3Љ (1 meter) with the supplied Sharp Advanced Presentation Software. position before pressing IrCOM. • If the On-screen Display does not change as shown on the left. • To use the "Power" remote control to operate this function, slide the MOUSE/ADJUSTMENT switch to enter the IrCOM mode. E-22 See the operation manual of view. 3 Press IrCOM on the projector...

XG-NV5XU Operation Manual
Page 24
... picture due to display in the language selected. 5 To exit from the GUI, press MENU. • When the system mode is now programed to signal differences. Projector 1, 6 ON VOL MUTE OFF BLACK SCREEN LASER TOOLS MENU 2, 3, 4 5 R-CLICK ENTER INPUT IrCOM FREEZE AUTO SYNC The video input system mode is not compatible with the connected audiovisual equipment. (For use with the "Power" remote control, slide the MOUSE/ADJUSTMENT switch to save the setting...
... picture due to display in the language selected. 5 To exit from the GUI, press MENU. • When the system mode is now programed to signal differences. Projector 1, 6 ON VOL MUTE OFF BLACK SCREEN LASER TOOLS MENU 2, 3, 4 5 R-CLICK ENTER INPUT IrCOM FREEZE AUTO SYNC The video input system mode is not compatible with the connected audiovisual equipment. (For use with the "Power" remote control, slide the MOUSE/ADJUSTMENT switch to save the setting...
XG-NV5XU Operation Manual
Page 34
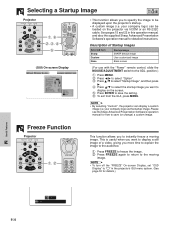
... change) a custom image. LIGHT This function allows you want to display a still image of Startup Images Selected item Sharp Custom None Startup image SHARP default image User customized image Black screen (For use with the "Power" remote control, slide the MOUSE/ADJUSTMENT switch to save the setting. 6 To exit from the GUI, press MENU. • By selecting "Custom", the projector can be displayed upon the projector's startup. • A custom image (i.e. Please see the Sharp Advanced Presentation Software's operation manual for...
... change) a custom image. LIGHT This function allows you want to display a still image of Startup Images Selected item Sharp Custom None Startup image SHARP default image User customized image Black screen (For use with the "Power" remote control, slide the MOUSE/ADJUSTMENT switch to save the setting. 6 To exit from the GUI, press MENU. • By selecting "Custom", the projector can be displayed upon the projector's startup. • A custom image (i.e. Please see the Sharp Advanced Presentation Software's operation manual for...

XG-NV5XU Operation Manual
Page 36
.... 8 On-screen Display Menu Window Red Green Blue Yellow Orange White Black 1 Slide the MOUSE/ADJUSTMENT switch to select " " and ENTER, or simply use LEFT-CLICK on the screen, press to the ADJ. position. 2 Press TOOLS to display the presentation tools menu window on the screen. 3 Press to select the desired tool and color. 4 Press ENTER to select it. 5 Once the tool is displayed on the screen. 7 To remove the menu from the "Power" remote control...
.... 8 On-screen Display Menu Window Red Green Blue Yellow Orange White Black 1 Slide the MOUSE/ADJUSTMENT switch to select " " and ENTER, or simply use LEFT-CLICK on the screen, press to the ADJ. position. 2 Press TOOLS to display the presentation tools menu window on the screen. 3 Press to select the desired tool and color. 4 Press ENTER to select it. 5 Once the tool is displayed on the screen. 7 To remove the menu from the "Power" remote control...

XG-NV5XU Operation Manual
Page 39
... Authorized Sharp Industrial LCD Products Dealer or Service Center for repair. • Securely install the bottom filter cover. • If the TEMPERATURE WARNING indicator lights up, follow the procedures given below. Do not attempt to look into the aperture and lens while the projector is abnormally high. Problem • Blocked air intake. • Clogged air filter. • Cooling fan breakdown. • Internal circuit failure. Maintenance Indicator Condition TEMPERATURE WARNING indicator The internal temperature is operating. The POWER indicator flashes...
... Authorized Sharp Industrial LCD Products Dealer or Service Center for repair. • Securely install the bottom filter cover. • If the TEMPERATURE WARNING indicator lights up, follow the procedures given below. Do not attempt to look into the aperture and lens while the projector is abnormally high. Problem • Blocked air intake. • Clogged air filter. • Cooling fan breakdown. • Internal circuit failure. Maintenance Indicator Condition TEMPERATURE WARNING indicator The internal temperature is operating. The POWER indicator flashes...
XG-NV5XU Operation Manual
Page 40
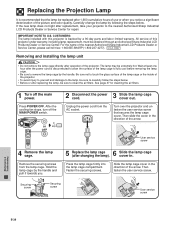
... the user service screw. Slide the lamp cage cover out. Unplug the power cord from the lamp cage. Press the lamp cage firmly into the lamp cage compartment. After the cooling fan stops, turn off the main power. Securing screw Securing screw User service screw Maintenance & Troubleshooting E-39 Hold the lamp cage by a 90-day parts and labor limited warranty. User service screw 4 Remove the lamp cage. Slide the lamp cage cover in the direction of the projector. Replacing the Projection Lamp...
... the user service screw. Slide the lamp cage cover out. Unplug the power cord from the lamp cage. Press the lamp cage firmly into the lamp cage compartment. After the cooling fan stops, turn off the main power. Securing screw Securing screw User service screw Maintenance & Troubleshooting E-39 Hold the lamp cage by a 90-day parts and labor limited warranty. User service screw 4 Remove the lamp cage. Slide the lamp cage cover in the direction of the projector. Replacing the Projection Lamp...
XG-NV5XU Operation Manual
Page 41
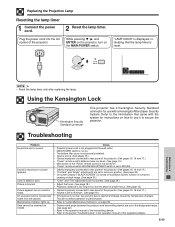
... by temperature changes. E-40 Maintenance & Troubleshooting Replacing the Projection Lamp Resetting the lamp timer 1 Connect the power cord. 2 Reset the lamp timer. Sound is too long or too short to allow for use it to minimum position. (See page 24.) • On-screen Display ("BLACK SCREEN") is turned off and Black Screen function is turned on . • "Power" remote control's MOUSE/ADJUSTMENT switch is heard. Data cannot be received via IrCOM. Using the Kensington Lock Kensington Security Standard connector This projector has...
... by temperature changes. E-40 Maintenance & Troubleshooting Replacing the Projection Lamp Resetting the lamp timer 1 Connect the power cord. 2 Reset the lamp timer. Sound is too long or too short to allow for use it to minimum position. (See page 24.) • On-screen Display ("BLACK SCREEN") is turned off and Black Screen function is turned on . • "Power" remote control's MOUSE/ADJUSTMENT switch is heard. Data cannot be received via IrCOM. Using the Kensington Lock Kensington Security Standard connector This projector has...

XG-NV5XU Operation Manual
Page 43
... the command from the computer are sent in the following order: command, parameter, and return code. Connection Pin Assignments Analog Computer 1 and 2 Signal Input Ports: 15-pin mini D-sub female connector Computer Input Analog 1. Not connected 2. Bi-directional data 10 6 4. Data clock 7. Earth (green/sync on green) 11. If the projector receives a command other than one code is being sent, send each adjustment menu and checking the status with the On-screen Display.
... the command from the computer are sent in the following order: command, parameter, and return code. Connection Pin Assignments Analog Computer 1 and 2 Signal Input Ports: 15-pin mini D-sub female connector Computer Input Analog 1. Not connected 2. Bi-directional data 10 6 4. Data clock 7. Earth (green/sync on green) 11. If the projector receives a command other than one code is being sent, send each adjustment menu and checking the status with the On-screen Display.
XG-NV5XU Operation Manual
Page 46
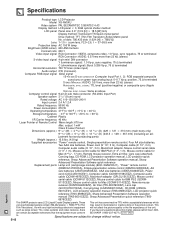
..., Mouse control serial cable (3Ј 3Љ, 1 m), Mouse control cable for IBM PS/2 (3Ј 3Љ, 1 m), Mouse control cable for Mac (6 45⁄64Љ, 17 cm), Remote mouse receiver, Extra air filter, Lens cap (attached), Carrying bag, CD-ROM, LCD projector operation manual, LCD projector quick reference, Sharp Advanced Presentation Software operation manual, Sharp Advanced Presentation Software quick reference Replacement parts Lamp unit (Lamp/cage module) (BQC-XGNV5XU/1), "Power" remote control (RRMCG1470CESA), Simple presentation remote control (RRMCG1480CESA), AA size...
..., Mouse control serial cable (3Ј 3Љ, 1 m), Mouse control cable for IBM PS/2 (3Ј 3Љ, 1 m), Mouse control cable for Mac (6 45⁄64Љ, 17 cm), Remote mouse receiver, Extra air filter, Lens cap (attached), Carrying bag, CD-ROM, LCD projector operation manual, LCD projector quick reference, Sharp Advanced Presentation Software operation manual, Sharp Advanced Presentation Software quick reference Replacement parts Lamp unit (Lamp/cage module) (BQC-XGNV5XU/1), "Power" remote control (RRMCG1470CESA), Simple presentation remote control (RRMCG1480CESA), AA size...

XG-NV5XU Operation Manual
Page 53
... switch 18 MENU button 20 MOUSE/ADJUSTMENT switch 11 Mouse control cable for IBM PS/2 15 Mouse control cable for Mac 15 Mouse control serial cable 15 MUTE button 19 O Opening image 33 P PDF 6 Picture adjustment 24 POWER buttons 18 Power cord 18 POWER indicator 18 R Rear projection 12 Remote control 11 Remote control sensor 10 Remote mouse receiver 10 RIGHT-CLICK button 11 RS-232C port 15 S Speaker 8 Startup image 33 Status confirmation 19 S-VIDEO INPUT terminal 17 T TEMPERATURE WARNING indicator 38 TOOLS button 35 V VIDEO INPUT terminal 17 VOLUME buttons 19 Z Zoom...
... switch 18 MENU button 20 MOUSE/ADJUSTMENT switch 11 Mouse control cable for IBM PS/2 15 Mouse control cable for Mac 15 Mouse control serial cable 15 MUTE button 19 O Opening image 33 P PDF 6 Picture adjustment 24 POWER buttons 18 Power cord 18 POWER indicator 18 R Rear projection 12 Remote control 11 Remote control sensor 10 Remote mouse receiver 10 RIGHT-CLICK button 11 RS-232C port 15 S Speaker 8 Startup image 33 Status confirmation 19 S-VIDEO INPUT terminal 17 T TEMPERATURE WARNING indicator 38 TOOLS button 35 V VIDEO INPUT terminal 17 VOLUME buttons 19 Z Zoom...


