

XG-NV6XU Operation Manual
Page 1
OPERATION MANUAL MODEL XG-NV6XU LCD PROJECTOR Important Information Setup & Connections Operation Useful Features Maintenance & Troubleshooting Appendix
OPERATION MANUAL MODEL XG-NV6XU LCD PROJECTOR Important Information Setup & Connections Operation Useful Features Maintenance & Troubleshooting Appendix

XG-NV6XU Operation Manual
Page 2
Model No.: XG-NV6XU Serial No.: There are designed to provide reasonable protection against the list of light. WARRANTY This is to assure that any safety notification of your new SHARP LCD Projector, using the LCD projector, please read this product to correct the interference at his...Class A verification. Before recycling the packaging, please be of important operating and maintenance (servicing) instructions in accordance with the operation manual, may be sure that the device complies with the device. ONLY E-1 CONSUMER PRODUCT SAFETY ACT To ensure that you have ...
Model No.: XG-NV6XU Serial No.: There are designed to provide reasonable protection against the list of light. WARRANTY This is to assure that any safety notification of your new SHARP LCD Projector, using the LCD projector, please read this product to correct the interference at his...Class A verification. Before recycling the packaging, please be of important operating and maintenance (servicing) instructions in accordance with the operation manual, may be sure that the device complies with the device. ONLY E-1 CONSUMER PRODUCT SAFETY ACT To ensure that you have ...
XG-NV6XU Operation Manual
Page 5
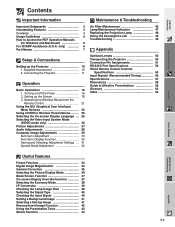
... 47 Replacing the Projection Lamp 48 Using the Kensington Lock 49 Troubleshooting 49 Appendix Optional Lenses 50 Transporting the Projector 50 Connection Pin Assignments 51 RS-232C Port Specifications 52 Wired Remote Control Terminal Specifications 54 Input Signals (Recommended... Timing 55 Specifications 57 Dimensions 58 Guide to Access the PDF Operation Manuals (for Windows and Macintosh 6 For SHARP Assistance (U.S.A. only 6 Part Names 7 Setup & Connections Setting up the Screen 18 3. Turning on/off the ...
... 47 Replacing the Projection Lamp 48 Using the Kensington Lock 49 Troubleshooting 49 Appendix Optional Lenses 50 Transporting the Projector 50 Connection Pin Assignments 51 RS-232C Port Specifications 52 Wired Remote Control Terminal Specifications 54 Input Signals (Recommended... Timing 55 Specifications 57 Dimensions 58 Guide to Access the PDF Operation Manuals (for Windows and Macintosh 6 For SHARP Assistance (U.S.A. only 6 Part Names 7 Setup & Connections Setting up the Screen 18 3. Turning on/off the ...

XG-NV6XU Operation Manual
Page 7
...www.adobe.com). Double click on the "saps" pdf file to install Adobe Acrobat Reader on your question, please call toll free 1-800-BE-SHARP (1-800-237-4277) for other languages, please download the appropriate version from the CD-ROM For Windows: 1 Insert the CD-ROM in the ...ROM" icon. 3 Double click on the "manuals" folder. 4 Double click on the "xg-nv6xu" folder. 5 Double click on the language (name of the folder) that you do not have not installed Acrobat Reader yet, you encounter any problems during setup or operation of the folder) that you have to access the projector manuals.
...www.adobe.com). Double click on the "saps" pdf file to install Adobe Acrobat Reader on your question, please call toll free 1-800-BE-SHARP (1-800-237-4277) for other languages, please download the appropriate version from the CD-ROM For Windows: 1 Insert the CD-ROM in the ...ROM" icon. 3 Double click on the "manuals" folder. 4 Double click on the "xg-nv6xu" folder. 5 Double click on the language (name of the folder) that you do not have not installed Acrobat Reader yet, you encounter any problems during setup or operation of the folder) that you have to access the projector manuals.

XG-NV6XU Operation Manual
Page 8
Important Information Part Names Numbers next to the part names refer to the main pages in this manual where the topic is explained. Projector MUTE button 17 POWER indicator 16 POWER buttons (ON/OFF) 17 LENS button 19 INPUT button 17 FREEZE button 33 ENLARGE button 34 UNDO button ...
Important Information Part Names Numbers next to the part names refer to the main pages in this manual where the topic is explained. Projector MUTE button 17 POWER indicator 16 POWER buttons (ON/OFF) 17 LENS button 19 INPUT button 17 FREEZE button 33 ENLARGE button 34 UNDO button ...
XG-NV6XU Operation Manual
Page 11
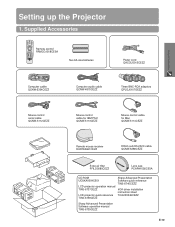
... Mac QCNW-5114CEZZ Remote mouse receiver RUNTK0661CEZZ DIN-D-sub RS-232C cable QCNW-5288CEZZ Extra air filter PFILD0080CEZZ Lens cap PCAPH1056CESA CD-ROM UDSKA0004CE01 LCD projector operation manual TINS-6737CEZZ LCD projector quick reference TINS-6738CEZZ Sharp Advanced Presentation Software quick reference TINS-6740CEZZ IrDA driver installation instruction sheet TCAUZ3046CEZZ...
... Mac QCNW-5114CEZZ Remote mouse receiver RUNTK0661CEZZ DIN-D-sub RS-232C cable QCNW-5288CEZZ Extra air filter PFILD0080CEZZ Lens cap PCAPH1056CESA CD-ROM UDSKA0004CE01 LCD projector operation manual TINS-6737CEZZ LCD projector quick reference TINS-6738CEZZ Sharp Advanced Presentation Software quick reference TINS-6740CEZZ IrDA driver installation instruction sheet TCAUZ3046CEZZ...
XG-NV6XU Operation Manual
Page 12
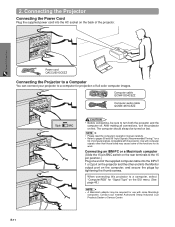
...can connect your nearest Authorized Sharp Industrial LCD Products Dealer or Service Center. Use with computer signals other end into the Monitor output port on the GUI menu. (See page 40.) • A Macintosh adaptor may cause some Macintosh computers. Contact your projector to work. After making...connecting, be turned on last. • Please read the computer's operation manual carefully. • Refer to the 15 pin position.) Plug one end of the projector. E-11 When connecting this projector to turn the projector on the back of the supplied computer cable into the AC socket on ...
...can connect your nearest Authorized Sharp Industrial LCD Products Dealer or Service Center. Use with computer signals other end into the Monitor output port on the GUI menu. (See page 40.) • A Macintosh adaptor may cause some Macintosh computers. Contact your projector to work. After making...connecting, be turned on last. • Please read the computer's operation manual carefully. • Refer to the 15 pin position.) Plug one end of the projector. E-11 When connecting this projector to turn the projector on the back of the supplied computer cable into the AC socket on ...

XG-NV6XU Operation Manual
Page 15
... (cross type, sold separately), the computer can be required for details on . Please refer to control the projector and check the status of the projector. Setup & Connections To audio input terminals Audio cable (sold separately) Amplifier Connecting RS-232C Port When the RS... cable to protect both the projector and the components being connected. • By using external audio components, the volume can be used to the operation manual of the signals. • A Macintosh adaptor may not operate if your nearest Authorized Sharp Industrial LCD Products Dealer or ...
... (cross type, sold separately), the computer can be required for details on . Please refer to control the projector and check the status of the projector. Setup & Connections To audio input terminals Audio cable (sold separately) Amplifier Connecting RS-232C Port When the RS... cable to protect both the projector and the components being connected. • By using external audio components, the volume can be used to the operation manual of the signals. • A Macintosh adaptor may not operate if your nearest Authorized Sharp Industrial LCD Products Dealer or ...
XG-NV6XU Operation Manual
Page 23
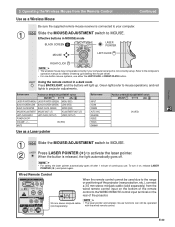
...pointer. ON (RED) Use as a Wireless Mouse Be sure the supplied remote mouse receiver is connected to the computer's operation manual for details of the projector. 3.5 mm stereo minijack cable • The laser pointer and wireless mouse functions can still be operated (sold separately) with... the wired remoto control. Slide the MOUSE/ADJUSTMENT switch to MOUSE. 2 Press LASER POINTER ( ) to projector adjustments. When the button is not correctly set up. Slide the MOUSE/ADJUSTMENT switch to the WIRED REMOTE control input terminal on the...
...pointer. ON (RED) Use as a Wireless Mouse Be sure the supplied remote mouse receiver is connected to the computer's operation manual for details of the projector. 3.5 mm stereo minijack cable • The laser pointer and wireless mouse functions can still be operated (sold separately) with... the wired remoto control. Slide the MOUSE/ADJUSTMENT switch to MOUSE. 2 Press LASER POINTER ( ) to projector adjustments. When the button is not correctly set up. Slide the MOUSE/ADJUSTMENT switch to the WIRED REMOTE control input terminal on the...

XG-NV6XU Operation Manual
Page 26
... left. • To avoid transmission errors or changes in the supplied CD-ROM on the computer. • See the operation manual of the software for Wireless Presentations Projector Remote control IrCOM1 1, 2 3 IrCOM2 45˚ 30˚ 30˚ 45˚ 30˚ 4؆ (10 ...2 The IrCOM function can transfer still images from a computer or digital camera to the projector via infrared (wireless) communication. Sharp Advanced Presentation Software • This function requires the supplied Sharp Advanced Presentation Software (SAPS). • Install the SAPS in the image, ensure the ...
... left. • To avoid transmission errors or changes in the supplied CD-ROM on the computer. • See the operation manual of the software for Wireless Presentations Projector Remote control IrCOM1 1, 2 3 IrCOM2 45˚ 30˚ 30˚ 45˚ 30˚ 4؆ (10 ...2 The IrCOM function can transfer still images from a computer or digital camera to the projector via infrared (wireless) communication. Sharp Advanced Presentation Software • This function requires the supplied Sharp Advanced Presentation Software (SAPS). • Install the SAPS in the image, ensure the ...
XG-NV6XU Operation Manual
Page 31
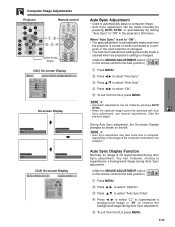
... "ON": • The sync adjustment is automatically made each time the projector is turned on while connected to a computer or the input selection is changed. • The Auto Sync adjustment setting previously made manually by pressing AUTO SYNC, or automatically by setting "Auto Sync" to "...ON" in the projector's GUI menu. position.) 1 Press MENU. 2 Press ß/© to select "Fine Sync". 3 Press...
... "ON": • The sync adjustment is automatically made each time the projector is turned on while connected to a computer or the input selection is changed. • The Auto Sync adjustment setting previously made manually by pressing AUTO SYNC, or automatically by setting "Auto Sync" to "...ON" in the projector's GUI menu. position.) 1 Press MENU. 2 Press ß/© to select "Fine Sync". 3 Press...

XG-NV6XU Operation Manual
Page 42
...projector can be displayed upon the projector's startup. • A custom image (i.e. Custom image must be 256-color BMP file with a picture size of Startup Images Selected item Sharp Custom None Startup image SHARP default image User customized image (i.e. See pages 14 and 25 in this operation manual, and also the supplied Sharp Advanced Presentation Software operation manual... your company logo) as the startup image. Please see the Sharp Advanced Presentation Software operation manual for detailed instructions. Custom image must be 256-color BMP file with a picture...
...projector can be displayed upon the projector's startup. • A custom image (i.e. Custom image must be 256-color BMP file with a picture size of Startup Images Selected item Sharp Custom None Startup image SHARP default image User customized image (i.e. See pages 14 and 25 in this operation manual, and also the supplied Sharp Advanced Presentation Software operation manual... your company logo) as the startup image. Please see the Sharp Advanced Presentation Software operation manual for detailed instructions. Custom image must be 256-color BMP file with a picture...
XG-NV6XU Operation Manual
Page 50
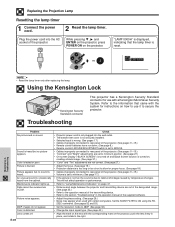
...to "Lamp/Maintenance Indicators" on page 47. • Distance and angle between the projector and transmitting device are out of the designated range. (See page 25.) • Refer to the operation manual of the projector. Color is due to minimum position. (See page 27.) • On-screen ...System. While pressing ƒ, © and ENTER on the projector, press POWER ON on the projector, push the lens firmly in the operation manual of the projector. (See pages 11-15.) • Volume is set to secure the projector. Maintenance indicator lights up. Picture noise appears. 480P images do...
...to "Lamp/Maintenance Indicators" on page 47. • Distance and angle between the projector and transmitting device are out of the designated range. (See page 25.) • Refer to the operation manual of the projector. Color is due to minimum position. (See page 27.) • On-screen ...System. While pressing ƒ, © and ENTER on the projector, press POWER ON on the projector, push the lens firmly in the operation manual of the projector. (See pages 11-15.) • Volume is set to secure the projector. Maintenance indicator lights up. Picture noise appears. 480P images do...
XG-NV6XU Operation Manual
Page 51
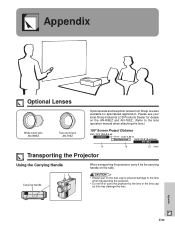
... Sharp Industrial LCD Products Dealer for specialized application. CAUTION • Always put on the lens cap to prevent damage to the lens when transporting the projector. • Do not lift or carry the projector by the carrying handle on the AN-W6EZ and AN-T6EZ. (Refer to the lens operation manual... Handle Carrying handle When transporting the projector, carry it by the lens or the lens cap as this may damage the lens. Appendix Optional Lenses Wide-zoom lens AN-W6EZ Tele-zoom lens AN-T6EZ Optional wide and telephoto lenses from Sharp are also available for details on ...
... Sharp Industrial LCD Products Dealer for specialized application. CAUTION • Always put on the lens cap to prevent damage to the lens when transporting the projector. • Do not lift or carry the projector by the carrying handle on the AN-W6EZ and AN-T6EZ. (Refer to the lens operation manual... Handle Carrying handle When transporting the projector, carry it by the lens or the lens cap as this may damage the lens. Appendix Optional Lenses Wide-zoom lens AN-W6EZ Tele-zoom lens AN-T6EZ Optional wide and telephoto lenses from Sharp are also available for details on ...

XG-NV6XU Operation Manual
Page 57
... occurs and the image is displayed with 1,024 lines, causing part of the image to display images from notebook computers in your notebook computer's operation manual. • This projector can be blocked. COMPONENT - - - - - - - 44.955 - - - - - - - 59.940 - - - - - - 59.740 1080I 1,920 1,080 - - - - - - - 33.716 - - - - - - - 59.940 • This...
... occurs and the image is displayed with 1,024 lines, causing part of the image to display images from notebook computers in your notebook computer's operation manual. • This projector can be blocked. COMPONENT - - - - - - - 44.955 - - - - - - - 59.940 - - - - - - 59.740 1080I 1,920 1,080 - - - - - - - 33.716 - - - - - - - 59.940 • This...
XG-NV6XU Operation Manual
Page 58
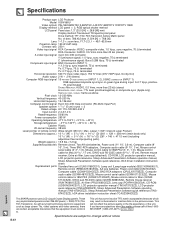
...8486; terminated STEREO MINIJACK: AUDIO, 0.5 Vrms, more than 22 kΩ (stereo) HORIZONTAL SYNC. Specifications Product type LCD Projector Model XG-NV6XU Video system PAL/SECAM/NTSC 3.58/NTSC 4.43/DTV 480P/DTV 720P/DTV 1080I Display method LCD panel ן... cm), Remote mouse receiver, Extra air filter, Lens cap (attached), CD-ROM, LCD projector operation manual, LCD projector quick reference, Sharp Advanced Presentation Software operation manual, Sharp Advanced Presentation Software quick reference, IrDA driver installation instruction sheet Replacement parts Standard lens unit (...
...8486; terminated STEREO MINIJACK: AUDIO, 0.5 Vrms, more than 22 kΩ (stereo) HORIZONTAL SYNC. Specifications Product type LCD Projector Model XG-NV6XU Video system PAL/SECAM/NTSC 3.58/NTSC 4.43/DTV 480P/DTV 720P/DTV 1080I Display method LCD panel ן... cm), Remote mouse receiver, Extra air filter, Lens cap (attached), CD-ROM, LCD projector operation manual, LCD projector quick reference, Sharp Advanced Presentation Software operation manual, Sharp Advanced Presentation Software quick reference, IrDA driver installation instruction sheet Replacement parts Standard lens unit (...

Quick Reference Guide
Page 1
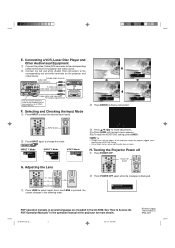
POWER ON button Mouse control cable for XG-NV6X LCD Projector A. AUTO SYNC button Three BNC-RCA adaptors Component cable (sold separately) To analog component output terminals DTV decoder or DVD player 5 Turn on the .... (See "Selecting the Signal Type" in the operation manual.) XG-NV6XU/QR (E) 1 99.11.8, 2:05 PM When inputting these signals through the 15-pin D-sub terminals (INPUT 1 and 2 ports) and BNC terminals (INPUT 1 terminals), the projector cannot distinguish between the two types of the projector. Mouse control cable for Mac when using the wireless...
POWER ON button Mouse control cable for XG-NV6X LCD Projector A. AUTO SYNC button Three BNC-RCA adaptors Component cable (sold separately) To analog component output terminals DTV decoder or DVD player 5 Turn on the .... (See "Selecting the Signal Type" in the operation manual.) XG-NV6XU/QR (E) 1 99.11.8, 2:05 PM When inputting these signals through the 15-pin D-sub terminals (INPUT 1 and 2 ports) and BNC terminals (INPUT 1 terminals), the projector cannot distinguish between the two types of the projector. Mouse control cable for Mac when using the wireless...
Quick Reference Guide
Page 2
...To reset the KEYSTONE setting, press UNDO. • Straight lines and the edges of the projector for more details. Each time LENS is pressed, the screen changes in Japan TINS-6738CEZZ 9P06-JWG XG-NV6XU/QR (E) 2 99.11.8, 2:05 PM Printed in the following order. 2 Press POWER... video source. INPUT button 2 Press INPUT again to the corresponding yellow terminals on the projector and video source. PDF operation manuals in several languages are included in the operation manual of the displayed image may appear jagged, when adjusting the KEYSTONE setting. • Do not ...
...To reset the KEYSTONE setting, press UNDO. • Straight lines and the edges of the projector for more details. Each time LENS is pressed, the screen changes in Japan TINS-6738CEZZ 9P06-JWG XG-NV6XU/QR (E) 2 99.11.8, 2:05 PM Printed in the following order. 2 Press POWER... video source. INPUT button 2 Press INPUT again to the corresponding yellow terminals on the projector and video source. PDF operation manuals in several languages are included in the operation manual of the displayed image may appear jagged, when adjusting the KEYSTONE setting. • Do not ...


