

XG-NV7XU Operation Manual
Page 1
OPERATION MANUAL MODEL XG-NV7XU DIGITAL MULTIMEDIA PROJECTOR Important Information Setup & Connections Operation Useful Features Maintenance & Troubleshooting Appendix
OPERATION MANUAL MODEL XG-NV7XU DIGITAL MULTIMEDIA PROJECTOR Important Information Setup & Connections Operation Useful Features Maintenance & Troubleshooting Appendix

XG-NV7XU Operation Manual
Page 2
... REMOVE SCREWS EXCEPT SPECIFIED USER SERVICE SCREW. ment. ference when the equipment is likely to cause harmful interference, in a commercial environment. This equipment generates, uses, and can radiate radio frequency energy and, if not installed and used with FCC Class A verification. Operation of fire or electric shock, do not stare directly into the beam of your projector, please record the Serial Number located...
... REMOVE SCREWS EXCEPT SPECIFIED USER SERVICE SCREW. ment. ference when the equipment is likely to cause harmful interference, in a commercial environment. This equipment generates, uses, and can radiate radio frequency energy and, if not installed and used with FCC Class A verification. Operation of fire or electric shock, do not stare directly into the beam of your projector, please record the Serial Number located...

XG-NV7XU Operation Manual
Page 3
... other sources, refer to defeat the safeguards incorporated into this Projector, observe the following conditions: a. and the like. 8. Attachments Do not use instructions should be moved with the same characteristics as an improper adjustment of any kind into this product through openings as opening or removing covers may cause the product and cart combination to rain or water. Power-Cord Protection Power-supply cords...
... other sources, refer to defeat the safeguards incorporated into this Projector, observe the following conditions: a. and the like. 8. Attachments Do not use instructions should be moved with the same characteristics as an improper adjustment of any kind into this product through openings as opening or removing covers may cause the product and cart combination to rain or water. Power-Cord Protection Power-supply cords...

XG-NV7XU Operation Manual
Page 5
...mode only 26 Picture Adjustments 27 Audio Adjustments 28 Computer Image Adjustments 29 Auto Sync Adjustment 30 Auto Sync Display Function 30 Saving and Selecting Adjustment Settings ... 31 Special Mode Adjustment 32 Maintenance & Troubleshooting Lamp/Maintenance Indicators 47 Replacing the Projection Lamp 48 Using the Kensington Lock 49 Troubleshooting 49 Appendix Transporting the Projector 51 Connection Pin Assignments 52 RS-232C Port Specifications 53 Input Signals (Recommended Timing 55 Specifications 57 Dimensions 58 Guide to Access the PDF Operation Manuals (for Windows...
...mode only 26 Picture Adjustments 27 Audio Adjustments 28 Computer Image Adjustments 29 Auto Sync Adjustment 30 Auto Sync Display Function 30 Saving and Selecting Adjustment Settings ... 31 Special Mode Adjustment 32 Maintenance & Troubleshooting Lamp/Maintenance Indicators 47 Replacing the Projection Lamp 48 Using the Kensington Lock 49 Troubleshooting 49 Appendix Transporting the Projector 51 Connection Pin Assignments 52 RS-232C Port Specifications 53 Input Signals (Recommended Timing 55 Specifications 57 Dimensions 58 Guide to Access the PDF Operation Manuals (for Windows...

XG-NV7XU Operation Manual
Page 6
...-second cooling-off period the power will return the projector to maintain high image quality, SHARP recommends that this product is automatically controlled. Remove the projector power cord from the laser pointer window. This will shut off the projector lamp. OUTPUT : 1mW CLASS II LASER PRODUCT "COMPLIES WITH 21 CFR SUBCHAPTER J" SHARP ELECTRONICS CORPORATION SHARP PLAZA, MAHWAH, NEW JERSEY 07430 TEL : 1-800-BE-SHARP U.S.A. Refer to setup problems or a dirty air filter, "TEMP."
...-second cooling-off period the power will return the projector to maintain high image quality, SHARP recommends that this product is automatically controlled. Remove the projector power cord from the laser pointer window. This will shut off the projector lamp. OUTPUT : 1mW CLASS II LASER PRODUCT "COMPLIES WITH 21 CFR SUBCHAPTER J" SHARP ELECTRONICS CORPORATION SHARP PLAZA, MAHWAH, NEW JERSEY 07430 TEL : 1-800-BE-SHARP U.S.A. Refer to setup problems or a dirty air filter, "TEMP."

XG-NV7XU Operation Manual
Page 7
...click on the "mac" folder. 6 Double click on the installation program and follow the instructions on the screen. E-6 Double click on the "saps" pdf file to Access the PDF Operation Manuals (for Windows and Macintosh) PDF operation manuals in several languages...problems during setup or operation of the folder) that you want to view. 7 Double click on the "nv7" pdf file to access the projector manuals. Our World Wide Web address is http://www.sharp-usa.com/ . For other languages: If you prefer using the English version of Acrobat Reader.) Accessing the PDF Manuals For Windows...
...click on the "mac" folder. 6 Double click on the installation program and follow the instructions on the screen. E-6 Double click on the "saps" pdf file to Access the PDF Operation Manuals (for Windows and Macintosh) PDF operation manuals in several languages...problems during setup or operation of the folder) that you want to view. 7 Double click on the "nv7" pdf file to access the projector manuals. Our World Wide Web address is http://www.sharp-usa.com/ . For other languages: If you prefer using the English version of Acrobat Reader.) Accessing the PDF Manuals For Windows...

XG-NV7XU Operation Manual
Page 17
... proceeding. E-16 The POWER indicator lights up red and the projector enters standby mode. 2 Press Power ON. • The flashing green LAMP REPLACEMENT indicator shows that the lamp is on . • After the projector is ready. This odor will soon disappear with use. Connect the power cord to a wall outlet. Red: Change the lamp. Flashing green: Warming up . Operation Operation Basic Operations 2 1 Make the necessary connections before the lamp turns on , the LAMP REPLACEMENT indicator lights indicating the status of the lamp. When the power is warming up .
... proceeding. E-16 The POWER indicator lights up red and the projector enters standby mode. 2 Press Power ON. • The flashing green LAMP REPLACEMENT indicator shows that the lamp is on . • After the projector is ready. This odor will soon disappear with use. Connect the power cord to a wall outlet. Red: Change the lamp. Flashing green: Warming up . Operation Operation Basic Operations 2 1 Make the necessary connections before the lamp turns on , the LAMP REPLACEMENT indicator lights indicating the status of the lamp. When the power is warming up .

XG-NV7XU Operation Manual
Page 18
...; Wait until the cooling fan stops before disconnecting the power cord. • The power can be turned on the screen becomes clear. 4 Rotate the zoom ring. Operation Basic Operations 4 3 EXAMPLE 5 f f 6 7 8 5 INPUT 1 Mode INPUT 2 Mode VIDEO Mode 6 7 8 E-17 3 Rotate the focus ring until the image on again by pressing POWER ON. The image can be adjusted to the desired size within the zoom range. 5 Press INPUT to turn the sound back on , the POWER indicator and the LAMP REPLACEMENT indicator light green. The projector will be displayed.
...; Wait until the cooling fan stops before disconnecting the power cord. • The power can be turned on the screen becomes clear. 4 Rotate the zoom ring. Operation Basic Operations 4 3 EXAMPLE 5 f f 6 7 8 5 INPUT 1 Mode INPUT 2 Mode VIDEO Mode 6 7 8 E-17 3 Rotate the focus ring until the image on again by pressing POWER ON. The image can be adjusted to the desired size within the zoom range. 5 Press INPUT to turn the sound back on , the POWER indicator and the LAMP REPLACEMENT indicator light green. The projector will be displayed.
XG-NV7XU Operation Manual
Page 19
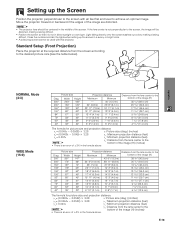
...;3% in the formula above . Light falling directly onto the screen washes out colors, making viewing difficult. • Position the screen so that it is an error of the image are distorted. • The projector lens should be used with all feet flat and level to the desired picture size (see the table below). Setting up the screen in a sunny or bright room. •...
...;3% in the formula above . Light falling directly onto the screen washes out colors, making viewing difficult. • Position the screen so that it is an error of the image are distorted. • The projector lens should be used with all feet flat and level to the desired picture size (see the table below). Setting up the screen in a sunny or bright room. •...

XG-NV7XU Operation Manual
Page 21
... screen between the projector and the audience. • Use the projector's menu system to reverse the projected image. (See page 43 for use of this function.) Projection using a mirror, be sure to carefully position both the projector and the mirror so the light does not shine into the eyes of this installation. • Before mounting the projector, contact your nearest Authorized Sharp Industrial LCD Products Dealer or Service...
... screen between the projector and the audience. • Use the projector's menu system to reverse the projected image. (See page 43 for use of this function.) Projection using a mirror, be sure to carefully position both the projector and the mirror so the light does not shine into the eyes of this installation. • Before mounting the projector, contact your nearest Authorized Sharp Industrial LCD Products Dealer or Service...

XG-NV7XU Operation Manual
Page 23
.../ADJUSTMENT switch MOUSE ADJ. LASER POINTER/MENU LASER POINTER (GREEN) MENU (RED) BLACK SCREEN/KEYSTONE BLACK SCREEN (GREEN) KEYSTONE (RED) RIGHT-CLICK/ENTER RIGHT-CLICK (GREEN) ENTER (RED) MOUSE/ADJUSTMENT MOUSE (NOT LIT) ADJUSTMENT (NOT LIT) LEFT-CLICK/UNDO LEFT-CLICK (NOT LIT) UNDO (NOT LIT) POWER ON/OFF VOLUME ON (RED) MUTE Button name INPUT IrCOM FREEZE AUTO SYNC ENLARGE RESIZE TOOLS GAMMA Position of setting up/installing the mouse driver. • For one-button...
.../ADJUSTMENT switch MOUSE ADJ. LASER POINTER/MENU LASER POINTER (GREEN) MENU (RED) BLACK SCREEN/KEYSTONE BLACK SCREEN (GREEN) KEYSTONE (RED) RIGHT-CLICK/ENTER RIGHT-CLICK (GREEN) ENTER (RED) MOUSE/ADJUSTMENT MOUSE (NOT LIT) ADJUSTMENT (NOT LIT) LEFT-CLICK/UNDO LEFT-CLICK (NOT LIT) UNDO (NOT LIT) POWER ON/OFF VOLUME ON (RED) MUTE Button name INPUT IrCOM FREEZE AUTO SYNC ENLARGE RESIZE TOOLS GAMMA Position of setting up/installing the mouse driver. • For one-button...

XG-NV7XU Operation Manual
Page 31
... do not need to "ON" in the projector's GUI menu. Computer Image Adjustments Projector Remote control 1, 5 2, 3, 4 AUTO SYNC button (GUI) On-screen Display On-screen Display g f s (GUI) On-screen Display Auto Sync Adjustment • Used to automatically adjust a computer image. • Auto Sync adjustment can be achieved with Auto Sync adjustment, use manual adjustments. (See the previous page.) • When inputting DIGITAL signal, the projector automatically selects the settings for the best possible picture. position.) 1 Press MENU. 2 Press ß /© to select "Options...
... do not need to "ON" in the projector's GUI menu. Computer Image Adjustments Projector Remote control 1, 5 2, 3, 4 AUTO SYNC button (GUI) On-screen Display On-screen Display g f s (GUI) On-screen Display Auto Sync Adjustment • Used to automatically adjust a computer image. • Auto Sync adjustment can be achieved with Auto Sync adjustment, use manual adjustments. (See the previous page.) • When inputting DIGITAL signal, the projector automatically selects the settings for the best possible picture. position.) 1 Press MENU. 2 Press ß /© to select "Options...

XG-NV7XU Operation Manual
Page 45
.... Displaying the break time (Slide the MOUSE/ADJUSTMENT switch MOUSE ADJ. on the remote control to the ADJ. on the remote control to the ADJ. position.) 1 Press TOOLS to display the presentation tools menu window on the screen, press to select " " in "Selecting a Startup Image". (See page 42.) E-44 Using the Presentation Tools Projector Remote control 2, 4 Useful Features 3, 5 6 1 On-screen Display Menu Window Red Green Blue Yellow Orange White Black Projector Remote control This projector is equipped with presentation tools. These will help...
.... Displaying the break time (Slide the MOUSE/ADJUSTMENT switch MOUSE ADJ. on the remote control to the ADJ. on the remote control to the ADJ. position.) 1 Press TOOLS to display the presentation tools menu window on the screen, press to select " " in "Selecting a Startup Image". (See page 42.) E-44 Using the Presentation Tools Projector Remote control 2, 4 Useful Features 3, 5 6 1 On-screen Display Menu Window Red Green Blue Yellow Orange White Black Projector Remote control This projector is equipped with presentation tools. These will help...

XG-NV7XU Operation Manual
Page 48
... lamp in again. Maintenance & Troubleshooting E-47 Lamp/Maintenance Indicators Maintenance Indicators LAMP REPLACEMENT indicator TEMPERATURE WARNING indicator • The warning lights on the projector indicate problems inside the projector. • There are two warning lights: a TEMPERATURE WARNING indicator which lets you notice a significant deterioration of the picture and color quality. The lamp usage time can vary significantly, the projector lamp may be checked with the On-screen Display (see page 39). Do not attempt to your nearest Authorized Sharp Industrial LCD...
... lamp in again. Maintenance & Troubleshooting E-47 Lamp/Maintenance Indicators Maintenance Indicators LAMP REPLACEMENT indicator TEMPERATURE WARNING indicator • The warning lights on the projector indicate problems inside the projector. • There are two warning lights: a TEMPERATURE WARNING indicator which lets you notice a significant deterioration of the picture and color quality. The lamp usage time can vary significantly, the projector lamp may be checked with the On-screen Display (see page 39). Do not attempt to your nearest Authorized Sharp Industrial LCD...

XG-NV7XU Operation Manual
Page 49
.... All service of the picture and color quality. or 2 3 Disconnect the power cord. Turn over the projector and unfasten the user service screw that the lamp be sure to remove the lamp cage by following the instructions below . 1 Turn off the power. Slide the lamp cage cover in the direction of the arrow. Replacing the Projection Lamp It is recommended that secures the lamp cage cover. Carefully change the lamp by a 90-day parts and labor...
.... All service of the picture and color quality. or 2 3 Disconnect the power cord. Turn over the projector and unfasten the user service screw that the lamp be sure to remove the lamp cage by following the instructions below . 1 Turn off the power. Slide the lamp cage cover in the direction of the arrow. Replacing the Projection Lamp It is recommended that secures the lamp cage cover. Carefully change the lamp by a 90-day parts and labor...

XG-NV7XU Operation Manual
Page 50
... on the projector, press POWER ON on , creating a black image. (See page 37.) • "Color" and "Tint" adjustments are set to MOUSE. • Cables improperly connected to side panel of the projector. (See pages 11-15.) • Remote control batteries have run down. (See page 8.) • Remote control's MOUSE/ADJUSTMENT switch is set to minimum position. (See page 27.) • On-screen Display ("BLACK SCREEN") is turned off . Replacing the Projection Lamp Resetting the lamp timer 1 Connect the power cord.
... on the projector, press POWER ON on , creating a black image. (See page 37.) • "Color" and "Tint" adjustments are set to MOUSE. • Cables improperly connected to side panel of the projector. (See pages 11-15.) • Remote control batteries have run down. (See page 8.) • Remote control's MOUSE/ADJUSTMENT switch is set to minimum position. (See page 27.) • On-screen Display ("BLACK SCREEN") is turned off . Replacing the Projection Lamp Resetting the lamp timer 1 Connect the power cord.

XG-NV7XU Operation Manual
Page 54
...serial port settings of the computer to match that of INPUT 1 IMAGE ADJUSTMENT is being sent, send each command only after the OK response code for each adjustment menu and checking the status with the On-screen Display. Computer RABR _מ1 0 → ← Projector OK CONTROL ITEM AUTO POWER OFF POWER SETTING INPUT SWITCHING INPUT CHECK KEYSTONE ADJUSTMENT COMMAND PARAMETER C1 C2 C3 C4 P1 P2 P3 P4 CONTROL CONTENTS A P O W _ _ _ 0 AUTO POWER OFF A P O W _ _ _ 1 AUTO POWER ON P O W R _ _ _ 0 POWER OFF (STANDBY) P O W R _ _ _ 1 POWER ON I V E D _ _ _ 1 VIDEO...
...serial port settings of the computer to match that of INPUT 1 IMAGE ADJUSTMENT is being sent, send each command only after the OK response code for each adjustment menu and checking the status with the On-screen Display. Computer RABR _מ1 0 → ← Projector OK CONTROL ITEM AUTO POWER OFF POWER SETTING INPUT SWITCHING INPUT CHECK KEYSTONE ADJUSTMENT COMMAND PARAMETER C1 C2 C3 C4 P1 P2 P3 P4 CONTROL CONTENTS A P O W _ _ _ 0 AUTO POWER OFF A P O W _ _ _ 1 AUTO POWER ON P O W R _ _ _ 0 POWER OFF (STANDBY) P O W R _ _ _ 1 POWER ON I V E D _ _ _ 1 VIDEO...

XG-NV7XU Operation Manual
Page 55
Appendix E-54 Set the NOISE FILTER to ON using the RS-232C command. RS-232C Port Specifications CONTROL ITEM VIDEO SYSTEM SELECTION VIDEO IMAGE ADJUSTMENT BACKGROUND SELECTION STARTUP IMAGE SELECTION VOLUME ADJUSTMENT AUDIO ADJUSTMENT INPUT 1 IMAGE ADJUSTMENT INPUT 2 IMAGE ADJUSTMENT INPUT AUTO SYNCHRONIZATION COMMAND PARAMETER C1 C2 C3 C4 P1 P2 P3 P4 CONTROL CONTENTS M E S Y _ _ _ 1 AUTO M E S Y _ _ _ 2 PAL (50/60 Hz) M E S Y _ _ _ 3 SECAM M E S Y _ _ _ 4 NTSC 4.43 M E S Y _ _ _ 5 NTSC 3.58 V A P I _ * * * CONTRAST (מ30 - ם30) V A B ...
Appendix E-54 Set the NOISE FILTER to ON using the RS-232C command. RS-232C Port Specifications CONTROL ITEM VIDEO SYSTEM SELECTION VIDEO IMAGE ADJUSTMENT BACKGROUND SELECTION STARTUP IMAGE SELECTION VOLUME ADJUSTMENT AUDIO ADJUSTMENT INPUT 1 IMAGE ADJUSTMENT INPUT 2 IMAGE ADJUSTMENT INPUT AUTO SYNCHRONIZATION COMMAND PARAMETER C1 C2 C3 C4 P1 P2 P3 P4 CONTROL CONTENTS M E S Y _ _ _ 1 AUTO M E S Y _ _ _ 2 PAL (50/60 Hz) M E S Y _ _ _ 3 SECAM M E S Y _ _ _ 4 NTSC 4.43 M E S Y _ _ _ 5 NTSC 3.58 V A P I _ * * * CONTRAST (מ30 - ם30) V A B ...

XG-NV7XU Operation Manual
Page 58
... 15 cm), Remote mouse receiver, Carrying bag, Lens cap (attached), Lens cap strap, CD-ROM, Projector operation manual, Projector quick reference, Sharp Advanced Presentation Software operation manual, Sharp Advanced Presentation Software quick reference, IrDA driver installation instruction sheet Replacement parts Remote control (RRMCG1530CESA), AA size batteries, Power cord (QACCU5013CEZZ), Computer cable (QCNW-5304CEZZ), Computer audio cable (QCNW-4870CEZZ), Mouse control serial cable (QCNW-5112CEZZ), Mouse control cable for IBM PS/2 (QCNW5113CEZZ), Mouse control cable for Mac (QCNW-5114CEZZ...
... 15 cm), Remote mouse receiver, Carrying bag, Lens cap (attached), Lens cap strap, CD-ROM, Projector operation manual, Projector quick reference, Sharp Advanced Presentation Software operation manual, Sharp Advanced Presentation Software quick reference, IrDA driver installation instruction sheet Replacement parts Remote control (RRMCG1530CESA), AA size batteries, Power cord (QACCU5013CEZZ), Computer cable (QCNW-5304CEZZ), Computer audio cable (QCNW-4870CEZZ), Mouse control serial cable (QCNW-5112CEZZ), Mouse control cable for IBM PS/2 (QCNW5113CEZZ), Mouse control cable for Mac (QCNW-5114CEZZ...

XG-NV7XU Operation Manual
Page 65
... Mouse control cable for Mac 15 Mouse control serial cable 15 MUTE button 17 O On-screen display language 26 P PDF 6 Phase 29 Picture adjustments 27 POWER buttons 16 Power cord 11 POWER indicator 16 Presentation tools 44 R Rear projection 20 Remote control 21 Remote control sensor 21 Remote mouse receiver 21 RESIZE button 36 RIGHT-CLICK button 22 RS-232C port 14 S Sharp Advanced Presentation Software (SAPS 25 Special mode adjustment 32 Startup image 42 Status function 45 S-VIDEO INPUT terminal 13 Sync 30 Sync on green 52 T TEMPERATURE WARNING indicator...
... Mouse control cable for Mac 15 Mouse control serial cable 15 MUTE button 17 O On-screen display language 26 P PDF 6 Phase 29 Picture adjustments 27 POWER buttons 16 Power cord 11 POWER indicator 16 Presentation tools 44 R Rear projection 20 Remote control 21 Remote control sensor 21 Remote mouse receiver 21 RESIZE button 36 RIGHT-CLICK button 22 RS-232C port 14 S Sharp Advanced Presentation Software (SAPS 25 Special mode adjustment 32 Startup image 42 Status function 45 S-VIDEO INPUT terminal 13 Sync 30 Sync on green 52 T TEMPERATURE WARNING indicator...


