

XG-P20XU Operation Manual
Page 2
... any safety notification of the device". Model No.: XG-P20XU Serial No.: There are designed to operate this device. REFER SERVICING TO QUALIFIED SERVICE PERSONNEL. ment. Important Information Before using the REGISTRATION CARD packed with the device. DO NOT REMOVE SCREWS EXCEPT SPECIFIED USER SERVICE SCREW. NO USER-SERVICEABLE PARTS EXCEPT LAMP UNIT. ONLY The enclosed RGB (computer) cable must be used in the frequency band of 49.82...
... any safety notification of the device". Model No.: XG-P20XU Serial No.: There are designed to operate this device. REFER SERVICING TO QUALIFIED SERVICE PERSONNEL. ment. Important Information Before using the REGISTRATION CARD packed with the device. DO NOT REMOVE SCREWS EXCEPT SPECIFIED USER SERVICE SCREW. NO USER-SERVICEABLE PARTS EXCEPT LAMP UNIT. ONLY The enclosed RGB (computer) cable must be used in the frequency band of 49.82...

XG-P20XU Operation Manual
Page 4
... maintain high image quality, SHARP recommends that all internal cleaning must be installed in . Then turn off the projector lamp. E-3 POTENTIAL HAZARD OF GLASS PARTICLES IF LAMP HAS RUPTURED. For disposal or recycling information, please contact your nearest Authorized Sharp Industrial LCD Products Dealer or Service Center for a replacement. CAUTION PRECAUCIÓN PRÉCAUTION Cautions Concerning the Setup of these environments, the lens must...
... maintain high image quality, SHARP recommends that all internal cleaning must be installed in . Then turn off the projector lamp. E-3 POTENTIAL HAZARD OF GLASS PARTICLES IF LAMP HAS RUPTURED. For disposal or recycling information, please contact your nearest Authorized Sharp Industrial LCD Products Dealer or Service Center for a replacement. CAUTION PRECAUCIÓN PRÉCAUTION Cautions Concerning the Setup of these environments, the lens must...
XG-P20XU Operation Manual
Page 5
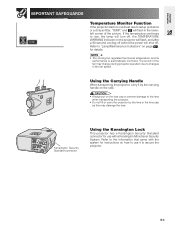
... IMPORTANT SAFEGUARDS Temperature Monitor Function If the projector starts to overheat due to rise, the lamp will turn off, the TEMPERATURE WARNING indicator on the projector will flash, and after a 90-second cooling-off period the power will flash in the fan speed. and " " will shut off. The sound of the picture. E-4 If the temperature continues to setup problems or a dirty air filter, "TEMP." Kensington Security Standard connector Using the Kensington Lock This projector has...
... IMPORTANT SAFEGUARDS Temperature Monitor Function If the projector starts to overheat due to rise, the lamp will turn off, the TEMPERATURE WARNING indicator on the projector will flash, and after a 90-second cooling-off period the power will flash in the fan speed. and " " will shut off. The sound of the picture. E-4 If the temperature continues to setup problems or a dirty air filter, "TEMP." Kensington Security Standard connector Using the Kensington Lock This projector has...
XG-P20XU Operation Manual
Page 6
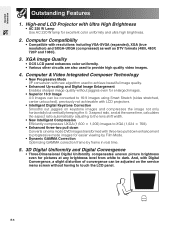
... to 16:9 images using Smart Stretch (sides stretched, center untouched), previously not achievable with LCD projectors. • Intelligent Digital Keystone Correction Smooths out jaggies on the service menu screen without having to dark. E-5 High-end LCD Projector with resolutions including VGA-SVGA (expanded), XGA (true resolution) and SXGA-UXGA (compressed) as well as DTV formats (480i, 480P, 720P and 1080i). 3. XGA Image Quality • OCS LCD panel enhances color uniformity. •...
... to 16:9 images using Smart Stretch (sides stretched, center untouched), previously not achievable with LCD projectors. • Intelligent Digital Keystone Correction Smooths out jaggies on the service menu screen without having to dark. E-5 High-end LCD Projector with resolutions including VGA-SVGA (expanded), XGA (true resolution) and SXGA-UXGA (compressed) as well as DTV formats (480i, 480P, 720P and 1080i). 3. XGA Image Quality • OCS LCD panel enhances color uniformity. •...

XG-P20XU Operation Manual
Page 7
...; Lens Shift, Power Zoom & Focus, Digital Keystone Correction • High Speed Auto Sync Technology 10. Projector RS-232C OUT can be used for daisy chain connection. • Simple Stacking and Videowall Display Comes with software for easy stacking and videowall processing even for RGB/Component/Video Signal • PC Digital Input (DVI) • Output terminal with a wireless, RF (nondirectional) design that erases out-of-sight worries. Useful Features • Picture-in -air" remote control...
...; Lens Shift, Power Zoom & Focus, Digital Keystone Correction • High Speed Auto Sync Technology 10. Projector RS-232C OUT can be used for daisy chain connection. • Simple Stacking and Videowall Display Comes with software for easy stacking and videowall processing even for RGB/Component/Video Signal • PC Digital Input (DVI) • Output terminal with a wireless, RF (nondirectional) design that erases out-of-sight worries. Useful Features • Picture-in -air" remote control...

XG-P20XU Operation Manual
Page 9
... Confirming the Lamp Usage Time ......... 57 Reversing/Inverting Projected Images ... 57 Setting the Stacking Mode 58 Locking the Operation Buttons on the Projector 58 Deselecting Inputs 59 Selecting the Transmission Speed (RS-232C 59 Controling Multiple Projectors with ID Numbers 60 Protecting Important Settings with a Password 61 Selecting the On-screen Display Language 62 Displaying the Adjustment Settings ....... 62 Maintenance & Troubleshooting Lamp/Maintenance Indicators 67 Replacing the Lamp 68 Replacing the Air Filter 70 Troubleshooting 71 For SHARP Assistance (U.S.A. only...
... Confirming the Lamp Usage Time ......... 57 Reversing/Inverting Projected Images ... 57 Setting the Stacking Mode 58 Locking the Operation Buttons on the Projector 58 Deselecting Inputs 59 Selecting the Transmission Speed (RS-232C 59 Controling Multiple Projectors with ID Numbers 60 Protecting Important Settings with a Password 61 Selecting the On-screen Display Language 62 Displaying the Adjustment Settings ....... 62 Maintenance & Troubleshooting Lamp/Maintenance Indicators 67 Replacing the Lamp 68 Replacing the Air Filter 70 Troubleshooting 71 For SHARP Assistance (U.S.A. only...

XG-P20XU Operation Manual
Page 10
... on the "manuals" folder. 5 Double click on the "xg-p20xu" folder. 6 Double click on the language (name of the folder) that you prefer using the "File", "Open" menu. • See the "readme.txt" file on the CD-ROM for languages other operating systems: Please download Acrobat Reader from the Internet. Important Information How to Access the PDF Operation Manuals PDF operation manuals in several...
... on the "manuals" folder. 5 Double click on the "xg-p20xu" folder. 6 Double click on the language (name of the folder) that you prefer using the "File", "Open" menu. • See the "readme.txt" file on the CD-ROM for languages other operating systems: Please download Acrobat Reader from the Internet. Important Information How to Access the PDF Operation Manuals PDF operation manuals in several...

XG-P20XU Operation Manual
Page 11
Projector Front View LAMP REPLACEMENT indicator 67 POWER indicator 67 POWER buttons (ON/OFF) 19 MUTE button 39 LENS button 21 INPUT 1, 2, 3, 4, 5 buttons 39 LEARN button 37 BLACK SCREEN button 40 ENTER button 44 Antenna 32 Lens shift dial 20 Speakers 52 Foot releases 20 67 TEMPERATURE WARNING indicator 32 GYRO RF indicator 39 VOLUME buttons 44 MENU button 51 AUTO SYNC button 42 RESIZE button 43 GAMMA button 44 UNDO button 44 ADJUSTMENT buttons 3 Cooling fan (Exhaust vent) 70 Air filter/Cooling fan (Intake vent) Rear View 70 Cooling...
Projector Front View LAMP REPLACEMENT indicator 67 POWER indicator 67 POWER buttons (ON/OFF) 19 MUTE button 39 LENS button 21 INPUT 1, 2, 3, 4, 5 buttons 39 LEARN button 37 BLACK SCREEN button 40 ENTER button 44 Antenna 32 Lens shift dial 20 Speakers 52 Foot releases 20 67 TEMPERATURE WARNING indicator 32 GYRO RF indicator 39 VOLUME buttons 44 MENU button 51 AUTO SYNC button 42 RESIZE button 43 GAMMA button 44 UNDO button 44 ADJUSTMENT buttons 3 Cooling fan (Exhaust vent) 70 Air filter/Cooling fan (Intake vent) Rear View 70 Cooling...
XG-P20XU Operation Manual
Page 16
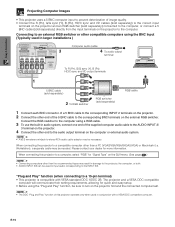
... a computer, select "RGB" for "Signal Type" on the GUI menu. (See page 47 .) • Connecting computers other than a PC (VGA/SVGA/XGA/SXGA/UXGA) or Macintosh (i.e. Setup & Connections Projecting Computer Images • This projector uses a 5 BNC computer input to prevent deterioration of image quality. • Connect the R (PR), G/G sync (Y), B (PB), HD/C sync and VD cables (sold separately) to the correct input terminals on the projector and an RGB switcher...
... a computer, select "RGB" for "Signal Type" on the GUI menu. (See page 47 .) • Connecting computers other than a PC (VGA/SVGA/XGA/SXGA/UXGA) or Macintosh (i.e. Setup & Connections Projecting Computer Images • This projector uses a 5 BNC computer input to prevent deterioration of image quality. • Connect the R (PR), G/G sync (Y), B (PB), HD/C sync and VD cables (sold separately) to the correct input terminals on the projector and an RGB switcher...
XG-P20XU Operation Manual
Page 20
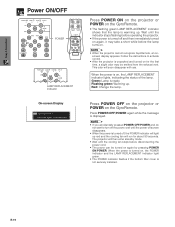
... POWER indicator will light up red and the cooling fan will soon disappear with use. This odor will run for the first time, a slight odor may take a short while before operating the projector. • If the power is turned off screen disappears. • When the power is unpacked and turned on , the POWER indicator and the LAMP REPLACEMENT indicator light green. • The POWER indicator flashes if the bottom filter cover is ready. Setup & Connections Power ON/OFF POWER LAMP REPLACEMENT indicator On-screen Display...
... POWER indicator will light up red and the cooling fan will soon disappear with use. This odor will run for the first time, a slight odor may take a short while before operating the projector. • If the power is turned off screen disappears. • When the power is unpacked and turned on , the POWER indicator and the LAMP REPLACEMENT indicator light green. • The POWER indicator flashes if the bottom filter cover is ready. Setup & Connections Power ON/OFF POWER LAMP REPLACEMENT indicator On-screen Display...
XG-P20XU Operation Manual
Page 22
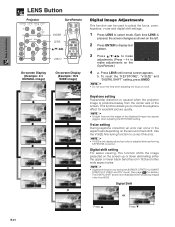
... & Connections LENS Button Projector GyroRemote ENTER LENS UNDO On-screen Display (Example: 4:3 NORMAL image) On-screen Display (Example: 16:9 WIDE image) Digital Image Adjustments This function can be adjusted when performing KEYSTONE correction. To reset the "KEYSTONE", "V-SIZE" and "DIGITAL SHIFT" setting, press UNDO. • Do not touch the lens when adjusting the focus or zoom. This function allows you to select mode. E-21 b. V-size setting During keystone correction an error can only be used to adjust the focus, zoom, keystone, v-size and digital shift settings...
... & Connections LENS Button Projector GyroRemote ENTER LENS UNDO On-screen Display (Example: 4:3 NORMAL image) On-screen Display (Example: 16:9 WIDE image) Digital Image Adjustments This function can be adjusted when performing KEYSTONE correction. To reset the "KEYSTONE", "V-SIZE" and "DIGITAL SHIFT" setting, press UNDO. • Do not touch the lens when adjusting the focus or zoom. This function allows you to select mode. E-21 b. V-size setting During keystone correction an error can only be used to adjust the focus, zoom, keystone, v-size and digital shift settings...

XG-P20XU Operation Manual
Page 23
... lens operation manual when attaching a lens.) You can install the AN-W6EZ and AN-T6EZ optional lenses yourself. NORMAL Mode (4:3) 3 WIDE Mode (16:9) 16 9 3 40 (ft) X H L 4 : Screen size and Picture size (4:3) 4 : Screen size and Picture size (16:9) : Signal mask area E-22 Four optional lenses from Sharp are available for specialized application. Move the projector forward or backward if the edges of the screen. However, be distorted, making viewing difficult. Setup & Connections Adjusting the Projection Distance...
... lens operation manual when attaching a lens.) You can install the AN-W6EZ and AN-T6EZ optional lenses yourself. NORMAL Mode (4:3) 3 WIDE Mode (16:9) 16 9 3 40 (ft) X H L 4 : Screen size and Picture size (4:3) 4 : Screen size and Picture size (16:9) : Signal mask area E-22 Four optional lenses from Sharp are available for specialized application. Move the projector forward or backward if the edges of the screen. However, be distorted, making viewing difficult. Setup & Connections Adjusting the Projection Distance...
XG-P20XU Operation Manual
Page 68
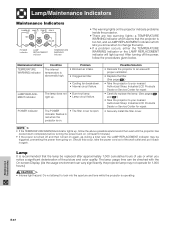
... filter cover is open. LAMP REPLACEMENT indicator The lamp does not • Burnt-out lamp. Do not attempt to change the lamp. • If a problem occurs, either the TEMPERATURE WARNING indicator or the LAMP REPLACEMENT indicator will light up . • Lamp circuit failure. Maintenance & Troubleshooting E-67 Should this occur, take the power cord out of use or when you know when to look into the aperture and lens while the projector is operating. Lamp It is abnormally high. After turning...
... filter cover is open. LAMP REPLACEMENT indicator The lamp does not • Burnt-out lamp. Do not attempt to change the lamp. • If a problem occurs, either the TEMPERATURE WARNING indicator or the LAMP REPLACEMENT indicator will light up . • Lamp circuit failure. Maintenance & Troubleshooting E-67 Should this occur, take the power cord out of use or when you know when to look into the aperture and lens while the projector is operating. Lamp It is abnormally high. After turning...

XG-P20XU Operation Manual
Page 69
... change the air filter during lamp replacement. Press POWER OFF. Tab Maintenance & Troubleshooting 4 Remove the air filter. 5 Replace the air filter. 6 Replace the filter cover. Insert the tab on the filter frame. Replacing the Lamp CAUTION • Potential hazard of the nearest Authorized Sharp Industrial LCD Products Dealer or Service Center, please call toll-free: 1-888-GO-SHARP (1-888-467-4277). Wait at your nearest Authorized Sharp Industrial LCD Products Dealer or Service Center for repair. Purchase a replacement lamp unit (lamp...
... change the air filter during lamp replacement. Press POWER OFF. Tab Maintenance & Troubleshooting 4 Remove the air filter. 5 Replace the air filter. 6 Replace the filter cover. Insert the tab on the filter frame. Replacing the Lamp CAUTION • Potential hazard of the nearest Authorized Sharp Industrial LCD Products Dealer or Service Center, please call toll-free: 1-888-GO-SHARP (1-888-467-4277). Wait at your nearest Authorized Sharp Industrial LCD Products Dealer or Service Center for repair. Purchase a replacement lamp unit (lamp...

XG-P20XU Operation Manual
Page 70
... socket of the arrow. Hold the lamp cage by the handle and pull it towards you. Plug the power cord into the lamp cage compartment. Fasten the securing screws. User service screw Resetting the lamp timer 1 Connect the power cord. Turn over the projector and loosen the user service screw that the lamp timer is reset. Ł Maintenance & Troubleshooting • Reset the lamp timer only after replacing the lamp. Replacing the Lamp 7 8 Remove the lamp cage cover. "LAMP 0000H" is displayed, indicating that secures the lamp cage cover.
... socket of the arrow. Hold the lamp cage by the handle and pull it towards you. Plug the power cord into the lamp cage compartment. Fasten the securing screws. User service screw Resetting the lamp timer 1 Connect the power cord. Turn over the projector and loosen the user service screw that the lamp timer is reset. Ł Maintenance & Troubleshooting • Reset the lamp timer only after replacing the lamp. Replacing the Lamp 7 8 Remove the lamp cage cover. "LAMP 0000H" is displayed, indicating that secures the lamp cage cover.
XG-P20XU Operation Manual
Page 71
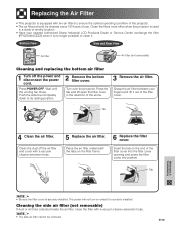
... the filter cover into the filter cover opening and press the filter cover into position. Press POWER OFF. Push the antenna completely down to its resting position. 2 Remove the bottom filter cover. Bottom View Side and Rear View Air filter Air filter (not removable) Cleaning and replacing the bottom air filter 1 Turn off the air filter and cover with a vacuum cleaner extension hose. • The side air filter cannot be cleaned every 100 hours of use. Turn over the projector. Tab 4 Clean the air filter. Insert...
... the filter cover into the filter cover opening and press the filter cover into position. Press POWER OFF. Push the antenna completely down to its resting position. 2 Remove the bottom filter cover. Bottom View Side and Rear View Air filter Air filter (not removable) Cleaning and replacing the bottom air filter 1 Turn off the air filter and cover with a vacuum cleaner extension hose. • The side air filter cannot be cleaned every 100 hours of use. Turn over the projector. Tab 4 Clean the air filter. Insert...

XG-P20XU Operation Manual
Page 72
... the GyroRemote is connected to "Lamp/Maintenance Indicators" on INPUT 1 or 2 COMPONENT. Maintenance indicator lights • Refer to the projector with certain computers. Set the NOISE FILTER to operate. Picture is blurred. • "Color" and "Tint" adjustments are not correct. (See page 47 .) • Adjust the focus. (See page 21 .) • Projection distance is turned on the projector and the GyroRemote are set . Troubleshooting Problem Power cannot be operated by GyroRemote. Use the SAPS or...
... the GyroRemote is connected to "Lamp/Maintenance Indicators" on INPUT 1 or 2 COMPONENT. Maintenance indicator lights • Refer to the projector with certain computers. Set the NOISE FILTER to operate. Picture is blurred. • "Color" and "Tint" adjustments are not correct. (See page 47 .) • Adjust the focus. (See page 21 .) • Projection distance is turned on the projector and the GyroRemote are set . Troubleshooting Problem Power cannot be operated by GyroRemote. Use the SAPS or...
XG-P20XU Operation Manual
Page 74
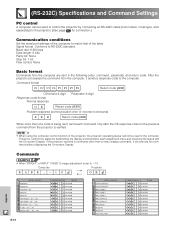
Signal format: Conforms to the computer. Appendix BUTTONS & REMOTE CONTROL KEY BUTTONS & REMOTE CONTROL KEY Commands EXAMPLE • When "BRIGHT" of the table. (RS-232C) Specifications and Command Settings PC control A computer can be used to control the projector by transmitting the display commands for each command only after the OK response code for connection.) Communication conditions Set the serial port settings of the computer to match that of INPUT 1 (RGB 1) image adjustment is verified. • When using the...
Signal format: Conforms to the computer. Appendix BUTTONS & REMOTE CONTROL KEY BUTTONS & REMOTE CONTROL KEY Commands EXAMPLE • When "BRIGHT" of the table. (RS-232C) Specifications and Command Settings PC control A computer can be used to control the projector by transmitting the display commands for each command only after the OK response code for connection.) Communication conditions Set the serial port settings of the computer to match that of INPUT 1 (RGB 1) image adjustment is verified. • When using the...

XG-P20XU Operation Manual
Page 80
...), AAA size batteries, Power cord (QACCU5013DE01), RGB cable (QCNW-5304CEZZ), USB mouse control cable (QCNW-5916CEZZ), Computer audio cable (QCNW-4870CEZZ), ø2.5-ø3.5 mm wired remote control cable (QCNW5943CEZZ), BNC-RCA adaptors (QPLGJ0107GEZZ), Air filter (PFILD0080CEZZ), Lens cap (PCAPH1056CESA), CD-ROM (UDSKA0043CEN1), LCD projector operation manual (TINS7354CEZZ), LCD projector quick guide (TINS-7355CEZZ), Sharp Advanced Presentation Software operation manual (TINS-7356CEZZ), ID number seal (TLABZ0781CEZZ) This SHARP projector uses LCD (Liquid Crystal Display) panels...
...), AAA size batteries, Power cord (QACCU5013DE01), RGB cable (QCNW-5304CEZZ), USB mouse control cable (QCNW-5916CEZZ), Computer audio cable (QCNW-4870CEZZ), ø2.5-ø3.5 mm wired remote control cable (QCNW5943CEZZ), BNC-RCA adaptors (QPLGJ0107GEZZ), Air filter (PFILD0080CEZZ), Lens cap (PCAPH1056CESA), CD-ROM (UDSKA0043CEN1), LCD projector operation manual (TINS7354CEZZ), LCD projector quick guide (TINS-7355CEZZ), Sharp Advanced Presentation Software operation manual (TINS-7356CEZZ), ID number seal (TLABZ0781CEZZ) This SHARP projector uses LCD (Liquid Crystal Display) panels...

XG-P20XU Operation Manual
Page 82
... Adjusting the Picture 47 Adjustment Feet 20 Air filter 70 Aspect ratio 42 ASSIGN Select button 33 Audio 52 Audio cable 18 AUDIO INPUT terminal 14 AUDIO OUTPUT terminal 18 Auto sync adjustment 51 AUTO SYNC button 51 B Background 55 BLACK SCREEN button 40 BNC-RCA adaptors 18 BORDER 42 C Carrying handle 4 Ceiling-mount 29 Ceiling+Rear 57 Clock 49 CLR Temp (Color Temperature 47 D Digital shift 21 DNR (Digital Noise Reduction 53 DOT BY DOT 42 DVI INPUT port (INPUT 3 16 E Economy Mode...
... Adjusting the Picture 47 Adjustment Feet 20 Air filter 70 Aspect ratio 42 ASSIGN Select button 33 Audio 52 Audio cable 18 AUDIO INPUT terminal 14 AUDIO OUTPUT terminal 18 Auto sync adjustment 51 AUTO SYNC button 51 B Background 55 BLACK SCREEN button 40 BNC-RCA adaptors 18 BORDER 42 C Carrying handle 4 Ceiling-mount 29 Ceiling+Rear 57 Clock 49 CLR Temp (Color Temperature 47 D Digital shift 21 DNR (Digital Noise Reduction 53 DOT BY DOT 42 DVI INPUT port (INPUT 3 16 E Economy Mode...


