

XG-P20XU Operation Manual
Page 1
Important Information Setup & Connections Operation Buttons Basic Operation Multiple Function Maintenance & Troubleshooting OPERATION MANUAL MODEL XG-P20XU LCD PROJECTOR Appendix
Important Information Setup & Connections Operation Buttons Basic Operation Multiple Function Maintenance & Troubleshooting OPERATION MANUAL MODEL XG-P20XU LCD PROJECTOR Appendix

XG-P20XU Operation Manual
Page 2
..., service and labor warranty applicable to radio communications. WARNING: FCC Regulations state that SHARP may cause harmful interference to your new SHARP LCD Projector, using the LCD projector, please read this equipment not expressly approved by the manufacturer could void the user's...(Effective Isotropic Radiated Power). Caution Any changes made to this product to comply with FCC Class A verification. Model No.: XG-P20XU Serial No.: There are designed to provide reasonable protection against harmful interference when the equipment is to the following two conditions...
..., service and labor warranty applicable to radio communications. WARNING: FCC Regulations state that SHARP may cause harmful interference to your new SHARP LCD Projector, using the LCD projector, please read this equipment not expressly approved by the manufacturer could void the user's...(Effective Isotropic Radiated Power). Caution Any changes made to this product to comply with FCC Class A verification. Model No.: XG-P20XU Serial No.: There are designed to provide reasonable protection against harmful interference when the equipment is to the following two conditions...

XG-P20XU Operation Manual
Page 3
... replace your personal safety. In order not to protect it from the type of power supply to your home, consult your LCD Projector, please be sure the service technician has used replacement parts specified by the manufacturer. 22. Do not defeat the safety purpose of.... Cleaning Unplug this product near water-for ventilation to read before use a mounting accessory recommended by the product manufacturer as this LCD Projector, observe the following basic rules for its installation, use liquid cleaners or aerosol cleaners. Power-Cord Protection Power-supply cords should be ...
... replace your personal safety. In order not to protect it from the type of power supply to your home, consult your LCD Projector, please be sure the service technician has used replacement parts specified by the manufacturer. 22. Do not defeat the safety purpose of.... Cleaning Unplug this product near water-for ventilation to read before use a mounting accessory recommended by the product manufacturer as this LCD Projector, observe the following basic rules for its installation, use liquid cleaners or aerosol cleaners. Power-Cord Protection Power-supply cords should be ...

XG-P20XU Operation Manual
Page 4
... a small amount of glass particles if lamp ruptures. This does not indicate a malfunction. Remove the projector power cord from humidity, dust and cigarette smoke. REPLACE WITH SAME SHARP LAMP UNIT TYPE BQC-XGP20X//1 ONLY. UV RADIATION : CAN CAUSE EYE DAMAGE. TURN OFF LAMP BEFORE...and adjacent areas may be regulated due to maintain high image quality, SHARP recommends that all internal cleaning must be extremely hot during projector operation. Notes on the power by an Authorized Sharp Industrial LCD Products Dealer or Service Center. Caution Concerning the Lamp ...
... a small amount of glass particles if lamp ruptures. This does not indicate a malfunction. Remove the projector power cord from humidity, dust and cigarette smoke. REPLACE WITH SAME SHARP LAMP UNIT TYPE BQC-XGP20X//1 ONLY. UV RADIATION : CAN CAUSE EYE DAMAGE. TURN OFF LAMP BEFORE...and adjacent areas may be regulated due to maintain high image quality, SHARP recommends that all internal cleaning must be extremely hot during projector operation. Notes on the power by an Authorized Sharp Industrial LCD Products Dealer or Service Center. Caution Concerning the Lamp ...
XG-P20XU Operation Manual
Page 5
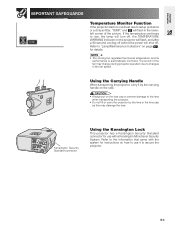
.... Refer to rise, the lamp will turn off, the TEMPERATURE WARNING indicator on the projector will flash, and after a 90-second cooling-off . Using the Carrying Handle When transporting the projector, carry it to changes in the lowerleft corner of the fan may damage the lens.... as this may change during projector operation due to secure the projector. Important Information IMPORTANT SAFEGUARDS Temperature Monitor Function If the projector starts to overheat due to the lens when transporting the projector. • Do not lift or carry the projector by the carrying handle on the...
.... Refer to rise, the lamp will turn off, the TEMPERATURE WARNING indicator on the projector will flash, and after a 90-second cooling-off . Using the Carrying Handle When transporting the projector, carry it to changes in the lowerleft corner of the fan may damage the lens.... as this may change during projector operation due to secure the projector. Important Information IMPORTANT SAFEGUARDS Temperature Monitor Function If the projector starts to overheat due to the lens when transporting the projector. • Do not lift or carry the projector by the carrying handle on the...
XG-P20XU Operation Manual
Page 6
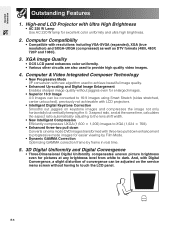
...; Intelligent Digital Keystone Correction Smooths out jaggies on the service menu screen without having to dark. High-end LCD Projector with Ultra High Brightness • AC 220 W Lamp Use AC 220 W lamp for pictures at the same time, calculates the aspect ratio automatically adjusting to ...
...; Intelligent Digital Keystone Correction Smooths out jaggies on the service menu screen without having to dark. High-end LCD Projector with Ultra High Brightness • AC 220 W Lamp Use AC 220 W lamp for pictures at the same time, calculates the aspect ratio automatically adjusting to ...

XG-P20XU Operation Manual
Page 7
... malfunctions. • Multiple & Group Projector Control Up to -see screen pointer. • Raising the bar for roaming interaction with software for easy stacking and videowall processing even for input from a single source. 7. Application Software • "Sharp Advanced Presentation Software-Professional Edition" (Network... gyro device for RGB/Component/Video Signal • PC Digital Input (DVI) • Output terminal with USB mouse control. 11. Projector RS-232C OUT can be used for Maximum Flexibility • Bayonet mount type: Wide-Zoom Lens, Tele-Zoom Lens • Screw ...
... malfunctions. • Multiple & Group Projector Control Up to -see screen pointer. • Raising the bar for roaming interaction with software for easy stacking and videowall processing even for input from a single source. 7. Application Software • "Sharp Advanced Presentation Software-Professional Edition" (Network... gyro device for RGB/Component/Video Signal • PC Digital Input (DVI) • Output terminal with USB mouse control. 11. Projector RS-232C OUT can be used for Maximum Flexibility • Bayonet mount type: Wide-Zoom Lens, Tele-Zoom Lens • Screw ...

XG-P20XU Operation Manual
Page 9
... Images ... 57 Setting the Stacking Mode 58 Locking the Operation Buttons on the Projector 58 Deselecting Inputs 59 Selecting the Transmission Speed (RS-232C 59 Controling Multiple Projectors with ID Numbers 60 Protecting Important Settings with a Password 61 Selecting the On...-screen Display Language 62 Displaying the Adjustment Settings ....... 62 Maintenance & Troubleshooting Lamp/Maintenance Indicators 67 Replacing the Lamp 68 Replacing the Air Filter 70 Troubleshooting 71 For SHARP ...
... Images ... 57 Setting the Stacking Mode 58 Locking the Operation Buttons on the Projector 58 Deselecting Inputs 59 Selecting the Transmission Speed (RS-232C 59 Controling Multiple Projectors with ID Numbers 60 Protecting Important Settings with a Password 61 Selecting the On...-screen Display Language 62 Displaying the Adjustment Settings ....... 62 Maintenance & Troubleshooting Lamp/Maintenance Indicators 67 Replacing the Lamp 68 Replacing the Air Filter 70 Troubleshooting 71 For SHARP ...

XG-P20XU Operation Manual
Page 10
... CD-ROM in this operation manual. and follow the instructions on the pdf file. Double click on the "saps" pdf file to access the Sharp Advanced Presentation Software manual. 7 Double click on the pdf file. • If the desired pdf file cannot be opened by double clicking the ... click on the "CD-ROM" icon. 3 Double click on the "manuals" folder. 4 Double click on the "xg-p20xu" folder. 5 Double click on the language (name of the folder) that you want to access the projector manuals. Accessing the PDF Manuals For Windows: 1 Insert the CD-ROM in the CD-ROM. To utilize...
... CD-ROM in this operation manual. and follow the instructions on the pdf file. Double click on the "saps" pdf file to access the Sharp Advanced Presentation Software manual. 7 Double click on the pdf file. • If the desired pdf file cannot be opened by double clicking the ... click on the "CD-ROM" icon. 3 Double click on the "manuals" folder. 4 Double click on the "xg-p20xu" folder. 5 Double click on the language (name of the folder) that you want to access the projector manuals. Accessing the PDF Manuals For Windows: 1 Insert the CD-ROM in the CD-ROM. To utilize...

XG-P20XU Operation Manual
Page 11
Important Information Part Names Numbers next to the part names refer to the main pages in this manual where the topic is explained. Projector Front View LAMP REPLACEMENT indicator 67 POWER indicator 67 POWER buttons (ON/OFF) 19 MUTE button 39 LENS button 21 INPUT 1, 2, 3, 4, 5 buttons 39 LEARN button ...
Important Information Part Names Numbers next to the part names refer to the main pages in this manual where the topic is explained. Projector Front View LAMP REPLACEMENT indicator 67 POWER indicator 67 POWER buttons (ON/OFF) 19 MUTE button 39 LENS button 21 INPUT 1, 2, 3, 4, 5 buttons 39 LEARN button ...
XG-P20XU Operation Manual
Page 13
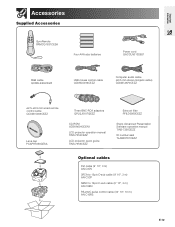
...;3.5 mm wired remote control cable QCNW-5943CEZZ Lens cap PCAPH1056CESA Three BNC-RCA adaptors QPLGJ0107GEZZ CD-ROM UDSKA0043CEN1 LCD projector operation manual TINS-7354CEZZ LCD projector quick guide TINS-7355CEZZ Extra air filter PFILD0080CEZZ Sharp Advanced Presentation Software operation manual TINS-7356CEZZ ID number seal TLABZ0781CEZZ Optional cables DVI cable (9Ј 10Љ...
...;3.5 mm wired remote control cable QCNW-5943CEZZ Lens cap PCAPH1056CESA Three BNC-RCA adaptors QPLGJ0107GEZZ CD-ROM UDSKA0043CEN1 LCD projector operation manual TINS-7354CEZZ LCD projector quick guide TINS-7355CEZZ Extra air filter PFILD0080CEZZ Sharp Advanced Presentation Software operation manual TINS-7356CEZZ ID number seal TLABZ0781CEZZ Optional cables DVI cable (9Ј 10Љ...

XG-P20XU Operation Manual
Page 14
Connect the power cord to a wall outlet. The POWER indicator lights up red and the projector enters standby mode. POWER indicator • If the bottom filter cover is not securely installed, the POWER indicator flashes. Setup & Connections Connections Power Supply Connecting the Power Cord Plug the supplied power cord into the AC socket on the rear of the projector. Power cord Make the necessary connections before proceeding. E-13
Connect the power cord to a wall outlet. The POWER indicator lights up red and the projector enters standby mode. POWER indicator • If the bottom filter cover is not securely installed, the POWER indicator flashes. Setup & Connections Connections Power Supply Connecting the Power Cord Plug the supplied power cord into the AC socket on the rear of the projector. Power cord Make the necessary connections before proceeding. E-13

XG-P20XU Operation Manual
Page 15
...Sharp Industrial LCD Products Dealer or Service Center. • AUDIO INPUT 1 can connect your projector to a computer for projection of full color computer images. Secure the connectors by tightening the thumb screws. 3 To use with some of the supplied computer audio cable to the INPUT 1. When connecting this projector... Chart" for a list of computer signals compatible with computer signals other end to the audio output terminal on the projector. 4 Connect the other than those listed may cause some Macintosh computers. Connecting to a computer using the standard 15...
...Sharp Industrial LCD Products Dealer or Service Center. • AUDIO INPUT 1 can connect your projector to a computer for projection of full color computer images. Secure the connectors by tightening the thumb screws. 3 To use with some of the supplied computer audio cable to the INPUT 1. When connecting this projector... Chart" for a list of computer signals compatible with computer signals other end to the audio output terminal on the projector. 4 Connect the other than those listed may cause some Macintosh computers. Connecting to a computer using the standard 15...
XG-P20XU Operation Manual
Page 16
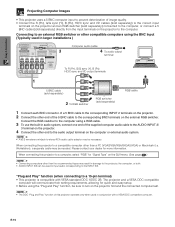
... 2 To RGB switcher RGB switcher (sold separately) RGB cable 1 Connect each BNC connector of a 5 BNC cable to the corresponding INPUT 2 terminals on the projector. 2 Connect the other end of image quality. • Connect the R (PR), G/G sync (Y), B (PB), HD/C sync and VD cables (sold ... • A ø3.5 mm stereo minijack to stereo RCA audio cable adaptor may be necessary. Setup & Connections Projecting Computer Images • This projector uses a 5 BNC computer input to prevent deterioration of the 5 BNC cable to the corresponding BNC terminals on the GUI menu. (See page 47...
... 2 To RGB switcher RGB switcher (sold separately) RGB cable 1 Connect each BNC connector of a 5 BNC cable to the corresponding INPUT 2 terminals on the projector. 2 Connect the other end of image quality. • Connect the R (PR), G/G sync (Y), B (PB), HD/C sync and VD cables (sold ... • A ø3.5 mm stereo minijack to stereo RCA audio cable adaptor may be necessary. Setup & Connections Projecting Computer Images • This projector uses a 5 BNC computer input to prevent deterioration of the 5 BNC cable to the corresponding BNC terminals on the GUI menu. (See page 47...

XG-P20XU Operation Manual
Page 17
...output terminal 1 DVI cable (sold separately) 2 To digital output terminal 1 Connect one end of the DVI cable to the INPUT 3 port on the projector. 2 Connect the other end to the audio output terminal on the computer. • This DVI port is DVI version 1.0 compatible. Connecting to a ... while it is not correctly set up /installing the correct mouse driver. • A Macintosh adaptor may not operate if your nearest Authorized Sharp Industrial LCD Products Dealer or Service Center. RGB cable Computer audio cable RS-232C cable (null modem, cross type, sold separately) CAUTION &#...
...output terminal 1 DVI cable (sold separately) 2 To digital output terminal 1 Connect one end of the DVI cable to the INPUT 3 port on the projector. 2 Connect the other end to the audio output terminal on the computer. • This DVI port is DVI version 1.0 compatible. Connecting to a ... while it is not correctly set up /installing the correct mouse driver. • A Macintosh adaptor may not operate if your nearest Authorized Sharp Industrial LCD Products Dealer or Service Center. RGB cable Computer audio cable RS-232C cable (null modem, cross type, sold separately) CAUTION &#...
XG-P20XU Operation Manual
Page 18
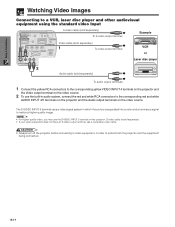
... Audio cable (sold separately. • If your video equipment does not have an S-video output terminal, use the S-VIDEO INPUT 5 terminal on the projector. The S-VIDEO INPUT 5 terminal uses a video signal system in which the picture is sold separately) To audio output terminals 1 Connect the yellow RCA... output terminal on the video source. 2 To use the built-in audio system, connect the red and white RCA connectors to protect both the projector and the equipment being connected. S-video cable is separated into a color and a luminance signal to realize a higher-quality image. • For...
... Audio cable (sold separately. • If your video equipment does not have an S-video output terminal, use the S-VIDEO INPUT 5 terminal on the projector. The S-VIDEO INPUT 5 terminal uses a video signal system in which the picture is sold separately) To audio output terminals 1 Connect the yellow RCA... output terminal on the video source. 2 To use the built-in audio system, connect the red and white RCA connectors to protect both the projector and the equipment being connected. S-video cable is separated into a color and a luminance signal to realize a higher-quality image. • For...

XG-P20XU Operation Manual
Page 19
... an amplifier and other audio components Audio cable (sold separately) To audio input terminals Amplifier CAUTION • Always turn off the projector before connecting to audio components, in audio system, connect one end of an audio cable (sold separately) or DVD video player ... mm stereo minijack/RCA cable, sold separately) Example DTV decoder 1 Component cable (sold separately) to the AUDIO INPUT 2/3 terminal on the projector. 4 Connect the other component video equipment using external audio components, the volume can be amplified for better sound. • The AUDIO OUTPUT ...
... an amplifier and other audio components Audio cable (sold separately) To audio input terminals Amplifier CAUTION • Always turn off the projector before connecting to audio components, in audio system, connect one end of an audio cable (sold separately) or DVD video player ... mm stereo minijack/RCA cable, sold separately) Example DTV decoder 1 Component cable (sold separately) to the AUDIO INPUT 2/3 terminal on the projector. 4 Connect the other component video equipment using external audio components, the volume can be amplified for better sound. • The AUDIO OUTPUT ...
XG-P20XU Operation Manual
Page 20
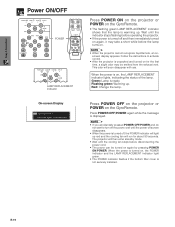
... ON/POWER. Red: Change the lamp. Setup & Connections Power ON/OFF POWER LAMP REPLACEMENT indicator On-screen Display Press POWER ON on the projector or POWER on , the POWER indicator and the LAMP REPLACEMENT indicator light green. • The POWER indicator flashes if the bottom filter cover ...is not securely installed. Flashing green: Warming up red and the cooling fan will soon disappear with use. The projector will then enter standby mode. • Wait until the indicator stops flashing before disconnecting the power cord. • The power can be emitted...
... ON/POWER. Red: Change the lamp. Setup & Connections Power ON/OFF POWER LAMP REPLACEMENT indicator On-screen Display Press POWER ON on the projector or POWER on , the POWER indicator and the LAMP REPLACEMENT indicator light green. • The POWER indicator flashes if the bottom filter cover ...is not securely installed. Flashing green: Warming up red and the cooling fan will soon disappear with use. The projector will then enter standby mode. • Wait until the indicator stops flashing before disconnecting the power cord. • The power can be emitted...

XG-P20XU Operation Manual
Page 21
...the center of the lens and center of the screen are extended without firmly holding the projector. • Do not hold the lens when lifting or lowering the projector. • When lowering the projector, be adjusted within the shift range of the lens by rotating the dial on the ...lens is adjusted, the image may result in the area between the adjustment feet and the projector. Setting Up the Screen Using the Adjustment Feet 1 2 3 Setup & Connections Press foot releases. E-20 Projector Projected Image Lens shift dial UP UP DOWN DOWN • The lens shift dial is reached...
...the center of the lens and center of the screen are extended without firmly holding the projector. • Do not hold the lens when lifting or lowering the projector. • When lowering the projector, be adjusted within the shift range of the lens by rotating the dial on the ...lens is adjusted, the image may result in the area between the adjustment feet and the projector. Setting Up the Screen Using the Adjustment Feet 1 2 3 Setup & Connections Press foot releases. E-20 Projector Projected Image Lens shift dial UP UP DOWN DOWN • The lens shift dial is reached...
XG-P20XU Operation Manual
Page 22
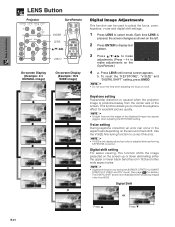
Setup & Connections LENS Button Projector GyroRemote ENTER LENS UNDO On-screen Display (Example: 4:3 NORMAL image) On-screen Display (Example: 16:9 WIDE image) Digital Image Adjustments This function can only be ... function only works with BORDER, STRETCH or SMART STRETCH of the screen. Digital Shift or Press ∂. b. Keystone setting Trapezoidal distortion is caused when the projector image is pressed, the screen changes as shown on the left. 2 Press ENTER to display test pattern. 3 Press to make adjustments. (Press to correct this...
Setup & Connections LENS Button Projector GyroRemote ENTER LENS UNDO On-screen Display (Example: 4:3 NORMAL image) On-screen Display (Example: 16:9 WIDE image) Digital Image Adjustments This function can only be ... function only works with BORDER, STRETCH or SMART STRETCH of the screen. Digital Shift or Press ∂. b. Keystone setting Trapezoidal distortion is caused when the projector image is pressed, the screen changes as shown on the left. 2 Press ENTER to display test pattern. 3 Press to make adjustments. (Press to correct this...


