
XG-V10WU Operation Manual
Page 4
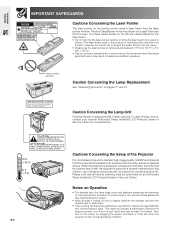
...: 1mW CLASS II LASER PRODUCT "COMPLIES WITH 21 CFR SUBCHAPTER J" SHARP ELECTRONICS CORPORATION SHARP PLAZA, MAHWAH, NEW JERSEY 07430 TEL : 1-800-BE-SHARP U.S.A. Cautions Concerning the Laser Pointer The laser pointer on the remote control emits a laser beam from the wall outlet and wait at least... turn off the projector lamp. Important Information IMPORTANT SAFEGUARDS CAUTION LASER RADIATIONDO NOT STARE INTO BEAM WAVE LENGTH : 650nm MAX. ONLY REMOTE CONTROL MODEL NO. : RRMCG1564CESA DC3V (1.5VX2PCS.) MADE IN CHINA FABRIQUÉ AU CHINE AVOID EXPOSURE-LASER RADIATION IS EMITTED FROM...
...: 1mW CLASS II LASER PRODUCT "COMPLIES WITH 21 CFR SUBCHAPTER J" SHARP ELECTRONICS CORPORATION SHARP PLAZA, MAHWAH, NEW JERSEY 07430 TEL : 1-800-BE-SHARP U.S.A. Cautions Concerning the Laser Pointer The laser pointer on the remote control emits a laser beam from the wall outlet and wait at least... turn off the projector lamp. Important Information IMPORTANT SAFEGUARDS CAUTION LASER RADIATIONDO NOT STARE INTO BEAM WAVE LENGTH : 650nm MAX. ONLY REMOTE CONTROL MODEL NO. : RRMCG1564CESA DC3V (1.5VX2PCS.) MADE IN CHINA FABRIQUÉ AU CHINE AVOID EXPOSURE-LASER RADIATION IS EMITTED FROM...

XG-V10WU Operation Manual
Page 7
...; High Speed AutoSync Technology (4 to 250 projectors can be -released) Expansion Video Board: Serial Digital Interface (SDI) Board 8. Application Software • "Sharp Advanced Presentation Software-Professional Edition" (Network and Remote Control) LAN LAN LAN E-6 Advanced Presentation Features • Built-in Presentation Tools, Picture-in-Picture, Digital Enlargement, Freeze • Customizable Startup Screen...
...; High Speed AutoSync Technology (4 to 250 projectors can be -released) Expansion Video Board: Serial Digital Interface (SDI) Board 8. Application Software • "Sharp Advanced Presentation Software-Professional Edition" (Network and Remote Control) LAN LAN LAN E-6 Advanced Presentation Features • Built-in Presentation Tools, Picture-in-Picture, Digital Enlargement, Freeze • Customizable Startup Screen...

XG-V10WU Operation Manual
Page 8
... Screen 32 Displaying a Still Image 32 Magnifying a Specific Portion of an Image 33 Adjusting the Picture Aspect Ratio 34 Gamma Correction Function 35 Selecting the Remote Control Mode ......... 36 Operating the Remote Control 36 Connecting the Mouse Receiver 38 Using as a Laser Pointer 39 Using as a Wired...
... Screen 32 Displaying a Still Image 32 Magnifying a Specific Portion of an Image 33 Adjusting the Picture Aspect Ratio 34 Gamma Correction Function 35 Selecting the Remote Control Mode ......... 36 Operating the Remote Control 36 Connecting the Mouse Receiver 38 Using as a Laser Pointer 39 Using as a Wired...
XG-V10WU Operation Manual
Page 9
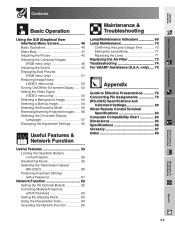
... Lamp Mode 71 Replacing the Lamp 71 Replacing the Air Filter 73 Troubleshooting 74 For SHARP Assistance (U.S.A. only) ..... 74 Appendix Guide to Effective Presentations 75 Connecting Pin Assignments 79 (RS-232C) Specifications and Command Settings 80 Wired Remote Control Terminal Specifications 83 Computer Compatibility Chart 84 Dimensions 85 Specifications 86 Glossary 87...
... Lamp Mode 71 Replacing the Lamp 71 Replacing the Air Filter 73 Troubleshooting 74 For SHARP Assistance (U.S.A. only) ..... 74 Appendix Guide to Effective Presentations 75 Connecting Pin Assignments 79 (RS-232C) Specifications and Command Settings 80 Wired Remote Control Terminal Specifications 83 Computer Compatibility Chart 84 Dimensions 85 Specifications 86 Glossary 87...

XG-V10WU Operation Manual
Page 11
... ENLARGE button 33 UNDO button 40 40 MENU button 40 ADJUSTMENT buttons 31 INPUT 4, 5, 6 button 49 AUTO SYNC button 34 RESIZE button 35 GAMMA button Remote control sensor 36 Lens (sold separately) 21 Air filter (Intake vent) 73 19 POWER indicator 4 Carrying handle 20 Adjuster 69 LAMP 1 REPLACEMENT indicator 69 LAMP...
... ENLARGE button 33 UNDO button 40 40 MENU button 40 ADJUSTMENT buttons 31 INPUT 4, 5, 6 button 49 AUTO SYNC button 34 RESIZE button 35 GAMMA button Remote control sensor 36 Lens (sold separately) 21 Air filter (Intake vent) 73 19 POWER indicator 4 Carrying handle 20 Adjuster 69 LAMP 1 REPLACEMENT indicator 69 LAMP...

XG-V10WU Operation Manual
Page 12
Projector Side and Rear View Speakers Exhaust vent 3 Remote control sensor 36 LED display (ID No.) 63 14 AC socket RS-232C INPUT port/ 16 RS-232C OUTPUT port 628 OUTPUT port (15-pin ... for INPUT 4, 5/ 17 S-VIDEO OUTPUT terminal for INPUT 4, 5 (4-pin Mini DIN)/ 18 AUDIO OUTPUT terminals for INPUT 4, 5 19 MAIN POWER switch DC 12V OUTPUT WIRED REMOTE control input terminal 39 Important Information Part Names Numbers next to the part names refer to the main pages in this manual where the topic...
Projector Side and Rear View Speakers Exhaust vent 3 Remote control sensor 36 LED display (ID No.) 63 14 AC socket RS-232C INPUT port/ 16 RS-232C OUTPUT port 628 OUTPUT port (15-pin ... for INPUT 4, 5/ 17 S-VIDEO OUTPUT terminal for INPUT 4, 5 (4-pin Mini DIN)/ 18 AUDIO OUTPUT terminals for INPUT 4, 5 19 MAIN POWER switch DC 12V OUTPUT WIRED REMOTE control input terminal 39 Important Information Part Names Numbers next to the part names refer to the main pages in this manual where the topic...
XG-V10WU Operation Manual
Page 13
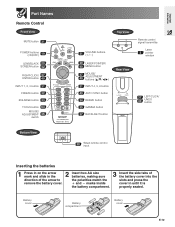
Important Information Part Names Remote Control Front View MUTE button 31 POWER buttons (ON/OFF) 19 LENS/BLACK 29 SCREEN button 32 RIGHT-CLICK/ 37 ENTER button 40 INPUT 1, 2, 3 button ... INPUT 4, 5, 6 button 49 AUTO SYNC button 34 RESIZE button 35 GAMMA button 37 BACKLIGHT button Rear View Remote control signal transmitter Laser 3 pointer window 37 LEFT-CLICK/ 40 UNDO button BBotottotmomVVieiwew 39 Wired remote control input Inserting the batteries 1 Press in on the arrow mark and slide in the 2 Insert two AA...
Important Information Part Names Remote Control Front View MUTE button 31 POWER buttons (ON/OFF) 19 LENS/BLACK 29 SCREEN button 32 RIGHT-CLICK/ 37 ENTER button 40 INPUT 1, 2, 3 button ... INPUT 4, 5, 6 button 49 AUTO SYNC button 34 RESIZE button 35 GAMMA button 37 BACKLIGHT button Rear View Remote control signal transmitter Laser 3 pointer window 37 LEFT-CLICK/ 40 UNDO button BBotottotmomVVieiwew 39 Wired remote control input Inserting the batteries 1 Press in on the arrow mark and slide in the 2 Insert two AA...
XG-V10WU Operation Manual
Page 14
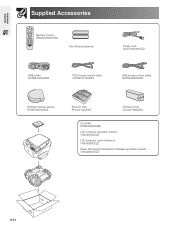
Important Information Supplied Accessories Remote control RRMCG1564CESA Two AA size batteries Power cord QACCU5013CEZZ RGB cable QCNW-5304CEZZ PS/2 mouse control cable QCNW-5113CEZZ USB mouse control cable QCNW-5680CEZZ Remote mouse receiver RUNTK0673CEZZ Extra air filter PFILD0110CEZZ Terminal cover CCOVA1789CE01 CD-ROM UDSKA0020CEN1 LCD projector operation manual TINS-6974CEZZ LCD projector quick reference TINS-6980CEZZ Sharp Advanced Presentation Software operation manual TINS-6992CEZZ E-13
Important Information Supplied Accessories Remote control RRMCG1564CESA Two AA size batteries Power cord QACCU5013CEZZ RGB cable QCNW-5304CEZZ PS/2 mouse control cable QCNW-5113CEZZ USB mouse control cable QCNW-5680CEZZ Remote mouse receiver RUNTK0673CEZZ Extra air filter PFILD0110CEZZ Terminal cover CCOVA1789CE01 CD-ROM UDSKA0020CEN1 LCD projector operation manual TINS-6974CEZZ LCD projector quick reference TINS-6980CEZZ Sharp Advanced Presentation Software operation manual TINS-6992CEZZ E-13

XG-V10WU Operation Manual
Page 20
... be emitted from the exhaust vent. Wait until the cooling fan stops before the lamp turns on. • After the projector is not on, the remote control cannot be used to turn off the power, wait until the power off and then immediately turned on the side of the lamp.
... be emitted from the exhaust vent. Wait until the cooling fan stops before the lamp turns on. • After the projector is not on, the remote control cannot be used to turn off the power, wait until the power off and then immediately turned on the side of the lamp.
XG-V10WU Operation Manual
Page 30
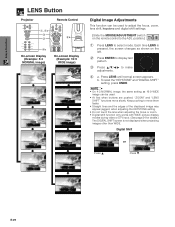
...reset the "KEYSTONE" and "DIGITAL SHIFT" setting, press UNDO. • On 4:3 NORMAL image, the same setting as shown on the remote control to the ADJ. Digital Shift Press ∂. Keep pushing to adjust the focus, zoom, lens shift, keystone and digital shift settings.... (Slide the MOUSE/ADJUSTMENT switch MOUSE ADJ. Setup & Connections LENS Button Projector Remote Control 1, 4a 3 2 4b 4b On-screen Display (Example: 5:4 NORMAL image) 1.2.3 4.5.6 On-screen Display (Example: 16:9 WIDE image) Digital...
...reset the "KEYSTONE" and "DIGITAL SHIFT" setting, press UNDO. • On 4:3 NORMAL image, the same setting as shown on the remote control to the ADJ. Digital Shift Press ∂. Keep pushing to adjust the focus, zoom, lens shift, keystone and digital shift settings.... (Slide the MOUSE/ADJUSTMENT switch MOUSE ADJ. Setup & Connections LENS Button Projector Remote Control 1, 4a 3 2 4b 4b On-screen Display (Example: 5:4 NORMAL image) 1.2.3 4.5.6 On-screen Display (Example: 16:9 WIDE image) Digital...

XG-V10WU Operation Manual
Page 32
...projector is not preset to temporarily turn the sound back on. On-screen Display 1.2.3 4.5.6 Muting the Sound Projector Conference Series Remote Control MUTE button Press MUTE to receive is received, "NO SIGNAL" will be displayed. INPUT 1 Mode On-screen Display ...INPUT 2 Mode INPUT 3 Mode INPUT 4 Mode INPUT 5 Mode INPUT 6 Mode Adjusting the Volume Projector Remote Control VOLUME buttons Press VOLUME to turn off the sound. On-screen Display E-31 1.2.3 4.5.6 will be displayed. INPUT buttons 1.2.3 4.5.6 •...
...projector is not preset to temporarily turn the sound back on. On-screen Display 1.2.3 4.5.6 Muting the Sound Projector Conference Series Remote Control MUTE button Press MUTE to receive is received, "NO SIGNAL" will be displayed. INPUT 1 Mode On-screen Display ...INPUT 2 Mode INPUT 3 Mode INPUT 4 Mode INPUT 5 Mode INPUT 6 Mode Adjusting the Volume Projector Remote Control VOLUME buttons Press VOLUME to turn off the sound. On-screen Display E-31 1.2.3 4.5.6 will be displayed. INPUT buttons 1.2.3 4.5.6 •...

XG-V10WU Operation Manual
Page 33
... Press FREEZE again to return to the moving image. Operation Buttons Superimposing a Black Screen Projector Remote Control BLACK SCREEN button This function can also use the remote control to superimpose a black screen over the projected image. Blacking out the Projected Image Press ... image from a computer while you to instantly freeze a moving image. This is displayed on the screen. sg Displaying a Still Image Projector Remote Control 1, 2 1.2.3 4.5.6 This function allows you make preparations for the next computer images to be used to operate this function to display...
... Press FREEZE again to return to the moving image. Operation Buttons Superimposing a Black Screen Projector Remote Control BLACK SCREEN button This function can also use the remote control to superimpose a black screen over the projected image. Blacking out the Projected Image Press ... image from a computer while you to instantly freeze a moving image. This is displayed on the screen. sg Displaying a Still Image Projector Remote Control 1, 2 1.2.3 4.5.6 This function allows you make preparations for the next computer images to be used to operate this function to display...

XG-V10WU Operation Manual
Page 34
Each time ENLARGE is pressed, the image will return to ן1. Operation Buttons s Magnifying a Specific Portion of an Image Projector Remote Control 2 1 3 1.2.3 4.5.6 3 On-screen Display ן4 This function allows you can pan and scan around the image by using... When the image is magnified, you to magnify a specific portion of the image. (Slide the MOUSE/ADJUSTMENT switch MOUSE ADJ. E-33 on the remote control to ן1, press UNDO. This is interrupted, or (c) when the input resolution and refresh rate changes. 3 To return to ...
Each time ENLARGE is pressed, the image will return to ן1. Operation Buttons s Magnifying a Specific Portion of an Image Projector Remote Control 2 1 3 1.2.3 4.5.6 3 On-screen Display ן4 This function allows you can pan and scan around the image by using... When the image is magnified, you to magnify a specific portion of the image. (Slide the MOUSE/ADJUSTMENT switch MOUSE ADJ. E-33 on the remote control to ן1, press UNDO. This is interrupted, or (c) when the input resolution and refresh rate changes. 3 To return to ...
XG-V10WU Operation Manual
Page 35
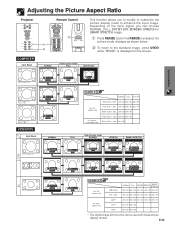
..., STRETCH or SMART STRETCH image. 1 Press RESIZE. Each time RESIZE is displayed on the screen. E-34 Adjusting the Picture Aspect Ratio Projector COMPUTER Input Signal Remote Control 1 2 1.2.3 4.5.6 2 This function allows you can be used with squeeze RESIZE NORMAL RESIZE NORMAL 720P 1080i FOR 16:9 aspect ratio RESIZE NORMAL RESIZE FULL RESIZE...
..., STRETCH or SMART STRETCH image. 1 Press RESIZE. Each time RESIZE is displayed on the screen. E-34 Adjusting the Picture Aspect Ratio Projector COMPUTER Input Signal Remote Control 1 2 1.2.3 4.5.6 2 This function allows you can be used with squeeze RESIZE NORMAL RESIZE NORMAL 720P 1080i FOR 16:9 aspect ratio RESIZE NORMAL RESIZE FULL RESIZE...
XG-V10WU Operation Manual
Page 36
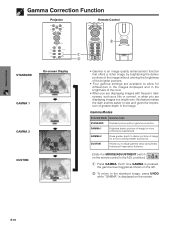
...this feature makes the dark scenes easier to the ADJ. on the left. 2 To return to adjust gamma value using Sharp Advanced Presentation Software. (Slide the MOUSE/ADJUSTMENT switch MOUSE ADJ. position.) 1 Press GAMMA. Gamma Modes Selected Mode Gamma ... you are displaying images in the image. GAMMA 1 Brightens darker portions of image for a more enhanced presentations. Operation Buttons Gamma Correction Function Projector Remote Control STANDARD GAMMA 1 GAMMA 2 CUSTOM 1 2 1.2.3 4.5.6 2 s s s On-screen Display • Gamma is an image quality enhancement function...
...this feature makes the dark scenes easier to the ADJ. on the left. 2 To return to adjust gamma value using Sharp Advanced Presentation Software. (Slide the MOUSE/ADJUSTMENT switch MOUSE ADJ. position.) 1 Press GAMMA. Gamma Modes Selected Mode Gamma ... you are displaying images in the image. GAMMA 1 Brightens darker portions of image for a more enhanced presentations. Operation Buttons Gamma Correction Function Projector Remote Control STANDARD GAMMA 1 GAMMA 2 CUSTOM 1 2 1.2.3 4.5.6 2 s s s On-screen Display • Gamma is an image quality enhancement function...

XG-V10WU Operation Manual
Page 37
... effective distance of a connected computer within the ranges shown below. • The signal from the remote control can be reflected off a screen for easy operation. Controling the Projector Remote Control 30˚ 23Ј (7 m) 30˚ 45˚ 45˚ 30˚... Using the Wireless Mouse Remote Control 30˚ 13Ј(4 m) 30˚ 120˚ Remote mouse receiver Remote Control E-36 Wireless mouse/ Laser pointer Projector control Operating the Remote Control Remote Control/Mouse Receiver Positioning • The remote control can be used to control ...
... effective distance of a connected computer within the ranges shown below. • The signal from the remote control can be reflected off a screen for easy operation. Controling the Projector Remote Control 30˚ 23Ј (7 m) 30˚ 45˚ 45˚ 30˚... Using the Wireless Mouse Remote Control 30˚ 13Ј(4 m) 30˚ 120˚ Remote mouse receiver Remote Control E-36 Wireless mouse/ Laser pointer Projector control Operating the Remote Control Remote Control/Mouse Receiver Positioning • The remote control can be used to control ...

XG-V10WU Operation Manual
Page 38
.../ADJUSTMENT switch to projector adjustments. MOUSE mode buttons BLACK SCREEN MOUSE RIGHT-CLICK 1.2.3 4.5.6 LASER POINTER LEFT-CLICK MOUSE/ ADJUSTMENT MOUSE ADJ. Operation Buttons Operating the Remote Control Use as a Wireless Mouse Be sure the supplied...
.../ADJUSTMENT switch to projector adjustments. MOUSE mode buttons BLACK SCREEN MOUSE RIGHT-CLICK 1.2.3 4.5.6 LASER POINTER LEFT-CLICK MOUSE/ ADJUSTMENT MOUSE ADJ. Operation Buttons Operating the Remote Control Use as a Wireless Mouse Be sure the supplied...

XG-V10WU Operation Manual
Page 39
...Windows Hardware: PC/AT compatible machine with PS/2 or USB type mouse systems. 1.2.3 4.5.6 Conference Series Operation Buttons Connecting to the USB port on the remote mouse receiver. OS: Windows 98/Windows NT 5.0 or higher Macintosh Hardware: Macintosh series with USB port OS: Mac OS 8.5 or higher E-38 USB ...of the supplied USB mouse control cable to the corresponding terminal on the computer. 2 Connect the other end to the PS/2 port on the remote mouse receiver. 4 Turn on the power of the supplied PS/2 mouse control cable to the corresponding terminal on the PC. 3 Connect the other...
...Windows Hardware: PC/AT compatible machine with PS/2 or USB type mouse systems. 1.2.3 4.5.6 Conference Series Operation Buttons Connecting to the USB port on the remote mouse receiver. OS: Windows 98/Windows NT 5.0 or higher Macintosh Hardware: Macintosh series with USB port OS: Mac OS 8.5 or higher E-38 USB ...of the supplied USB mouse control cable to the corresponding terminal on the computer. 2 Connect the other end to the PS/2 port on the remote mouse receiver. 4 Turn on the power of the supplied PS/2 mouse control cable to the corresponding terminal on the PC. 3 Connect the other...

XG-V10WU Operation Manual
Page 40
...harmless when directed onto the skin. E-39 Operation Buttons Using as a Laser Pointer Use as a Wired Remote Control 3.5 mm stereo minijack cable (sold separately) Wired Remote Control When the remote control cannot be used due to the range or positioning of the projector (rear projection, etc.), connect ...a 3.5 mm stereo minijack cable (sold separately) from the wired remote control input on the bottom of the remote control to the WIRED REMOTE control input terminal on yourself or others. (The laser beam used in this product is released, ...
...harmless when directed onto the skin. E-39 Operation Buttons Using as a Laser Pointer Use as a Wired Remote Control 3.5 mm stereo minijack cable (sold separately) Wired Remote Control When the remote control cannot be used due to the range or positioning of the projector (rear projection, etc.), connect ...a 3.5 mm stereo minijack cable (sold separately) from the wired remote control input on the bottom of the remote control to the WIRED REMOTE control input terminal on yourself or others. (The laser beam used in this product is released, ...
XG-V10WU Operation Manual
Page 41
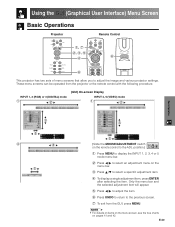
... on the menu bar. 3 Press ∂/ƒ to the ADJ. Using the GUI (Graphical User Interface) Menu Screen Basic Operations Projector Remote Control 1, 7 2, 3, 5 4 6 6 1.2.3 4.5.6 This projector has two sets of menu screens that allow you to the previous screen. 7...procedure. position.) 1 Press MENU to display the INPUT 1, 2, 3, 4 or 5 mode menu bar. 2 Press ß/© to select an adjustment menu on the remote control to select a specific adjustment item. 4 To display a single adjustment item, press ENTER after selecting the item. INPUT 1, 2 (RGB) or 3 (DIGITAL) mode...
... on the menu bar. 3 Press ∂/ƒ to the ADJ. Using the GUI (Graphical User Interface) Menu Screen Basic Operations Projector Remote Control 1, 7 2, 3, 5 4 6 6 1.2.3 4.5.6 This projector has two sets of menu screens that allow you to the previous screen. 7...procedure. position.) 1 Press MENU to display the INPUT 1, 2, 3, 4 or 5 mode menu bar. 2 Press ß/© to select an adjustment menu on the remote control to select a specific adjustment item. 4 To display a single adjustment item, press ENTER after selecting the item. INPUT 1, 2 (RGB) or 3 (DIGITAL) mode...


