Operation Manual
Page 4
...and can radiate radio frequency energy and, if not installed and used in accordance with Part 15 of conformity SHARP PROJECTOR, MODEL XV-Z30000 This device complies with the operation manual, may cause harmful interference to radio communications. U.S.A. ONLY Declaration of ...inside the lamp cage or gas contained in the lamp may cause undesired operation. Responsible Party: SHARP ELECTRONICS CORPORATION Sharp Plaza, Mahwah, New Jersey 07495-1163 TEL: 1-800-BE-SHARP (1-800-237-4277) Caution Concerning Lamp Replacement ■ This projector utilizes a pressurized mercury lamp. It ...
...and can radiate radio frequency energy and, if not installed and used in accordance with Part 15 of conformity SHARP PROJECTOR, MODEL XV-Z30000 This device complies with the operation manual, may cause harmful interference to radio communications. U.S.A. ONLY Declaration of ...inside the lamp cage or gas contained in the lamp may cause undesired operation. Responsible Party: SHARP ELECTRONICS CORPORATION Sharp Plaza, Mahwah, New Jersey 07495-1163 TEL: 1-800-BE-SHARP (1-800-237-4277) Caution Concerning Lamp Replacement ■ This projector utilizes a pressurized mercury lamp. It ...
Operation Manual
Page 7
...74 Reference Appendix Maintenance 75 Maintenance Indicators 76 Regarding the Lamp 78 Lamp 78 Caution Concerning the Lamp 78 Replacing the Lamp 78 Removing and Installing the Lamp Unit 79 Resetting the Lamp Timer 80 Compatibility Chart 81 Troubleshooting 83 For SHARP Assistance 86 Specifications 87 Dimensions 88 Index ... on viewing 3D images ......... 62 Supplied Accessories for the 3D Glasses 64 Part Names 64 Before Using the 3D Glasses 65 Replacing the Button Cell Battery 65 Attaching the Nose Pad 66 Attaching the 3D Glasses Band 66 Using the 3D Glasses 66 Connecting...
...74 Reference Appendix Maintenance 75 Maintenance Indicators 76 Regarding the Lamp 78 Lamp 78 Caution Concerning the Lamp 78 Replacing the Lamp 78 Removing and Installing the Lamp Unit 79 Resetting the Lamp Timer 80 Compatibility Chart 81 Troubleshooting 83 For SHARP Assistance 86 Specifications 87 Dimensions 88 Index ... on viewing 3D images ......... 62 Supplied Accessories for the 3D Glasses 64 Part Names 64 Before Using the 3D Glasses 65 Replacing the Button Cell Battery 65 Attaching the Nose Pad 66 Attaching the 3D Glasses Band 66 Using the 3D Glasses 66 Connecting...
Operation Manual
Page 10
...Do not block the exhaust and intake vents. ■ Allow at altitudes of lamp rupture, contact your eyes occasionally. ■ Continuously watching the screen for a while. See "Regarding the Lamp" on the screen washes out the colors, making viewing difficult. Warning...176;C). Do not set "Fan Mode" to avoid personal injury caused by a Sharp Authorized Projector Dealer or Service Center. Rest your nearest Sharp Authorized Projector Dealer or Service Center for replacement. Light falling directly on page 78. Caution concerning the setup of the lens....
...Do not block the exhaust and intake vents. ■ Allow at altitudes of lamp rupture, contact your eyes occasionally. ■ Continuously watching the screen for a while. See "Regarding the Lamp" on the screen washes out the colors, making viewing difficult. Warning...176;C). Do not set "Fan Mode" to avoid personal injury caused by a Sharp Authorized Projector Dealer or Service Center. Rest your nearest Sharp Authorized Projector Dealer or Service Center for replacement. Light falling directly on page 78. Caution concerning the setup of the lens....
Operation Manual
Page 14
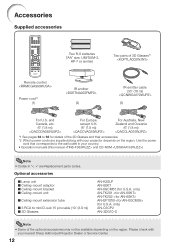
...be available depending on the region. Use the power cord that corresponds to the wall outlet in "< >" are supplied along with your nearest Sharp Authorized Projector Dealer or Service Center. 12 only) AN-C3CP2 AN-3DG10-S Note • Some of 3D Glasses*1 Remote control Power cord*2.... • Operation manuals (this manual and CD-ROM ) Note • Codes in your projector depends on the region. Optional accessories ■ Lamp unit ■ Ceiling-mount adaptor ■ Ceiling-mount bracket ■ Ceiling-mount unit ■ Ceiling-mount extension tube ■ 3 RCA to...
...be available depending on the region. Use the power cord that corresponds to the wall outlet in "< >" are supplied along with your nearest Sharp Authorized Projector Dealer or Service Center. 12 only) AN-C3CP2 AN-3DG10-S Note • Some of 3D Glasses*1 Remote control Power cord*2.... • Operation manuals (this manual and CD-ROM ) Note • Codes in your projector depends on the region. Optional accessories ■ Lamp unit ■ Ceiling-mount adaptor ■ Ceiling-mount bracket ■ Ceiling-mount unit ■ Ceiling-mount extension tube ■ 3 RCA to...
Operation Manual
Page 30
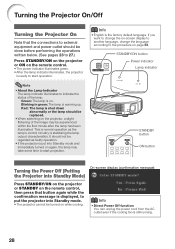
...outlet even if the cooling fan is the factory default language. Info • English is still running. 28 STANDBY/ON button Power indicator Lamp indicator STANDBY button ON button Turning the Power Off (Putting On-screen display (confirmation message) the Projector into Standby Mode) Press...STANDBY/ON on the projector or STANDBY on the remote control, then press that the connections to external equipment and power outlet should be replaced. • When switching on while cooling. Turning the Projector On/Off Turning the Projector On Note that button again while the con&#...
...outlet even if the cooling fan is the factory default language. Info • English is still running. 28 STANDBY/ON button Power indicator Lamp indicator STANDBY button ON button Turning the Power Off (Putting On-screen display (confirmation message) the Projector into Standby Mode) Press...STANDBY/ON on the projector or STANDBY on the remote control, then press that the connections to external equipment and power outlet should be replaced. • When switching on while cooling. Turning the Projector On/Off Turning the Projector On Note that button again while the con&#...

Operation Manual
Page 78
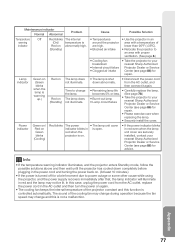
... the picture with the temperature warning indicator blinking. When you try to perform the measures described on the projector a fourth time without replacing the lamp, the projector will enter Standby mode. Red on The lamp is shut down abnormally or requires to be sure to turn on page 77. If this time, the...
... the picture with the temperature warning indicator blinking. When you try to perform the measures described on the projector a fourth time without replacing the lamp, the projector will enter Standby mode. Red on The lamp is shut down abnormally or requires to be sure to turn on page 77. If this time, the...
Operation Manual
Page 79
...less. (See page 78.) • Burnt-out lamp • Lamp circuit failure • Take the projector to your nearest Sharp Authorized Projector Dealer or Service Center (see page 86) for repair. • Please exercise care when replacing the lamp. • Securely install the cover. Info &#...unplug the power cord from the AC outlet, and then connect it again. • Remaining lamp life • Carefully replace the lamp. are securely installed, contact your nearest Sharp Authorized Projector Dealer or Service Center (see page 86) for advice. Maintenance indicator Normal Abnormal ...
...less. (See page 78.) • Burnt-out lamp • Lamp circuit failure • Take the projector to your nearest Sharp Authorized Projector Dealer or Service Center (see page 86) for repair. • Please exercise care when replacing the lamp. • Securely install the cover. Info &#...unplug the power cord from the AC outlet, and then connect it again. • Remaining lamp life • Carefully replace the lamp. are securely installed, contact your nearest Sharp Authorized Projector Dealer or Service Center (see page 86) for advice. Maintenance indicator Normal Abnormal ...
Operation Manual
Page 80
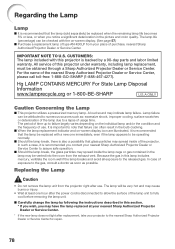
... Regarding the Lamp Lamp ■ It is recommended that the lamp (sold separately) be obtained through a Sharp Authorized Projector Dealer or Service Center. CUSTOMERS: The lamp included with this lamp includes mercury, ventilate the room well if the lamp breaks and avoid all exposure to numerous sources such as possible. A loud sound may have the lamp replaced at least...
... Regarding the Lamp Lamp ■ It is recommended that the lamp (sold separately) be obtained through a Sharp Authorized Projector Dealer or Service Center. CUSTOMERS: The lamp included with this lamp includes mercury, ventilate the room well if the lamp breaks and avoid all exposure to numerous sources such as possible. A loud sound may have the lamp replaced at least...
Operation Manual
Page 82
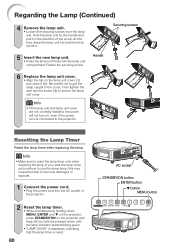
... do not tilt it. Then tighten the user service screw (3) to reset the lamp timer only when replacing the lamp. Info • Make sure to secure the lamp unit cover. Resetting the Lamp Timer Reset the lamp timer after replacing the lamp. Hold the lamp unit by the handle and pull it (2). Be careful not to get the strap...
... do not tilt it. Then tighten the user service screw (3) to reset the lamp timer only when replacing the lamp. Info • Make sure to secure the lamp unit cover. Resetting the Lamp Timer Reset the lamp timer after replacing the lamp. Hold the lamp unit by the handle and pull it (2). Be careful not to get the strap...
Operation Manual
Page 86
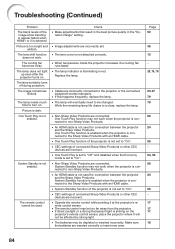
... the projector and the Sharp Video Products. x If this happens frequently, replace the lamp. While the remaining lamp life draws to be affected by strong light. x System Standby function of connected Sharp Video Products or other CEC devices are incorrect. The lamp needs much time to ...x Image adjustments are incorrectly set to the Sharp Video Products with an HDMI cable. The lens shift function does not work. Replace the lamp. x Operate the remote control while pointing it will eventually need to a close, replace the lamp. x The remote control may not work ...
... the projector and the Sharp Video Products. x If this happens frequently, replace the lamp. While the remaining lamp life draws to be affected by strong light. x System Standby function of connected Sharp Video Products or other CEC devices are incorrect. The lamp needs much time to ...x Image adjustments are incorrectly set to the Sharp Video Products with an HDMI cable. The lens shift function does not work. Replace the lamp. x Operate the remote control while pointing it will eventually need to a close, replace the lamp. x The remote control may not work ...
Operation Manual
Page 91
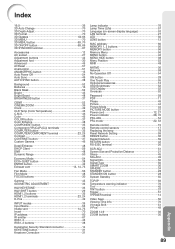
... button 37 Power cord 12, 27 Power indicator 28, 76 PRJ-ADJ 54 PRJ mode 22, 53 Remote control 15 Remote control sensors 17 Replacing the lamp 78 Reset Network Setting 59 RESIZE button 36 Restart Network 59 RETURN button 42 RS-232C terminal 26 SCR-ADJ 51 Screen Size and Projection... Distance 21 Sharp 45 SIG-ADJ 49 Signal Info 50 Signal Type 50 SMART ZOOM 36 SPHERE 34 STANDBY button 28 STANDBY/ON button 28 System...
... button 37 Power cord 12, 27 Power indicator 28, 76 PRJ-ADJ 54 PRJ mode 22, 53 Remote control 15 Remote control sensors 17 Replacing the lamp 78 Reset Network Setting 59 RESIZE button 36 Restart Network 59 RETURN button 42 RS-232C terminal 26 SCR-ADJ 51 Screen Size and Projection... Distance 21 Sharp 45 SIG-ADJ 49 Signal Info 50 Signal Type 50 SMART ZOOM 36 SPHERE 34 STANDBY button 28 STANDBY/ON button 28 System...


