

XVZ7000U Operation Manual
Page 2
... NORMAL OPERATION, NEVER TURN THE PROJECTOR OFF BY DISCONNECTING THE POWER CORD. L'INTERIEUR DU BOITIER ETANT EXTREMEMENT CHAUD, ATTENDRE 1 HEURE AVANT DE PROCEDER AU REMPLACEMENT DE LA LAMPE. ETEINDRE LA LAMPE AVANT DE PROCEDER A L'ENTRETIEN. ONLY WARNING: The cooling fan in accordance with Part 15 of Conformity SHARP LCD PROJECTOR, MODEL XV-Z7000U This device complies with the operation manual, may cause undesired operation. LAMP REPLACEMENT CAUTION BEFORE REMOVING THE SCREW, DISCONNECT POWER CORD. NE...
... NORMAL OPERATION, NEVER TURN THE PROJECTOR OFF BY DISCONNECTING THE POWER CORD. L'INTERIEUR DU BOITIER ETANT EXTREMEMENT CHAUD, ATTENDRE 1 HEURE AVANT DE PROCEDER AU REMPLACEMENT DE LA LAMPE. ETEINDRE LA LAMPE AVANT DE PROCEDER A L'ENTRETIEN. ONLY WARNING: The cooling fan in accordance with Part 15 of Conformity SHARP LCD PROJECTOR, MODEL XV-Z7000U This device complies with the operation manual, may cause undesired operation. LAMP REPLACEMENT CAUTION BEFORE REMOVING THE SCREW, DISCONNECT POWER CORD. NE...

XVZ7000U Operation Manual
Page 4
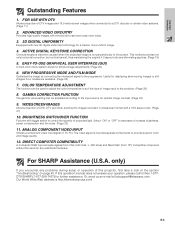
... signal to the input source for simple image adjustments. (Page 20) 6. Select "ON" or "OFF" to a DTV decoder or similar video systems. (Page 11) 2. FOR USE WITH DTV Allows projection of DTV images and 16:9 wide-screen images when connected to decrease or increase brightness, power consumption and fan noise. (Page 33) 11. ADVANCED VIDEO CIRCUITRY Provides high quality images with minimal dot crawl and cross color noise. 3. 3D DIGITAL...
... signal to the input source for simple image adjustments. (Page 20) 6. Select "ON" or "OFF" to a DTV decoder or similar video systems. (Page 11) 2. FOR USE WITH DTV Allows projection of DTV images and 16:9 wide-screen images when connected to decrease or increase brightness, power consumption and fan noise. (Page 33) 11. ADVANCED VIDEO CIRCUITRY Provides high quality images with minimal dot crawl and cross color noise. 3. 3D DIGITAL...

XVZ7000U Operation Manual
Page 5
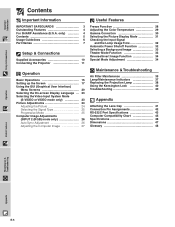
... 6 Part Names 7 Setup & Connections Supplied Accessories 10 Connecting the Projector 11 Operation Basic Operations 15 Setting up the Screen 17 Using the GUI (Graphical User Interface) Menu Screens 20 Selecting the On-screen Display Language ... 23 Selecting the Video Input System Mode (S-VIDEO or VIDEO mode only 23 Picture Adjustments 24 Adjusting the Picture 24 Selecting the Signal Type 25 Progressive Mode 25 Computer Image Adjustments (INPUT 2 (RGB) mode only 26 Auto Sync Adjustment 26 Adjusting the Computer Image 27 Useful Features Freeze Function 28 Adjusting the Color...
... 6 Part Names 7 Setup & Connections Supplied Accessories 10 Connecting the Projector 11 Operation Basic Operations 15 Setting up the Screen 17 Using the GUI (Graphical User Interface) Menu Screens 20 Selecting the On-screen Display Language ... 23 Selecting the Video Input System Mode (S-VIDEO or VIDEO mode only 23 Picture Adjustments 24 Adjusting the Picture 24 Selecting the Signal Type 25 Progressive Mode 25 Computer Image Adjustments (INPUT 2 (RGB) mode only 26 Auto Sync Adjustment 26 Adjusting the Computer Image 27 Useful Features Freeze Function 28 Adjusting the Color...

XVZ7000U Operation Manual
Page 6
... left corner of the picture. Refer to the normal operating condition. If the lamp has been used for 1,000 hours, the projector power will automatically turn off, the TEMPERATURE WARNING indicator on the projector will flash, and after the lamp has been used for lamp replacement. See "Replacing the Projection Lamp" on pages 38 and 39. Please note that all internal cleaning must be performed by plugging the power cord back in the...
... left corner of the picture. Refer to the normal operating condition. If the lamp has been used for 1,000 hours, the projector power will automatically turn off, the TEMPERATURE WARNING indicator on the projector will flash, and after the lamp has been used for lamp replacement. See "Replacing the Projection Lamp" on pages 38 and 39. Please note that all internal cleaning must be performed by plugging the power cord back in the...

XVZ7000U Operation Manual
Page 15
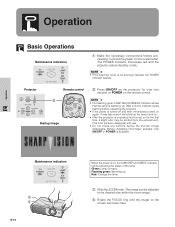
...REPLACEMENT indicator shows that the lamp is on the screen becomes clear. Green: Lamp is available. The image can be emitted from the exhaust vent. KEYSTONE INPUT PICT MODE BACK ENTER MENU 2 Startup image VOL POWER MUTE BACK MENU ENTER 1 Make the necessary connections before the startup image disappears. KEYSTONE Projector Remote control ON/OFF POWER LAMP TEMP. Red: Change the lamp. 3 Slide the ZOOM knob. Flashing green: Warming up . Wait until the image on , the LAMP REPLACEMENT indicator lights indicating the status of the lamp. Before "Adjusting...
...REPLACEMENT indicator shows that the lamp is on the screen becomes clear. Green: Lamp is available. The image can be emitted from the exhaust vent. KEYSTONE INPUT PICT MODE BACK ENTER MENU 2 Startup image VOL POWER MUTE BACK MENU ENTER 1 Make the necessary connections before the startup image disappears. KEYSTONE Projector Remote control ON/OFF POWER LAMP TEMP. Red: Change the lamp. 3 Slide the ZOOM knob. Flashing green: Warming up . Wait until the image on , the LAMP REPLACEMENT indicator lights indicating the status of the lamp. Before "Adjusting...
XVZ7000U Operation Manual
Page 16
... POWER indicator will light up red and the cooling fan will be displayed. 6 Press VOLUME on the remote control to adjust the volume. 7 Press MUTE on , the POWER indicator and the LAMP REPLACEMENT indicator light green. • The POWER indicator flashes if the right side filter cover is being received, "NOT REG." Press ON/OFF or POWER again while the message is being received, "Adjusting The Image" will be turned on the remote control to temporarily turn off . E-16 KEYSTONE INPUT...
... POWER indicator will light up red and the cooling fan will be displayed. 6 Press VOLUME on the remote control to adjust the volume. 7 Press MUTE on , the POWER indicator and the LAMP REPLACEMENT indicator light green. • The POWER indicator flashes if the right side filter cover is being received, "NOT REG." Press ON/OFF or POWER again while the message is being received, "Adjusting The Image" will be turned on the remote control to temporarily turn off . E-16 KEYSTONE INPUT...

XVZ7000U Operation Manual
Page 37
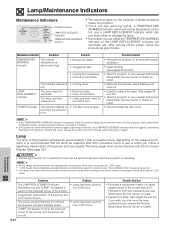
... The lamp requires replacement. • Lamp has been used for over 900 hours. POWER indicator The indicator flashes in • The filter cover is abnormally high. Possible Solution • Relocate the projector to an area with the On-screen Display. (See page 32.) CAUTION • Intense light hazard. "LAMP" will appear in red in again. Lamp/Maintenance Indicators Maintenance Indicators ON/OFF POWER LAMP TEMP. KEYSTONE POWER indicator LAMP REPLACEMENT indicator TEMPERATURE WARNING indicator • The warning lights on the usage environment. Problem • Blocked air...
... The lamp requires replacement. • Lamp has been used for over 900 hours. POWER indicator The indicator flashes in • The filter cover is abnormally high. Possible Solution • Relocate the projector to an area with the On-screen Display. (See page 32.) CAUTION • Intense light hazard. "LAMP" will appear in red in again. Lamp/Maintenance Indicators Maintenance Indicators ON/OFF POWER LAMP TEMP. KEYSTONE POWER indicator LAMP REPLACEMENT indicator TEMPERATURE WARNING indicator • The warning lights on the usage environment. Problem • Blocked air...
XVZ7000U Operation Manual
Page 38
..., please call toll-free: 1-877-DTV-SHARP (1-877-388-7427). First Change Filter (Steps 3-6) 3 Remove the filter cover. CUSTOMERS: The lamp included with the lamp unit. 1 Turn off the power. 2 Disconnect the power cord. Insert the tab on the remote control. Wait at your nearest Authorized SharpVision Service Center or Dealer. If you wish, you may be replaced after operation of the lamp cage to the lamp, be obtained through...
..., please call toll-free: 1-877-DTV-SHARP (1-877-388-7427). First Change Filter (Steps 3-6) 3 Remove the filter cover. CUSTOMERS: The lamp included with the lamp unit. 1 Turn off the power. 2 Disconnect the power cord. Insert the tab on the remote control. Wait at your nearest Authorized SharpVision Service Center or Dealer. If you wish, you may be replaced after operation of the lamp cage to the lamp, be obtained through...
XVZ7000U Operation Manual
Page 39
... the projector. 2 Reset the lamp timer. 1 Press KEYSTONE ∂ and KEYSTONE ƒ on the projector at the same time. 2 Press INPUT and PICT MODE on the projector at the same time. 1 INPUT PICT MODE 2 BACK ENTER 3 MENU "LAMP 0000H" is reset. • Reset the lamp timer only after replacing the lamp. Then tighten the user service screw. Plug the power cord into the lamp cage compartment. Replacing the Projection Lamp Then Change Lamp (Steps 7-10) 7 Remove the lamp cage cover. Loosen the securing screws on the projector at...
... the projector. 2 Reset the lamp timer. 1 Press KEYSTONE ∂ and KEYSTONE ƒ on the projector at the same time. 2 Press INPUT and PICT MODE on the projector at the same time. 1 INPUT PICT MODE 2 BACK ENTER 3 MENU "LAMP 0000H" is reset. • Reset the lamp timer only after replacing the lamp. Then tighten the user service screw. Plug the power cord into the lamp cage compartment. Replacing the Projection Lamp Then Change Lamp (Steps 7-10) 7 Remove the lamp cage cover. Loosen the securing screws on the projector at...
XVZ7000U Operation Manual
Page 43
... adjustment menu and checking the status with the On-screen Display. Signal format: Conforms to the computer. After the projector processes the command from the computer are sent in the following order: command, parameter, and return code. If the projector receives a command other communication errors) E R R Return code (0DH) When more than a menu display command, it sends a response code to match that of the computer to the computer. RS-232C Port Specifications...
... adjustment menu and checking the status with the On-screen Display. Signal format: Conforms to the computer. After the projector processes the command from the computer are sent in the following order: command, parameter, and return code. If the projector receives a command other communication errors) E R R Return code (0DH) When more than a menu display command, it sends a response code to match that of the computer to the computer. RS-232C Port Specifications...
XV-Z7000U Operation Manual
Page 2
... DE LA LAMPE. USER SERVICE SCREW VIS POUR ENTRETIEN PAR L'UTILISATEUR E-2 Operation is turned off always use the ON/OFF button on the projector or the POWER button on the remote control. DURING NORMAL OPERATION, NEVER TURN THE PROJECTOR OFF BY DISCONNECTING THE POWER CORD. HOT SURFACE INSIDE. ALLOW 1 HOUR TO COOL BEFORE REPLACING THE LAMP. POTENTIAL HAZARD OF GLASS PARTICLES IF LAMP HAS RUPTURED. NE REMPLACER QUE PAR UNE LAMPE SHARP DE TYPE...
... DE LA LAMPE. USER SERVICE SCREW VIS POUR ENTRETIEN PAR L'UTILISATEUR E-2 Operation is turned off always use the ON/OFF button on the projector or the POWER button on the remote control. DURING NORMAL OPERATION, NEVER TURN THE PROJECTOR OFF BY DISCONNECTING THE POWER CORD. HOT SURFACE INSIDE. ALLOW 1 HOUR TO COOL BEFORE REPLACING THE LAMP. POTENTIAL HAZARD OF GLASS PARTICLES IF LAMP HAS RUPTURED. NE REMPLACER QUE PAR UNE LAMPE SHARP DE TYPE...
XV-Z7000U Operation Manual
Page 4
... increase brightness, power consumption and fan noise. (Page 33) 11. GAMMA CORRECTION FUNCTION The gamma value setting can be adjusted according to control the quantity of this operation manual does not answer your question, please call toll free 1-877DTV-SHARP (1-877-388-7427) for any problems during setup or operation of projected light. DIRECT COMPUTER COMPATIBILITY A multi-scan RGB input accepts signals from VGA (640 dots ן...
... increase brightness, power consumption and fan noise. (Page 33) 11. GAMMA CORRECTION FUNCTION The gamma value setting can be adjusted according to control the quantity of this operation manual does not answer your question, please call toll free 1-877DTV-SHARP (1-877-388-7427) for any problems during setup or operation of projected light. DIRECT COMPUTER COMPATIBILITY A multi-scan RGB input accepts signals from VGA (640 dots ן...
XV-Z7000U Operation Manual
Page 5
... 6 Part Names 7 Setup & Connections Supplied Accessories 10 Connecting the Projector 11 Operation Basic Operations 15 Setting up the Screen 17 Using the GUI (Graphical User Interface) Menu Screens 20 Selecting the On-screen Display Language ... 23 Selecting the Video Input System Mode (S-VIDEO or VIDEO mode only 23 Picture Adjustments 24 Adjusting the Picture 24 Selecting the Signal Type 25 Progressive Mode 25 Computer Image Adjustments (INPUT 2 (RGB) mode only 26 Auto Sync Adjustment 26 Adjusting the Computer Image 27 Useful Features Freeze Function 28 Adjusting the Color...
... 6 Part Names 7 Setup & Connections Supplied Accessories 10 Connecting the Projector 11 Operation Basic Operations 15 Setting up the Screen 17 Using the GUI (Graphical User Interface) Menu Screens 20 Selecting the On-screen Display Language ... 23 Selecting the Video Input System Mode (S-VIDEO or VIDEO mode only 23 Picture Adjustments 24 Adjusting the Picture 24 Selecting the Signal Type 25 Progressive Mode 25 Computer Image Adjustments (INPUT 2 (RGB) mode only 26 Auto Sync Adjustment 26 Adjusting the Computer Image 27 Useful Features Freeze Function 28 Adjusting the Color...

XV-Z7000U Operation Manual
Page 6
... the fan may be extremely hot during projector operation due to setup problems or a dirty air filter, "TEMP." This does not indicate a malfunction. CAUT I ON ATTENT I ON BQC-PGC20X //1 95˚F (ם35˚C) 41˚F (ם5˚C) Cautions Concerning the Setup of the Projector For minimal servicing and to maintain high image quality, SHARP recommends that all internal cleaning must be cleaned...
... the fan may be extremely hot during projector operation due to setup problems or a dirty air filter, "TEMP." This does not indicate a malfunction. CAUT I ON ATTENT I ON BQC-PGC20X //1 95˚F (ם35˚C) 41˚F (ם5˚C) Cautions Concerning the Setup of the Projector For minimal servicing and to maintain high image quality, SHARP recommends that all internal cleaning must be cleaned...
XV-Z7000U Operation Manual
Page 15
... disappear with use. • Do not press any buttons before proceeding. Operation Maintenance indicators ON/OFF POWER LAMP TEMP. Flashing green: Warming up . Red: Change the lamp. 3 Slide the ZOOM knob. KEYSTONE Projector Remote control ON/OFF POWER LAMP TEMP. The image can be emitted from the exhaust vent. The POWER indicator illuminates red and the projector enters standby mode. • If the side filter cover is not securely installed, the POWER indicator flashes. 2 Press ON/OFF on the projector for the first time, a slight...
... disappear with use. • Do not press any buttons before proceeding. Operation Maintenance indicators ON/OFF POWER LAMP TEMP. Flashing green: Warming up . Red: Change the lamp. 3 Slide the ZOOM knob. KEYSTONE Projector Remote control ON/OFF POWER LAMP TEMP. The image can be emitted from the exhaust vent. The POWER indicator illuminates red and the projector enters standby mode. • If the side filter cover is not securely installed, the POWER indicator flashes. 2 Press ON/OFF on the projector for the first time, a slight...

XV-Z7000U Operation Manual
Page 16
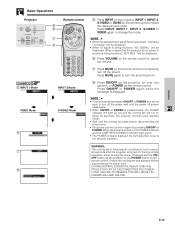
... change the mode. • When the selected input signal is being received, "Adjusting The Image" will be displayed. 6 Press VOLUME on the remote control to adjust the volume. 7 Press MUTE on , the POWER indicator and the LAMP REPLACEMENT indicator light green. • The POWER indicator flashes if the right side filter cover is displayed. • If you accidentally pressed ON/OFF or POWER and do not want to select the desired input mode. Operation Basic Operations Projector ON/OFF POWER LAMP TEMP...
... change the mode. • When the selected input signal is being received, "Adjusting The Image" will be displayed. 6 Press VOLUME on the remote control to adjust the volume. 7 Press MUTE on , the POWER indicator and the LAMP REPLACEMENT indicator light green. • The POWER indicator flashes if the right side filter cover is displayed. • If you accidentally pressed ON/OFF or POWER and do not want to select the desired input mode. Operation Basic Operations Projector ON/OFF POWER LAMP TEMP...
XV-Z7000U Operation Manual
Page 37
... circuit failure. The lamp requires replacement. • Lamp has been used for 1,000 hours. red when the projector is open. Lamp The lamp in again. This is different than the warranty period. • For safety, the power will not be replaced after use or when you notice a significant deterioration of use for over 1,000 hours. The power will enter standby mode. • Lamp has been used for repair. • Securely install the filter cover. LAMP REPLACEMENT indicator The indicator flashes...
... circuit failure. The lamp requires replacement. • Lamp has been used for 1,000 hours. red when the projector is open. Lamp The lamp in again. This is different than the warranty period. • For safety, the power will not be replaced after use or when you notice a significant deterioration of use for over 1,000 hours. The power will enter standby mode. • Lamp has been used for repair. • Securely install the filter cover. LAMP REPLACEMENT indicator The indicator flashes...

XV-Z7000U Operation Manual
Page 38
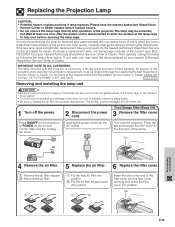
... call toll-free: 1-877-DTV-SHARP (1-877-388-7427). Please have the lamp replaced at least one hour after replacement, take your nearest Authorized SharpVision Service Center or Dealer. Then carefully change the lamp by following the steps below . Tab or POWER VOL POWER MUTE BACK MENU ENTER 4 Remove the air filter. 5 Replace the air filter. 6 Replace the filter cover. 1 Remove the air filter stopper. 2 Remove the air filter. 1 Put the new air filter into position. 2 Put the air filter stopper back...
... call toll-free: 1-877-DTV-SHARP (1-877-388-7427). Please have the lamp replaced at least one hour after replacement, take your nearest Authorized SharpVision Service Center or Dealer. Then carefully change the lamp by following the steps below . Tab or POWER VOL POWER MUTE BACK MENU ENTER 4 Remove the air filter. 5 Replace the air filter. 6 Replace the filter cover. 1 Remove the air filter stopper. 2 Remove the air filter. 1 Put the new air filter into position. 2 Put the air filter stopper back...

XV-Z7000U Operation Manual
Page 39
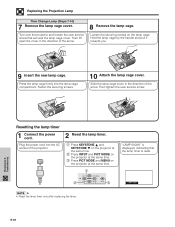
... socket of the projector. 2 Reset the lamp timer. 1 Press KEYSTONE ∂ and KEYSTONE ƒ on the projector at the same time. 2 Press INPUT and PICT MODE on the projector at the same time. 1 INPUT PICT MODE 2 BACK ENTER 3 MENU "LAMP 0000H" is displayed, indicating that secures the lamp cage cover. Turn over the projector and loosen the user service screw that the lamp timer is reset. • Reset the lamp timer only after replacing the lamp. Fasten the securing screws. 10 Attach the lamp cage cover.
... socket of the projector. 2 Reset the lamp timer. 1 Press KEYSTONE ∂ and KEYSTONE ƒ on the projector at the same time. 2 Press INPUT and PICT MODE on the projector at the same time. 1 INPUT PICT MODE 2 BACK ENTER 3 MENU "LAMP 0000H" is displayed, indicating that secures the lamp cage cover. Turn over the projector and loosen the user service screw that the lamp timer is reset. • Reset the lamp timer only after replacing the lamp. Fasten the securing screws. 10 Attach the lamp cage cover.

XV-Z7000U Operation Manual
Page 43
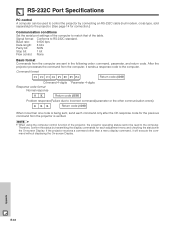
... bps Data length: 8 bits Parity bit: NON Stop bit: 1 bit Flow control: None Basic format Commands from the computer, it will execute the command without displaying the On-screen Display. Signal format: Conforms to match that of the projector, the projector operating status cannot be used to control the projector by transmitting the display commands for each command only after the OK response code for connection.) Communication conditions Set the serial port settings of...
... bps Data length: 8 bits Parity bit: NON Stop bit: 1 bit Flow control: None Basic format Commands from the computer, it will execute the command without displaying the On-screen Display. Signal format: Conforms to match that of the projector, the projector operating status cannot be used to control the projector by transmitting the display commands for each command only after the OK response code for connection.) Communication conditions Set the serial port settings of...


