

XVZ90U Operation Manual
Page 4
...time, unplug it is provided or the manufacturer's instructions have fallen into the outlet, contact your electrician to operate from overheating. Wall or Ceiling Mounting This product should be walked on a bed, sofa, rug, or other hazards. 20. and the like. 8. This product should be ... refer to . 4. Power-Cord Protection Power-supply cords should be routed so that could result in the operating instructions should not be mounted to your home, consult your obsolete outlet. If the product exhibits a distinct change in installation such as opening or removing covers may ...
...time, unplug it is provided or the manufacturer's instructions have fallen into the outlet, contact your electrician to operate from overheating. Wall or Ceiling Mounting This product should be walked on a bed, sofa, rug, or other hazards. 20. and the like. 8. This product should be ... refer to . 4. Power-Cord Protection Power-supply cords should be routed so that could result in the operating instructions should not be mounted to your home, consult your obsolete outlet. If the product exhibits a distinct change in installation such as opening or removing covers may ...
XVZ90U Operation Manual
Page 6
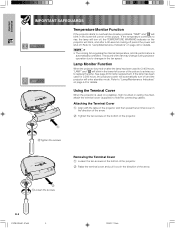
... the fan speed. Using the Terminal Cover When the projector is automatically controlled. If the temperature continues to "Lamp/Maintenance Indicators" on a desktop, high mounted or ceiling mounted, attach the terminal cover (supplied) to replace the lamp. Refer to rise, the lamp will turn off . Important Information IMPORTANT SAFEGUARDS Temperature Monitor Function...
... the fan speed. Using the Terminal Cover When the projector is automatically controlled. If the temperature continues to "Lamp/Maintenance Indicators" on a desktop, high mounted or ceiling mounted, attach the terminal cover (supplied) to replace the lamp. Refer to rise, the lamp will turn off . Important Information IMPORTANT SAFEGUARDS Temperature Monitor Function...
XVZ90U Operation Manual
Page 7
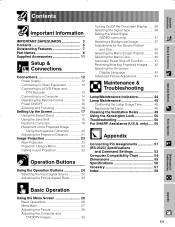
... of the Projected Image Using the Keystone Correction 20 Adjusting the Projection Distance 21 Image Projection 23 Rear Projection 23 Projection Using a Mirror 23 Ceiling-mount Projection 23 Operation Buttons Using the Operation Buttons 24 Selecting the Input Signal Source 24 Adjusting the Picture Aspect Ratio 24 Turning On/Off the... Maintenance 45 Confirming the Lamp Usage Time 45 Replacing the Lamp 46 Cleaning the Ventilative Holes 49 Using the Kensington Lock 50 Troubleshooting 50 For SHARP Assistance (U.S.A.
... of the Projected Image Using the Keystone Correction 20 Adjusting the Projection Distance 21 Image Projection 23 Rear Projection 23 Projection Using a Mirror 23 Ceiling-mount Projection 23 Operation Buttons Using the Operation Buttons 24 Selecting the Input Signal Source 24 Adjusting the Picture Aspect Ratio 24 Turning On/Off the... Maintenance 45 Confirming the Lamp Usage Time 45 Replacing the Lamp 46 Cleaning the Ventilative Holes 49 Using the Kensington Lock 50 Troubleshooting 50 For SHARP Assistance (U.S.A.

XVZ90U Operation Manual
Page 23
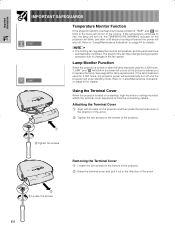
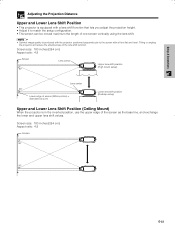
... the projector will reduce the effectiveness of screen (White portion) = Standard (0) point Lower lens shift position (Desktop setup) Upper and Lower Lens Shift Position (Ceiling Mount) When the projector is produced with all feet flat and level. Setup & Connections Adjusting the Projection Distance Upper and Lower Lens Shift Position • This... the lower and upper lens shift values. Screen size: 100 inches (254 cm) Aspect ratio: 4:3 Screen 90° Lens center Upper lens shift position (High mount setup) Lens center 90° Lower edge of the lens shift function.
... the projector will reduce the effectiveness of screen (White portion) = Standard (0) point Lower lens shift position (Desktop setup) Upper and Lower Lens Shift Position (Ceiling Mount) When the projector is produced with all feet flat and level. Setup & Connections Adjusting the Projection Distance Upper and Lower Lens Shift Position • This... the lower and upper lens shift values. Screen size: 100 inches (254 cm) Aspect ratio: 4:3 Screen 90° Lens center Upper lens shift position (High mount setup) Lens center 90° Lower edge of the lens shift function.

XVZ90U Operation Manual
Page 24
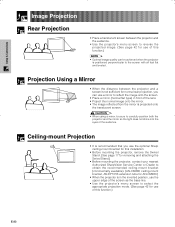
... screen between the projector and a screen is not sufficient for normal rear projection, you use the optional Sharp ceiling-mount bracket for this installation. • Before mounting the projector, remove the Swivel Stand. (See page 17 for removing and attaching the Swivel Stand.) •...; Before mounting the projector, contact your nearest Authorized SharpVision Service Center or Dealer to obtain the recommended ceiling-mount bracket (commercially available). (AN-CM260 ceiling-mount bracket, AN-EP101B extension tube for AN-CM260.) •...
... screen between the projector and a screen is not sufficient for normal rear projection, you use the optional Sharp ceiling-mount bracket for this installation. • Before mounting the projector, remove the Swivel Stand. (See page 17 for removing and attaching the Swivel Stand.) •...; Before mounting the projector, contact your nearest Authorized SharpVision Service Center or Dealer to obtain the recommended ceiling-mount bracket (commercially available). (AN-CM260 ceiling-mount bracket, AN-EP101B extension tube for AN-CM260.) •...
XVZ90U Operation Manual
Page 59
... buttons 26 Adjusting the Picture 29 Aspect ratio 24 Automatic power shutoff function 41 Auto sync adjustment 35 AUTO SYNC button 35 B Background 37 C Ceiling-mount 22 Clock 33 COMPONENT terminals 13 D Digital shift 38 DVI 14 E ENTER button 19 Exhaust ventilative hole 4 F Focus ring 16 H HDCP 7 I INPUT buttons 24 K Kensington...
... buttons 26 Adjusting the Picture 29 Aspect ratio 24 Automatic power shutoff function 41 Auto sync adjustment 35 AUTO SYNC button 35 B Background 37 C Ceiling-mount 22 Clock 33 COMPONENT terminals 13 D Digital shift 38 DVI 14 E ENTER button 19 Exhaust ventilative hole 4 F Focus ring 16 H HDCP 7 I INPUT buttons 24 K Kensington...

XV-Z90U Operation Manual
Page 4
...operate from overheating. If the product exhibits a distinct change in a wet basement; Unauthorized substitutions may cause hazards. 7. Wall or Ceiling Mounting This product should be followed. 5. or near water - For products intended to . 11. Power-Cord Protection Power-supply cords should ...the point where they are covered by the product manufacturer as opening or removing covers may expose you are required, be mounted to qualified service personnel under the following the operating instructions. Overloading Do not overload wall outlets, extension cords, or ...
...operate from overheating. If the product exhibits a distinct change in a wet basement; Unauthorized substitutions may cause hazards. 7. Wall or Ceiling Mounting This product should be followed. 5. or near water - For products intended to . 11. Power-Cord Protection Power-supply cords should ...the point where they are covered by the product manufacturer as opening or removing covers may expose you are required, be mounted to qualified service personnel under the following the operating instructions. Overloading Do not overload wall outlets, extension cords, or ...
XV-Z90U Operation Manual
Page 6
.... 2 Tighten the two screws on the bottom of the projector. 1 2Tighten the screws Removing the Terminal Cover 1 Loosen the two screws on a desktop, high mounted or ceiling mounted, attach the terminal cover (supplied) to hide the connecting cables. Refer to "Lamp/Maintenance Indicators" on after a 90-second cooling-off period the power...
.... 2 Tighten the two screws on the bottom of the projector. 1 2Tighten the screws Removing the Terminal Cover 1 Loosen the two screws on a desktop, high mounted or ceiling mounted, attach the terminal cover (supplied) to hide the connecting cables. Refer to "Lamp/Maintenance Indicators" on after a 90-second cooling-off period the power...
XV-Z90U Operation Manual
Page 7
... the Keystone Correction 20 Adjusting the Projection Distance 21 Image Projection 23 Rear Projection 23 Projection Using a Mirror 23 Ceiling-mount Projection 23 Operation Buttons Using the Operation Buttons 24 Selecting the Input Signal Source 24 Adjusting the Picture Aspect Ratio 24... the Lamp Usage Time 45 Replacing the Lamp 46 Cleaning the Ventilative Holes 49 Using the Kensington Lock 50 Troubleshooting 50 For SHARP Assistance (U.S.A. only) ..... 50 Appendix Connecting Pin Assignments 51 (RS-232C) Specifications and Command Settings 52 Computer Compatibility Chart 54...
... the Keystone Correction 20 Adjusting the Projection Distance 21 Image Projection 23 Rear Projection 23 Projection Using a Mirror 23 Ceiling-mount Projection 23 Operation Buttons Using the Operation Buttons 24 Selecting the Input Signal Source 24 Adjusting the Picture Aspect Ratio 24... the Lamp Usage Time 45 Replacing the Lamp 46 Cleaning the Ventilative Holes 49 Using the Kensington Lock 50 Troubleshooting 50 For SHARP Assistance (U.S.A. only) ..... 50 Appendix Connecting Pin Assignments 51 (RS-232C) Specifications and Command Settings 52 Computer Compatibility Chart 54...
XV-Z90U Operation Manual
Page 23
...176; 90° E-22 Screen size: 100 inches (254 cm) Aspect ratio: 4:3 Screen 90° Lens center Upper lens shift position (High mount setup) Lens center 90° Lower edge of screen (White portion) = Standard (0) point Lower lens shift position (Desktop setup) Upper and Lower Lens... Shift Position (Ceiling Mount) When the projector is produced with the projector positioned perpendicular to the screen with all feet flat and level. Tilting or angling the projector...
...176; 90° E-22 Screen size: 100 inches (254 cm) Aspect ratio: 4:3 Screen 90° Lens center Upper lens shift position (High mount setup) Lens center 90° Lower edge of screen (White portion) = Standard (0) point Lower lens shift position (Desktop setup) Upper and Lower Lens... Shift Position (Ceiling Mount) When the projector is produced with the projector positioned perpendicular to the screen with all feet flat and level. Tilting or angling the projector...
XV-Z90U Operation Manual
Page 24
...; Place a translucent screen between the projector and a screen is not sufficient for normal rear projection, you use the optional Sharp ceiling-mount bracket for this installation. • Before mounting the projector, remove the Swivel Stand. (See page 17 for removing and attaching the Swivel Stand.) • Before... Project the normal image onto the mirror. • The image reflected from the mirror is projected onto the translucent screen. Ceiling-mount Projection • It is recommended that you can be sure to carefully position both the projector and the mirror so the light does...
...; Place a translucent screen between the projector and a screen is not sufficient for normal rear projection, you use the optional Sharp ceiling-mount bracket for this installation. • Before mounting the projector, remove the Swivel Stand. (See page 17 for removing and attaching the Swivel Stand.) • Before... Project the normal image onto the mirror. • The image reflected from the mirror is projected onto the translucent screen. Ceiling-mount Projection • It is recommended that you can be sure to carefully position both the projector and the mirror so the light does...
XV-Z90U Operation Manual
Page 59
... buttons 26 Adjusting the Picture 29 Aspect ratio 24 Automatic power shutoff function 41 Auto sync adjustment 35 AUTO SYNC button 35 B Background 37 C Ceiling-mount 22 Clock 33 COMPONENT terminals 13 D Digital shift 38 DVI 14 E ENTER button 19 Exhaust ventilative hole 4 F Focus ring 16 H HDCP 7 I INPUT buttons 24 K Kensington...
... buttons 26 Adjusting the Picture 29 Aspect ratio 24 Automatic power shutoff function 41 Auto sync adjustment 35 AUTO SYNC button 35 B Background 37 C Ceiling-mount 22 Clock 33 COMPONENT terminals 13 D Digital shift 38 DVI 14 E ENTER button 19 Exhaust ventilative hole 4 F Focus ring 16 H HDCP 7 I INPUT buttons 24 K Kensington...

