
XVZ90U Operation Manual
Page 3
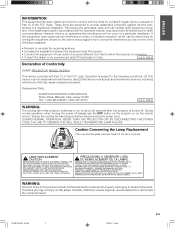
...of the FCC rules. ONLY Declaration of Conformity SHARP PROJECTOR, MODEL XV-Z90U This device complies with the operation manual, may cause undesired operation. Operation is turned off always use the OFF button on the projector or on the remote control. LAMP REPLACEMENT CAUTION BEFORE REMOVING THE SCREW,... equipment off and on a circuit different from that to radio communications. HANDLE WITH CARE. NE REMPLACER QUE PAR UNE LAMPE SHARP DE TYPE BQC-XVZ90+++1. ONLY WARNING: The cooling fan in this product include confidential and/or trade secret property belonging to ...
...of the FCC rules. ONLY Declaration of Conformity SHARP PROJECTOR, MODEL XV-Z90U This device complies with the operation manual, may cause undesired operation. Operation is turned off always use the OFF button on the projector or on the remote control. LAMP REPLACEMENT CAUTION BEFORE REMOVING THE SCREW,... equipment off and on a circuit different from that to radio communications. HANDLE WITH CARE. NE REMPLACER QUE PAR UNE LAMPE SHARP DE TYPE BQC-XVZ90+++1. ONLY WARNING: The cooling fan in this product include confidential and/or trade secret property belonging to ...
XVZ90U Operation Manual
Page 7
...Power Supply 12 Connecting to Video Equipment 12 Connecting to a DVD Player and DTV Decoder 13 Connecting to a Computer 14 Operating the Remote Control 15 Power ON/OFF 16 Zooming and Focusing 16 Setting Up the Screen 17 Using the Swivel Stand 17 Using the Lens Shift ...45 Confirming the Lamp Usage Time 45 Replacing the Lamp 46 Cleaning the Ventilative Holes 49 Using the Kensington Lock 50 Troubleshooting 50 For SHARP Assistance (U.S.A. only) ..... 50 Appendix Connecting Pin Assignments 51 (RS-232C) Specifications and Command Settings 52 Computer Compatibility Chart 54 Dimensions...
...Power Supply 12 Connecting to Video Equipment 12 Connecting to a DVD Player and DTV Decoder 13 Connecting to a Computer 14 Operating the Remote Control 15 Power ON/OFF 16 Zooming and Focusing 16 Setting Up the Screen 17 Using the Swivel Stand 17 Using the Lens Shift ...45 Confirming the Lamp Usage Time 45 Replacing the Lamp 46 Cleaning the Ventilative Holes 49 Using the Kensington Lock 50 Troubleshooting 50 For SHARP Assistance (U.S.A. only) ..... 50 Appendix Connecting Pin Assignments 51 (RS-232C) Specifications and Command Settings 52 Computer Compatibility Chart 54 Dimensions...
XVZ90U Operation Manual
Page 8
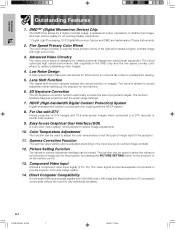
... Design A new optical engine has been developed for this product to the projector by pressing the PICTURE SETTING button on the projector or on the remote control. 13. Picture Setting Function The values in the DMD chip and the five speed primary color wheel, to provide superior color and image quality. 14...
... Design A new optical engine has been developed for this product to the projector by pressing the PICTURE SETTING button on the projector or on the remote control. 13. Picture Setting Function The values in the DMD chip and the five speed primary color wheel, to provide superior color and image quality. 14...
XVZ90U Operation Manual
Page 9
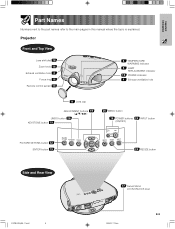
... this manual where the topic is explained. Projector Front and Top View Lens shift dial 18 Zoom knob 16 Exhaust ventilative hole 4 Focus ring 16 Remote control sensor 15 5 TEMPERATURE WARNING indicator 5 LAMP REPLACEMENT indicator 16 POWER indicator 4 Exhaust ventilative hole 9 Lens cap ADJUSTMENT buttons 19 UNDO button 26 KEYSTONE button 19...
... this manual where the topic is explained. Projector Front and Top View Lens shift dial 18 Zoom knob 16 Exhaust ventilative hole 4 Focus ring 16 Remote control sensor 15 5 TEMPERATURE WARNING indicator 5 LAMP REPLACEMENT indicator 16 POWER indicator 4 Exhaust ventilative hole 9 Lens cap ADJUSTMENT buttons 19 UNDO button 26 KEYSTONE button 19...

XVZ90U Operation Manual
Page 10
Important Information Part Names Numbers next to the part names refer to the lens. Projector Side and Rear View Remote control sensor 15 Intake ventilative hole 49 49 Intake ventilative hole INPUT 2 DVI digital port 13 INPUT 3 S-VIDEO terminal 13 (4-pin Mini DIN) 14 RS-232C ...
Important Information Part Names Numbers next to the part names refer to the lens. Projector Side and Rear View Remote control sensor 15 Intake ventilative hole 49 49 Intake ventilative hole INPUT 2 DVI digital port 13 INPUT 3 S-VIDEO terminal 13 (4-pin Mini DIN) 14 RS-232C ...

XVZ90U Operation Manual
Page 11
... 19 ADJUSTMENT buttons 24 INPUT 3 button 14 DIGITAL INPUT button 24 RESIZE button 32 PICTURE SETTING button 15 LIGHT button Top View Remote control signal transmitters Inserting the batteries 1 Pull down the tab on the battery cover and remove the cover towards the direction of the arrow...and press and marks inside the cover until it clicks the battery compartment. Important Information Part Names Remote Control POWER buttons (ON/OFF) 16 KEYSTONE button 19 ENTER button 19 UNDO button 26 INPUT 1 button 24 INPUT 2 button 24 INPUT 4 button...
... 19 ADJUSTMENT buttons 24 INPUT 3 button 14 DIGITAL INPUT button 24 RESIZE button 32 PICTURE SETTING button 15 LIGHT button Top View Remote control signal transmitters Inserting the batteries 1 Pull down the tab on the battery cover and remove the cover towards the direction of the arrow...and press and marks inside the cover until it clicks the battery compartment. Important Information Part Names Remote Control POWER buttons (ON/OFF) 16 KEYSTONE button 19 ENTER button 19 UNDO button 26 INPUT 1 button 24 INPUT 2 button 24 INPUT 4 button...

XVZ90U Operation Manual
Page 14
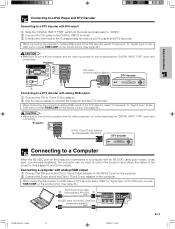
... end of the cable to turn both the projector and the video equipment off , before switching the "DIGITAL INPUT TYPE" swich and connecting. on the remote control. (See page 36.) CAUTION • Make sure to the corresponding terminals on the OSD menu or press RGB/COMP. Projector 2 To component output terminals DVD...
... end of the cable to turn both the projector and the video equipment off , before switching the "DIGITAL INPUT TYPE" swich and connecting. on the remote control. (See page 36.) CAUTION • Make sure to the corresponding terminals on the OSD menu or press RGB/COMP. Projector 2 To component output terminals DVD...
XVZ90U Operation Manual
Page 15
...Make sure to turn both the projector and the video equipment off , before switching the "DIGITAL INPUT TYPE" swich and connecting. on the remote control. (See page 36.) CAUTION • Make sure to turn both the projector and the video equipment off , before switching the "DIGITAL ...separately AN-A1DV) 1 RS-232C cable (null modem, cross type, commercially available) XVZ90U(E)#p12_14.p65 14 20/8/02, 7:21 pm E-14 on the remote control. (See page 36.) DVI to connect the projector and the DTV decoder. Projector DVI cable (commercially available) DTV decoder 2 3 1 Connecting to ...
...Make sure to turn both the projector and the video equipment off , before switching the "DIGITAL INPUT TYPE" swich and connecting. on the remote control. (See page 36.) CAUTION • Make sure to turn both the projector and the video equipment off , before switching the "DIGITAL ...separately AN-A1DV) 1 RS-232C cable (null modem, cross type, commercially available) XVZ90U(E)#p12_14.p65 14 20/8/02, 7:21 pm E-14 on the remote control. (See page 36.) DVI to connect the projector and the DTV decoder. Projector DVI cable (commercially available) DTV decoder 2 3 1 Connecting to ...

XVZ90U Operation Manual
Page 16
...press LIGHT again. However, the effective distance of the signal may differ due to the screen material. 45˚ 30˚ Remote Control Using the remote control in the configuration above indicate the direction of the signals. • A Macintosh adaptor may be turned on page 54 for easy... on the projector. 3 Connect the other than those listed may cause some Macintosh computers. Operating the Remote Control Remote Control 23Ј (7 m) 30˚ 45˚ 30˚ The remote control can be used to the serial port on the left. • The signal from the computer while...
...press LIGHT again. However, the effective distance of the signal may differ due to the screen material. 45˚ 30˚ Remote Control Using the remote control in the configuration above indicate the direction of the signals. • A Macintosh adaptor may be turned on page 54 for easy... on the projector. 3 Connect the other than those listed may cause some Macintosh computers. Operating the Remote Control Remote Control 23Ј (7 m) 30˚ 45˚ 30˚ The remote control can be used to the serial port on the left. • The signal from the computer while...
XVZ90U Operation Manual
Page 20
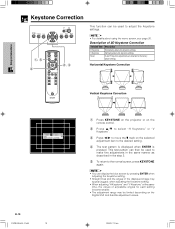
... is displayed when ENTER is pressed. Horizontal Keystone Correction Vertical Keystone Correction E-19 XVZ90U(E)#p15_21.p65 19 1 Press KEYSTONE on the projector or on the remote control. 2 Press / to select "H Keystone" or "V Keystone". 3 Press / to move the mark on the Digital Shift and Subtitle adjustment values. 20/8/02, 7:22 pm V and H Keystone...
... is displayed when ENTER is pressed. Horizontal Keystone Correction Vertical Keystone Correction E-19 XVZ90U(E)#p15_21.p65 19 1 Press KEYSTONE on the projector or on the remote control. 2 Press / to select "H Keystone" or "V Keystone". 3 Press / to move the mark on the Digital Shift and Subtitle adjustment values. 20/8/02, 7:22 pm V and H Keystone...
XVZ90U Operation Manual
Page 25
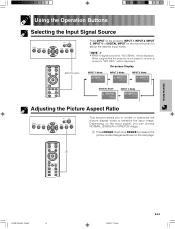
..., the picture mode changes as shown on the next page. 1 XVZ90U(E)#p24_25.p65 24 20/8/02, 7:23 pm E-24 will be displayed. Depending on the remote control to select the desired input mode. On-screen Display INPUT 1 Mode INPUT 2 Mode INPUT 3 Mode DIGITAL Mode INPUT 4 Mode Adjusting the Picture Aspect Ratio This...
..., the picture mode changes as shown on the next page. 1 XVZ90U(E)#p24_25.p65 24 20/8/02, 7:23 pm E-24 will be displayed. Depending on the remote control to select the desired input mode. On-screen Display INPUT 1 Mode INPUT 2 Mode INPUT 3 Mode DIGITAL Mode INPUT 4 Mode Adjusting the Picture Aspect Ratio This...

XVZ90U Operation Manual
Page 27
... the item if you to adjust the image and various projector settings. Only the selected adjustment item will be operated from the projector or the remote control with the following procedure. 64 2, 3, 5 1, 7 Basic Operation On-screen Display INPUT 1 (COMPONENT), 2 (COMPONENT or analog RGB) or DIGITAL INPUT (digital RGB) mode 1 2 INPUT 3 or 4 (VIDEO...
... the item if you to adjust the image and various projector settings. Only the selected adjustment item will be operated from the projector or the remote control with the following procedure. 64 2, 3, 5 1, 7 Basic Operation On-screen Display INPUT 1 (COMPONENT), 2 (COMPONENT or analog RGB) or DIGITAL INPUT (digital RGB) mode 1 2 INPUT 3 or 4 (VIDEO...
XVZ90U Operation Manual
Page 33
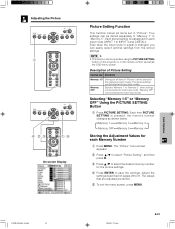
... can be operated using the PICTURE SETTING button on the projector or on pages 29 to save the settings. Adjust the settings described on the remote control, as well as shown below. Besides "Memory 1" to "Memory 5". Selecting "Memory 1-5" or "Memory OFF" Using the PICTURE SETTING Button 1 Press PICTURE SETTING, Each time PICTURE...
... can be operated using the PICTURE SETTING button on the projector or on pages 29 to save the settings. Adjust the settings described on the remote control, as well as shown below. Besides "Memory 1" to "Memory 5". Selecting "Memory 1-5" or "Memory OFF" Using the PICTURE SETTING Button 1 Press PICTURE SETTING, Each time PICTURE...

XVZ90U Operation Manual
Page 34
... digital mode. • Computer image adjustments can be made easily by pressing AUTO SYNC ( ) on your VCR). Adjusts horizontal noise (similar to tracking on the remote control. Basic Operation E-33 XVZ90U(E)#p33.p65 33 20/8/02, 7:25 pm Adjusting the Computer and DVD/DTV Images 2,3,4 1, 5 When displaying computer patterns which are returned...
... digital mode. • Computer image adjustments can be made easily by pressing AUTO SYNC ( ) on your VCR). Adjusts horizontal noise (similar to tracking on the remote control. Basic Operation E-33 XVZ90U(E)#p33.p65 33 20/8/02, 7:25 pm Adjusting the Computer and DVD/DTV Images 2,3,4 1, 5 When displaying computer patterns which are returned...

XVZ90U Operation Manual
Page 36
... adjustment, use manual adjustments. (See page 33.) • The Auto Sync adjustment may take some time to complete, depending on the Remote Control. Adjusting the Computer and DVD/DTV Images 2,3,4 1, 5 AUTO SYNC button On-screen Display Auto Sync Adjustment • Used to automatically adjust...MENU. ON ( ) • Synchronized adjustment is to be used in the digital mode. AUTO SYNC button Auto Sync Adjustment Using the Remote Control 1 Press AUTO SYNC button on the image of the computer connected to perform manual adjustment. Synchronized adjustment starts. OFF ( ) • ...
... adjustment, use manual adjustments. (See page 33.) • The Auto Sync adjustment may take some time to complete, depending on the Remote Control. Adjusting the Computer and DVD/DTV Images 2,3,4 1, 5 AUTO SYNC button On-screen Display Auto Sync Adjustment • Used to automatically adjust...MENU. ON ( ) • Synchronized adjustment is to be used in the digital mode. AUTO SYNC button Auto Sync Adjustment Using the Remote Control 1 Press AUTO SYNC button on the image of the computer connected to perform manual adjustment. Synchronized adjustment starts. OFF ( ) • ...
XVZ90U Operation Manual
Page 37
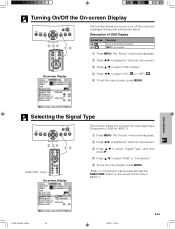
..." or "Component". 5 To exit the menu screen, press MENU. button On-screen Display This function allows you to turn on or off the on the remote control only in INPUT 2. The "Picture" menu screen appears. 2 Press / to display the "Options" menu screen. 3 Press / to select "Signal Type", and then press . 4 Press / to...
..." or "Component". 5 To exit the menu screen, press MENU. button On-screen Display This function allows you to turn on or off the on the remote control only in INPUT 2. The "Picture" menu screen appears. 2 Press / to display the "Options" menu screen. 3 Press / to select "Signal Type", and then press . 4 Press / to...

XVZ90U Operation Manual
Page 54
(RS-232C) Specifications and Command Settings BUTTONS & REMOTE CONTROL KEY CONTROL CONTENTS POWER ON POWER OFF INPUT 1 (COMPONENT 1) INPUT 2 (COMPONENT 2) INPUT 3 (S-VIDEO) INPUT 4 (VIDEO) DIGITAL MODE COMMAND PARAMETER RETURN P O W R _ _ _ 1 OK OR ERR P O W R _ _ _ 0 OK OR ERR I V E D _ _ _ 1 OK OR ERR I V E D _ _ _ 2 OK OR ERR I V E D _ _ _ 3 OK OR ERR I V E D _ _ _ 4 OK OR ERR I V E D _ _ _ 5 OK OR ERR • If an underbar (_) appears in the parameter column, enter a space. Appendix E-53 XVZ90U(E)#p51_60.p65 53 02.8.20, 8:00 PM
(RS-232C) Specifications and Command Settings BUTTONS & REMOTE CONTROL KEY CONTROL CONTENTS POWER ON POWER OFF INPUT 1 (COMPONENT 1) INPUT 2 (COMPONENT 2) INPUT 3 (S-VIDEO) INPUT 4 (VIDEO) DIGITAL MODE COMMAND PARAMETER RETURN P O W R _ _ _ 1 OK OR ERR P O W R _ _ _ 0 OK OR ERR I V E D _ _ _ 1 OK OR ERR I V E D _ _ _ 2 OK OR ERR I V E D _ _ _ 3 OK OR ERR I V E D _ _ _ 4 OK OR ERR I V E D _ _ _ 5 OK OR ERR • If an underbar (_) appears in the parameter column, enter a space. Appendix E-53 XVZ90U(E)#p51_60.p65 53 02.8.20, 8:00 PM
XVZ90U Operation Manual
Page 57
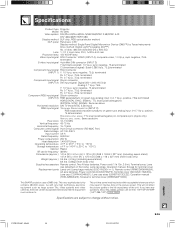
... any questions about this matter, please call toll free 1-877-DTV-SHARP (1-877-388-7427). Appendix XVZ90U(E)#p51_60.p65 56 02.8.20, 8:00 PM E-56 Specifications Product type Projector Model XV-Z90U Video system PAL/PAL 60/PAL-M/PAL-N/SECAM/NTSC 3.58/NTSC ...on the body), Lens cap strap, Operation manual, Screws for terminal cover Replacement parts Lamp unit (Lamp/cage module) (BQC-XVZ90+++1), Remote control (RRMCGA064WJSA), AA size batteries, Power cord (QACCDA007WJPZ), Terminal cover (GCOVAA116WJKA), Lens cap (CCAPHA004WJ01), Lens cap strap (UBNDT0013CEZZ), Operation manual...
... any questions about this matter, please call toll free 1-877-DTV-SHARP (1-877-388-7427). Appendix XVZ90U(E)#p51_60.p65 56 02.8.20, 8:00 PM E-56 Specifications Product type Projector Model XV-Z90U Video system PAL/PAL 60/PAL-M/PAL-N/SECAM/NTSC 3.58/NTSC ...on the body), Lens cap strap, Operation manual, Screws for terminal cover Replacement parts Lamp unit (Lamp/cage module) (BQC-XVZ90+++1), Remote control (RRMCGA064WJSA), AA size batteries, Power cord (QACCDA007WJPZ), Terminal cover (GCOVAA116WJKA), Lens cap (CCAPHA004WJ01), Lens cap strap (UBNDT0013CEZZ), Operation manual...
XVZ90U Operation Manual
Page 59
... display 36 On-screen display Language 42 P Phase 33 POWER buttons 16 Power cord 12 POWER indicator 44 R Rear+Ceiling 42 Rear projection 23 Remote control 10 Remote control sensor 15 Remote control signal transmitter 10 RESIZE button 24 INPUT 2 DVI digital port 13 RS-232C port 51 S STRETCH 24 Subtitle 39 S-VIDEO INPUT terminal 12...
... display 36 On-screen display Language 42 P Phase 33 POWER buttons 16 Power cord 12 POWER indicator 44 R Rear+Ceiling 42 Rear projection 23 Remote control 10 Remote control sensor 15 Remote control signal transmitter 10 RESIZE button 24 INPUT 2 DVI digital port 13 RS-232C port 51 S STRETCH 24 Subtitle 39 S-VIDEO INPUT terminal 12...

XVZ90U Operation Manual
Page 61
... respect to extend, enlarge or transfer this product within the applicable warranty period, Sharp shall, at Sharp's discretion on any Sharp Over The Range Microwave Oven. This warranty constitutes the entire express warranty granted by Sharp, including but not limited to earphones, remote controls, AC adapters, batteries, temperature probe, stylus, trays, filters, belts, ribbons, cables and...
... respect to extend, enlarge or transfer this product within the applicable warranty period, Sharp shall, at Sharp's discretion on any Sharp Over The Range Microwave Oven. This warranty constitutes the entire express warranty granted by Sharp, including but not limited to earphones, remote controls, AC adapters, batteries, temperature probe, stylus, trays, filters, belts, ribbons, cables and...


