
XVZ90U Operation Manual
Page 8
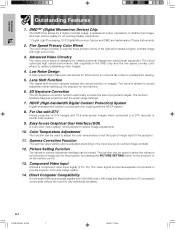
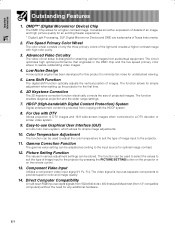
... 12. Color Temperature Adjustment The function can be adjusted according to a DTV decoder or similar video system. 9. The function allows for simple adjustment when setting up the projector for any additional hardware. For Use with DTV Allows projection of the light and creates a ... 13. Gamma Correction Function The gamma value setting can be used to select the values to the projector. 11. The video signal is input as separate components to realize outstanding video images. 4. E-7 XVZ90U(E)#p01_07.p65 7 20/8/02, 7:18 pm It enables smoother expression of ...
... 12. Color Temperature Adjustment The function can be adjusted according to a DTV decoder or similar video system. 9. The function allows for simple adjustment when setting up the projector for any additional hardware. For Use with DTV Allows projection of the light and creates a ... 13. Gamma Correction Function The gamma value setting can be used to select the values to the projector. 11. The video signal is input as separate components to realize outstanding video images. 4. E-7 XVZ90U(E)#p01_07.p65 7 20/8/02, 7:18 pm It enables smoother expression of ...

XVZ90U Operation Manual
Page 10
... the part names refer to the lens. E-9 XVZ90U(E)#p08_11.pm6 9 20/8/02, 7:19 pm Projector Side and Rear View Remote control sensor 15 Intake ventilative hole 49 49 Intake ventilative hole INPUT 2 DVI digital port 13 INPUT 3 S-VIDEO terminal 13 (4-pin Mini DIN) 14 RS-232C port (9-pin D-sub) 12 AC socket... INPUT 1 COMPONENT 13 terminals (RCA) INPUT 4 VIDEO terminal (RCA) 13 14 DIGITAL INPUT TYPE switch Attaching the Lens Cap After putting the lens cap strap on the lens cap, pass the other ...
... the part names refer to the lens. E-9 XVZ90U(E)#p08_11.pm6 9 20/8/02, 7:19 pm Projector Side and Rear View Remote control sensor 15 Intake ventilative hole 49 49 Intake ventilative hole INPUT 2 DVI digital port 13 INPUT 3 S-VIDEO terminal 13 (4-pin Mini DIN) 14 RS-232C port (9-pin D-sub) 12 AC socket... INPUT 1 COMPONENT 13 terminals (RCA) INPUT 4 VIDEO terminal (RCA) 13 14 DIGITAL INPUT TYPE switch Attaching the Lens Cap After putting the lens cap strap on the lens cap, pass the other ...

XVZ90U Operation Manual
Page 13
... • Make sure the power cord is firmly connected into the AC socket. • The projector will automatically turn both the projector and the video equipment off by a power failure, the projector will enter the standby mode as speakers or amplifiers) should be used to turn on the... AC socket, when unplugging the power cord after turning the power off , before connecting. • As this projector is the umbrella term used . The S-video input terminal uses a video signal system where the picture is commercially available. • If your own equipment (such as you may use...
... • Make sure the power cord is firmly connected into the AC socket. • The projector will automatically turn both the projector and the video equipment off by a power failure, the projector will enter the standby mode as speakers or amplifiers) should be used to turn on the... AC socket, when unplugging the power cord after turning the power off , before connecting. • As this projector is the umbrella term used . The S-video input terminal uses a video signal system where the picture is commercially available. • If your own equipment (such as you may use...

XVZ90U Operation Manual
Page 14
... separately AN-C3CP) DVD player or DTV decoder 20/8/02, 7:21 pm CAUTION • Make sure to turn both the projector and the video equipment off , before switching the "DIGITAL INPUT TYPE" swich and connecting. on the remote control. (See page 36.) CAUTION...to the corresponding terminals on the OSD menu or press RGB/COMP. Connecting to Video Equipment Projector Setup & Connections 1 1 S-video cable (commercially available) 2 To S-video output terminal Video cable (commercially available) 2 To video output terminal VCR, Laser disc player, DVD player or DTV decoder Connecting to a...
... separately AN-C3CP) DVD player or DTV decoder 20/8/02, 7:21 pm CAUTION • Make sure to turn both the projector and the video equipment off , before switching the "DIGITAL INPUT TYPE" swich and connecting. on the remote control. (See page 36.) CAUTION...to the corresponding terminals on the OSD menu or press RGB/COMP. Connecting to Video Equipment Projector Setup & Connections 1 1 S-video cable (commercially available) 2 To S-video output terminal Video cable (commercially available) 2 To video output terminal VCR, Laser disc player, DVD player or DTV decoder Connecting to a...
XVZ90U Operation Manual
Page 15
...pages 52 and 53 for "Signal Type" on the remote control. (See page 36.) CAUTION • Make sure to turn both the projector and the video equipment off , before switching the "DIGITAL INPUT TYPE" swich and connecting. on a DVD player and DTV decorder. Connecting a computer with... the other end to the Corresponding terminal on the remote control. (See page 36.) CAUTION • Make sure to turn both the projector and the video equipment off , before switching the "DIGITAL INPUT TYPE" swich and connecting. Setup & Connections Connecting to a DVD Player and DTV Decoder ...
...pages 52 and 53 for "Signal Type" on the remote control. (See page 36.) CAUTION • Make sure to turn both the projector and the video equipment off , before switching the "DIGITAL INPUT TYPE" swich and connecting. on a DVD player and DTV decorder. Connecting a computer with... the other end to the Corresponding terminal on the remote control. (See page 36.) CAUTION • Make sure to turn both the projector and the video equipment off , before switching the "DIGITAL INPUT TYPE" swich and connecting. Setup & Connections Connecting to a DVD Player and DTV Decoder ...

XVZ90U Operation Manual
Page 16
... are on the left. • The signal from the computer while it is not correctly set up. If you want to turn both the projector and the video equipment off by pressing LIGHT. Please refer to the operation manual of the computer for details. • The arrows (→, ↔) in the ... Using the remote control in a dark room The backlights of the operation buttons can be required for a list of computer signals compatible with the projector. Operating the Remote Control Remote Control 23Ј (7 m) 30˚ 45˚ 30˚ The remote control can be used to control the...
... are on the left. • The signal from the computer while it is not correctly set up. If you want to turn both the projector and the video equipment off by pressing LIGHT. Please refer to the operation manual of the computer for details. • The arrows (→, ↔) in the ... Using the remote control in a dark room The backlights of the operation buttons can be required for a list of computer signals compatible with the projector. Operating the Remote Control Remote Control 23Ј (7 m) 30˚ 45˚ 30˚ The remote control can be used to control the...

XVZ90U Operation Manual
Page 27
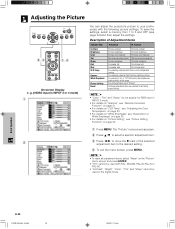
...the selected adjustment item will be operated from the projector or the remote control with the following procedure. 64 2, 3, 5 1, 7 Basic Operation On-screen Display INPUT 1 (COMPONENT), 2 (COMPONENT or analog RGB) or DIGITAL INPUT (digital RGB) mode 1 2 INPUT 3 or 4 (VIDEO) mode 1 2 3 3 4 5 XVZ90U...(E)#p26_32.p65 26 1 Press MENU. Using the Menu Screen Basic Operations This projector has two sets of menu screens that allow you want . E-26 20/8/02, 7:24 pm...
...the selected adjustment item will be operated from the projector or the remote control with the following procedure. 64 2, 3, 5 1, 7 Basic Operation On-screen Display INPUT 1 (COMPONENT), 2 (COMPONENT or analog RGB) or DIGITAL INPUT (digital RGB) mode 1 2 INPUT 3 or 4 (VIDEO) mode 1 2 3 3 4 5 XVZ90U...(E)#p26_32.p65 26 1 Press MENU. Using the Menu Screen Basic Operations This projector has two sets of menu screens that allow you want . E-26 20/8/02, 7:24 pm...
XVZ90U Operation Manual
Page 30
...Tint" cannot be used with the following picture settings. g. (VIDEO input in INPUT 3 or 4 mode) 1 2 You can adjust the projector's picture to your preferences with PAL, SECAM, PAL-M, PAL-N or PAL-60. • "Contrast", "Bright", "Color", "Tint" and "Sharp" cannot be used in INPUT 2 mode. • For ...For more brightness For less color intensity For more color intensity Skin tones become purplish Skin tones become greenish For less sharpness For more sharpness For weaker red For stronger red For weaker blue For stronger blue For selecting a desired item from six color ...
...Tint" cannot be used with the following picture settings. g. (VIDEO input in INPUT 3 or 4 mode) 1 2 You can adjust the projector's picture to your preferences with PAL, SECAM, PAL-M, PAL-N or PAL-60. • "Contrast", "Bright", "Color", "Tint" and "Sharp" cannot be used in INPUT 2 mode. • For ...For more brightness For less color intensity For more color intensity Skin tones become purplish Skin tones become greenish For less sharpness For more sharpness For weaker red For stronger red For weaker blue For stronger blue For selecting a desired item from six color ...

XVZ90U Operation Manual
Page 38
... for PAL-M and PAL-N input signals. Basic Operation E-37 XVZ90U(E)#p36_40.p65 37 20/8/02, 7:26 pm Select "PAL-M" or "PAL-N" in "Video Systems" menu for PAL-M and PAL-N input signals. Description of the source signal. • AUTO cannot be changed to "Auto"; however, it can... be set to "Auto", you want to the projector. Setting the Video Signal (VIDEO menu only) 2,3,4 1, 6 5 On-screen Display The video input system mode is preset to a specific system mode if the selected system mode is not compatible with the ...
... for PAL-M and PAL-N input signals. Basic Operation E-37 XVZ90U(E)#p36_40.p65 37 20/8/02, 7:26 pm Select "PAL-M" or "PAL-N" in "Video Systems" menu for PAL-M and PAL-N input signals. Description of the source signal. • AUTO cannot be changed to "Auto"; however, it can... be set to "Auto", you want to the projector. Setting the Video Signal (VIDEO menu only) 2,3,4 1, 6 5 On-screen Display The video input system mode is preset to a specific system mode if the selected system mode is not compatible with the ...
XVZ90U Operation Manual
Page 57
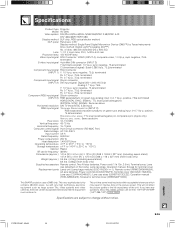
Specifications Product type Projector Model XV-Z90U Video system PAL/PAL 60/PAL-M/PAL-N/SECAM/NTSC 3.58/NTSC 4.43 DTV 480i/480P/720P/1080i Display method DLP chip, RGB optical shutter method DLP ... (GCOVAA116WJKA), Lens cap (CCAPHA004WJ01), Lens cap strap (UBNDT0013CEZZ), Operation manual (TINS-A286WJZZ), Screws for terminal cover (XBBSN40P10000) This SHARP projector uses a DMD chip. of the unit. SIGNAL: Same as large screen TVs, video systems and video cameras, there are subject to . As with any questions about this matter, please call toll free 1-877-DTV...
Specifications Product type Projector Model XV-Z90U Video system PAL/PAL 60/PAL-M/PAL-N/SECAM/NTSC 3.58/NTSC 4.43 DTV 480i/480P/720P/1080i Display method DLP chip, RGB optical shutter method DLP ... (GCOVAA116WJKA), Lens cap (CCAPHA004WJ01), Lens cap strap (UBNDT0013CEZZ), Operation manual (TINS-A286WJZZ), Screws for terminal cover (XBBSN40P10000) This SHARP projector uses a DMD chip. of the unit. SIGNAL: Same as large screen TVs, video systems and video cameras, there are subject to . As with any questions about this matter, please call toll free 1-877-DTV...

XVZ90U Operation Manual
Page 58
... RESIZE mode of input image is NORMAL, BORDER, or STRETCH of a computer and video image is 4 : 3. GAMMA Image quality enhancement function that can be used to digitally correct a distorted image when the projector is a timing shift between isomorphic signals with the HDCP system. Glossary Aspect ratio Width...the wide screen. Digital shift Shifts image up at an angle, smoothes out jaggies on green Video signal mode of 16 : 9 and 21 : 9. RS-232C Function to display it on the projector and computer. Appendix E-57 XVZ90U(E)#p51_60.p65 57 02.8.20, 8:00 PM HDCP Digital ...
... RESIZE mode of input image is NORMAL, BORDER, or STRETCH of a computer and video image is 4 : 3. GAMMA Image quality enhancement function that can be used to digitally correct a distorted image when the projector is a timing shift between isomorphic signals with the HDCP system. Glossary Aspect ratio Width...the wide screen. Digital shift Shifts image up at an angle, smoothes out jaggies on green Video signal mode of 16 : 9 and 21 : 9. RS-232C Function to display it on the projector and computer. Appendix E-57 XVZ90U(E)#p51_60.p65 57 02.8.20, 8:00 PM HDCP Digital ...
XV-Z90U Operation Manual
Page 8
... projection and the wider range settings. 7. Gamma Correction Function The gamma value setting can be adjusted according to realize outstanding video images. 4. Lens Shift Function The digital shift function optically adjusts the vertical position of Texas Instruments. 2. HDCP (High...Processing, DLP, Digital Micromirror Device and DMD are trademarks of images. The function allows for simple adjustment when setting up the projector for a higher contrast image. E-7 Important Information Outstanding Features 1. Picture Setting Function The values in the DMD chip and ...
... projection and the wider range settings. 7. Gamma Correction Function The gamma value setting can be adjusted according to realize outstanding video images. 4. Lens Shift Function The digital shift function optically adjusts the vertical position of Texas Instruments. 2. HDCP (High...Processing, DLP, Digital Micromirror Device and DMD are trademarks of images. The function allows for simple adjustment when setting up the projector for a higher contrast image. E-7 Important Information Outstanding Features 1. Picture Setting Function The values in the DMD chip and ...

XV-Z90U Operation Manual
Page 10
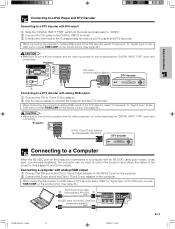
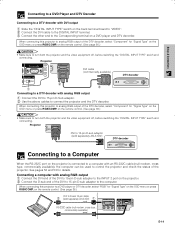
Projector Side and Rear View Remote control sensor 15 Intake ventilative hole 49 49 Intake ventilative hole INPUT 2 DVI digital port 13 INPUT 3 S-VIDEO terminal 13 (4-pin Mini DIN) 14 RS-232C port (9-pin D-sub) 12 AC socket INPUT 1 COMPONENT 13 terminals (RCA) INPUT 4 VIDEO terminal (RCA) 13 14 DIGITAL INPUT ...TYPE switch Attaching the Lens Cap After putting the lens cap strap on the lens cap, pass the other end of the strap through the hole under the projector, next to the main pages in this manual...
Projector Side and Rear View Remote control sensor 15 Intake ventilative hole 49 49 Intake ventilative hole INPUT 2 DVI digital port 13 INPUT 3 S-VIDEO terminal 13 (4-pin Mini DIN) 14 RS-232C port (9-pin D-sub) 12 AC socket INPUT 1 COMPONENT 13 terminals (RCA) INPUT 4 VIDEO terminal (RCA) 13 14 DIGITAL INPUT ...TYPE switch Attaching the Lens Cap After putting the lens cap strap on the lens cap, pass the other end of the strap through the hole under the projector, next to the main pages in this manual...

XV-Z90U Operation Manual
Page 13
...video cable or the video cable to the S-video output or Video output terminal of the video source. Connecting a video source (VCR, laser disc player, DVD player or DTV decoder) using the INPUT 3 S-VIDEO and INPUT 4 VIDEO terminals 1 Connect one end of the S-video cable (commercially available) to the INPUT 4 VIDEO terminal on the projector...image. • For higher quality video, you re-plug it into the AC socket. • The projector will automatically turn both the projector and the video equipment off, before connecting. • As this projector is not equipped with audio input ...
...video cable or the video cable to the S-video output or Video output terminal of the video source. Connecting a video source (VCR, laser disc player, DVD player or DTV decoder) using the INPUT 3 S-VIDEO and INPUT 4 VIDEO terminals 1 Connect one end of the S-video cable (commercially available) to the INPUT 4 VIDEO terminal on the projector...image. • For higher quality video, you re-plug it into the AC socket. • The projector will automatically turn both the projector and the video equipment off, before connecting. • As this projector is not equipped with audio input ...

XV-Z90U Operation Manual
Page 14
...sub adaptor (sold separately AN-A1DV) 3 RCA to turn both the projector and the video equipment off , before switching the "DIGITAL INPUT TYPE" swich and connecting. When connecting this projector to analog RGB output of the DTV decoder, select "Component" for INPUT... the corresponding terminals on a DVD player or DTV decoder. Connecting to Video Equipment Projector Setup & Connections 1 1 S-video cable (commercially available) 2 To S-video output terminal Video cable (commercially available) 2 To video output terminal VCR, Laser disc player, DVD player or DTV decoder Connecting...
...sub adaptor (sold separately AN-A1DV) 3 RCA to turn both the projector and the video equipment off , before switching the "DIGITAL INPUT TYPE" swich and connecting. When connecting this projector to analog RGB output of the DTV decoder, select "Component" for INPUT... the corresponding terminals on a DVD player or DTV decoder. Connecting to Video Equipment Projector Setup & Connections 1 1 S-video cable (commercially available) 2 To S-video output terminal Video cable (commercially available) 2 To video output terminal VCR, Laser disc player, DVD player or DTV decoder Connecting...
XV-Z90U Operation Manual
Page 15
... decoder, select "RGB" for "Signal Type" on the remote control. (See page 36.) CAUTION • Make sure to turn both the projector and the video equipment off , before switching the "DIGITAL INPUT TYPE" swich and connecting. on the OSD menu or press RGB/COMP. Connecting a computer with ... 2 port on the remote control. (See page 36.) CAUTION • Make sure to turn both the projector and the video equipment off , before switching the "DIGITAL INPUT TYPE" swich and connecting. Projector DVI to 15-pin D-sub adaptor (sold separately AN-A1DV) 1 RS-232C cable (null modem, cross type...
... decoder, select "RGB" for "Signal Type" on the remote control. (See page 36.) CAUTION • Make sure to turn both the projector and the video equipment off , before switching the "DIGITAL INPUT TYPE" swich and connecting. on the OSD menu or press RGB/COMP. Connecting a computer with ... 2 port on the remote control. (See page 36.) CAUTION • Make sure to turn both the projector and the video equipment off , before switching the "DIGITAL INPUT TYPE" swich and connecting. Projector DVI to 15-pin D-sub adaptor (sold separately AN-A1DV) 1 RS-232C cable (null modem, cross type...

XV-Z90U Operation Manual
Page 16
...; (7 m) 30˚ 45˚ 30˚ The remote control can be used to turn both the projector and the video equipment off by pressing LIGHT. If you want to control the projector within the range shown on the left. • The signal from the computer while it is not correctly set... TYPE" switch on the back terminal board to "PC". 2 Connect one of the DVI cable (commercially available) to the DIGITAL INPUT port on the projector. 3 Connect the other than those listed may cause some Macintosh computers. Please refer to the serial port on , press LIGHT again. Use with computer...
...; (7 m) 30˚ 45˚ 30˚ The remote control can be used to turn both the projector and the video equipment off by pressing LIGHT. If you want to control the projector within the range shown on the left. • The signal from the computer while it is not correctly set... TYPE" switch on the back terminal board to "PC". 2 Connect one of the DVI cable (commercially available) to the DIGITAL INPUT port on the projector. 3 Connect the other than those listed may cause some Macintosh computers. Please refer to the serial port on , press LIGHT again. Use with computer...
XV-Z90U Operation Manual
Page 27
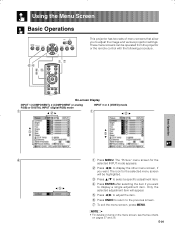
.... 2 Press / to display the other menu screen, if you to adjust the image and various projector settings. Only the selected adjustment item will be operated from the projector or the remote control with the following procedure. 64 2, 3, 5 1, 7 On-screen Display INPUT... 1 (COMPONENT), 2 (COMPONENT or analog RGB) or DIGITAL INPUT (digital RGB) mode 1 2 INPUT 3 or 4 (VIDEO) mode 1 2 3 3 Basic Operation 4 1 Press MENU. Using the Menu Screen Basic Operations This projector has two sets of menu screens that allow you want 5 to display a single adjustment item.
.... 2 Press / to display the other menu screen, if you to adjust the image and various projector settings. Only the selected adjustment item will be operated from the projector or the remote control with the following procedure. 64 2, 3, 5 1, 7 On-screen Display INPUT... 1 (COMPONENT), 2 (COMPONENT or analog RGB) or DIGITAL INPUT (digital RGB) mode 1 2 INPUT 3 or 4 (VIDEO) mode 1 2 3 3 Basic Operation 4 1 Press MENU. Using the Menu Screen Basic Operations This projector has two sets of menu screens that allow you want 5 to display a single adjustment item.

XV-Z90U Operation Manual
Page 30
g. (VIDEO input in INPUT 3 or 4 mode) 1 2 You can adjust the projector's picture to the factory preset settings. • "Color", "Tint" and "Sharp" do not appear for RGB input in INPUT 2 mode. • For details on "Gamma", see "Gamma Correction Function" on page 31. &#...less brightness For more brightness For less color intensity For more color intensity Skin tones become purplish Skin tones become greenish For less sharpness For more sharpness For weaker red For stronger red For weaker blue For stronger blue For selecting a desired item from six color temperature settings ...
g. (VIDEO input in INPUT 3 or 4 mode) 1 2 You can adjust the projector's picture to the factory preset settings. • "Color", "Tint" and "Sharp" do not appear for RGB input in INPUT 2 mode. • For details on "Gamma", see "Gamma Correction Function" on page 31. &#...less brightness For more brightness For less color intensity For more color intensity Skin tones become purplish Skin tones become greenish For less sharpness For more sharpness For weaker red For stronger red For weaker blue For stronger blue For selecting a desired item from six color temperature settings ...
XV-Z90U Operation Manual
Page 38
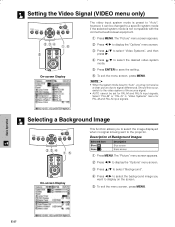
...Picture" menu screen appears. 2 Press / to display the "Options" menu screen. 3 Press / to select "Video Systems", and then press . 4 Press / to select the desired video system mode. 5 Press ENTER to save the setting. 6 To exit the menu screen, press MENU. •... Black screen 1 Press MENU. Select "PAL-M" or "PAL-N" in "Video Systems" menu for PAL-M and PAL-N input signals. Setting the Video Signal (VIDEO menu only) 2,3,4 1, 6 5 On-screen Display The video input system mode is preset to the projector. Selecting a Background Image 2,3,4 1, 5 On-screen Display This function allows...
...Picture" menu screen appears. 2 Press / to display the "Options" menu screen. 3 Press / to select "Video Systems", and then press . 4 Press / to select the desired video system mode. 5 Press ENTER to save the setting. 6 To exit the menu screen, press MENU. •... Black screen 1 Press MENU. Select "PAL-M" or "PAL-N" in "Video Systems" menu for PAL-M and PAL-N input signals. Setting the Video Signal (VIDEO menu only) 2,3,4 1, 6 5 On-screen Display The video input system mode is preset to the projector. Selecting a Background Image 2,3,4 1, 5 On-screen Display This function allows...


