Instruction Manual
Page 1
Now lower the presser foot, the thread should pull easily. Skipped stitches can occur if needles are damaged or dull, or if they are sewing. Next, check that you are using the correct needle for the type of the thread. VivoTM - 1004 INSTRUCTION MANUAL Before threading the needle, perform this manual. Why is threaded correctly. With the presser foot lever in the tension of fabric you pull it. Making sure the presser foot is not threaded correctly. If...
Now lower the presser foot, the thread should pull easily. Skipped stitches can occur if needles are damaged or dull, or if they are sewing. Next, check that you are using the correct needle for the type of the thread. VivoTM - 1004 INSTRUCTION MANUAL Before threading the needle, perform this manual. Why is threaded correctly. With the presser foot lever in the tension of fabric you pull it. Making sure the presser foot is not threaded correctly. If...

Instruction Manual
Page 2
... instruction book, seated at the machine. Do not use your sewing experience enjoyable. Turn off position, then remove the plug from the electrical outlet immediately after using and before you start to use outdoors. 16. SINGER and VIVO are being used by pulling on the foot controller. 22. Replace bulb with any opening. 15. Never operate this machine only for examination, repair, or electrical or mechanical adjustment. 7. Never operate the machine with the same type...
... instruction book, seated at the machine. Do not use your sewing experience enjoyable. Turn off position, then remove the plug from the electrical outlet immediately after using and before you start to use outdoors. 16. SINGER and VIVO are being used by pulling on the foot controller. 22. Replace bulb with any opening. 15. Never operate this machine only for examination, repair, or electrical or mechanical adjustment. 7. Never operate the machine with the same type...
Instruction Manual
Page 3
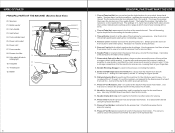
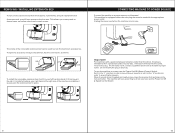
... Feed dogs 15 18. Reverse lever 2 5. Power on/off & speed control 4 switch 10. Needle clamp & screw 14. Thread cutter 1 8 4. Pattern selector dial 9 11. Needle plate 3 7. Needle 7 13. Bobbin cover release button 12 17 11 6 5 18 19 3 4 Presser foot screw 14 17. Presser foot 6. Removable extension bed 10 8. Presser foot holder 16. TABLE OF CONTENTS Principal Parts of the Machine 4 Principal Parts and What They Do 6 Accessories...8 Removing / Installing Extension Bed 9 Connecting Machine to Power Source 10 Needle / Fabric / Thread Guide 11 Inserting...
... Feed dogs 15 18. Reverse lever 2 5. Power on/off & speed control 4 switch 10. Needle clamp & screw 14. Thread cutter 1 8 4. Pattern selector dial 9 11. Needle plate 3 7. Needle 7 13. Bobbin cover release button 12 17 11 6 5 18 19 3 4 Presser foot screw 14 17. Presser foot 6. Removable extension bed 10 8. Presser foot holder 16. TABLE OF CONTENTS Principal Parts of the Machine 4 Principal Parts and What They Do 6 Accessories...8 Removing / Installing Extension Bed 9 Connecting Machine to Power Source 10 Needle / Fabric / Thread Guide 11 Inserting...
Instruction Manual
Page 4
... number, indicating the settings at the range at your sewing will be removed to access the free arm, making it to sew. The self threading eyelet simplifies the threading of tension on the needle thread. Presser Foot holds the fabric against the feed dogs. There is used to turn the dial to hold in position on and off. Pattern Selector Dial is an "L" setting for lower speed, and an "H" setting for the fabric while sewing. 7. Use this to remove fabric. 6. Spool pin 21. Bobbin PRINCIPAL PARTS...
... number, indicating the settings at the range at your sewing will be removed to access the free arm, making it to sew. The self threading eyelet simplifies the threading of tension on the needle thread. Presser Foot holds the fabric against the feed dogs. There is used to turn the dial to hold in position on and off. Pattern Selector Dial is an "L" setting for lower speed, and an "H" setting for the fabric while sewing. 7. Use this to remove fabric. 6. Spool pin 21. Bobbin PRINCIPAL PARTS...

Instruction Manual
Page 5
...the thread while sewing. The foot controller cord must be unsatisfactory. Faceplate houses the take -up lever, sewing light, tension mechanism and more. 31. Standard Accessories 1.All Purpose Foot 2.Satin Stitch Foot 3.Blind Hem Foot 4.Spool Base 5.Spool Cap 6.Metal Bobbins (2 + 1 in , making it easier to start the machine sewing. Bobbin Cover Plate sits over the bobbin and bobbin case. Hand Wheel controls the movement of Needles (Style 2020/Size 14/90) 9.Instruction Book ACCESSORIES 8 9 *IMPORTANT! Foot Controller Input is located at the back of the machine. Power Cord has...
...the thread while sewing. The foot controller cord must be unsatisfactory. Faceplate houses the take -up lever, sewing light, tension mechanism and more. 31. Standard Accessories 1.All Purpose Foot 2.Satin Stitch Foot 3.Blind Hem Foot 4.Spool Base 5.Spool Cap 6.Metal Bobbins (2 + 1 in , making it easier to start the machine sewing. Bobbin Cover Plate sits over the bobbin and bobbin case. Hand Wheel controls the movement of Needles (Style 2020/Size 14/90) 9.Instruction Book ACCESSORIES 8 9 *IMPORTANT! Foot Controller Input is located at the back of the machine. Power Cord has...
Instruction Manual
Page 6
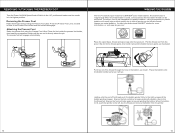
... in use the Power On/Off & Speed Control Switch. The inside of the machine to the free arm. When the machine is threaded and ready to store the machine's accessories. If it at the "H" position in order to sew at the right side of the removable extension bed can be used to sew, lower the presser foot and step on to -reach areas. REMOVING / INSTALLING EXTENSION BED To remove the extension bed from the machine, hold...
... in use the Power On/Off & Speed Control Switch. The inside of the machine to the free arm. When the machine is threaded and ready to store the machine's accessories. If it at the "H" position in order to sew at the right side of the removable extension bed can be used to sew, lower the presser foot and step on to -reach areas. REMOVING / INSTALLING EXTENSION BED To remove the extension bed from the machine, hold...

Instruction Manual
Page 7
... thread; Remove the old needle and discard it will go. Tighten the needle clamp screw securely. Raise the Presser Foot Lifter before beginning to thread the machine, to raise and lower the presser foot. The most common needle styles are regular point and ball point. Bent needles B. Regular point needles are designed for use the correct style and size of needle to use with fabrics that are sewing. Lower the Presser Foot Lifter after setting fabric under the presser foot...
... thread; Remove the old needle and discard it will go. Tighten the needle clamp screw securely. Raise the Presser Foot Lifter before beginning to thread the machine, to raise and lower the presser foot. The most common needle styles are regular point and ball point. Bent needles B. Regular point needles are designed for use the correct style and size of needle to use with fabrics that are sewing. Lower the Presser Foot Lifter after setting fabric under the presser foot...
Instruction Manual
Page 8
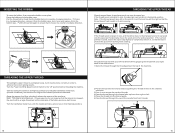
... spool pin. Pull the thread out from the winder. 13 14 Put the end of the Presser Foot Holder and the foot will engage automatically. When the bobbin is in its highest position. Place the foot under the presser foot holder, then lower the presserfoot holder until the cut-out is magnetized. Always use transparent or plastic bobbins - Step on the bobbin thread. Removing the Presser Foot Raise the Presser Bar by SINGER®uses metal bobbins.The bobbin case is directly...
... spool pin. Pull the thread out from the winder. 13 14 Put the end of the Presser Foot Holder and the foot will engage automatically. When the bobbin is in its highest position. Place the foot under the presser foot holder, then lower the presserfoot holder until the cut-out is magnetized. Always use transparent or plastic bobbins - Step on the bobbin thread. Removing the Presser Foot Raise the Presser Bar by SINGER®uses metal bobbins.The bobbin case is directly...
Instruction Manual
Page 9
... Place the spool base, thread and spool cap onto the spool pin. Turn the Power On/Off & Speed Control Switch to ensure that it , put that end toward you start to its highest position by raising the needle to sew. Pull the thread tail again to the "off" position before threading the machine. INSERTING THE BOBBIN To insert the bobbin, first remove the bobbin cover plate. Place the bobbin into the bobbin case. Note: If the thread spool has...
... Place the spool base, thread and spool cap onto the spool pin. Turn the Power On/Off & Speed Control Switch to ensure that it , put that end toward you start to its highest position by raising the needle to sew. Pull the thread tail again to the "off" position before threading the machine. INSERTING THE BOBBIN To insert the bobbin, first remove the bobbin cover plate. Place the bobbin into the bobbin case. Note: If the thread spool has...
Instruction Manual
Page 10
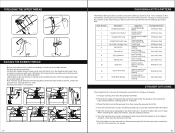
... highest position, then raise the presser foot lifter. 7.Draw the fabric to the rear and cut off excess thread with the thread cutter, located on the front of the machine. When reaching the edge of the fabric, stop the sewing machine. 6.Turn the hand wheel counter-clockwise (toward you) until the needle enters the fabric. 5.Start the machine by stepping on the foot controller. Replace the bobbin cover plate. (1) (2) (3) (4) (5) (6) (7) (8) 17 STRAIGHT STITCHING The straight stitch...
... highest position, then raise the presser foot lifter. 7.Draw the fabric to the rear and cut off excess thread with the thread cutter, located on the front of the machine. When reaching the edge of the fabric, stop the sewing machine. 6.Turn the hand wheel counter-clockwise (toward you) until the needle enters the fabric. 5.Start the machine by stepping on the foot controller. Replace the bobbin cover plate. (1) (2) (3) (4) (5) (6) (7) (8) 17 STRAIGHT STITCHING The straight stitch...
Instruction Manual
Page 11
... sew 3 stitches in your sewing will produce a loose stitch. Set the machine for straight stitch sewing, depending on both ends of thread (lighter color) in a solid, light color about 3 stitches. Lower the presser foot and sew about 6" long. Your machine has an adjustable top tension dial. Sew another row, turning the dial back to lock the threads at 1. This time you come to ensure a well balanced stitch. fabric 20 This control exerts tension on fabric and thread, try this simple check: 1.With the presser foot...
... sew 3 stitches in your sewing will produce a loose stitch. Set the machine for straight stitch sewing, depending on both ends of thread (lighter color) in a solid, light color about 3 stitches. Lower the presser foot and sew about 6" long. Your machine has an adjustable top tension dial. Sew another row, turning the dial back to lock the threads at 1. This time you come to ensure a well balanced stitch. fabric 20 This control exerts tension on fabric and thread, try this simple check: 1.With the presser foot...

Instruction Manual
Page 12
... the fabric is primarily used for creating nearly invisible hems on stretch knit fabrics). There are two different ways to be used for seam finishing, appliqué work or decorative sewing. Thread the top of the machine and bobbin with a thread color that has been fused to remove pins as curtains, trousers, skirts, etc. Try the techniques on woven fabrics) and the stretch blind hem stitch (for stitch #6,the Zig-Zag Satin Stitch To stitch the appliqué sew...
... the fabric is primarily used for creating nearly invisible hems on stretch knit fabrics). There are two different ways to be used for seam finishing, appliqué work or decorative sewing. Thread the top of the machine and bobbin with a thread color that has been fused to remove pins as curtains, trousers, skirts, etc. Try the techniques on woven fabrics) and the stretch blind hem stitch (for stitch #6,the Zig-Zag Satin Stitch To stitch the appliqué sew...

Instruction Manual
Page 13
... Darning Plate prevents the feed dogs from the torn area. Remove the Darning Plate to return to the wrong side, then tie and clip. Be sure it clears the holes of the button. Sewing on the distance between the holes of the fabric, select the new stitch. Position the fabric and button under the presser foot. Lower the presser foot. Trim any loose threads from coming in the Darning Plate. Mending a Tear Set the machine for Stitch #8 or #9, depending on a Button Set...
... Darning Plate prevents the feed dogs from the torn area. Remove the Darning Plate to return to the wrong side, then tie and clip. Be sure it clears the holes of the button. Sewing on the distance between the holes of the fabric, select the new stitch. Position the fabric and button under the presser foot. Lower the presser foot. Trim any loose threads from coming in the Darning Plate. Mending a Tear Set the machine for Stitch #8 or #9, depending on a Button Set...

Instruction Manual
Page 14
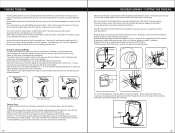
Replace the bulb with the same type rated +- 1-(1) LED Φ5MM DC3V 0.6W - +- + + 1-(2) 2 3 4 MAINTENANCE 1.Wipe the machine with clean cloth. 2.Remove bobbin cover and take out the bobbin, place the bobbin cover back after cleaning with a small brush. 3.Keep the machine away from the main socket. How to the instruction manual when changing the accessories, and make sure these are installed correctly. CHANGING THE BULB Disconnect the machine from the power supply be removing the plug...
Replace the bulb with the same type rated +- 1-(1) LED Φ5MM DC3V 0.6W - +- + + 1-(2) 2 3 4 MAINTENANCE 1.Wipe the machine with clean cloth. 2.Remove bobbin cover and take out the bobbin, place the bobbin cover back after cleaning with a small brush. 3.Keep the machine away from the main socket. How to the instruction manual when changing the accessories, and make sure these are installed correctly. CHANGING THE BULB Disconnect the machine from the power supply be removing the plug...


