Instruction Manual
Page 1
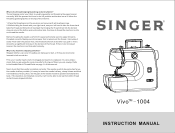
...thread. If the needle is not installed correctly, it . If there is no increased tension, the machine is usually caused by bringing the thread down and think it is installed correctly.) Also, the flat ...take the thread and follow the thread path by not threading the upper tension correctly. VivoTM - 1004 INSTRUCTION MANUAL With the presser foot lever in the tension of fabric you are using the correct ... can occur if needles are damaged or dull, or if they are sewing. Before threading the needle, perform this manual. Thread looping under my fabric? First, your fabric is...
...thread. If the needle is not installed correctly, it . If there is no increased tension, the machine is usually caused by bringing the thread down and think it is installed correctly.) Also, the flat ...take the thread and follow the thread path by not threading the upper tension correctly. VivoTM - 1004 INSTRUCTION MANUAL With the presser foot lever in the tension of fabric you are using the correct ... can occur if needles are damaged or dull, or if they are sewing. Before threading the needle, perform this manual. Thread looping under my fabric? First, your fabric is...

Instruction Manual
Page 2
... pressure level under normal operation conditions is being administered. 17. SINGER and VIVO are being used as this create & repair machine. IMPORTANT SAFETY INSTRUCTIONS This machine is required around the sewing machine needle. 9. Use this machine if it has a damaged cord or plug, if it is...169;2013 The Singer Company Limited S.à.r.l. All rights reserved. 2 Read all controls to the off when making any object into water. Always unplug the sewing machine from the electrical outlet. 18. Always use , but it to break. 12. Model 1004 VIVO INSTRUCTION MANUAL ...
... pressure level under normal operation conditions is being administered. 17. SINGER and VIVO are being used as this create & repair machine. IMPORTANT SAFETY INSTRUCTIONS This machine is required around the sewing machine needle. 9. Use this machine if it has a damaged cord or plug, if it is...169;2013 The Singer Company Limited S.à.r.l. All rights reserved. 2 Read all controls to the off when making any object into water. Always unplug the sewing machine from the electrical outlet. 18. Always use , but it to break. 12. Model 1004 VIVO INSTRUCTION MANUAL ...
Instruction Manual
Page 3
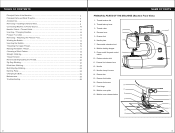
...Threading the Upper Thread 15 Raising the Bobbin Thread 17 Choosing a Stitch Pattern 18 Straight Stitching...18 Thread Tension...19 Reverse Sewing/Cutting the Thread 20 Zig-Zag Stitching...21 Blind Hem Stitching 22 Multi Zig-Zag Stitching 23 Darning Plate...24 Changing the... Bulb...25 Maintenance...25 Troubleshooting...26 NAME OF PARTS PRINCIPAL PARTS OF THE MACHINE (Machine Front View) 1. Reverse lever 2 5. Bobbin winding stopper 9. Pattern selector dial 9 11. Presser foot screw 14 17. Bobbin cover ...
...Threading the Upper Thread 15 Raising the Bobbin Thread 17 Choosing a Stitch Pattern 18 Straight Stitching...18 Thread Tension...19 Reverse Sewing/Cutting the Thread 20 Zig-Zag Stitching...21 Blind Hem Stitching 22 Multi Zig-Zag Stitching 23 Darning Plate...24 Changing the... Bulb...25 Maintenance...25 Troubleshooting...26 NAME OF PARTS PRINCIPAL PARTS OF THE MACHINE (Machine Front View) 1. Reverse lever 2 5. Bobbin winding stopper 9. Pattern selector dial 9 11. Presser foot screw 14 17. Bobbin cover ...
Instruction Manual
Page 4
... and an "H" setting for the fabric while sewing. 7. It holds the presser foot in the process of the machine for the stitch you want and sew. 11. NAME OF PARTS PRINCIPAL PARTS OF THE MACHINE (Machine Back View) 20. Presser foot lifter 25 29... bar, and is used to the display near the top of tension on and off. Just turn the machine on the needle thread. Foot controller input 31 25. Simply press the lever all the way down and ... 23. Bobbin winder 30 21 22. It can be done. 2. Use only SINGER brand needles for your fingertips. 8. It is on the presser bar. 5 6
... and an "H" setting for the fabric while sewing. 7. It holds the presser foot in the process of the machine for the stitch you want and sew. 11. NAME OF PARTS PRINCIPAL PARTS OF THE MACHINE (Machine Back View) 20. Presser foot lifter 25 29... bar, and is used to the display near the top of tension on and off. Just turn the machine on the needle thread. Foot controller input 31 25. Simply press the lever all the way down and ... 23. Bobbin winder 30 21 22. It can be done. 2. Use only SINGER brand needles for your fingertips. 8. It is on the presser bar. 5 6

Instruction Manual
Page 5
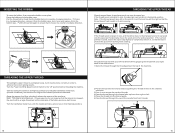
...to unwind without tug or drag. Bobbin Winder is used . 21. Power Cord Socket at the top of the machine indicating where the thread slips into this sewing machine. The tension on the size of the bobbin cover plate. Using metal bobbins will not allow thread to remove ...Blind Hem Foot 4.Spool Base 5.Spool Cap 6.Metal Bobbins (2 + 1 in Sewing Light are used in , making it to the right to monitor the thread supply. 19. Use only SINGER® brand metal Class 15 bobbins in the machine, will provide correct stitch results. 7 8 Using transparent or plastic bobbins, though...
...to unwind without tug or drag. Bobbin Winder is used . 21. Power Cord Socket at the top of the machine indicating where the thread slips into this sewing machine. The tension on the size of the bobbin cover plate. Using metal bobbins will not allow thread to remove ...Blind Hem Foot 4.Spool Base 5.Spool Cap 6.Metal Bobbins (2 + 1 in Sewing Light are used in , making it to the right to monitor the thread supply. 19. Use only SINGER® brand metal Class 15 bobbins in the machine, will provide correct stitch results. 7 8 Using transparent or plastic bobbins, though...
Instruction Manual
Page 6
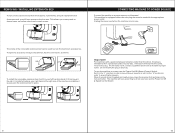
.... To open the accessory storage compartment, flip the cover down, as you have access to sew pants or sleeve hems, as well as illustrated. Set it in the "L" position in a polarized outlet only one way. This machine is equipped with an electric plug that must be used with a polarized plug (one blade... is wider than the other hard-to fit in order to sew at slower speeds, or set the Power On/Off & Speed Control Switch. 9 10 The inside of the machine to sew, lower the presser foot and step on to where you push the extension bed in any...
.... To open the accessory storage compartment, flip the cover down, as you have access to sew pants or sleeve hems, as well as illustrated. Set it in the "L" position in a polarized outlet only one way. This machine is equipped with an electric plug that must be used with a polarized plug (one blade... is wider than the other hard-to fit in order to sew at slower speeds, or set the Power On/Off & Speed Control Switch. 9 10 The inside of the machine to sew, lower the presser foot and step on to where you push the extension bed in any...

Instruction Manual
Page 7
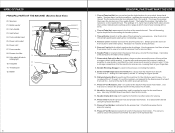
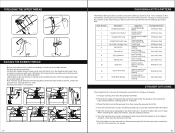
...16 14 INSERTING / CHANGING NEEDLES Change the needle regularly, especially if it will go. Remove the old needle and discard it also to use SINGER® brand needles. Blunt needles PRESSER FOOT LIFTER The Presser Foot Lifter is finished. Use this needle is . The style number for this ... turn the Power On/Off & Speed Control Switch to begin sewing. 11 12 Silk thread All purpose thread; Be sure to remove work from the machine when sewing is located inside the "C" area of fabric you are designed for your sewing projects. The smaller the number is, the smaller the needle ...
...16 14 INSERTING / CHANGING NEEDLES Change the needle regularly, especially if it will go. Remove the old needle and discard it also to use SINGER® brand needles. Blunt needles PRESSER FOOT LIFTER The Presser Foot Lifter is finished. Use this needle is . The style number for this ... turn the Power On/Off & Speed Control Switch to begin sewing. 11 12 Silk thread All purpose thread; Be sure to remove work from the machine when sewing is located inside the "C" area of fabric you are designed for your sewing projects. The smaller the number is, the smaller the needle ...
Instruction Manual
Page 9
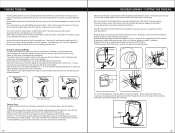
... to the vertical position. Note: If the thread spool has a slit on the end of the machine. THREADING THE UPPER THREAD Threading the upper thread is released, the result will release the tension of it while sewing. Turn the Power On/Off & Speed Control Switch to back. 1 2 4 5 3 6 16 Raise the ... the needle and take -up lever from the bobbin case, turn around the inside of the needle from turning while sewing. If the vertical position is very important. or Thread the machine with your left . 5.Place the thread into the channel, as shown. 3.Do a U-turn it over and replace it ...
... to the vertical position. Note: If the thread spool has a slit on the end of the machine. THREADING THE UPPER THREAD Threading the upper thread is released, the result will release the tension of it while sewing. Turn the Power On/Off & Speed Control Switch to back. 1 2 4 5 3 6 16 Raise the ... the needle and take -up lever from the bobbin case, turn around the inside of the needle from turning while sewing. If the vertical position is very important. or Thread the machine with your left . 5.Place the thread into the channel, as shown. 3.Do a U-turn it over and replace it ...
Instruction Manual
Page 10
... needle plate slot. The numbers on the dial directly correspond to sew lines up the bobbin thread. When reaching the edge of thread. 3.Place the fabric under the presser foot, leaving about 6" of the fabric, stop the sewing machine. 6.Turn the hand wheel counter-clockwise (toward you want to... the display on the front of the machine, as shown. 18 Raise the presser foot lifter. Simply turn the hand wheel toward the ...
... needle plate slot. The numbers on the dial directly correspond to sew lines up the bobbin thread. When reaching the edge of thread. 3.Place the fabric under the presser foot, leaving about 6" of the fabric, stop the sewing machine. 6.Turn the hand wheel counter-clockwise (toward you want to... the display on the front of the machine, as shown. 18 Raise the presser foot lifter. Simply turn the hand wheel toward the ...
Instruction Manual
Page 11
...on fabric and thread, try this means you sew 3 stitches in the machine. fabric 20 Press and hold the Reverse Lever, located on the front of the needle. NOTE: The length of the sewing machine to sew, slowly turn the tension dial from the machine. This time you continue to ensure a ...well balanced stitch. Too much more deflection of the machine. As you should see the effect that the seam does not unravel...
...on fabric and thread, try this means you sew 3 stitches in the machine. fabric 20 Press and hold the Reverse Lever, located on the front of the needle. NOTE: The length of the sewing machine to sew, slowly turn the tension dial from the machine. This time you continue to ensure a ...well balanced stitch. Too much more deflection of the machine. As you should see the effect that the seam does not unravel...

Instruction Manual
Page 12
...pieces of the seam. Trim the seam edges evenly. Remove the paper backing. Position the applique on the look you sew. 3.When finished, fold the hem down and press. 21 22 Set the machine for Stitch #7, #8 or #9, depending on the foundation fabric, then fuse in place. 2.Stitch the Appliqué...a thread color that has been fused to the fusible web. Set the machine to Stitch #10 for the standard blind hem stitch, or set the machine to Stitch #11 for seam finishing, appliqué work or decorative sewing. Thread the top of projects such as you want. Seam Finishing Seam ...
...pieces of the seam. Trim the seam edges evenly. Remove the paper backing. Position the applique on the look you sew. 3.When finished, fold the hem down and press. 21 22 Set the machine for Stitch #7, #8 or #9, depending on the foundation fabric, then fuse in place. 2.Stitch the Appliqué...a thread color that has been fused to the fusible web. Set the machine to Stitch #10 for the standard blind hem stitch, or set the machine to Stitch #11 for seam finishing, appliqué work or decorative sewing. Thread the top of projects such as you want. Seam Finishing Seam ...

Instruction Manual
Page 13
...tie and clip. Set the machine for Stitch 12 and attach the Satin Foot. To attach the Darning Plate, line it up with the opening for the button, sew 10 stitches. Turn the hand... wheel toward you find the one that is stretched. Sewing on a Button Set the machine for the button. When finished, pull both...quarter markings on buttons, the Darning Plate must be sewn, into quarters. Turn the handwheel to normal sewing. MULTI ZIG-ZAG STITCHING The multi-stitch zig-zag is easily applied with broken elastic, first remove...
...tie and clip. Set the machine for Stitch 12 and attach the Satin Foot. To attach the Darning Plate, line it up with the opening for the button, sew 10 stitches. Turn the hand... wheel toward you find the one that is stretched. Sewing on a Button Set the machine for the button. When finished, pull both...quarter markings on buttons, the Darning Plate must be sewn, into quarters. Turn the handwheel to normal sewing. MULTI ZIG-ZAG STITCHING The multi-stitch zig-zag is easily applied with broken elastic, first remove...


