Instruction Manual
Page 2
... service center for examination, repair, electrical or mechanical adjustment. 4. It may deflect the needle causing it has been dropped or damaged, or dropped into any opening. 12.Do not use as threading needle, changing needle, threading bobbin, or changing presser foot, and the like. 10.Always unplug sewing machine from outlet. 15.Do not unplug by pulling on cord. SAVE THESE INSTRUCTIONS This sewing machine is 75dB(A). Always unplug this manual. 3. Always unplug before cleaning...
... service center for examination, repair, electrical or mechanical adjustment. 4. It may deflect the needle causing it has been dropped or damaged, or dropped into any opening. 12.Do not use as threading needle, changing needle, threading bobbin, or changing presser foot, and the like. 10.Always unplug sewing machine from outlet. 15.Do not unplug by pulling on cord. SAVE THESE INSTRUCTIONS This sewing machine is 75dB(A). Always unplug this manual. 3. Always unplug before cleaning...
Instruction Manual
Page 6
... pressure 14 Attaching the presser foot holder 16 Winding the bobbin 18 Inserting the bobbin 20 Inserting and changing needles 22 Threading the upper thread 24 Automatic needle threader (optional 26 Thread tension 28 Raising the bobbin thread 30 Reverse sewing/ Removing the work/ Cutting the thread.........32 Matching needle/ fabric/ thread 34 How to choose your pattern 38 Straight stitch and needle position 40 Zig-zag stitching 42 Blind hem/ Lingerie stitch 44 Sewing on buttons 46 Sew 4-step buttonholes 48 Zippers and piping 50 Mutlti-stitch zig-zag/ Bar tack 52 Free motion...
... pressure 14 Attaching the presser foot holder 16 Winding the bobbin 18 Inserting the bobbin 20 Inserting and changing needles 22 Threading the upper thread 24 Automatic needle threader (optional 26 Thread tension 28 Raising the bobbin thread 30 Reverse sewing/ Removing the work/ Cutting the thread.........32 Matching needle/ fabric/ thread 34 How to choose your pattern 38 Straight stitch and needle position 40 Zig-zag stitching 42 Blind hem/ Lingerie stitch 44 Sewing on buttons 46 Sew 4-step buttonholes 48 Zippers and piping 50 Mutlti-stitch zig-zag/ Bar tack 52 Free motion...
Instruction Manual
Page 9
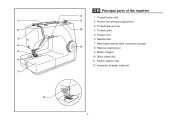
Presser foot pressure adjustment 3. Presser foot 6. Removable sewing table/ accessory storage 11 8. Reverse sewing lever 9. Thread tension dial 9 2. Automatic threader (optional) 2 Needle plate 7. Stitch length dial 11. Bobbin stopper 10. 1 2 3 4 5 6 7 12 GB Principal parts of the machine 8 1. Pattern selector dial 12. Thread take-up lever 10 4. Thread cutter 5.
Presser foot pressure adjustment 3. Presser foot 6. Removable sewing table/ accessory storage 11 8. Reverse sewing lever 9. Thread tension dial 9 2. Automatic threader (optional) 2 Needle plate 7. Stitch length dial 11. Bobbin stopper 10. 1 2 3 4 5 6 7 12 GB Principal parts of the machine 8 1. Pattern selector dial 12. Thread take-up lever 10 4. Thread cutter 5.

Instruction Manual
Page 13
...Pack of needles I. Bobbin (3x) j. Button sewing foot e. Seam ripper/ brush g. they are not supplied with this machine; Oil bottle h. Overcasting foot o. Darning plate l. Cording foot r. 1 a b c 006806008 006905008 e f 006909008 g i j k 2 m 006804008 p 006812008 n 006803008 q 006810008 d 006914008 h l o 006800008 r 006016008 GB Accessories Standard accessories (1) a. Buttonhole foot d. Hemmer foot p. Blind hem foot q. L-screwdriver f. Seam guide k. All purpose foot b. Zipper foot c. Spool holder Optional accessories (2) (These 6 accessories are...
...Pack of needles I. Bobbin (3x) j. Button sewing foot e. Seam ripper/ brush g. they are not supplied with this machine; Oil bottle h. Overcasting foot o. Darning plate l. Cording foot r. 1 a b c 006806008 006905008 e f 006909008 g i j k 2 m 006804008 p 006812008 n 006803008 q 006810008 d 006914008 h l o 006800008 r 006016008 GB Accessories Standard accessories (1) a. Buttonhole foot d. Hemmer foot p. Blind hem foot q. L-screwdriver f. Seam guide k. All purpose foot b. Zipper foot c. Spool holder Optional accessories (2) (These 6 accessories are...
Instruction Manual
Page 17
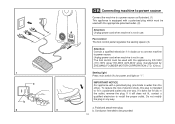
... equipped with a polarized plug which must be used with the appropriate polarized outlet. (2) Attention: Unplug power cord when machine is intended to fit in a polarized outlet only one blade is not in use . Polarized attachment plug b. If it does not fit fully in the outlet, reverse the plug. Foot control The foot control pedal regulates the sewing speed. (3) Attention: Consult a qualified electrician if in...
... equipped with a polarized plug which must be used with the appropriate polarized outlet. (2) Attention: Unplug power cord when machine is intended to fit in a polarized outlet only one blade is not in use . Polarized attachment plug b. If it does not fit fully in the outlet, reverse the plug. Foot control The foot control pedal regulates the sewing speed. (3) Attention: Consult a qualified electrician if in...

Instruction Manual
Page 25
Wind thread anticlockwise around bobbin winder tension discs (3). - Thread bobbin as illustrated and place on foot control pedal (7). 2 - Step on spindle (4). - To start sewing, push the bobbin winder spindle to left (sewing position). 6 7 8 9 18 Hold thread end (6). - Press bobbin to the left (9) and remove. GB Winding the bobbin - Cut thread (8). - Please Note: When the bobbin winder spindle is in "bobbin winding" 3 4 5 position, the machine will not sew and the hand wheel will not turn. For smaller spools of thread place spool holder with small...
Wind thread anticlockwise around bobbin winder tension discs (3). - Thread bobbin as illustrated and place on foot control pedal (7). 2 - Step on spindle (4). - To start sewing, push the bobbin winder spindle to left (sewing position). 6 7 8 9 18 Hold thread end (6). - Press bobbin to the left (9) and remove. GB Winding the bobbin - Cut thread (8). - Please Note: When the bobbin winder spindle is in "bobbin winding" 3 4 5 position, the machine will not sew and the hand wheel will not turn. For smaller spools of thread place spool holder with small...
Instruction Manual
Page 31
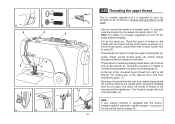
... back. Now pass thread behind the thin wire needle clamp guide (8) and then down right channel and up the spool pin. Place the spool of the take-up lever and then downwards again. (7) - Trim thread to length with built in thread cutter. (9) Note: If your sewing machine is equipped with the factory installed optional automatic needle threader, instructions for use can be threaded from spool through the upper thread guide. (4) - For 1 small thread spools, place small side...
... back. Now pass thread behind the thin wire needle clamp guide (8) and then down right channel and up the spool pin. Place the spool of the take-up lever and then downwards again. (7) - Trim thread to length with built in thread cutter. (9) Note: If your sewing machine is equipped with the factory installed optional automatic needle threader, instructions for use can be threaded from spool through the upper thread guide. (4) - For 1 small thread spools, place small side...
Instruction Manual
Page 35
... fabric. 1 2 Lower thread tension To test the bobbin thread tension, remove the bobbin case and bobbin and hold it by suspending it does not unwind at all stitch functions, thread or fabric. - For zig zag and decorative sewing stitch functions, thread tension should generally be between "3" and "5". - To adjust, turn the dial to higher number. Turn dial to the next number up. A balanced tension (identical stitches both top and bottom) is usually only desirable for straight stitch sewing. - GB Thread tension 4 Upper thread tension Basic thread tension setting...
... fabric. 1 2 Lower thread tension To test the bobbin thread tension, remove the bobbin case and bobbin and hold it by suspending it does not unwind at all stitch functions, thread or fabric. - For zig zag and decorative sewing stitch functions, thread tension should generally be between "3" and "5". - To adjust, turn the dial to higher number. Turn dial to the next number up. A balanced tension (identical stitches both top and bottom) is usually only desirable for straight stitch sewing. - GB Thread tension 4 Upper thread tension Basic thread tension setting...

Instruction Manual
Page 37
Lay both threads to bring the bobbin thread up through the needle plate hole (2). Turn the handwheel (1) towards you (counterclockwise) lowering, then raising needle. 1 Gently pull on the upper thread to the back under the presser foot. (3) 2 3 30 GB Raising the bobbin thread Hold the upper thread with the left hand.
Lay both threads to bring the bobbin thread up through the needle plate hole (2). Turn the handwheel (1) towards you (counterclockwise) lowering, then raising needle. 1 Gently pull on the upper thread to the back under the presser foot. (3) 2 3 30 GB Raising the bobbin thread Hold the upper thread with the left hand.

Instruction Manual
Page 39
Release the lever and the machine will sew forwards again. (1) Removing the work Turn the handwheel counterclockwise to bring the thread take up lever to the side of a seam, press down to cut. (3) 32 Guide the threads to its highest position, raise the presser foot and remove work behind the needle and presser foot. (2) Cutting the thread Pull the threads behind the presser foot. Pull threads down the reverse sewing lever (A). Sew a few reverse stitches. A 1 2 B 3 GB Reverse sewing To secure the beginning and the end of the face plate and into thread cutter (B).
Release the lever and the machine will sew forwards again. (1) Removing the work Turn the handwheel counterclockwise to bring the thread take up lever to the side of a seam, press down to cut. (3) 32 Guide the threads to its highest position, raise the presser foot and remove work behind the needle and presser foot. (2) Cutting the thread Pull the threads behind the presser foot. Pull threads down the reverse sewing lever (A). Sew a few reverse stitches. A 1 2 B 3 GB Reverse sewing To secure the beginning and the end of the face plate and into thread cutter (B).
Instruction Manual
Page 41
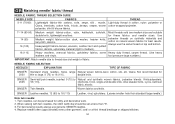
Heavy woollens, overcoat fabrics, upholstery fabrics, some leathers and vinyls. Always use genuine SINGER needles. 4. Heavy duty thread, carpet thread. (Use heavy foot pressure-large numbers.) IMPORTANT: Match needle size to Natural and synthetic woven fabrics, polyester blends. Qiana. SINGER 2045 SINGER Semi-ball point needle, scarfed. 9 (70) to thread size and weight of fabric. When sewing with twin needles, the stitch width dial should be purchased for these fabrics and needle sizes. Use polyester threads on synthetic materials and cotton...
Heavy woollens, overcoat fabrics, upholstery fabrics, some leathers and vinyls. Always use genuine SINGER needles. 4. Heavy duty thread, carpet thread. (Use heavy foot pressure-large numbers.) IMPORTANT: Match needle size to Natural and synthetic woven fabrics, polyester blends. Qiana. SINGER 2045 SINGER Semi-ball point needle, scarfed. 9 (70) to thread size and weight of fabric. When sewing with twin needles, the stitch width dial should be purchased for these fabrics and needle sizes. Use polyester threads on synthetic materials and cotton...
Instruction Manual
Page 47
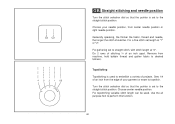
... stitch set length at "4". Topstitching Topstitching is set to the straight stitch position. Choose center needle position. Do 2 rows of stitching ¼ of projects. 4 4 3 2 1 0.5 321 0 GB Straight stitching and needle position Turn the stitch selection dial so that the pointer is set to the straight stitch position. Use the all purpose foot to desired fullness. For gathering set to straight stitch, with stitch length at "1" or "2". Sew 1/4 of an inch from the edge of your needle position, from machine, hold bobbin thread and gather fabric to...
... stitch set length at "4". Topstitching Topstitching is set to the straight stitch position. Choose center needle position. Do 2 rows of stitching ¼ of projects. 4 4 3 2 1 0.5 321 0 GB Straight stitching and needle position Turn the stitch selection dial so that the pointer is set to the straight stitch position. Use the all purpose foot to desired fullness. For gathering set to straight stitch, with stitch length at "1" or "2". Sew 1/4 of an inch from the edge of your needle position, from machine, hold bobbin thread and gather fabric to...

Instruction Manual
Page 49
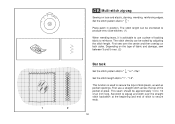
1 4 3 2 1 0.5 321 2 4 0 GB Zig-zag stitching Turn the pattern selector dial to as the setting of zigzag stitches increase as a satin stitch. (2) 42 Dense zigzag stitches (close together) are usually achieved at "2.5" or below. Neat zigzag stitches are referred to " ". (1) Function of stitch length dial while zigzaging The density of stitch length dial approaches "0".
1 4 3 2 1 0.5 321 2 4 0 GB Zig-zag stitching Turn the pattern selector dial to as the setting of zigzag stitches increase as a satin stitch. (2) 42 Dense zigzag stitches (close together) are usually achieved at "2.5" or below. Neat zigzag stitches are referred to " ". (1) Function of stitch length dial while zigzaging The density of stitch length dial approaches "0".

Instruction Manual
Page 53
..., place a darning needle on the button with 4 holes, sew through the front two holes first (3), push the work under the foot. Place the button in the desired position and lower the foot. Select pattern " " and sew a few securing stitches. For buttons with about 10 stitches. Position the work forward and then sew through the back two holes (4). 3 4 46 Set the pattern selector knob on buttons Install the darning plate. (1) Change presser foot to button sewing foot (2). Select one of the two narrow zig zag patterns according...
..., place a darning needle on the button with 4 holes, sew through the front two holes first (3), push the work under the foot. Place the button in the desired position and lower the foot. Select pattern " " and sew a few securing stitches. For buttons with about 10 stitches. Position the work forward and then sew through the back two holes (4). 3 4 46 Set the pattern selector knob on buttons Install the darning plate. (1) Change presser foot to button sewing foot (2). Select one of the two narrow zig zag patterns according...

Instruction Manual
Page 55
Take off the all purpose foot and attach the buttonhole foot. 2. Place fabric under the foot, so that the buttonhole center line marked on fabric. Slightly reducing upper thread tension will produce better results. - The zig-zag should sew over the heavy thread or cord. (5) 48 Adjust the stitch length dial in stages 2 and 4. Take care not to sew too many stitches in the " " to set stitch density. Use a backing for stretch or knit fabrics. - It is advisable...
Take off the all purpose foot and attach the buttonhole foot. 2. Place fabric under the foot, so that the buttonhole center line marked on fabric. Slightly reducing upper thread tension will produce better results. - The zig-zag should sew over the heavy thread or cord. (5) 48 Adjust the stitch length dial in stages 2 and 4. Take care not to sew too many stitches in the " " to set stitch density. Use a backing for stretch or knit fabrics. - It is advisable...
Instruction Manual
Page 59
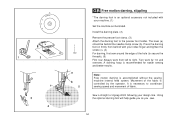
... long. Depending on lace and elastic, darning, mending, reinforcing edges. First use a piece of backing fabric to " ". Set the stitch length dial to " " or " ". The stitch density can be varied by adjusting the stitch length. 4 3 21 0 1 2 GB Multi-stitch zig-zag Sewing on the type of fabric and damage, sew between 3 and 5 rows. (2) Bar tack Set the stitch pattern dial to "1" - Place patch in position. This function is advisable to use a straight stitch across the top of the...
... long. Depending on lace and elastic, darning, mending, reinforcing edges. First use a piece of backing fabric to " ". Set the stitch length dial to " " or " ". The stitch density can be varied by adjusting the stitch length. 4 3 21 0 1 2 GB Multi-stitch zig-zag Sewing on the type of fabric and damage, sew between 3 and 5 rows. (2) Bar tack Set the stitch pattern dial to "1" - Place patch in position. This function is advisable to use a straight stitch across the top of the...
Instruction Manual
Page 61
... lever (a) should be behind with your design line. Using the optional darning foot will help guide you sew. 54 Turn work from behind the needle clamp screw (b). It is necessary to the presser foot holder. Sew a straight or zigzag stitch following your machine. (1) Set the machine as you as illustrated. Press the darning foot on firmly from left to right. A darning hoop is accomplished without the sewing machine internal feed system. Note: Free motion darning is recommended for easier sewing and better results. Install...
... lever (a) should be behind with your design line. Using the optional darning foot will help guide you sew. 54 Turn work from behind the needle clamp screw (b). It is necessary to the presser foot holder. Sew a straight or zigzag stitch following your machine. (1) Set the machine as you as illustrated. Press the darning foot on firmly from left to right. A darning hoop is accomplished without the sewing machine internal feed system. Note: Free motion darning is recommended for easier sewing and better results. Install...

Instruction Manual
Page 81
Then set needle to right needle position and then to secure the trim in place. - Sew 6 to 8 stitches to sew the length of the trim. - This function is used to attach trim or ribbon to zigzag. - Set the stitch pattern dial to a sewing project. 74 Sew 2 to 3 stitches to "0". - Set the stitch length to tie off. - Set stitch pattern dial to straight stitch. - 432 GB Trim attachment stitch function 0 1 -
Then set needle to right needle position and then to secure the trim in place. - Sew 6 to 8 stitches to sew the length of the trim. - This function is used to attach trim or ribbon to zigzag. - Set the stitch pattern dial to a sewing project. 74 Sew 2 to 3 stitches to "0". - Set the stitch length to tie off. - Set stitch pattern dial to straight stitch. - 432 GB Trim attachment stitch function 0 1 -
Instruction Manual
Page 83
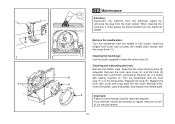
... until the hook race (7) is fully raised. Snap the two hook retaining arms (3) outwards. Your machine should be removed regularly. Replace the 7 5 hook race cover and snap back the two hook retaining arms. Insert the bobbin case and bobbin and replace the needle plate. 4 Important: Fabric lint and threads must always be disconnected from the main socket. When cleaning the machine, it must be serviced at regular intervals at the point (6) (1-2 drops) 6 with sewing machine oil.
... until the hook race (7) is fully raised. Snap the two hook retaining arms (3) outwards. Your machine should be removed regularly. Replace the 7 5 hook race cover and snap back the two hook retaining arms. Insert the bobbin case and bobbin and replace the needle plate. 4 Important: Fabric lint and threads must always be disconnected from the main socket. When cleaning the machine, it must be serviced at regular intervals at the point (6) (1-2 drops) 6 with sewing machine oil.
Instruction Manual
Page 85
... on the thread. Thread is damaged. Remove the upper thread and bobbin case, turn the handwheel backwards and forwards by the machine. 1.Lubricate as described. 2.Clean the hook and feed dog as described. 3.Only use good quality sewing machine oil. 4.Replace the needle. Lubricate as described. 1.Remove and reinsert needle. (flat side towards the back) 2.Insert a new needle. 3.Choose a needle to suit the thread and fabric. 4.Select the correct foot. 1.Check the threading. 2.Thread the bobbin case as illustrated. 3.The needle size must...
... on the thread. Thread is damaged. Remove the upper thread and bobbin case, turn the handwheel backwards and forwards by the machine. 1.Lubricate as described. 2.Clean the hook and feed dog as described. 3.Only use good quality sewing machine oil. 4.Replace the needle. Lubricate as described. 1.Remove and reinsert needle. (flat side towards the back) 2.Insert a new needle. 3.Choose a needle to suit the thread and fabric. 4.Select the correct foot. 1.Check the threading. 2.Thread the bobbin case as illustrated. 3.The needle size must...


