Instruction Manual
Page 2
... one blade wider than the other user servicing adjustments mentioned in the instruction manual." "Never operate this sewing machine." "Do not use bent needles." 13. "CAUTION-- Do not modify the plug in the outlet, reverse the plug. Copyright © 2007 All Rights Reserved. "Never drop or insert any other ). "Do not unplug by the manufacturer as threading needle, changing needle, threading bobbin, or changing presser foot, etc." 15. Special care is being...
... one blade wider than the other user servicing adjustments mentioned in the instruction manual." "Never operate this sewing machine." "Do not use bent needles." 13. "CAUTION-- Do not modify the plug in the outlet, reverse the plug. Copyright © 2007 All Rights Reserved. "Never drop or insert any other ). "Do not unplug by the manufacturer as threading needle, changing needle, threading bobbin, or changing presser foot, etc." 15. Special care is being...
Instruction Manual
Page 5
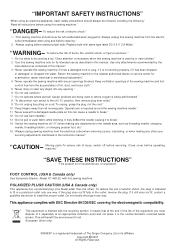
...CARING FOR YOUR MACHINE Cleaning hook area and feed dogs 60 - 61 4. KNOWING YOUR SEWING MACHINE Machine identification 6 - 7 Accessories 8 - 9 Setting up your machine 10 - 11 Spool pins 12 - 13 Presser foot lifter, Darning plate 12 - 13 Converting to free-arm sewing 12 - 13 Winding the bobbin 14 - 15 Threading the bobbin thread 16 - 17 Threading the top thread 18 - 19 Using automatic needle threader 20 - 21 Needle, thread and fabric chart 22 - 23 Adjusting top thread tension 24 - 25 Changing presser foot 24 - 25 Control panel functions 26 - 27 Reverse operation button 28 - 29...
...CARING FOR YOUR MACHINE Cleaning hook area and feed dogs 60 - 61 4. KNOWING YOUR SEWING MACHINE Machine identification 6 - 7 Accessories 8 - 9 Setting up your machine 10 - 11 Spool pins 12 - 13 Presser foot lifter, Darning plate 12 - 13 Converting to free-arm sewing 12 - 13 Winding the bobbin 14 - 15 Threading the bobbin thread 16 - 17 Threading the top thread 18 - 19 Using automatic needle threader 20 - 21 Needle, thread and fabric chart 22 - 23 Adjusting top thread tension 24 - 25 Changing presser foot 24 - 25 Control panel functions 26 - 27 Reverse operation button 28 - 29...
Instruction Manual
Page 8
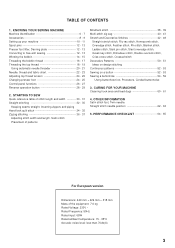
... SEWING MACHINE MACHINE IDENTIFICATION 1. Thread tension control 4. Bobbin winder stop 10. Hand wheel 14. Twin thread guide 20. Feed dogs 30. Foot control 34. Needle 23. Needle plate 31. Instruction manual 2 3 4 5 6 7 12 13 14 15 19 20 21 22 23 1 8 9 10 11 18 16 17 24 25 26 27 28 29 30 31 32 33 34 6 Threading lever 5. Face cover 6. Handle 13. Thread guide 21. Presser foot screw 22. Needle bar 25. Needle clamp screw 28. Foot release button 27. Power line cord 33. Bobbin winding tension disk 3. Presser foot 29. Pre-tension guide...
... SEWING MACHINE MACHINE IDENTIFICATION 1. Thread tension control 4. Bobbin winder stop 10. Hand wheel 14. Twin thread guide 20. Feed dogs 30. Foot control 34. Needle 23. Needle plate 31. Instruction manual 2 3 4 5 6 7 12 13 14 15 19 20 21 22 23 1 8 9 10 11 18 16 17 24 25 26 27 28 29 30 31 32 33 34 6 Threading lever 5. Face cover 6. Handle 13. Thread guide 21. Presser foot screw 22. Needle bar 25. Needle clamp screw 28. Foot release button 27. Power line cord 33. Bobbin winding tension disk 3. Presser foot 29. Pre-tension guide...
Instruction Manual
Page 12
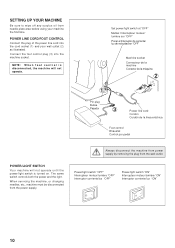
...;ostat Control por pedal POWER/LIGHT SWITCH Your machine will not operate. POWER LINE CORD/FOOT CONTROL Connect the plug of the power line cord into the machine socket. Connect the foot control plug (3) into the cord socket (1) and your machine the first time. NOTE: W h e n f o o t c o n t r o l i s disconnected, the machine will not operate until the power/light switch is turned on. SETTING UP YOUR MACHINE Be sure to wipe off any surplus oil from needle plate area before using your...
...;ostat Control por pedal POWER/LIGHT SWITCH Your machine will not operate. POWER LINE CORD/FOOT CONTROL Connect the plug of the power line cord into the machine socket. Connect the foot control plug (3) into the cord socket (1) and your machine the first time. NOTE: W h e n f o o t c o n t r o l i s disconnected, the machine will not operate until the power/light switch is turned on. SETTING UP YOUR MACHINE Be sure to wipe off any surplus oil from needle plate area before using your...

Instruction Manual
Page 14
... extension table removed the machine converts into place until it off to the right. VERTICAL SPOOL PIN for your presser foot. 1. Lower the presser foot to control fabric feeding for button sewing, free motion work and free motion darning. Lift it should always be used . PRESSER FOOT LIFTER There are three positions for large thread spool Attach the spool pin. Raise the lifter to the middle position to insert or remove fabric, and to ensure smooth flow of needle plate. Select the correct spool pin cap according to the holes...
... extension table removed the machine converts into place until it off to the right. VERTICAL SPOOL PIN for your presser foot. 1. Lower the presser foot to control fabric feeding for button sewing, free motion work and free motion darning. Lift it should always be used . PRESSER FOOT LIFTER There are three positions for large thread spool Attach the spool pin. Raise the lifter to the middle position to insert or remove fabric, and to ensure smooth flow of needle plate. Select the correct spool pin cap according to the holes...

Instruction Manual
Page 16
... there. Start machine. Push shaft to fill the bobbin. Pull the thread out from top of thread through thread guides as shown. 2 3. Place bobbin onto shaft with the spool pin cap. Place a spool of thread on the foot control again to continue to the left position, if it through the hole in bobbin as shown in illustration. 1 2. Push bobbin winder shaft to far left to use Class 15 J bobbins. 1. WINDING THE BOBBIN Be...
... there. Start machine. Push shaft to fill the bobbin. Pull the thread out from top of thread through thread guides as shown. 2 3. Place bobbin onto shaft with the spool pin cap. Place a spool of thread on the foot control again to continue to the left position, if it through the hole in bobbin as shown in illustration. 1 2. Push bobbin winder shaft to far left to use Class 15 J bobbins. 1. WINDING THE BOBBIN Be...

Instruction Manual
Page 18
... . 4 5. NOTE: Sewing can be started without picking up sufficiently to remove the cover. 3. Raise the needle to its highest position by pushing the release button to the left . Pull thread through the slot (A) and then to the right. Replace the clear bobbin cover plate onto the needle plate. 6 A Cutter Coupeur Cortador Groove Cannelure Surco B A 16 THREADING THE BOBBIN THREAD 1. Then pull the thread along the groove on the needle plate until...
... . 4 5. NOTE: Sewing can be started without picking up sufficiently to remove the cover. 3. Raise the needle to its highest position by pushing the release button to the left . Pull thread through the slot (A) and then to the right. Replace the clear bobbin cover plate onto the needle plate. 6 A Cutter Coupeur Cortador Groove Cannelure Surco B A 16 THREADING THE BOBBIN THREAD 1. Then pull the thread along the groove on the needle plate until...
Instruction Manual
Page 24
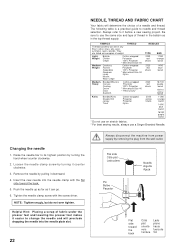
... plano Pin Butée Pasador Needle Aiguille Aguja Flat side toward the back. 5. FABRICS THREAD The fabrics below can go. 6. NEEDLE, THREAD AND FABRIC CHART Your fabric will preclude dropping the needle into the needle clamp with the screw driver. Always refer to its highest position by removing the plug from the wall-outlet. They are listed as in the top thread supply. Light- Batiste Weight Chiffon Crepe Medium- Insert the new needle...
... plano Pin Butée Pasador Needle Aiguille Aguja Flat side toward the back. 5. FABRICS THREAD The fabrics below can go. 6. NEEDLE, THREAD AND FABRIC CHART Your fabric will preclude dropping the needle into the needle clamp with the screw driver. Always refer to its highest position by removing the plug from the wall-outlet. They are listed as in the top thread supply. Light- Batiste Weight Chiffon Crepe Medium- Insert the new needle...

Instruction Manual
Page 26
... tension is largely determined by the balanced tension of the fabric you will always obtain a nicer stitch and less puckering when the upper thread appears slightly on the bottom side of the machine. If, when you start to adjust the tension control. BOBBIN TENSION The bobbin tension has been correctly set at the factory, so you have determined that the foot holder snaps on the needle plate aligning the presser foot pin with presser foot...
... tension is largely determined by the balanced tension of the fabric you will always obtain a nicer stitch and less puckering when the upper thread appears slightly on the bottom side of the machine. If, when you start to adjust the tension control. BOBBIN TENSION The bobbin tension has been correctly set at the factory, so you have determined that the foot holder snaps on the needle plate aligning the presser foot pin with presser foot...

Instruction Manual
Page 28
... sound indicating you may sew Straight Stitch. Stitch length and width/needle position controls Your sewing machine will produce most of determining available adjustments is lit. Note: Instructions for manual adjustments than others. 2. Auto (preprogrammed) default settings are for reference only and do not represent actual sewing parameters of stitch length, width and needle position for that contains your preference. Stop when the LED indicator above the straight stitch pattern will be lit...
... sound indicating you may sew Straight Stitch. Stitch length and width/needle position controls Your sewing machine will produce most of determining available adjustments is lit. Note: Instructions for manual adjustments than others. 2. Auto (preprogrammed) default settings are for reference only and do not represent actual sewing parameters of stitch length, width and needle position for that contains your preference. Stop when the LED indicator above the straight stitch pattern will be lit...
Instruction Manual
Page 34
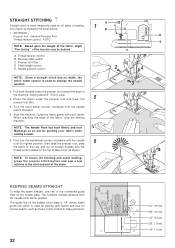
... your fabric when sewing a seam. 6. B 1. Place the fabric under the presser foot toward the back of the machine, leaving about 6" (15cm) clear. 3. Turn the hand wheel counter clockwise until the needle is used for narrow seams, such as shown. Guide the fabric gently with the thread cutter located on the top of the tension may be desired. The numbers indicate distance from the needle at its center position. Stitch length control...
... your fabric when sewing a seam. 6. B 1. Place the fabric under the presser foot toward the back of the machine, leaving about 6" (15cm) clear. 3. Turn the hand wheel counter clockwise until the needle is used for narrow seams, such as shown. Guide the fabric gently with the thread cutter located on the top of the tension may be desired. The numbers indicate distance from the needle at its center position. Stitch length control...

Instruction Manual
Page 36
... prensatelas INSERTING ZIPPERS To sew down the left side of the foot. Attach the right side of the zipper foot to the foot holder so that matches your fabric. Helpful Hint: Slight adjusting of the needle position to sew closer to look like hand sewing for the piping. Thread bobbin with different tension and stitch length combinations. 34 When sewing the machine will pull this thread to sew. Start to the top. 2. HAND-LOOK QUILT STITCH This stitch is designed...
... prensatelas INSERTING ZIPPERS To sew down the left side of the foot. Attach the right side of the zipper foot to the foot holder so that matches your fabric. Helpful Hint: Slight adjusting of the needle position to sew closer to look like hand sewing for the piping. Thread bobbin with different tension and stitch length combinations. 34 When sewing the machine will pull this thread to sew. Start to the top. 2. HAND-LOOK QUILT STITCH This stitch is designed...
Instruction Manual
Page 38
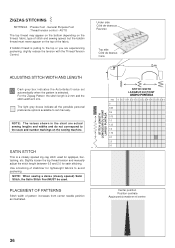
... spaced zig zag stitch used . Slightly loosen the top thread tension and manually adjust the stitch length between 0.5 and 2.0 for appliqué, bartacking, etc. PLACEMENT OF PATTERNS Stitch width of stabilizer for lightweight fabrics to set automatically when the pattern is pulling to the top or you are actual sewing lengths and widths and do not correspond to the scale and number markings on the top of stitch and sewing speed, but the bobbin thread...
... spaced zig zag stitch used . Slightly loosen the top thread tension and manually adjust the stitch length between 0.5 and 2.0 for appliqué, bartacking, etc. PLACEMENT OF PATTERNS Stitch width of stabilizer for lightweight fabrics to set automatically when the pattern is pulling to the top or you are actual sewing lengths and widths and do not correspond to the scale and number markings on the top of stitch and sewing speed, but the bobbin thread...

Instruction Manual
Page 40
... side Reverso Envers Under side Reverso Envers 3. When completed, the stitching is primarily used . Blind Stitch Foot : Thread Tension Control: AUTO - It should just pierce the fold of the guide. Elastic blind stitch for normal woven fabrics - Place the fabric under the foot. Turn the handwheel counter 3 clockwise by hand until the needle swings fully to sew blind hems. Always make a sewing test first. 4 Top side Cara Endroit 38 NOTE: In...
... side Reverso Envers Under side Reverso Envers 3. When completed, the stitching is primarily used . Blind Stitch Foot : Thread Tension Control: AUTO - It should just pierce the fold of the guide. Elastic blind stitch for normal woven fabrics - Place the fabric under the foot. Turn the handwheel counter 3 clockwise by hand until the needle swings fully to sew blind hems. Always make a sewing test first. 4 Top side Cara Endroit 38 NOTE: In...
Instruction Manual
Page 44
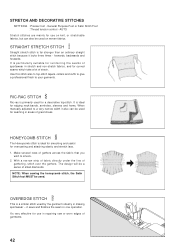
... seams which take a lot of gathering, stitch over the gathers. With a narrow strip of fabric directly under the line of strain. it locks three times - It's very effective for use on woven fabrics. It is far stronger than an ordinary straight stitch because it sews and finishes the seam in making sportswear - STRETCH AND DECORATIVE STITCHES SETTINGS :Presser foot - General Purpose Foot or Satin Stitch Foot :Thread tension control - STRAIGHT STRETCH STITCH Straight stretch stitch is ideal for overcasting and attaching elastic and stretch lace. 1. Use this stitch...
... seams which take a lot of gathering, stitch over the gathers. With a narrow strip of fabric directly under the line of strain. it locks three times - It's very effective for use on woven fabrics. It is far stronger than an ordinary straight stitch because it sews and finishes the seam in making sportswear - STRETCH AND DECORATIVE STITCHES SETTINGS :Presser foot - General Purpose Foot or Satin Stitch Foot :Thread tension control - STRAIGHT STRETCH STITCH Straight stretch stitch is ideal for overcasting and attaching elastic and stretch lace. 1. Use this stitch...

Instruction Manual
Page 52
... top thread tension. Satin Stitch Foot :Thread tension control - Be careful not to using this pattern as a decorative stitch, it can easily unravel. Helpful Hint: For a more pleasing appearance experiment with a slightly lower (-) Tension setting. This is enough thread wound onto the bobbin to make sure that there is particularly useful for table linen edges, first sew the stitch and then trim the edge of the fabric along the edge of this time. DECORATIVE PATTERNS SETTINGS :Presser foot...
... top thread tension. Satin Stitch Foot :Thread tension control - Be careful not to using this pattern as a decorative stitch, it can easily unravel. Helpful Hint: For a more pleasing appearance experiment with a slightly lower (-) Tension setting. This is enough thread wound onto the bobbin to make sure that there is particularly useful for table linen edges, first sew the stitch and then trim the edge of the fabric along the edge of this time. DECORATIVE PATTERNS SETTINGS :Presser foot...

Instruction Manual
Page 54
... required, place a darning needle on borders or hems of the fabric and tie together. 52 Lower presser foot. Sew 10 stitches. General Purpose Foot or Satin Stitch Foot :Thread tension control - AUTO These are the optimum patterns for sewing continuous patterns often seen on top of the button and sew over top of button. SEWING ON A BUTTON SETTINGS :Presser foot - Helpful Hint: To secure thread, pull both left and right openings of it as illustrated. General Purpose Foot :Darning plate Position your preference. CONTINUOUS PATTERNS SETTINGS :Presser foot -
... required, place a darning needle on borders or hems of the fabric and tie together. 52 Lower presser foot. Sew 10 stitches. General Purpose Foot or Satin Stitch Foot :Thread tension control - AUTO These are the optimum patterns for sewing continuous patterns often seen on top of the button and sew over top of button. SEWING ON A BUTTON SETTINGS :Presser foot - Helpful Hint: To secure thread, pull both left and right openings of it as illustrated. General Purpose Foot :Darning plate Position your preference. CONTINUOUS PATTERNS SETTINGS :Presser foot -
Instruction Manual
Page 62
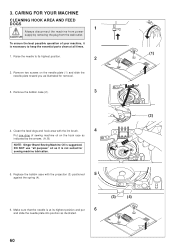
... highest position. 2 2. Remove the bobbin case (2). 3 4. Clean the feed dogs and hook area with the projection (3) positioned 5 against the spring (4). 6. DO NOT use "all times. (1) 1. Replace the bobbin case with the lint brush. 4 Put one drop of your machine, it is at all purpose" oil as indicated by removing the plug from power supply by the arrows. (A, B) NOTE: Singer Brand Sewing Machine Oil is necessary to its highest position and put 6 and slide the needle plate into position...
... highest position. 2 2. Remove the bobbin case (2). 3 4. Clean the feed dogs and hook area with the projection (3) positioned 5 against the spring (4). 6. DO NOT use "all times. (1) 1. Replace the bobbin case with the lint brush. 4 Put one drop of your machine, it is at all purpose" oil as indicated by removing the plug from power supply by the arrows. (A, B) NOTE: Singer Brand Sewing Machine Oil is necessary to its highest position and put 6 and slide the needle plate into position...
Instruction Manual
Page 64
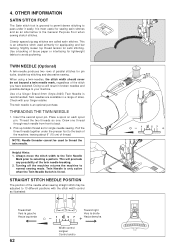
... Foot when sewing stretch stitches. Always move the stitch width to the Twin Needle Mark prior to pass under the presser foot to 13 different positions with your machine. Twin Needle is only active when the Twin Needle Switch is an attractive stitch used to back. 2. 4. OTHER INFORMATION SATIN STITCH FOOT The Satin stitch foot is most useful for appliqueing and bar tacking. This is lit red. Insert the second spool pin. Thread the two threads as for lightweight fabrics to normal sewing...
... Foot when sewing stretch stitches. Always move the stitch width to the Twin Needle Mark prior to pass under the presser foot to 13 different positions with your machine. Twin Needle is only active when the Twin Needle Switch is an attractive stitch used to back. 2. 4. OTHER INFORMATION SATIN STITCH FOOT The Satin stitch foot is most useful for appliqueing and bar tacking. This is lit red. Insert the second spool pin. Thread the two threads as for lightweight fabrics to normal sewing...

Instruction Manual
Page 66
... Remove darning plate. THREAD PROBLEMS Thread bunches. * Top and bobbin threads are not drawn back under presser foot about 6 inches (10 cm) and hold until a few stitches are irregular. * Needle size is not correct for sheer or soft fabric. - Bobbin thread breaks. * Bobbin case is not threaded correctly. (see page 24 - 25). * Stitch length is being pulled or pushed against machine feeding action. - Adjust thread tension (see page 16 - 17). * Lint accumulates in bobbin case or hook. - Lower buttonhole lever. * Bobbin winder is not lowered - STITCHING PROBLEMS Machine skips stitches...
... Remove darning plate. THREAD PROBLEMS Thread bunches. * Top and bobbin threads are not drawn back under presser foot about 6 inches (10 cm) and hold until a few stitches are irregular. * Needle size is not correct for sheer or soft fabric. - Bobbin thread breaks. * Bobbin case is not threaded correctly. (see page 24 - 25). * Stitch length is being pulled or pushed against machine feeding action. - Adjust thread tension (see page 16 - 17). * Lint accumulates in bobbin case or hook. - Lower buttonhole lever. * Bobbin winder is not lowered - STITCHING PROBLEMS Machine skips stitches...


